
Product added to cart

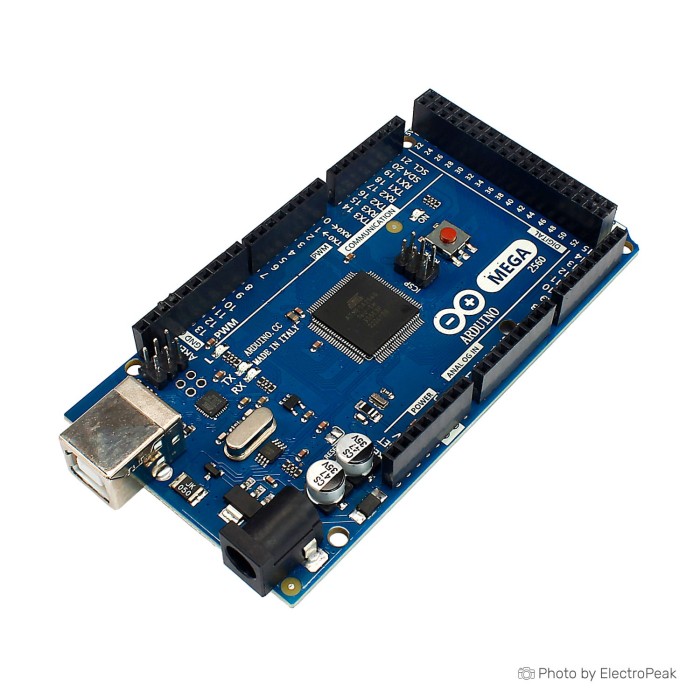
Arduino Mega 2560 R3 (Clone)
$17.2500
In stock
SKU
ARD-01-032-WL
Volume discounts:
- +25 4 % $16.5800
- +50 6 % $16.2500
- +100 8 % $15.9200
- +300 10 % $15.5900
- +500 12 % $15.2500
Product Variations: View out of stock variants


Add an Accessory:
-
 Protective Transparent Acrylic Case For Arduino Mega 2560$0.9600
 - Arduino Mega R3 Shell (Black)$1.6800


View more


Ships in 2-3 business days, then:
Free delivery in 12-15 days by Tracked Economic Shipping on orders over $100.
Free delivery in 7-10 days by Express Shipping on orders over $300.
More shipping info

Shop with confidence Learn More
 Arduino Nano Previous
Arduino Mega 2560 R3 Clone review and specifications
Arduino Mega 2560 clone review: who it suits and where it falls short
This board is a Mega-compatible ATmega2560 platform for projects that outgrow an Uno on pin count. At $17.25, it fits bench prototypes, student builds, robotics, multi-sensor systems, RAMPS-style controller projects, and other jobs where 54 digital I/O and 16 analog inputs matter more than official branding.
The main benefit is simple. You get the standard Mega 2560 layout, Arduino IDE compatibility, USB connection, power jack, ICSP header, and reset button at clone-board pricing. The catch matters just as much: the USB bridge chip is not specified on this version, so first-time setup certainty is lower than on a fully documented board, and clone-family differences in regulator and USB implementation can affect the day-one experience.
If you want Mega functionality and are comfortable with normal hobby-level setup, this board is a good fit. If you need official Arduino support, stronger quality consistency, or fully specified hardware details before ordering, the Arduino Mega 2560 R3 Original is the cleaner option. For a broader look at board families, see the Arduino Buying Guide or browse the full Arduino Boards category.
In practical terms, this is the right board when your project needs many outputs, several buses at once, and room for larger AVR sketches. It is the wrong board when plug-and-play USB behavior, traceability, or official support are part of the requirement.
Specifications of Arduino Mega 2560 R3 Clone
- Dimensions: 101.52 mm x 53.3 mm
- Microcontroller: ATmega2560
- Operating Voltage: 5V
- Input Voltage (recommended): 7-12V
- Input Voltage (limit): 6-20V
- Digital I/O Pins: 54 (of which 15 provide PWM output)
- Analog Input Pins: 16
- DC Current per I/O Pin: 20 mA
- DC Current for 3.3V Pin: 50 mA
- Flash Memory: 256 KB of which 0.5 KB used by bootloader
- SRAM: 8 KB
- EEPROM: 4 KB
- Clock Speed: 16 MHz
- LED_BUILTIN: 13
Arduino Mega 2560 specifications explained
The raw numbers matter because they answer a basic buying question: is this just a bigger Uno, or is it meant for genuinely larger AVR projects? In practice, it is the second. The extra pins, memory, and full Mega footprint change what you can wire directly without immediately adding I/O expanders or moving to a different platform.
| Specification | Why it matters |
|---|---|
| 54 digital I/O pins | This is the main reason to buy a Mega. It gives you enough headroom for relay banks, many switches, stepper control signals, LCDs, keypads, and multiple sensor connections without the pin shortage that appears quickly on smaller AVR boards. |
| 16 analog input pins | Useful for sensor-heavy builds such as data logging, robotics feedback, and control panels with many analog sources. An Uno-class board reaches its analog limits much sooner. |
| 15 PWM outputs | PWM is what you use for motor speed control, servo timing support in many libraries, LED dimming, and similar outputs. Not every digital pin provides PWM, so this figure matters if your project has several motors or dimmable channels. |
| 256 KB flash, 8 KB SRAM, 4 KB EEPROM | The larger flash and SRAM make room for bigger sketches, more libraries, more state data, and more complex interfaces than an Uno-class board. That helps when a project combines displays, communications, storage, and control logic on one AVR platform. |
| 5V operating voltage | This board fits well with classic 5V Arduino shields and many older sensor modules. It also means you need to pay attention with 3.3V-only peripherals, because some will need level shifting and separate 3.3V power. |
| 7-12V recommended input, 6-20V limit | The recommended range is the one to design around. The 6-20V figure is a limit, not an everyday target, and using higher input voltage with onboard regulation creates more heat. |
| 101.52 mm x 53.3 mm dimensions | A Mega takes noticeably more bench and enclosure space than a Nano or Uno. That extra size is worthwhile when you need headers and room for wiring, but it can be a constraint in compact builds. |
| 16 MHz clock | This is the standard AVR Mega speed, which keeps library behavior familiar across the Arduino ecosystem. It is fine for control, interface, and timing-heavy hobby projects, but it does not change the fact that this is still an 8-bit AVR board. |
One specification needs context. The flash line above states “256 KB of which 0.5 KB used by bootloader,” but standard Mega 2560 documentation points to an 8 KB bootloader reservation rather than 0.5 KB. The top spec block is kept as published, but for planning real available program space, treat the Mega 2560 bootloader figure as 8 KB.
That correction matters most if your sketch is already large and every kilobyte counts. It does not change the main buying decision: this board still gives you far more AVR memory headroom than an Uno-class board. If your project does not need Mega-scale I/O or memory and you want a smaller standard board, the Arduino Uno R3 Clone is the more sensible choice.
Arduino Mega 2560 clone shield compatibility and power limits
This board uses the standard Mega R3-style form factor, which is why it remains popular in the Arduino Boards ecosystem for controller builds and stacked shields. In normal hobby use, it works with most Mega/R3 shields, and it exposes the interfaces most buyers expect: serial communication, I2C, SPI, PWM, ADC, and external interrupts.
The 5V logic level is the first compatibility checkpoint. Many classic Arduino shields and 5V modules fit naturally, but a growing number of newer sensors, radios, and displays are 3.3V-only. Those parts may need level shifting even if they can physically connect, and the onboard 3.3V rail is not meant to feed larger 3.3V loads.
| Area | What to know |
|---|---|
| Arduino software | Works with the Arduino IDE; select “Arduino Mega or Mega 2560”. |
| Programming connection | The board includes a USB connection, but the connector and USB bridge details are not fully specified here. |
| USB driver requirement | Not fully known before purchase because the USB bridge chip is unspecified. If the received board uses CH340-family USB, driver installation is commonly required. |
| Logic level | 5V operating voltage. |
| External power | It can be powered by USB, an AC-to-DC adapter, or a battery. |
| Recommended input voltage | 7-12V. |
| Input voltage limit | 6-20V. |
| Shield fit | Compatible with most Arduino Mega/R3 shields. |
| Interfaces | Serial communication, I2C, SPI, PWM, ADC, external interrupts. |
| PWM availability | 15 PWM-capable digital pins. |
| 3.3V peripherals | The 3.3V pin is limited to 50 mA. Many 3.3V modules need level shifting and/or separate 3.3V power. |
| Operating systems | Windows, macOS, and Linux can use the platform; boards using CH340-family USB commonly need driver attention on Windows or macOS. |
| Best-fit environments | Bench prototyping, education, robotics, controller builds, and larger AVR projects. |
| Poor-fit environments | Commercial deployments that need traceability, compliance details, or guaranteed consistent clone internals. |
The 20 mA per I/O pin figure should be treated as a sane operating target, not as permission to load every pin to that level at once. Do not calculate total current as pin count multiplied by 20 mA. Real designs have package limits, rail limits, and thermal limits, so motors, relays, LED strips, and other meaningful loads should be driven through separate power stages.
The 3.3V pin limit is only 50 mA. That is enough for light logic-level tasks, but not for ESP8266, ESP32, radio modules with current bursts, or display backlights with any real demand. Those need their own regulator or power path.
External power needs the same realistic planning. The board accepts 7-12V as recommended input, but higher input voltage combined with onboard regulation and attached loads can make clone-family regulators run hot. For many builds, 7-9V is the more practical external range if you are feeding the barrel jack or VIN. If your project has really outgrown AVR-class performance rather than just needing more pins, the Arduino Due 32-bit ARM is a different path worth considering. For shield-style prototyping on this footprint, the Arduino MEGA 2560 R3 Prototype Shield is a natural match for this board.
Arduino Mega 2560 clone quick start and first connection
Getting started is simple if you begin with a basic USB upload and leave heavier project wiring for later. The normal flow is to install the Arduino IDE, connect the board with USB, select the correct board and port, and upload a sketch.
- Install the Arduino IDE.
- Connect the board with a USB A-to-B cable.
- In the IDE, select Arduino Mega or Mega 2560 and the detected port.
- Upload a simple Blink sketch.
- Confirm that the built-in LED on pin 13 blinks.
The quickest verification path is the Blink example. A successful upload followed by LED_BUILTIN on pin 13 blinking tells you the board, cable, port selection, and basic USB programming path are working.
There is one uncertainty to plan for before ordering: the USB bridge chip on this board is not specified. Driver steps depend on the board you receive. If it uses CH340-family USB, installing the CH340 driver is the common first-use fix when the board is not recognized. A USB A-to-B cable is also the safe add-on because cable inclusion is not confirmed for this version. The USB A to USB B Cable for Arduino Uno/Mega is the matching accessory.
The most common first-run mistakes are predictable:
- Selecting the wrong board.
- Choosing the wrong serial port.
- Using a charge-only or faulty cable.
- Missing the USB driver on boards that need it.
- Starting with external 12V power and attached loads before confirming a basic USB upload works.
If you want a closely related board that is explicitly labeled with its USB converter and you are comfortable installing that driver, the Mega 2560 CH340G Clone is the clearer pick.
For the setup steps in more detail, see How to Install Arduino IDE on Windows & MAC and How to Install CH340 Driver on Windows.
Arduino Mega 2560 clone limitations and buyer mistakes
The main limitation is not the ATmega2560 itself. It is the uncertainty around clone implementation details that are not specified here. The USB bridge chip is not named, the onboard regulator model is not given, and component choices can vary across clone-family boards. That does not make the board unusable, but it does reduce setup certainty compared with a fully documented original.
USB behavior is the most immediate example. Some buyers assume every Mega-compatible board connects without any driver work. That is not a safe assumption here. If the received board uses CH340-family USB, driver installation is a common requirement, which is why USB recognition problems are one of the first things to check. The CH340 driver guide is the relevant fix path when that happens.
Power expectations cause the next group of mistakes. The listing allows 6-20V as an input limit, but that should not be treated as a recommended everyday operating range. Feeding higher voltage into a linear-regulated clone board while also asking it to supply external loads can create heat and instability. The same goes for the 3.3V pin: 50 mA is a small rail, not a general-purpose supply for wireless modules or larger peripherals.
A few specification misunderstandings are worth clearing up before purchase. This is not a 14-digital-pin or 6-analog-input board. It is the full Mega class with 54 digital I/O, 16 analog inputs, and 15 PWM outputs. Not all digital pins provide PWM, and the 20 mA per-pin figure is not a total current budget for the whole board.
The bootloader line also deserves correction because it affects capacity planning and confidence in the documentation. The published flash spec says 0.5 KB used by bootloader, but the standard Mega 2560 figure is 8 KB. If that kind of documentation mismatch is a concern, or if you want stronger trust signals and fewer clone-family unknowns, the Arduino Mega 2560 R3 Original is the safer route.
One last nuance: legal clone boards and counterfeit-logo boards are not the same thing. This board is sold openly as a clone, which is different from a product trying to pass itself off as official hardware. There are also occasional reports of ADC consistency differences on cheaper clones, but that evidence is weak and not a primary buying factor here. If the board will live in a permanent build, a protective enclosure such as the Protective Transparent Acrylic Case For Arduino Mega 2560 helps reduce shorts and bench damage.
Arduino Mega 2560 clone vs original and vs Uno
This comparison comes down to what you are optimizing for: cost, documentation clarity, or using the smallest board that still fits the job. There is no single winner across all projects.
| Board choice | Best when | Main trade-off |
|---|---|---|
| This board | You want Mega-scale I/O and memory at $17.25, and you are comfortable with normal clone-board setup and power planning. | The USB bridge chip is unspecified, and clone-family hardware details are less fully documented. |
| Arduino Mega 2560 R3 Original | Official hardware, stronger trust signals, and fewer clone-family unknowns matter more than clone pricing. | Higher upfront cost is the usual trade-off for the original Mega path. |
| Mega 2560 CH340G Clone | You want the same kind of Mega-compatible board but prefer the USB chip to be explicitly stated. | It is tied to the CH340G path, so driver installation should be expected where needed. It is also listed lower in price at $13.71. |
| Arduino Uno R3 Clone | Your project does not need Mega-scale pins or memory, and a smaller AVR board is enough. | You give up a large amount of I/O and memory headroom. |
| Arduino UNO R4 WiFi with LED Matrix | Your real requirement is built-in wireless rather than the Mega’s large I/O footprint. | It is a different approach, not a direct Mega substitute. |
Against the original Mega, this board is mainly a pricing decision versus confidence and support. Against the CH340G-labeled sibling, the key difference is not computing capability but disclosure: that board explicitly names its USB converter, while this one does not. Against an Uno, the choice is simpler. Buy a Mega when an Uno would force compromises on pin count, analog channels, or sketch size. If you are still deciding between form factors, the Arduino Buying Guide lays out the families clearly.
Arduino Mega 2560 clone FAQ
Is this a genuine Arduino Mega 2560 R3?
No. It is sold as a clone based on the ATmega2560 and intended to work with the Arduino software ecosystem, but it is not the official Arduino board.
Does this Arduino Mega 2560 clone need a driver?
Possibly. The USB bridge chip is not specified on this board, and if the received board uses CH340-family USB, driver installation is commonly required.
Is a USB cable included?
Cable inclusion is not confirmed for this board. A USB A-to-B cable is the safe add-on.
What board should I select in Arduino IDE?
Select Arduino Mega or Mega 2560. Then choose the correct port before uploading.
How many PWM pins does this board have?
It has 15 PWM-capable digital pins. Those are commonly identified as pins 2–13 and 44–46.
Can it use Arduino Mega shields?
Yes, in general it should. Most Arduino Mega/R3 shields are compatible with this board’s form factor.
Can I power 3.3V modules from the 3.3V pin?
Only small ones. The 3.3V pin is rated at 50 mA, so higher-current 3.3V modules need their own regulator.
Is 12V a good power input for this board?
It is allowed within the recommended 7-12V range, but it is not always the most practical choice. Clone-family regulators can run hot under load at higher input voltages, so lower external input within the recommended range is often easier on the board.
Why does the specification say 0.5 KB bootloader?
That figure conflicts with standard Mega 2560 documentation. For real capacity planning, the Mega 2560 bootloader should be treated as 8 KB.
Should I buy this or the Mega 2560 CH340G Clone?
Choose the CH340G-labeled sibling if you want the USB chip stated up front. This board is listed at $17.25, while the CH340G sibling is listed at $13.71.
When should I choose the genuine Arduino Mega instead?
Choose the original when official hardware, stronger trust signals, and fewer clone-family unknowns matter more than clone pricing.
Accessories
Required
- USB A to USB B Cable for Arduino Uno/Mega — needed for first connection and sketch uploads.
- Driver/software setup if the received board uses CH340-family USB — required only on boards that use that USB path.
- External DC supply if USB power is not enough for the project — needed for motors, relays, and other higher-load hardware.
Recommended
- Protective Transparent Acrylic Case For Arduino Mega 2560 — helps prevent shorts and bench damage.
- Transparent ABS Case (for Arduino Mega 2560 — an alternative enclosure style for installed projects.
- Arduino MEGA 2560 R3 Prototype Shield — useful for soldered prototyping and shield-style add-ons.
- External 3.3V regulator for loads above 50 mA — needed when 3.3V peripherals draw more than the onboard pin can provide.
- External 5V regulator or better project power distribution for higher-current loads — recommended when the board is controlling more than light logic signals.
Optional
- A case if the board will live in a permanent project rather than on the bench.
- Heatsink or other thermal mitigation for sustained higher input-voltage use.
Purchase decision summary
- Ideal for: Budget-conscious Mega buyers who need many I/O pins, multiple interfaces, and the standard Arduino IDE workflow for robotics, controller builds, and larger AVR prototypes.
- Maybe for: Beginners willing to follow setup steps carefully, verify USB-driver needs, and keep power expectations modest.
- Consider another option if: You need fully specified hardware details before purchase, official Arduino support, commercial traceability or compliance details, plug-and-play USB certainty, or more than 50 mA from the 3.3V pin.
Buying checklist
- ✓ Do you actually need Mega-scale I/O, or would an Uno/Nano-class board do?
- ✓ Do you have a USB A-to-B cable?
- ✓ Are you comfortable installing a USB driver if the received board uses CH340-family USB?
- ✓ Will your project use 5V logic, or do you need a 3.3V-native board or ecosystem?
- ✓ Will you power loads externally instead of expecting the board to supply everything?
- ✓ Will any 3.3V module draw more than 50 mA?
- ✓ Do you need official Arduino support or just Mega-compatible functionality?
- ✓ Are you using shields or enclosures that require the Mega R3 footprint?
- ✓ Is your project sensitive to clone-to-clone component variance?
For final setup help, see How to Install Arduino IDE on Windows & MAC and How to Install CH340 Driver on Windows. If you want enclosure protection from the start, the Transparent ABS Case (for Arduino Mega 2560 is the matching fit.
Write Your Own Review

Please complete your information below to login.
Sign In
Create New Account