
Product added to cart

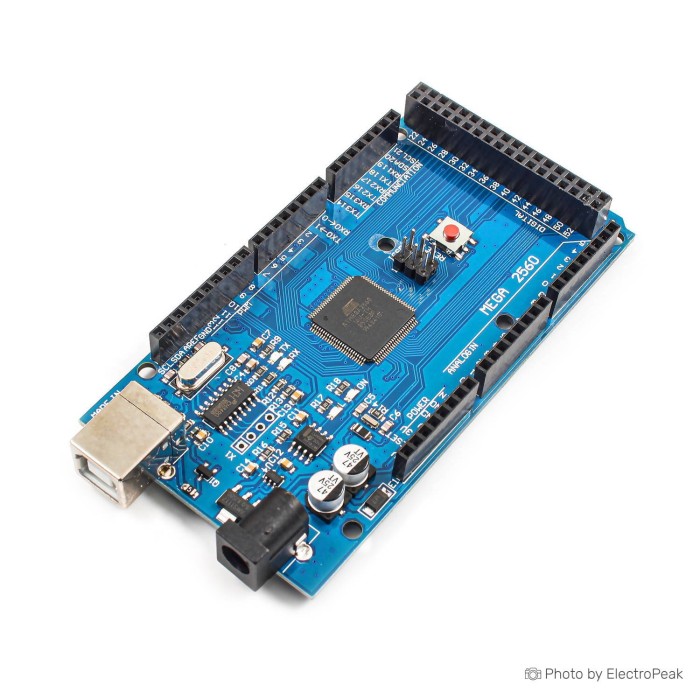
Mega 2560 CH340G (Clone to Arduino Mega 2560 R3)
$14.5000
In stock
SKU
ARD-01-036
Volume discounts:
- +25 4 % $13.9300
- +50 6 % $13.6500
- +100 8 % $13.3600
- +300 10 % $13.0800
- +500 12 % $12.7900
Product Variations: View out of stock variants


Add an Accessory:
-
 Protective Transparent Acrylic Case For Arduino Mega 2560$0.9600
 - Transparent ABS Case (for Arduino Mega 2560)$0.4800


View more


Ships in 2-3 business days, then:
Free delivery in 12-15 days by Tracked Economic Shipping on orders over $100.
Free delivery in 7-10 days by Express Shipping on orders over $300.
More shipping info

Shop with confidence Learn More
 LilyPad Arduino 328 Main Board (Clone) Previous
Mega 2560 CH340G clone review and specifications
This board is a third-party Arduino Mega 2560 R3-style clone built around the ATmega2560, with a CH340G handling the USB connection. It fills the same broad role as a Mega-class board: lots of I/O, more memory than an Uno, and a layout intended for larger Arduino projects.
It suits robotics, sensor-heavy builds, multi-device prototypes, and Mega-compatible shield projects where you want the Mega platform without specifically needing a genuine board. The trade-off is clear: you get Mega-class capability, but you give up official traceability and may need to sort out CH340 USB setup on first use.
You can browse the wider Arduino Boards range first, or compare board families before you commit. The Arduino Buying Guide: How to Choose the Right Arduino For Your Project is a useful reference. If your priority is a genuine board with clearer revision control, the Arduino Mega 2560 R3 Original is the direct equivalent.
Specifications of Mega 2560 CH340G (Clone to Arduino Mega 2560 R3)
- Microcontroller: ATmega2560
- Operating Voltage: 5V
- Input Voltage: 7-12V DC
- Input Voltaget: 7-12V
- Digital I/O Pins: 54
- PWM Output Pins: 15
- Analog Input Pins: 16
- DC Current per I/O Pin: 20 mA
- DC Current for 3.3V Pin: 50 mA
- Flash Memory: 256 KB
- Flash Memory Used by Bootloader: 8 KB
- SRAM: 8 KB
- EEPROM: 4 KB
- Clock Speed: 16 MHz
- USB-to-Serial Converter Chip: CH340G
- USB Connector: Type-B
- Dimensions: 101.52mm x 53.3mm
Mega 2560 CH340G strengths and limitations
The main reason to buy this board is the ATmega2560 platform itself. Compared with an Uno-class board, you get much more room for larger sketches, more RAM for handling multiple libraries or data buffers, and a much higher pin count for projects that outgrow a basic sensor-and-relay setup.
Those 54 digital I/O pins, 15 PWM outputs, and 16 analog inputs matter in real builds. A robotics project can tie together motor interfaces, several sensors, a display, buttons, and status LEDs without running out of pins. A sensor hub can read many analog signals while still leaving serial, PWM, and digital pins free for expansion.
Another practical advantage of the Mega family is four hardware UARTs. That is one of the biggest reasons engineers move from an Uno to a Mega. You can keep USB serial for programming and debugging while also wiring multiple serial peripherals such as GPS modules, GSM modules, serial displays, or controller links.
This board is also a 5 V AVR design, which fits many existing Arduino projects and shields. If your codebase, tutorials, or hardware stack assumes classic 5 V Arduino behavior, a Mega-style board is often a more natural fit than a newer 3.3 V wireless board.
The limits matter just as much. This is not a board with built-in Wi‑Fi or Bluetooth, and no wireless feature is listed. It is also not the right pick if your project is mainly 3.3 V-native and you do not want to manage voltage checks or level shifting.
Clone-specific trade-offs are part of the decision too. The board is openly sold as a clone, but the exact manufacturer, PCB revision, regulator implementation, and batch consistency are not specified. In practice, that means the ATmega2560 platform remains familiar, while details around USB behavior, labeling, reset circuitry, or component selection can vary more than with a reference-standard board.
For many buyers, that trade-off is acceptable because the role of the board is still clear: a Mega-compatible platform for larger Arduino builds. If you do not need Mega-level I/O or memory, the Arduino Uno R3 Clone is the simpler, smaller alternative. For easier access to grouped headers for sensors and servos, pair this board with the Arduino Mega Sensor Shield Expansion Board.
| Key spec | Why it matters |
|---|---|
| ATmega2560 | Runs the standard Mega-class Arduino platform, which is widely supported in libraries, examples, and existing sketches. |
| 54 digital I/O pins | Gives more headroom for larger builds with many sensors, switches, drivers, and expansion headers. |
| 15 PWM outputs | Helps when a project needs several controllable outputs for dimming, speed control, or signal generation. |
| 16 analog inputs | Useful for data-logging, analog sensor arrays, and mixed-input systems where an Uno runs out of ADC channels quickly. |
| 256 KB flash, 8 KB SRAM, 4 KB EEPROM | Supports larger firmware, more libraries, and more stored configuration data than smaller ATmega328-based boards. |
| Four hardware UARTs | Lets you connect several serial devices without relying as heavily on software serial workarounds. |
| 5 V logic | Matches many classic Arduino shields and modules, but needs care with 3.3 V-only peripherals. |
| CH340G USB interface | Works well in many setups, but first-use USB recognition can depend on cable quality, driver support, and operating system behavior. |
Mega 2560 CH340G USB setup, drivers, and first-use checks
This board uses a Type-B USB connector, and no cable is included. For programming and serial communication, you need a USB A-to-B data cable such as this USB A to USB B Cable for Arduino Uno/Mega. A power-only cable will stop the board from appearing correctly and is a common reason first tests fail.
The USB bridge on this version is CH340G. Some operating systems already support CH340 devices out of the box or install support automatically, while others need a manual driver install. For a more predictable first setup, keep the driver step in mind and use the CH340 guide if the serial port does not appear.
Programming is intended for Arduino IDE, and Platform IO is also listed as an option. For most buyers, Arduino IDE is the straightforward place to start. The board profile and upload workflow are well established.
Treat the first power-up like a bench test, not a fully wired system on day one. Connect only the USB cable at first, leave external circuitry disconnected, and keep pins 0/1 free during the initial upload because those pins are part of the serial path and can interfere with uploads.
Quick start
- Get a USB A-to-B data cable; the board does not include one.
- Connect the board through its Type-B USB port with no external hardware attached, especially nothing on pins 0/1.
- Install Arduino IDE, or open your existing setup. If needed, use the guide for How to Install Arduino IDE on Windows & MAC.
- If your operating system does not expose a working serial port for the board, install the CH340 driver using How to Install CH340 Driver on Windows.
- Select Arduino Mega or Mega 2560 and choose the newly detected port.
- Upload a simple Blink test and confirm the onboard LED blinks at the expected interval.
- Only after that, add shields or external wiring one step at a time.
Common first-use failure points
- Using a power-only USB cable instead of a data cable
- Not having a USB A-to-B cable ready at all
- Choosing Uno instead of Mega 2560 in the IDE
- Leaving devices connected to pins 0/1 during upload
- Assuming a visible COM port guarantees successful uploads
- Powering external loads from the board during the first test
If you want the more reference-standard USB path instead of CH340G behavior, the Arduino Mega 2560 R3 Original is the direct same-board alternative. For bench wiring during setup, a Breadboard Jumper Wire Kit - 140 Pieces is handy as well.
Mega 2560 CH340G power and compatibility notes
This is a 5V board. That affects both logic compatibility and powering decisions. Many classic Arduino modules and shields are comfortable in that environment, but 3.3 V-only sensors, radios, and displays need to be checked carefully before you connect them directly.
The listed input range is 7-12V DC. That is the range to design around here. As with the reference Mega family, lower voltage can lead to unstable behavior once regulation losses are considered, while higher voltage increases regulator heat; staying above 12 V is not a good plan for this board.
The listed current limits matter because they are often misunderstood. The I/O pins are listed at 20 mA per pin, which is a signal-drive limit to respect in normal use, not a practical source for powering motors, servos, relays, LED strips, or other heavy loads. The 3.3V pin is listed at 50 mA, so it should also be treated as limited and checked carefully before powering sensitive 3.3 V peripherals.
In real projects, the safe approach is simple: use the board for logic and control, and use separate driver hardware and external power for anything that draws meaningful current. Motors, servos, and relay banks should have their own supply path and switching hardware, with a common ground shared back to the Mega.
Shield and module compatibility is mostly about voltage and pin use, not just physical fit. A board may plug in mechanically and still be the wrong electrical match if it expects 3.3 V logic, uses pins your sketch already needs, or draws more current than the board should provide.
For barrel-jack input, the 9V 1A DC Power Supply Adapter for Arduino fits the listed input range well. If your real requirement is integrated wireless rather than a plain Mega platform, the Mega2560+WiFi R3 with ESP8266 is the better direction. You can also browse other options in the Arduino Boards category.
Compatibility summary
| Area | Summary |
|---|---|
| Hardware platform | ATmega2560 Mega 2560-style development board |
| Logic voltage | 5V operating logic |
| External input power | 7-12V DC |
| USB interface | CH340G USB-to-serial converter |
| USB connector | Type-B |
| IDE support | Arduino IDE; Mega 2560 board profile is the standard family-level choice |
| PlatformIO | Listed as supported, though Arduino IDE is the more established starting point |
| Drivers | CH340 driver may be needed depending on operating system and version |
| Serial ports | Four hardware UARTs in the Mega family |
| Shields | Mega/R3-style shield compatibility is the right expectation, but pin, voltage, and fit should still be verified |
| 3.3 V peripherals | Check input tolerance and use level shifting where needed |
| Motors/servos/relays | Use external power and driver hardware rather than board pins as load-power outputs |
| ICSP | ICSP header is present |
| Cases/enclosures | Listed dimensions are 101.52mm x 53.3mm; confirm fit if tolerances are critical |
Mega 2560 CH340G shield compatibility and physical fit
This board follows the Mega 2560 R3-style layout and includes onboard USB, a power jack, an ICSP header, and a reset button. The listed dimensions are 101.52mm x 53.3mm, which puts it in the standard Mega footprint buyers expect for shields, mounting, and enclosure planning.
Still, the practical expectation should be “most Mega-compatible shields” rather than “all shields.” Pin mapping, connector height, tolerances around the Type-B connector or barrel jack, and the electrical needs of the shield still matter. If a shield depends on exact mechanical clearance or tight enclosure fit, it is worth checking dimensions and component positions carefully.
I2C and mixed-voltage accessories need the same caution as direct-wired modules. A shield can fit physically and still need voltage review, especially if it was designed around 3.3 V logic or uses pins already committed in your design.
For enclosed builds, the Protective Transparent Acrylic Case For Arduino Mega 2560 is one enclosure option, and the Transparent ABS Case (for Arduino Mega 2560 is another. If you want a same-class availability alternative, the Arduino Mega 2560 R3 Clone serves the same Mega clone role.
For add-ons, the Arduino MEGA 2560 R3 Prototype Shield helps when you want a soldered custom circuit on the Mega footprint, and the Arduino Mega Sensor Shield Expansion Board is useful when you want easier access to grouped sensor and servo headers.
Mega 2560 clone vs original Arduino Mega and Uno
The direct comparison starts with board role. This board and the genuine Mega are both ATmega2560-based boards intended for larger Arduino projects with many pins and more memory than an Uno. The difference is not the core project class; it is the USB interface and the level of traceability around manufacturing and revision control.
The clone board here uses CH340G for USB and is sold as a third-party Mega 2560 R3-style board. The Arduino Mega 2560 R3 Original is the better fit when official hardware, clearer revision control, and a more reference-standard purchase matter to you.
Against an Uno, the decision is mostly about scale. A Mega gives you far more I/O and significantly more memory headroom, which matters once a project grows beyond a handful of sensors and outputs. If your build is still in the standard Arduino range and does not need Mega size or resources, a smaller Uno is easier to fit into simple projects.
Need the smaller route? The Arduino Uno R3 Clone is the practical alternative when cost, footprint, and standard Arduino basics matter more than pin count. If you want the genuine smaller reference board, the Arduino Uno R3 Original fills that role.
Integrated Wi‑Fi points to a different approach rather than a direct substitute. If wireless networking is part of the requirement from the start, it makes more sense to choose a board built for that job than to add it later as an afterthought. The Arduino Buying Guide: How to Choose the Right Arduino For Your Project can help if you are still deciding between board families.
| Option | Best when | Main trade-off |
|---|---|---|
| Mega 2560 CH340G clone | You need Mega-class I/O, memory, and multi-UART capability in a clone board | CH340 setup and less manufacturing traceability than a genuine board |
| Arduino Mega 2560 R3 Original | You want the genuine Mega with clearer reference-standard traceability | Not specified here as a lower-cost clone-style option |
| Arduino Uno R3 Clone | You do not need Mega-level I/O or memory and want a smaller standard Arduino board | Lower pin count and memory than a Mega |
| Arduino Uno R3 Original | You want a genuine smaller Arduino for standard projects | Lower pin count and memory than a Mega |
Mega 2560 CH340G FAQ and buying checklist
FAQ
Is this a genuine Arduino Mega 2560 Rev3?
No. This is a clone to Arduino Mega 2560 R3, not a genuine Arduino board. It uses an ATmega2560 for the main MCU and CH340G for USB-to-serial.
Do I need a driver for the CH340G USB chip?
Maybe. Some systems already support CH340 devices or install support automatically, while others need a manual driver install before the port appears correctly.
What USB cable does this board use, and is it included?
It uses a Type-B USB connector, and no cable is included. You need a USB A-to-B data cable such as the USB A to USB B Cable for Arduino Uno/Mega.
Which board should I select in Arduino IDE?
Select Arduino Mega or Mega 2560 and choose the correct serial port. Choosing an Uno profile is a common reason uploads fail.
Can I power it with 12 V?
Yes, 12 V is within the listed 7-12V DC input range. Higher input voltage increases regulator heat, so there is no benefit in going above the listed range.
Are the I/O pins 5 V or 3.3 V?
This is a 5V board. Check 3.3 V-only peripherals carefully and use level shifting where needed.
Can I power motors or servos directly from the board?
No, not as a normal design choice. The listed 20 mA per I/O pin is not a motor or servo power rating, so external power and driver hardware should be used for those loads.
Will Mega shields fit this board?
Many Mega-compatible shields should fit because this board follows the Mega 2560 R3-style layout. It is still wise to verify pin use, voltage expectations, and enclosure clearance instead of assuming every shield will work unchanged.
How many hardware serial ports does it have?
The Mega family provides four hardware UARTs. That is one of the strongest reasons to choose a Mega when several serial devices need to stay connected at once.
When should I buy the genuine Mega instead of this clone?
Buy the genuine Mega when official hardware, clearer revision control, and a more reference-standard purchase matter more than clone-style value. The direct option is the Arduino Mega 2560 R3 Original.
When is a smaller Uno a better choice?
An Uno is the better fit when your project does not need Mega size, pin count, or memory. For simpler Arduino work, a smaller board can be easier to wire and place.
Accessories
Required
- USB programming/data connection: USB A to USB B Cable for Arduino Uno/Mega
- CH340 driver when needed by your operating system: no hardware purchase required, but driver support should be confirmed before first use
- Arduino IDE for the normal workflow: install the software before your first upload
Recommended
- External adapter for barrel-jack power input: 9V 1A DC Power Supply Adapter for Arduino
- Breadboard jumpers for first tests and shieldless wiring: Breadboard Jumper Wire Kit - 140 Pieces
- Easy breakout for multiple sensor and servo headers: Arduino Mega Sensor Shield Expansion Board
- Breadboard and prototyping expansion on the Mega footprint: Arduino MEGA 2560 R3 Prototype Shield
Optional
- Protective enclosure: Protective Transparent Acrylic Case For Arduino Mega 2560
- Alternate protective enclosure: Transparent ABS Case (for Arduino Mega 2560
- Logic-level shifter for 3.3 V-only peripherals: needed when voltage translation is required
- Motor or servo driver hardware for external loads: needed for anything beyond light signal-level control
- ICSP programmer / ISP recovery tool: useful only for bootloader recovery or lower-level troubleshooting
Purchase decision summary
Ideal for
- Buyers who need ATmega2560 resources, many I/O pins, and Mega-size expansion in a clone board
- Robotics, sensor-heavy, and multi-serial Arduino builds
- Makers who already know how to handle cables, drivers, and board selection
Maybe for
- Beginners following well-supported Mega tutorials and willing to handle CH340 setup if needed
- Buyers who need a spare Mega-compatible board for prototyping or classroom use
- Shield users who can verify fit, voltage, and pin expectations
Consider another option if
- You want a genuine Arduino board
- You need built-in Wi‑Fi instead of a plain Mega; in that case, the Mega2560+WiFi R3 with ESP8266 is the more relevant direction
- You need the lowest-friction USB experience or strong manufacturing traceability
- Your project is mainly 3.3 V-native and you do not want to handle level shifting
Buying checklist
- ✓ Confirm you actually need Mega-class I/O, analog count, and memory
- ✓ Confirm you are buying a clone, not a genuine Arduino
- ✓ Confirm you have a USB A-to-B data cable
- ✓ Confirm your workflow is Arduino IDE or a compatible PlatformIO setup
- ✓ Confirm CH340 driver support for your operating system if needed
- ✓ Confirm your project uses 5 V logic or includes level shifting
- ✓ Confirm motors, servos, relays, and high-current loads have separate driver and power hardware
- ✓ Confirm your shield or enclosure matches the Mega layout and dimensions
- ✓ Confirm whether you would be better served by the genuine Mega or a smaller Uno
- ✓ Confirm whether integrated Wi‑Fi is a real requirement before choosing a plain Mega
For setup help, see How to Install CH340 Driver on Windows and How to Install Arduino IDE on Windows & MAC. If you want to compare other board families before ordering, the Arduino Boards category is the right place to continue.
| MCU/SoC | ATmega2560 |
|---|---|
| Product Family | Arduino |
| Architecture | AVR |
| CPU Cores | 1 |
| Clock Speed (MHz) | 16 MHz |
| Flash | 256 KB |
| SRAM | 8 KB |
| EEPROM | 4 KB |
| GPIO Pins | 54 |
| SPI interface Pins | 1 |
| I2C interface Pins | 1 |
| UART interface Pins | 4 |
| USB Ports | Type-B |
| CAN Bus Support | No |
| Ethernet Support | No |
| ADC Channels | 16 |
| DAC Channels | No |
| PWM Channels | 15 |
| Timers Count | 6 |
| Operating Voltage (V) | 5V |
| GPIO Voltage (V) | 5V |
| GPIO Current (mA) | 20 mA |
| Wireless | No |
| Form Factor | 101.52mm x 53.3mm |
| IDE Support | Arduino IDE |
| Input Voltage (V) | 7-12V |
| Antenna Type | No |
| Bluetooth Ver. | No |
Write Your Own Review

Please complete your information below to login.
Sign In
Create New Account