How to choose the right oscilloscope type for your bench
| Need |
Best fit in this catalog |
Why it fits |
Main limitation |
Better alternative if your need grows |
| I want soldering practice and a working board is a bonus |
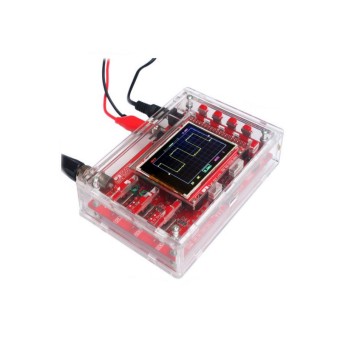
DSO138 DIY Oscilloscope Kit |
Semi-populated STM32F103C8 / ARM Cortex-M3 kit with SMD parts pre-soldered, so the build is the point and the scope function is a reward after assembly |
DSO138-class units are low-speed only, with roughly a 200 kHz real-world ceiling, so they are learning kits or signal-presence checkers rather than repair-grade instruments |
If you want the build experience more than a long-term measurement tool, see a different DIY scope project path; if your immediate task exceeds about 100–200 kHz or needs accurate triggering, save for a higher tier |
| I want the cheapest PC-connected scope for low-speed signals |
Hantek 6022BL PC oscilloscope with 16-channel logic analyzer |
A practical fit when a PC is always on the bench and you want both a 2-channel DSO and separate 16-channel digital capture in one low-cost setup |
USB workflow, software dependence, and low-voltage limits make it a compromise tool rather than a bench-scope replacement |
For jobs where a multimeter still tells you enough before you need to see the waveform, hold off; for frequent embedded work on STM-based projects, the usual step-up is a 70–100 MHz bench scope |
| I want a standalone portable screen |
FNIRSI 1013D tablet oscilloscope |
Self-contained handheld-style use with a 7-inch touch screen, internal storage, and built-in battery |
Still only 2 channels, and paper specs matter less than day-to-day workflow and trust in the measurements |
If you will use a scope weekly, 70–100 MHz honest capability and ideally 4 channels are the more durable path |
| I mostly identify components and only occasionally view simple waveforms |
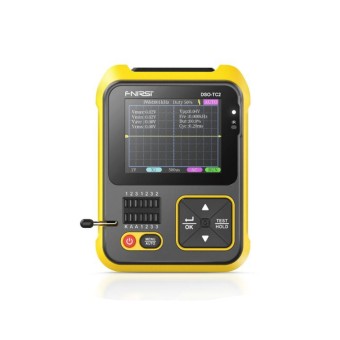
FNIRSI DSO-TC2 oscilloscope and LCR tester |
Best suited when transistor, diode, MOSFET, and LCR testing are the main job, with PWM generation and occasional waveform viewing as extras |
This is a component tester first and a scope second |
If waveform analysis becomes the main task, move to a dedicated oscilloscope |
| I mainly debug I2C/SPI/UART data |
Sipeed SLogic Combo 8 |
For pure protocol debugging, a cheap logic analyzer often beats a cheap oscilloscope because 8–16 digital channels and real decoding are more useful than seeing only one or two square waves |
Logic analyzers cannot show analog effects like ringing, levels, and noise |
Wrong bytes point to a logic analyzer; weird waveform, noise, ringing, or power issues point to a scope |
| I want a real long-term first scope for frequent embedded work |
None of these entry models are the long-term default |
Rule of thumb: choose about 3–5× your highest analog frequency, and about 5× the clock rate for digital signals, which is why 70–100 MHz is the hobbyist sweet spot for a first working scope |
Most products here are 2-channel and entry-tier, while the community’s no-regret advice is still 4 channels if budget allows |
Save for a higher-tier bench scope if you expect regular MCU, PWM, or bus-debug work |
| I need mains or high-voltage work |
None of these low-cost entry scopes are the right first choice |
Mains or anything above about 40 V needs the correct probes, CAT-rated accessories, and a clear understanding of earth-referenced grounds |
Cheap USB scopes and toy-class kits are poor candidates here |
Choose a properly rated higher-tier instrument and the right accessories first |
What the budget scope models here actually differ on
| Product name |
Type |
Bandwidth |
Sample rate |
Power |
Included extras |
Best for |
Main caveat |
| DSO138 DIY Oscilloscope Kit |
DIY kit |
200 kHz |
1 Msps |
8V–12V external, 9V recommended |
2.4-inch TFT, semi-populated PCB with SMD parts pre-soldered |
Buyers who want soldering practice first |
Build project first, low-speed scope second |
| DSO150 oscilloscope with case |
Portable low-speed DSO |
— |
1 Msps |
External 9V DC, 8–10V acceptable |
Protective case, 2.4-inch TFT, 12-bit resolution |
A more convenient ready-to-use DSO1xx option |
Convenience and 5mV/Div to 20V/Div sensitivity do not make it a high-speed upgrade |
| DSO138Pro with 2.5MS/s sampling |
Compact low-speed DSO |
200 kHz |
2.5 Ms/s |
Standard version has no battery management circuit assembled |
Protective case, compact 71.6 mm width |
Buyers who want the smallest cased DSO1xx variant |
Slightly higher sample rate, same low-speed class |
| Hantek 6022BL with 16-channel logic analyzer |
PC USB scope |
20 MHz |
48 MSa/s |
PC connection required |
2 PP80 probes, FFT, separate 16-channel logic analysis |
Low-cost mixed analog/digital bench work at a PC |
Workflow depends on software and computer setup |
| FNIRSI 1013D tablet oscilloscope |
Portable tablet scope |
100 MHz analog |
1 GS/s |
6000 mAh battery |
7-inch capacitive touch screen, 1 GB internal storage for 1000 screenshots/waveforms |
Shoppers who want a portable standalone screen |
Most portable high-spec option on paper, but still an entry-tier buying decision |
| FNIRSI DSO-TC2 oscilloscope and LCR tester |
Combo tester |
— |
2.5 MS/s |
1500 mAh rechargeable battery, USB Type-C charging |
Integrated transistor/diode/MOSFET/LCR tester, PWM signal generator |
Component testing with occasional waveform viewing |
Best treated as a tester with scope capability, not the other way around |
The practical comparison between the DSO138, DSO150, and DSO138Pro is simpler than it first appears: the community treats DSO1xx variants as broadly the same low-speed class. Choose by build preference, enclosure, and convenience, not for a dramatic performance jump. That matters most for beginners working on Arduino projects, where these models are often mistaken for a true first bench scope.
USB scope, handheld scope, or logic analyzer: the close-call choice
Pick the Hantek 6022BL when a PC is always present and bundled digital capture matters as much as the analog view. Its catalog specs are 20 MHz bandwidth and 48 MSa/s, with separate 16-channel logic-analyzer functionality and FFT, so it works as a mixed analog/digital budget tool. Community consensus still favors benchtop scopes unless space or budget forces USB, because low-cost USB models often give up stable software and direct controls. Hantek’s official software is widely treated as Windows-centric and unstable, so OpenHantek for Windows, macOS, and Linux is the standard workaround.
The FNIRSI 1013D makes more sense when you want a self-contained screen instead of a laptop-tethered workflow. It offers 100 MHz analog bandwidth, 1 GS/s, a 7-inch capacitive touch screen, 1 GB internal storage for 1000 screenshots or waveforms, and a 6000 mAh battery.
The Sipeed SLogic Combo 8 is the better fit when the real job is bus decoding. Showing a digital square wave is not the same as protocol decoding, and budget scopes mostly do not decode I2C, SPI, UART, or CAN while logic analyzers do. SLogic gives 8 channels, 80 MHz sampling rate, 130+ protocols, and can also work as a CKLink debugger, DAP-Link debugger, or UART module. That is often the right tool for bus-heavy work on ESP32 development boards. If you want a practical timing source to inspect, a repeatable digital clock generator build is a useful reference project. Logic analyzers cannot show analog issues like ringing, noise, and level problems, which is why “wrong bytes” and “weird waveform” lead to different tools.
Pre-purchase gotchas that actually change which scope to buy
- Check the voltage and safety fit first. Hantek 6022BE-class USB scopes are widely associated with a ±5 V input-stage limit in community use, so they are low-voltage tools, not casual higher-voltage experiments. For mains or anything similar, scope ground on bench units is earth-referenced; clipping the ground lead to a live point can short to earth and damage the scope, the circuit, or you.
- Check whether the scope needs a PC. The Hantek only makes sense if you are comfortable with a PC-dependent workflow and software setup.
- Check battery vs external power. The FNIRSI 1013D has a 6000 mAh battery, while the DSO150 needs external 9V DC and the DSO138 kit needs 8V–12V power with 9V recommended.
- Check the probe connector before reusing accessories. Most standard scopes use BNC, but DSO-TC2-class devices are associated with MCX connectors, so standard probes may need an adapter.
- Budget for better probes. Included probes are usable to start, but decent x10 probes are a common upgrade and often outlast several scopes.
- Know what you are buying with kits. The DSO138 ships as a bare-board kit, and its shell is separate. The DSO138 acrylic case is a transparent acrylic modular enclosure measuring 160x10x40 mm, and it includes no oscilloscope hardware.
- Have a known signal ready for first checks. A simple NE555 pulse source is useful for first probe compensation and sanity checks.
When to skip these entry scope options and move up
If you expect to use a scope weekly for embedded work, the recurring best oscilloscope for beginners advice moves up to the $300–500 no-regrets tier, usually represented by Rigol DS1054Z or Siglent SDS1104X-E class models. That jump matters when your work includes MCU clocks, PWM edges, or bursts in the 1–50 MHz range, where honest 50–100 MHz capability becomes the real threshold.
These entry products still make sense when the goal is soldering practice, occasional signal-presence checks, or a compact secondary tool. DSO138-class units fit that under-$30 learning role, not a weekly-use bench role. Modern digital scopes also beat used analog when you need storage, single-shot capture, protocol work, or export. Used analog can still make sense for audio because 20–30 MHz is enough there, but shipped CRT scopes can arrive as a box of shards and their calibration history is unknown. Once you move past toy-tier measurements, a cleaner known-frequency test-signal setup becomes more useful, especially on more capable Raspberry Pi projects that expose timing and signal-quality issues quickly.
FAQs on Oscilloscope
Is a DSO138 good enough as my first oscilloscope?
DSO138-class units are roughly 200 kHz class, around 1 Msps in the supplied kit, and are best treated as soldering or learning kits or signal-presence checkers rather than full measurement scopes. If your goal is to practice through-hole assembly and end up with a working board, the DSO138 DIY Oscilloscope Kit makes sense. If your goal is regular debugging, accurate triggering, or growth into faster electronics work, it is too limited.
How much bandwidth do I need for Arduino, ESP32, or similar electronics projects?
Use about 3–5× your highest analog frequency and about 5× the clock rate for digital signals, so a 16 MHz Arduino signal needs roughly 80 MHz bandwidth to look right. That is why a 70–100 MHz scope is the usual starting target for embedded hobby work, while low-speed kits are quickly outgrown. For bus-heavy MCU projects, it is also worth deciding whether you need waveform quality, protocol decoding, or both.
Do I need 2 channels or 4?
2 channels is the workable minimum, but community consensus strongly prefers 4 channels when budget allows, especially for comparing input and output or watching multiple bus lines at once. A 2-channel scope can still handle basic bench work, and most products here are in that entry tier. The limit shows up when you want to watch power, clock, and data together instead of moving one probe around.
Should I buy a USB oscilloscope or a standalone one?
USB scopes are cheaper for the specs but require a PC and depend heavily on software quality, while standalone units trade that for a built-in screen and direct controls; for Hantek buyers, OpenHantek is the common workaround. A USB model like the Hantek 6022BL is the right call when you always work at a computer and want low-cost mixed analog and digital capture. A standalone option like the FNIRSI 1013D is more appropriate when portability and direct controls matter more than software flexibility.
Can I use these scopes to measure mains or 230 V safely?
Mains work needs the correct 10x and CAT-rated probe setup plus a clear understanding that scope ground is often earth-referenced; cheap USB scopes and toy-kit scopes are poor candidates for this job. The main risk is not just voltage range but grounding mistakes, especially with bench-style grounds clipped to the wrong point. If mains measurement is part of your plan, start with a properly rated instrument and accessories rather than trying to stretch an entry model into that role.
What’s the difference between a scope and a logic analyzer?
A scope shows analog waveform shape, levels, ringing, and noise, while a logic analyzer is better for decoding digital buses like I2C, SPI, and UART across many channels. If you are chasing protocol content, a logic analyzer such as the Sipeed SLogic Combo 8 usually answers the question faster. If you are chasing edge quality, rail noise, pulse shape, or analog faults, you need an oscilloscope instead.
Do I need better probes than the ones in the box?
Included probes are usually usable for getting started, but decent x10 probes are a common early upgrade and are often said to outlast several scopes. The reason is not just durability: x10 probes usually load the circuit less and are the normal choice for cleaner measurements. If you already own good BNC probes, checking connector compatibility before buying can save money.
Glossary
- Bandwidth
- The frequency where the scope is already showing a sine wave smaller than it should be, which is why you do not match a 100 MHz scope to a 100 MHz signal.
- Sample rate
- How many samples the scope takes per second, and it needs to support the bandwidth rather than replace it as a spec.
- Channels
- The number of signals you can watch at the same time, with 2 as the practical minimum and 4 the less-regretted choice.
- x10 probe
- A probe setting that attenuates the signal by 10 instead of amplifying it, while improving bandwidth and reducing circuit loading.
- Probe compensation
- A small adjustment that matches the probe to the scope so square-wave edges display correctly.
- Logic analyzer
- A digital debugging tool that captures many logic lines at once and decodes buses better than a cheap oscilloscope.
- CAT rating
- A safety category marking that matters when you are measuring mains or higher-energy circuits.
- MCX
- A smaller probe connector used on some handheld or combo devices, which may require an adapter if you already own standard BNC probes.



Please complete your information below to login.
Sign In
Create New Account