Nano CH340G Development Board review
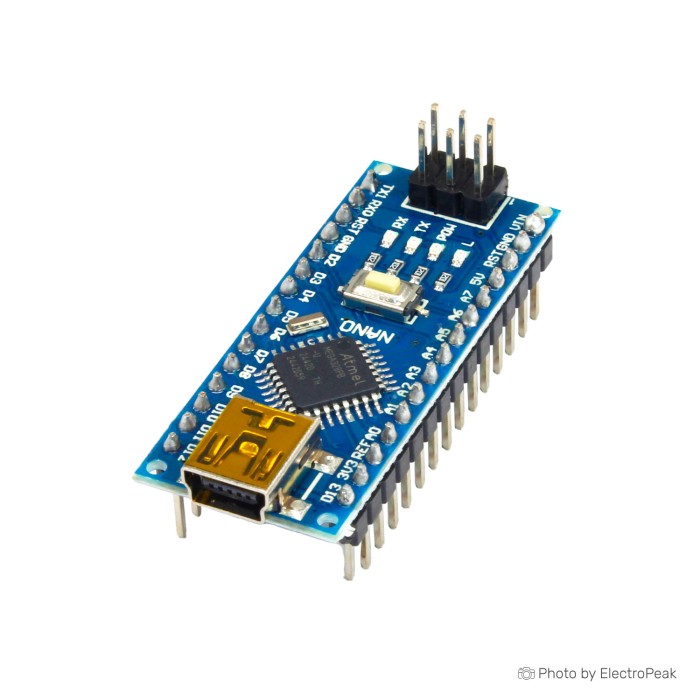
This board is a compact 5V Arduino Nano-compatible clone built around the ATmega328 and a CH340G USB-to-serial chip. It suits small electronics and robotics work where Nano size, breadboard use, and the familiar Arduino IDE workflow matter more than official branding.
The trade-off is clear. You get the small Nano form factor, mini USB programming, and standard AVR behavior, but you should expect clone-style setup realities such as CH340 driver installation and possible bootloader selection changes if uploads fail. If you want stronger hardware identity and consistency, the Arduino Nano (Original) is the closer fit.
Its layout follows the usual Nano pattern with standard 2.54 mm pin spacing, a compact dual-side PCB, ICSP header, and onboard LEDs for power and serial activity. That still makes it useful and easy to work with for compact breadboard prototypes, student projects, and small robot controllers.
For buyers comparing boards across the wider Arduino Boards range and wanting a broader form-factor view, the Arduino Buying Guide: How to Choose the Right Arduino For Your Project helps place this Nano against larger Uno-style boards and other Nano variants.
Specifications of Nano CH340G Development Board
- Microcontroller: ATmega328
- Operating Voltage: 5V
- Input Voltage: 7 to 12 V
- Digital I/O Pins: 14
- PWM Pins: 6
- Analog Input Pins: 8
- DC Current per I/O Pin: 40 mA
- Flash Memory: 32 KB
- Bootloader Memory: 2 KB
- SRAM: 2 KB
- EEPROM: 1 KB
- Clock Speed: 16 MHz
- USB-to-Serial Chip: CH340G
Nano CH340G specifications explained
These are familiar Nano-class specs, which is why this board fits typical Arduino sketches, sensor reading, button inputs, relay control, and small motor-driver projects. What matters is what those numbers let you do before you reach the board’s limits.
| Specification |
What it means in practice |
| Operating Voltage: 5V |
This board uses 5V logic, which suits many classic Arduino sensors, modules, and shields. It also means you need to check 3.3V-only parts carefully before wiring them directly. |
| Digital I/O Pins: 14 |
Fourteen digital pins are enough for many compact controllers, but not all 14 are equally convenient. D0 and D1 are shared with USB serial, so they should be left free during uploads and serial debugging if you want fewer communication conflicts. |
| PWM Pins: 6 |
Six PWM outputs are useful for LED dimming, servo timing setups, and simple motor-driver control. For small robots, that pin count is often enough for a pair of motors plus a few status or control lines. |
| Analog Input Pins: 8 |
Eight analog inputs give more room for multi-sensor projects than many entry boards. That helps when you are reading several potentiometers, analog distance sensors, or battery-monitor points in one build. |
| Flash Memory: 32 KB |
32 KB flash is the normal range for classic Nano and Uno-style AVR sketches. It handles teaching examples, compact control firmware, and many sensor projects well, but larger menus, communication stacks, or heavy libraries can fill it quickly. |
| SRAM: 2 KB |
SRAM is the first real limit on this class of board. With only 2 KB, large display buffers, long strings, and memory-hungry libraries need care. |
| EEPROM: 1 KB |
EEPROM gives you a small non-volatile space for settings, calibration values, or counters that need to survive power loss. It is useful for simple configuration storage without adding external memory. |
| Bootloader Memory: 2 KB |
The stated 2 KB bootloader memory reflects the sold specification and matters when estimating available program space. In practice, bootloader size can vary with bootloader version, which is one reason upload behavior is not always identical across Nano clone batches. |
| Clock Speed: 16 MHz |
16 MHz is the standard timing baseline for classic 5V AVR Arduino projects. Libraries and example code written for traditional Nano and Uno boards generally expect this clock speed. |
| USB-to-Serial Chip: CH340G |
The CH340G handles programming and serial monitor access over USB. It works well in many setups, but it is the main reason Windows users should expect driver setup rather than assume first-plug detection will always be smooth. |
| Breadboard-friendly 2.54 mm pitch |
The standard 2.54 mm spacing makes this board easy to place in breadboard-based prototypes. That matters when you want a compact controller without moving straight to soldered perfboard or a custom PCB. |
| ICSP header included |
The ICSP header is useful if you ever need to burn or recover a bootloader, or program the AVR at a lower level. Most buyers will not use it on day one, but it becomes valuable when troubleshooting. |
| DC Current per I/O Pin: 40 mA |
The 40 mA figure should be treated as a limit-style number, not a normal design target. For reliable work, external loads such as relays, motors, bright LEDs, and modules should be driven through proper driver circuitry instead of asking one GPIO pin to carry that kind of current directly. |
The board also includes Power OK, TX, RX, and L LEDs, which help with quick sanity checks during setup. For cleaner access to all pins for sensors, servos, and three-pin wiring, the Arduino Nano IO Shield Expansion Board makes this format easier to use on the bench.
If your sketch size and RAM usage are already close to the limits of a standard Nano, move to the Nano Every Clone with ATMega4808. It is the more suitable variant because it provides more flash, more SRAM, and a faster 20 MHz clock.
Nano CH340G driver setup and first upload
This board is straightforward to bring up if you follow the usual CH340 Nano sequence. Treat the first upload as a setup check, not as proof that every clone behaves exactly like every other Nano on the first try.
Start with the CH340 driver if you are using Windows. The board uses the CH340G USB-to-serial chip, and the normal setup flow is to install the driver, connect the board through its mini USB port, and then use it for programming and serial communication. If you need the cable, add a USB A to Mini USB Cable for Arduino Nano - 30Cm. This board uses mini USB, not micro USB and not USB-C.
In Arduino IDE, choose Arduino Nano as the board, then select the correct COM port. If the first upload fails, the most common fix on this clone family is Processor: ATmega328P (Old Bootloader). That single setting solves a large share of first-use upload failures that buyers otherwise mistake for dead hardware.
A simple Blink upload is the fastest confidence check. Upload the sketch, then confirm that the onboard LED marked L blinks. Also leave D0 and D1 free during programming, because those pins are shared with USB serial and attached serial hardware can block uploads.
Linux systems commonly recognize CH340-based boards through built-in ch341 support. macOS support is widely available too, though driver setup may still be needed on some systems. Windows remains the platform where CH340 setup causes the most first-time friction, so it is worth keeping the How to Install CH340 Driver on Windows guide and the How to Install Arduino IDE on Windows & MAC guide nearby for the first connection.
One real-world caveat: clone supply chains sometimes include problematic CH340-family chips that behave poorly with newer Windows drivers. That is not a guaranteed issue on this board, but it is a known source of odd detection and upload symptoms in this board family. If you would rather avoid hunting for a mini USB cable in the first place, the Nano CH340G with Type-C USB is the more convenient variant.
Nano CH340G power limits and known quirks
The input voltage specification is 7 to 12 V, which is correct for this board. What buyers most often miss is that the practical result depends on how much current the board and attached peripherals are drawing.
Feeding 12V into VIN can push the typical onboard linear regulator into unnecessary heat under load. For light loads it may be acceptable, but once you add sensors, indicator LEDs, radio modules, or anything else drawing extra current, 12V VIN becomes a common cause of overheating, resets, and unstable behavior. For many real projects, 7–9V input or a regulated 5V supply is the safer path.
There are also the usual clone-family unknowns. The sold specification is ATmega328, but the exact MCU suffix on shipped boards is not confirmed, and generic Nano boards can vary by batch in MCU marking, USB parts, regulators, reset circuitry, and overall assembly consistency. That does not make the board unusable. It just means you should not expect the same hardware identity guarantees as a more tightly controlled board.
The CH340G interface is widely supported, but Windows driver setup is still a recurring source of trouble on this family. If your concern is fewer clone-related unknowns and stronger quality-control signals, the Arduino Nano (Original) is the steadier choice. The Windows side of CH340 setup is covered in the How to Install CH340 Driver on Windows guide.
A few smaller quirks are worth knowing before you order.
- This board uses mini USB, so you need the right cable type.
- D0 and D1 are shared with USB serial and can interfere with uploads if another serial device is connected.
- The 3.3V capability is not clearly defined here, so it should not be treated as a dependable power source for external 3.3V peripherals.
Arduino Nano clone vs original and other Nano options
This board makes sense when you want a compact Nano-format AVR board with CH340G USB serial and mini USB connectivity. The real question is not whether it is universally better or worse than other Nano options, but which trade-off fits your project and setup habits.
Compared with the Arduino Nano (Original), the main difference is confidence in hardware identity and consistency. The original board is the right fit for buyers who want official-board certainty, stronger trust signals, and fewer clone-family unknowns. This board remains a practical choice when standard Nano capability matters more than that extra consistency layer.
For buyers who want a compatible Nano from another exact source, the Arduino Nano Clone is another equivalent Nano-format path in the store. It uses an FT232RL USB-to-serial chip rather than CH340G, which is why some buyers searching for Arduino Nano FT232 prefer it.
Connector choice matters more than many buyers expect. If mini USB is inconvenient, the Nano CH340G with Type-C USB keeps the same general Nano/CH340 direction with a more common connector. The Nano Clone with USB Type-C is another Type-C Nano-format option in this family.
Program size and memory can decide it too. The Nano Every Clone with ATMega4808 is the better fit when you need more flash and SRAM for larger firmware or more complex robotics logic, with the trade-off that it needs its own driver and board-manager setup rather than acting like a drop-in classic Nano in every workflow.
For tighter mechanical limits, the Nano SuperMini Type-C is the more space-focused variant. It is aimed at builds where even a standard Nano footprint feels larger than necessary.
If you are comparing form factors across the wider Arduino Boards category, the Arduino Buying Guide: How to Choose the Right Arduino For Your Project is the useful next read before you commit.
Nano CH340G accessories you may also need
This board is easiest to buy when you treat it as one part of a small prototyping setup. For many buyers, the first missing item is the cable, followed by basic breadboard wiring parts.
Required
Recommended
Optional
- ISP programmer or an Arduino used as ISP for bootloader recovery.
- Multimeter for first power checks and troubleshooting.
Nano CH340G FAQ
Do I need a driver for this Arduino Nano CH340 board?
Yes. This board uses a CH340G USB-to-serial chip, and the normal setup flow includes installing the CH340 driver. Windows is the main case where first-use driver issues show up; Linux and macOS are commonly easier, though macOS may still need driver setup in some cases.
Why won’t my sketch upload to this Nano CH340G board?
Start by changing the processor setting to ATmega328P (Old Bootloader). Also confirm that Arduino Nano is selected in Arduino IDE, choose the correct COM port, and keep D0 and D1 free during upload so another serial device is not blocking communication.
Is this a genuine Arduino Nano?
No. This is a compatible clone-style Nano board with CH340G USB-to-serial. If your real requirement is official-board identity and stronger consistency, the Arduino Nano (Original) is the better match.
What USB cable does this board use?
Yes, the input voltage specification is 7 to 12 V. The practical caution is that 12V on VIN can overheat the typical onboard linear regulator under load, so 7–9V input or regulated 5V is the safer choice when current draw increases.
Does this board work on Linux and macOS?
Yes, in many cases it does. CH340-based boards commonly work on Linux through built-in ch341 support, and macOS support is available, though macOS may require driver setup depending on the system.
Is this board good for breadboards and compact builds?
Yes. The board uses a breadboard-friendly layout with standard 2.54 mm pin spacing and a compact dual-side PCB layout, which is exactly why Nano-format boards are popular for tight prototypes.
Does this board guarantee an ATmega328P?
No. The sold specification is ATmega328, but the exact MCU suffix on shipped boards is not confirmed here. That is a normal uncertainty with generic Nano clone batches, even though the board is still sold and specified as ATmega328.
Where can I find the CH340 and Arduino IDE setup steps?
Purchase decision summary
- Ideal for: Compact 5V Arduino-style builds, breadboard prototypes, student projects, and buyers who already know the Arduino IDE basics and do not mind CH340 setup.
- Maybe for: First-time Arduino users who are comfortable following a short driver and upload checklist, and buyers who specifically want a Nano form factor with clone-board expectations.
- Consider another option if: You want an official Arduino, guaranteed batch consistency, the smoothest Windows setup, USB-C by default, or dependable onboard 3.3V power for peripherals.
Buying checklist
- ✓ You want a Nano-size AVR board rather than a larger Uno-style board.
- ✓ Your sensors, modules, and shields are compatible with 5V logic.
- ✓ You already have a mini USB cable or are adding one.
- ✓ You are comfortable installing the CH340 driver if needed.
- ✓ You are prepared to try ATmega328P (Old Bootloader) in Arduino IDE if the first upload fails.
- ✓ Your project fits within 14 digital I/O, 6 PWM, 8 analog inputs, 32 KB flash, and 2 KB SRAM.
- ✓ You will avoid relying on 12V VIN for higher-current loads.
- ✓ If you want official Arduino identity and stronger consistency, you should choose Arduino Nano (Original) instead.
- ✓ If you want Type-C convenience, you should choose a supplied Type-C Nano variant instead.







Please complete your information below to login.
Sign In
Create New Account