
Product added to cart

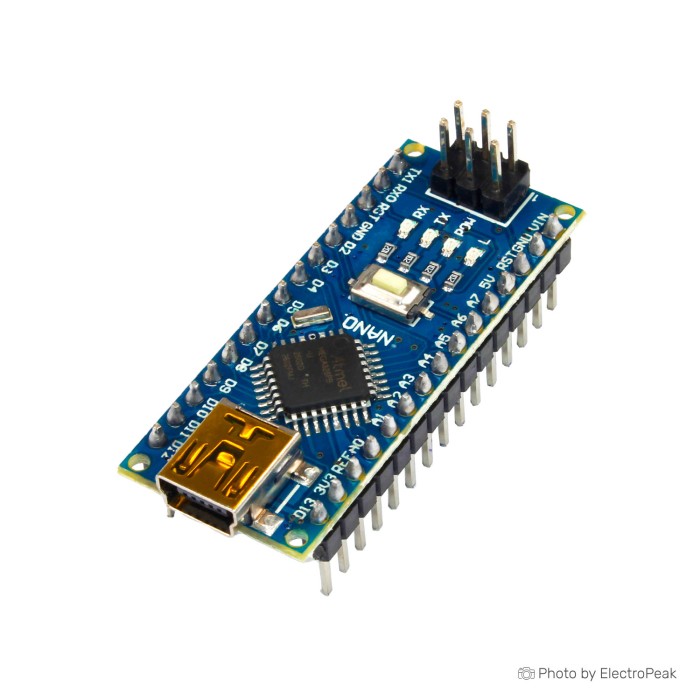
Arduino Nano (Clone)
$2.1300
Out of stock
SKU
ARD-01-025
Volume discounts:
- +50 3 % $2.0600
- +100 5 % $2.0200
- +300 7 % $1.9900
- +500 8 % $1.9500
- +1000 10 % $1.9200
Product Variations: View out of stock variants


Add an Accessory:


Shop with confidence Learn More
 Nano CH340G Development Board (Clone to Arduino Nano 3.0) Previous
Arduino Nano Clone review and specifications
This board is a third-party Arduino Nano-compatible board built around the ATMega328P. It suits low-cost prototyping, classroom use, and everyday hobby projects where the Nano form factor and Arduino library support matter more than official manufacturing traceability.
At $2.85, it is a practical pick for buyers who want a small AVR board for experiments, spares, or bulk builds. If you need official manufacturing standards, certified hardware, or the lowest possible setup risk, the Arduino Nano Original is the safer choice. If you are still comparing sizes and layouts, you can also browse other Arduino Boards.
Specifications of Arduino Nano (Clone)
- Microcontroller: ATMega328P
- Architecture: AVR
- Operating Voltage: 5 V
- DC Current per I/O Pins: 40 mA (I/O Pins)
- Power Consumption: 19 mA
- USB-to-Serial Converter: FT232RL chip.
- Input Voltage: Accepts a voltage range of 7-12V when powered via the VIN pin or 5V when powered via the USB port.
- Digital Pins: Offers 14 digital input/output pins, each of which can be used for digital input or output and supports PWM (Pulse Width Modulation).
- PWM Output: 6
- Analog Pins: Provides 8 analog input pins for reading analog sensor values.
- UART, I2C, and SPI: Includes UART (Serial), I2C, and SPI communication interfaces, expanding its connectivity options.
- Flash Memory: Features 32KB of flash memory, of which 2KB is used for the bootloader.
- SRAM: Contains 2KB of SRAM for variable storage during program execution.
- EEPROM: Includes 1KB of EEPROM for non-volatile data storage.
- Clock Speed: Operates at a clock speed of 16 MHz for rapid program execution.
- Dimensions: 18.5mm x 45mm.
- Integrated Components: Include built-in components such as LEDs, reset button, and voltage regulator for ease of use.
- Compatibility: Compatible with the Arduino IDE, allowing you to program it using Arduino sketches and libraries.
- Please note that the exact specifications may vary slightly between different clone manufacturers, so it's advisable to refer to the specific datasheet or product documentation provided by the manufacturer when working with a particular Arduino Nano clone.
Arduino Nano Clone specifications explained
The ATMega328P and AVR platform are mature and well documented. In practice, that means broad support in the Arduino ecosystem, plenty of example code, and fewer surprises on simple sensor, display, relay, and serial-module projects.
This is a 5 V board, and that matters because many classic Arduino sensors and modules were designed around 5 V logic. Integration is straightforward with common hobby parts. You still need to be careful before wiring 3.3 V-only peripherals directly.
A pinout diagram helps here because the PWM and analog assignments matter once you start mapping a real project. The Arduino Nano IO Shield Expansion Board also makes those connections easier if you do not want to wire everything directly on headers and jumpers.
| Key spec | Why it matters |
|---|---|
| ATMega328P / AVR | Works with the classic Arduino Nano software model, common sketches, and many established libraries. It is a familiar choice for straightforward embedded control rather than large or memory-heavy applications. |
| Operating Voltage: 5 V | The board uses 5 V logic, which suits many Arduino-era modules and shields-by-wiring. It is less convenient with 3.3 V-only devices unless you check signal-level compatibility first. |
| 14 digital I/O | Enough for many compact builds: buttons, LEDs, relays, sensor triggers, and serial control lines. If a project grows into many actuators or lots of discrete inputs, this count can become the limiting factor. |
| 6 PWM outputs | You can dim LEDs, control motor speed through driver boards, or generate servo-style timing where supported. The important detail is that only six pins provide PWM, so not every digital pin can do that job. |
| 8 analog inputs | Useful for analog sensors such as light, potentiometer, or voltage-monitoring inputs. That gives this board good flexibility in small data-acquisition and teaching projects. |
| UART, I2C, and SPI | These three interfaces cover most module types buyers attach to a Nano: GPS and Bluetooth over UART, IMUs and RTCs over I2C, and displays or storage over SPI. |
| 32KB flash, 2KB SRAM, 1KB EEPROM | Fine for many small and medium Arduino sketches, but memory headroom is limited once you add larger libraries, buffers, menus, or multiple communication stacks. EEPROM gives you a small area for settings that should survive power loss. |
| 16 MHz clock speed | Standard Nano timing for common Arduino code, libraries, and serial communication expectations. It is fast enough for normal control tasks, but not aimed at compute-heavy workloads. |
| 18.5mm x 45mm size | The narrow Nano footprint is one of the main reasons to buy this board instead of a larger Uno. It fits compact breadboard builds and space-limited enclosures more easily. |
In real use, this board fits sensor reading, PWM lighting, simple robotics control, serial modules, and compact breadboard prototypes. If your sketches are getting tight on flash or SRAM, or you know you need more pins from the start, the Nano Every Clone (ATMega4808) is the better fit. If you are still comparing board families, the Arduino Buying Guide helps sort out where a Nano still makes sense and where a larger or newer board is easier to live with.
Arduino Nano Clone USB setup and first upload
Getting started is simple: connect the board with a Mini-USB data cable, open Arduino IDE, select Arduino Nano, choose the detected serial port, and upload Blink. If the onboard LED starts blinking at the expected interval, the board, cable, port, and upload path are all working.
This version is sold as an FT232RL-based Nano clone. That keeps the main Arduino IDE setup path straightforward without a CH340-specific step, but clone-family boards are still commonly cross-shopped against CH340 versions, so it is worth verifying USB detection and driver behavior as soon as the board arrives.
If you need a cable, use a USB A to Mini USB Cable for Arduino Nano - 30Cm. No cable is confirmed as included, so check before ordering if you do not already have a Mini-USB data cable.
- Connect the board with a Mini-USB data cable.
- Open Arduino IDE.
- Select Arduino Nano as the board.
- Select the detected serial or COM port.
- Upload the Blink example.
- If upload fails, try the processor setting ATmega328P (Old Bootloader).
The most common first-time problem is the cable. Some Mini-USB cables only provide power, so the board lights up but no serial port appears. The next common issue is board selection or processor selection, especially on Nano-compatible boards where old bootloader settings still show up in real use.
If your computer does not detect the board or uploads fail even after checking cable, port, and old bootloader selection, USB-interface troubleshooting is the next step. These guides cover the usual path for installing the IDE and cross-checking CH340-based alternatives: How to Install Arduino IDE on Windows & MAC and How to Install CH340 Driver on Windows.
If you want a clearly stated CH340G version and are comfortable installing that driver, the Nano CH340G Clone is the same class of board sold with that USB interface called out directly.
Arduino Nano Clone power, limits, and compatibility
This board runs at 5 V and can be powered in two main ways: 5 V from USB or 7-12 V through VIN. That covers most bench setups, USB-powered prototypes, and basic battery or adapter-fed projects without extra power hardware for the board itself.
The limit to keep straight is I/O current. The spec sheet lists 40 mA per pin, but the safer operating guidance is 20 mA maximum per digital or analog pin and 200 mA total across all pins. Treat 40 mA as an absolute-max-style figure, not a normal design target.
| Area | Compatibility summary |
|---|---|
| Microcontroller platform | ATmega328P / AVR |
| Arduino software | Compatible with Arduino IDE |
| Other development software | PlatformIO is supported |
| Operating systems | Works with Windows, macOS, and Linux; USB detection experience depends on interface behavior during first setup |
| USB connection | Uses a USB connection, with Nano V3.0 family use centered around Mini-USB form factor |
| Power via USB | 5V when powered via USB port |
| Power via external input | 7-12V via VIN |
| Logic voltage | 5V logic |
| Digital I/O | 14 digital I/O |
| PWM outputs | 6 PWM outputs |
| Analog inputs | 8 analog inputs |
| Serial/protocols | UART, I2C, SPI |
| Breadboard use | Fits the standard 0.1" header ecosystem and suits breadboard prototyping |
| Shield fit | Most shields for other Arduino boards are not directly compatible |
| 3.3V peripherals | Low-current use is the safer assumption; higher-current 3.3V loads should use an external regulator |
| Driver reality | Sold as FT232RL; first-use verification still matters on clone-family boards |
| Bootloader selection | Use Arduino Nano board selection first and try ATmega328P (Old Bootloader) if upload fails |
For practical compatibility, this board works well with common sensors, LEDs, displays, GPS modules, Bluetooth serial modules, and many small I2C or SPI breakouts. It is also breadboard-friendly, and the Arduino Nano IO Shield Expansion Board is useful if you want cleaner module hookups than loose jumper wires.
One common wrong assumption is shield fit. Most Uno-format shields do not plug straight onto a Nano, so if your project depends on direct shield stacking, this board is the wrong mechanical choice even if the MCU and code are compatible.
If wireless connectivity is the real requirement rather than a 5 V AVR Nano, look at the Nano ESP32 with WiFi/Bluetooth. It solves a different problem and uses 3.3 V I/O instead of 5 V.
Arduino Nano Clone limitations and buyer mistakes
The main compromise here is not processing power. It is consistency and setup certainty. This is a low-cost clone board, and that makes it attractive for hobby use, but it is not the right choice when official certification, traceability, or production-grade sourcing confidence are part of the requirement.
Mini-USB is another practical drawback. It works fine, but it is less convenient than newer connector options, and many buyers no longer keep Mini-USB data cables around.
- Do not assume all Nano clones behave the same over USB.
- Do not treat 40 mA per pin as a normal operating current.
- Do not expect Uno shields to fit directly.
- After an upload failure, do not overlook the old bootloader option.
- A charge-only cable will power the board but prevent programming.
This board is sold as an FT232RL version. In real use, though, USB-chip identity and driver behavior are common pain points across clone-family Nanos, so checking enumeration and a simple Blink upload early is a good first test.
For long-term deployments, commercial products, or reliability-critical work, this board is the wrong fit. If official component sourcing and manufacturing standards are the priority, the Arduino Nano Original is the better buy. If you are comparing board classes more broadly, the Arduino Buying Guide is a useful way to decide whether staying with a Nano still makes sense.
Arduino Nano Clone vs original and CH340 alternatives
The core decision here is less about raw performance and more about board identity, connector preference, and how much setup certainty you want. All of these boards target the same small Arduino-style project space, but they differ in USB interface, connector type, and confidence in component sourcing.
| Board | What changes | Who it suits better |
|---|---|---|
| This board | Mini-USB Nano clone sold as FT232RL-based | Buyers who want a low-cost ATmega328P Nano-compatible board and are comfortable with normal clone-style first setup checks |
| Arduino Nano Original | Official manufacturing standards and genuine components | Buyers who care more about official sourcing confidence than clone pricing |
| Nano CH340G Clone | Clearly stated CH340G USB-to-serial interface with Mini-USB | Buyers who prefer a clearly stated CH340G path and are comfortable installing the CH340 driver |
| Nano CH340G with Micro USB | Micro USB connector instead of Mini-USB, with CH340G | Buyers who want Micro USB cable convenience; note that headers are supplied but not soldered |
| Nano CH340G with Type-C USB | Type-C connector instead of Mini-USB, with CH340G | Buyers who want Type-C convenience and are fine with the CH340G interface |
| Nano Clone with Type-C and FT232RL | Type-C connector while keeping the FT232RL listing claim | Buyers who want Type-C convenience but still prefer the FT232RL-listed Nano variant |
The connector difference is mainly about convenience, not a performance upgrade. Mini-USB, Micro USB, and Type-C versions all handle the same Nano-style jobs; the better choice is the one that matches the cables you already use and the setup path you are comfortable troubleshooting.
Arduino Nano Clone accessories you may need
A Nano board is straightforward to use, but first orders often fail because the cable or prototyping parts were left out. What you need depends on whether you already have a Mini-USB data cable and whether you plan to breadboard the board right away.
Required
- Mini-USB data cable for programming and USB power: USB A to Mini USB Cable for Arduino Nano - 30Cm
- Mini-USB data cable for programming and USB power when you need more reach: USB A to Mini USB Cable for Arduino Nano - 50Cm
Recommended
- Small breadboard for quick prototypes: 400 Points Half Size Breadboard
- Larger breadboard for more spread-out circuits: SYB-500 Breadboard
- Jumper wires for sensors, LEDs, and module hookups: Breadboard Jumper Wire Pack - 65 Pieces
- Easier breakout and access to Nano pins: Arduino Nano IO Shield Expansion Board
Optional
- External 3.3V regulator for higher-current 3.3V peripherals
- ICSP programmer for bootloader recovery
- Multimeter for troubleshooting power and connection issues
FAQs
Is this an original Arduino Nano or a clone?
This is a clone, not an official Arduino-manufactured board. It is based on the ATmega328P Nano platform and is intended for the same Arduino software workflow.
What USB cable does this board use?
It uses a USB A to Mini-USB data cable. A charge-only cable can power the board without giving you a working programming connection.
Do I need any drivers to use this Arduino Nano Clone?
Start with Arduino IDE and the standard Arduino Nano board selection. This board is sold as an FT232RL version, but if the board is not detected or uploads fail, driver and USB-interface troubleshooting is the next thing to check.
Can I power it from USB or from a battery?
Yes. It supports 5V via USB and 7-12V via VIN, and it can also be powered from an AC-to-DC adapter or battery.
How many pins do I actually get?
You get 14 digital I/O pins, 6 PWM outputs, and 8 analog inputs, along with UART, I2C, and SPI support. That is enough for many compact control, sensing, and interface projects.
Is 40 mA per pin safe to use?
No, 20 mA per pin is the safer operating guidance. The spec sheet lists 40 mA per I/O pin, but the practical limit stated for use is 20 mA maximum per digital or analog pin and 200 mA total across all pins.
Will Uno shields fit this Nano?
No, most Uno-format shields do not fit directly. Some can still be connected by pin arrangement, but direct plug-in compatibility should not be assumed.
Can I use this board for Python?
Yes, but it is not the preferred route if Python is your main goal. Boards based on Raspberry Pi Pico or ESP32/ESP8266 are the more suitable choice for Python-focused work.
Should I buy this clone or the original Arduino Nano?
Buy this board if low cost matters most for hobby use and prototyping. Choose the original Nano if official manufacturing standards and sourcing confidence matter more than price.
Purchase decision summary
Ideal for
- Learning Arduino on a very low budget
- Breadboard prototypes using common 5V sensors, LEDs, and simple modules
- Keeping spare Nano-compatible boards for experiments or classroom use
- Buyers who specifically want an ATmega328P Nano form factor rather than a larger Uno
Maybe for
- Beginners, if they are comfortable checking cable, port, and bootloader settings
- Small embedded builds where Mini-USB is acceptable
- Users comparing Mini-USB, Micro USB, and Type-C Nano variants for connector convenience
Consider another option if
- You need official Arduino manufacturing standards or certified hardware
- You want guaranteed USB-chip identity and a zero-troubleshooting setup path
- Your project needs more memory, more I/O, or built-in wireless
- Your project is commercial, production-bound, or reliability-critical
Buying checklist
- ✓ Decide whether a clone board is acceptable, or whether you need the original Arduino Nano
- ✓ Check that Mini-USB is the connector you want, rather than Micro USB or Type-C
- ✓ Make sure you already have a Mini-USB data cable, or add one
- ✓ Confirm that 14 digital I/O, 6 PWM, and 8 analog inputs are enough for your project
- ✓ Confirm that 32KB flash and 2KB SRAM are enough for your sketch
- ✓ Check that your sensors and modules are compatible with 5V logic
- ✓ Plan an external 3.3V supply if your 3.3V peripherals need more current
- ✓ Be ready to try the old bootloader setting if the first upload fails
- ✓ Use this board for hobby and prototyping work rather than certified production use
| MCU/SoC | ATmega328P |
|---|---|
| Product Family | Arduino |
| Architecture | AVR |
| CPU Cores | 1 |
| Clock Speed (MHz) | 16 MHz |
| Flash | 32 KB |
| SRAM | 2 KB |
| EEPROM | 1 KB |
| GPIO Pins | 14 |
| SPI interface Pins | 1 |
| I2C interface Pins | 1 |
| UART interface Pins | 1 |
| USB Ports | Mini-USB |
| CAN Bus Support | No |
| Ethernet Support | No |
| ADC Channels | 8 |
| PWM Channels | 6 |
| Timers Count | 3 |
| Operating Voltage (V) | 5V |
| GPIO Voltage (V) | 5V |
| GPIO Current (mA) | 40 mA |
| Wireless | No |
| Form Factor | 18.5mm x 45mm |
| IDE Support | Arduino IDE |
| Input Voltage (V) | 7-12V |
| Antenna Type | No |
| Bluetooth Ver. | No |
Write Your Own Review
Please complete your information below to login.
Sign In
Create New Account