
Product added to cart

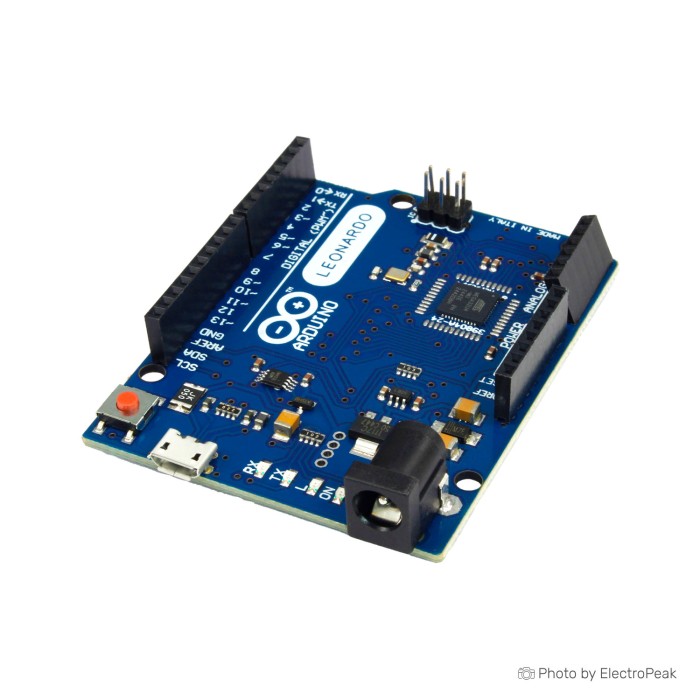
Arduino Leonardo
$6.2500
In stock
SKU
ARD-01-033
Volume discounts:
- +25 4 % $6.0000
- +50 6 % $5.8700
- +100 8 % $5.7500
- +300 10 % $5.6200
- +500 12 % $5.4900
Add an Accessory:


Ships in 2-3 business days, then:
Free delivery in 12-15 days by Tracked Economic Shipping on orders over $100.
Free delivery in 7-10 days by Express Shipping on orders over $300.
More shipping info

Shop with confidence Learn More
 Arduino 101 (Genuino) Previous
Arduino Leonardo review: native USB HID, Uno-style layout, and the trade-offs to know
Arduino Leonardo is a full-size 5V development board built around the ATmega32U4. What separates it from a typical Uno-class board is built-in USB communication on the main microcontroller, with no secondary processor sitting between the board and USB.
That matters when your project needs to behave like a USB device when connected to a computer. Leonardo fits keyboard, mouse, joystick, shortcut pad, foot pedal, MIDI, and other USB-input style projects well. The trade-off is native USB behavior with a few quirks during upload and serial use, so it is less forgiving than an Uno for first-time Arduino users.
The board keeps a familiar full-size layout and includes a micro USB port, a power jack, an ICSP header, and a reset button. If you are comparing options in the wider Arduino Boards range, Leonardo makes the most sense when native USB device behavior is the reason you are choosing it. If you do not need that, Uno R3 is the simpler board for upload and serial work. You will also need a USB to Micro USB Cable - 30cm for setup because no cable is included.
For a broader family-level comparison before you decide, the Arduino Buying Guide helps place Leonardo in context.
Specifications of Arduino Leonardo
- Microcontroller: ATmega32U4
- Operating Voltage: 5V DC
- Input Voltage (Recommended): 7-12V DC
- Input Voltage (Range): 6-20V DC
- Digital I/O Pins: 20
- PWM Digital I/O Pins: 7
- Analog Input Pins: 12
- DC Current per I/O Pin: 40 mA
- DC Current for 3.3V Pin: 50 mA
- Flash Memory: 32 KB
- Bootloader Flash Memory: 4 KB
- SRAM: 2.5 KB
- EEPROM: 1 KB
- Clock Speed: 16 MHz
Arduino Leonardo specifications and what the numbers mean
Leonardo gives you enough I/O for control panels, sensor projects, classroom exercises, and many USB-device builds without feeling cramped. The headline numbers are solid for an 8-bit ATmega32U4 board. One detail needs clarification before you buy.
The 20 digital I/O and 12 analog inputs are board totals, not 32 separate physical signal pins. Twelve of the digital I/O are shared with analog-capable pins, and A6-A11 are multiplexed onto digital pins 4, 6, 8, 9, 10, and 12 rather than appearing as extra standalone header positions. That is normal for this platform, but it catches buyers who expect every count in the spec sheet to map to its own header pin.
For breadboard work, an 830 points Breadboard is a natural match. Need the same ATmega32U4 family in a smaller board and can accept fewer exposed pins? Pro Micro Clone fits that role better.
If you are still comparing board families, the Arduino Buying Guide is a useful second reference.
| Specification | What it means in practice |
|---|---|
| ATmega32U4 | This is the key Leonardo feature. The microcontroller handles USB directly, which enables keyboard, mouse, joystick, and similar USB-device behavior without a separate USB interface chip doing the main communication job. |
| Operating Voltage: 5V DC | The board uses 5V logic levels. That suits many classic Arduino modules, but it is not ideal for projects centered on 3.3V-only peripherals unless you plan the interfacing carefully. |
| Digital I/O Pins: 20 | This gives enough room for buttons, LEDs, relays, chip-select lines, and general control wiring. The catch is that the count includes shared analog-capable pins, so treat it as total usable I/O rather than 20 dedicated digital-only header positions. |
| PWM Digital I/O Pins: 7 | Seven PWM outputs are useful for LED dimming, motor speed control through driver boards, servos in mixed projects, and analog-like output tasks. It is a healthy count for an 8-bit Arduino board. |
| Analog Input Pins: 12 | The analog count is higher than many Uno-class expectations, which helps in sensor-heavy projects. A6-A11 are multiplexed onto digital pins 4, 6, 8, 9, 10, and 12, so they expand function choices more than physical header count. |
| Flash Memory: 32 KB | This is the space for your sketch and libraries. It is enough for many HID devices, control interfaces, and moderate sensor logic, though it is still an AVR-class board rather than a large-memory platform. |
| SRAM: 2.5 KB | SRAM is the working memory used while the sketch runs. It is fine for ordinary input handling, small buffers, and straightforward state machines, but large display buffers or memory-heavy parsing can become tight. |
| EEPROM: 1 KB | EEPROM lets you store settings that survive power loss, such as calibration values, button mappings, or saved modes in a custom controller. |
| Clock Speed: 16 MHz | This is standard for many 5V AVR boards. It is well understood, stable for everyday Arduino code, and a good match for the ecosystem Leonardo is used in. |
| DC Current per I/O Pin: 40 mA | This is an electrical limit, not a design target for every pin at once. In practice, external drivers are still the right choice for motors, high-brightness LEDs, and heavier loads. |
| DC Current for 3.3V Pin: 50 mA | The 3.3V pin is there for light peripheral use, not for powering a stack of 3.3V devices. Small sensors are one thing; 3.3V-heavy projects need more planning. |
Arduino Leonardo shield compatibility and SPI limitations
Leonardo is a practical option when you want a full-size board with the usual Uno-style footprint. The board includes the expected ICSP header and power jack, so many shield-based builds and teaching setups transfer over cleanly.
The detail buyers miss is SPI. On Leonardo, SPI is available on the ICSP header only, not on the main digital header positions many Uno users expect. If your display, SD card, radio, or shield assumes Uno-style SPI access from the standard header arrangement, check that carefully before ordering.
That does not mean SPI devices cannot work. It means some shields and wiring guides written around Uno habits may require you to use the ICSP header instead. If your project depends on easy Uno-style SPI access on the standard header arrangement, Uno R3 Clone is the safer fit.
For custom shield-side prototyping, the Arduino UNO Proto Shield Prototype Expansion Board with Breadboard is a useful add-on. If you are cross-shopping full-size AVR boards, see also Uno R3.
Arduino Leonardo power input and first-time setup
You can power Leonardo through the micro USB port or through the power jack. For bench setup and programming, USB is the normal place to start. For standalone use, external input is supported, with 7-12V DC as the recommended range and 6-20V DC as the accepted input range.
In practice, treat 7-12V as the target. Running above 12V can create unnecessary heat in the onboard regulator, especially if the board is also powering peripherals. A 9V 1A DC Power Supply Adapter for Arduino is a sensible standalone option.
Setup is straightforward as long as the USB cable is the right kind. No cable is included, so you need a data-capable USB to Micro USB Cable - 30cm. A power-only cable will light the board but block uploading and serial communication, which is a very common first-time mistake.
In the Arduino IDE, select Arduino Leonardo as the board, choose the detected port, and upload a simple sketch such as Blink. Then open Serial Monitor if needed. On native USB boards like this one, the port can disappear and reappear during reset or upload, and that behavior is normal.
Want ATmega32U4 native USB in a smaller board and do not need a barrel jack? Micro is the closer alternative. For IDE installation, use the How to Install Arduino IDE on Windows & MAC guide.
Compatibility summary
| Area | Compatibility |
|---|---|
| USB connection | Micro USB port; a USB cable is required; no cable is included |
| USB role | Built-in USB communication; suitable for USB-based interaction with a connected computer |
| USB HID | Supports native keyboard, mouse, joystick, and similar USB-device behavior on the ATmega32U4 platform |
| Arduino IDE | Use Arduino IDE 1.8+ or 2.x with Arduino Leonardo selected as the board |
| Drivers | Uses typical native USB CDC behavior; Windows may install automatically, while Linux and macOS typically need no extra driver |
| Power via USB | Supported |
| Power via external input | Power jack supported; recommended 7-12V DC; input range 6-20V DC |
| Logic level | 5V DC |
| 3.3V output | 3.3V pin current listed as 50 mA |
| UART serial | UART1 available on pins 0 and 1 |
| SPI | Available on the ICSP header only |
| Shields | Works with Uno-style shield layouts, with extra attention needed for shields that assume Uno-style SPI pin placement |
| Breadboard prototyping | Suitable with jumper wires and breadboard accessories |
Quick start
- Connect the board to your computer with a data-capable micro USB cable.
- Install and open the Arduino IDE.
- Select Arduino Leonardo as the board and choose the detected port.
- Upload a simple test sketch such as Blink.
- Open Serial Monitor if needed and confirm the board reconnects after upload.
Blink should upload successfully, and the onboard LED behavior should confirm that the sketch is running. During upload or reset, the serial port may vanish and reappear; that is expected on Leonardo.
The first things to check when setup fails are simple: make sure the cable supports data, confirm the correct board is selected in the IDE, and try another USB port before assuming the board is faulty.
Arduino Leonardo weaknesses and quirks before you buy
Leonardo’s main advantage and its main annoyance come from the same place: native USB on the ATmega32U4. During upload or reset, the serial or COM port can disappear and reappear. That is normal behavior, but it surprises users coming from boards with a more fixed USB-serial path.
A bad sketch can also interfere with USB recognition until you recover the board with reset timing or bootloader-entry steps. The 1200 baud reset behavior that helps some upload workflows is part of that picture. This does not mean the board is defective, but it does make troubleshooting less straightforward than on boards built around the usual Uno-style workflow.
Power input is another place to stay realistic. The board accepts 6-20V DC, but regular use should stay in the 7-12V recommended range. Pushing much above 12V risks heating the regulator more than necessary, especially if you are drawing extra current for connected parts.
The other recurring gotcha is SPI access. Leonardo supports SPI, but it is on the ICSP header only. If you need the most straightforward serial debugging and upload experience, Uno R3 is the easier board to live with. If you do run into setup trouble, the Arduino IDE installation guide is a good place to confirm the basics first.
For deeper recovery cases, an external ISP programmer can be useful, though one is not included here.
Arduino Leonardo vs Uno, Pro Micro, and Micro
These boards overlap enough to be cross-shopped, but they solve different problems.
Against Uno R3, the decision comes down to USB behavior. Leonardo is the right call when the board itself needs to act like a USB keyboard, mouse, or similar device. Uno R3 is easier when you want a straightforward upload and serial workflow and fewer surprises around ports and reset behavior.
The comparison with Uno R3 Clone follows the same pattern. If your project expects easy Uno-style SPI access on the standard header arrangement, the clone follows that layout more naturally, while Leonardo keeps SPI on the ICSP header.
With Pro Micro Clone, the trade-off is physical format. Leonardo gives you a fuller board format, more exposed I/O, a power jack, and a more shield-friendly layout, while Pro Micro Clone fits better when space is tight and you can work within its smaller pin count.
Compared with Micro, Leonardo stays in the same ATmega32U4 native USB family but uses a larger board with a barrel jack and Uno-style footprint. Micro makes more sense when you want similar USB-device capability in a smaller board and do not need the full-size format.
If your project needs the smallest option in this family, Leonardo Mini ATmega32u4 is aimed at very space-limited builds, with fewer I/O and USB-power-only use. For a broader family-level comparison, the Arduino Buying Guide is a useful reference.
Arduino Leonardo FAQ and buying checklist
FAQ
Can Arduino Leonardo act as a keyboard or mouse?
Yes. The ATmega32U4 platform supports native USB HID behavior, so Leonardo is suitable for keyboard, mouse, joystick, and similar USB input-device projects.
Is Arduino Leonardo compatible with Uno shields?
Yes, in many cases. It uses a full-size, Uno-style form factor and includes the ICSP header and power jack, but shield designs that assume Uno-style SPI pin placement need extra attention.
Are the SPI pins on the normal digital header like an Uno?
No. SPI is on the ICSP header only, which is the most important compatibility detail for SPI shields and modules.
What power supply should I use with Arduino Leonardo?
USB works for programming and light bench use, and the power jack supports external input. The practical target for external power is 7-12V DC, even though the input range is 6-20V DC, because going above 12V can overheat the regulator.
Does the product include a USB cable?
No. A data-capable micro USB cable is required for setup and is sold separately.
Why does the serial/COM port disappear after upload?
This is normal on Leonardo. The native USB connection can disconnect and reconnect during reset and upload, so the port may change state briefly.
My Arduino Leonardo is not showing up on the computer. What should I check first?
Start with the USB cable. A power-only micro USB cable is a common cause, then check that Arduino Leonardo is selected in the IDE and try a different USB port.
Is Arduino Leonardo a good choice for 3.3V projects?
No, not for 3.3V-heavy work. The board operates at 5V DC, and the 3.3V pin is listed at 50 mA, so it suits light 3.3V peripheral use better than a project centered on 3.3V logic.
Accessories
Required
- USB to Micro USB Cable - 30cm for programming and USB power
- 830 points Breadboard if your project will be built on a breadboard
- Breadboard Jumper Wire Kit - 140 Pieces if your project will be built on a breadboard
Recommended
- 9V 1A DC Power Supply Adapter for Arduino for standalone power without USB
- Arduino UNO Proto Shield Prototype Expansion Board with Breadboard for shield-based prototyping or quick add-on circuit building
Optional
- Arduino UNO R3 ABS Case Box- Black for bench protection or permanent installation
- External ISP programmer for recovery from USB or bootloader issues
- Logic level shifting for 3.3V peripherals
- Additional cooling or DC-DC conversion for higher input voltage scenarios
Purchase decision summary
Ideal for
- USB HID projects such as macro pads, custom controllers, foot pedals, and keyboard or mouse emulation
- Buyers who want ATmega32U4 native USB in a full-size board with Uno-style shield compatibility
- Intermediate users comfortable with native USB reset and serial behavior
Maybe for
- General Arduino prototyping if you specifically want more analog inputs than a typical Uno and can work around SPI and header differences
- Educational use when teaching USB device concepts
- Buyers choosing between full-size Leonardo and smaller ATmega32U4 variants
Consider another option if
- You want the simplest beginner Arduino experience with the least USB and upload confusion
- Your SPI hardware or shields expect Uno-style SPI access on the main digital header
- Your build is very space-constrained
- Your project is mainly 3.3V and you want a board centered on that voltage
If you need the smallest Leonardo-family option and can accept fewer I/O plus USB-power-only use, Leonardo Mini ATmega32u4 is the more suitable variant.
Buying checklist
- ✓ You specifically need native USB HID behavior such as keyboard or mouse emulation
- ✓ You want a full-size board with a power jack and Uno-style shield footprint
- ✓ Your SPI hardware can use the ICSP header instead of assuming Uno digital-header SPI
- ✓ 20 digital I/O, 7 PWM, and 12 analog inputs are enough for your project
- ✓ Your project is planned around 5V logic
- ✓ You already have, or are adding, a data-capable micro USB cable
- ✓ If powering externally, you will stay in the 7-12V recommended range
- ✓ A smaller ATmega32U4 board such as Pro Micro, Micro, or Leonardo Mini is not a better physical fit
- ✓ An Uno would not suit you better because you do need native USB HID
If you want to compare again with other full-size and compact options, the Arduino Boards category is the right place to browse.
| MCU/SoC | ATmega32U4 |
|---|---|
| Product Family | Arduino |
| Architecture | AVR |
| CPU Cores | 1 |
| Clock Speed (MHz) | 16 MHz |
| Flash | 32 KB |
| SRAM | 2.5 KB |
| EEPROM | 1 KB |
| GPIO Pins | 20 |
| SPI interface Pins | 1 |
| I2C interface Pins | 1 |
| UART interface Pins | 1 |
| USB Ports | micro USB |
| Ethernet Support | No |
| ADC Channels | 12 |
| PWM Channels | 7 |
| Operating Voltage (V) | 5V |
| GPIO Voltage (V) | 5V |
| GPIO Current (mA) | 40 mA |
| Wireless | No |
| Form Factor | Arduino Leonardo |
| IDE Support | Arduino IDE |
| Input Voltage (V) | 7-12V DC |
| Antenna Type | No |
| Bluetooth Ver. | No |
Write Your Own Review

Please complete your information below to login.
Sign In
Create New Account