
Product added to cart

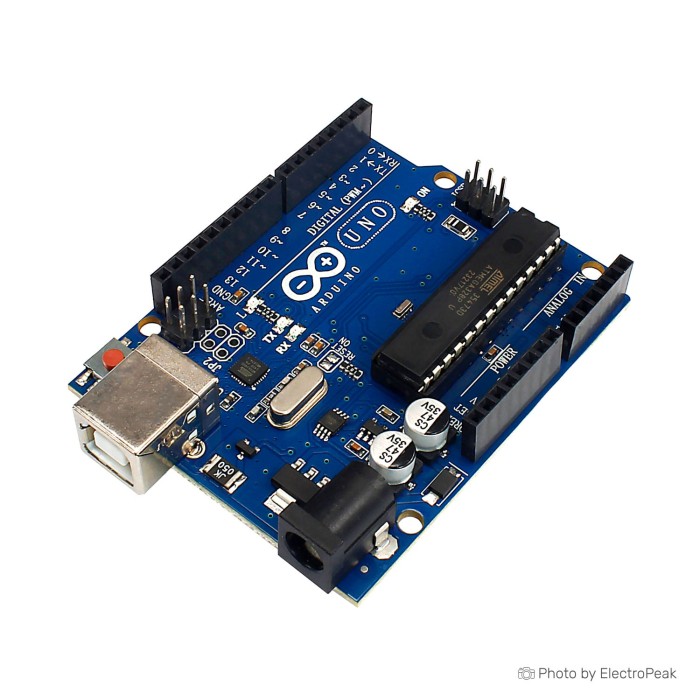
Arduino Uno R3 (Clone)
$5.9500
In stock
SKU
ARD-01-020
Volume discounts:
- +25 4 % $5.7000
- +50 6 % $5.5800
- +100 8 % $5.4600
- +300 10 % $5.3400
- +500 12 % $5.2100
Product Variations: View out of stock variants


Add an Accessory:
-
 Transparent ABS Case for Arduino UNO R3$0.2700
 - Protective Transparent Acrylic Case for Arduino UNO$0.6100


Ships in 2-3 business days, then:
Free delivery in 12-15 days by Tracked Economic Shipping on orders over $100.
Free delivery in 7-10 days by Express Shipping on orders over $300.
More shipping info

Shop with confidence Learn More

Arduino Uno R3 Clone Review
Arduino Uno R3 (Clone) is a 5 V, 16 MHz ATmega328 Uno-compatible development board for classic Arduino electronics, robotics, learning, and low-cost prototype work. It follows the familiar Uno pinout and Arduino software workflow, making it practical for LEDs, buttons, sensors, displays, and basic control projects.
It is listed at $5.95 each, with volume pricing down to $5.21 each at 500+ units. This board suits standard Uno-style work when component variation is acceptable and traceable production hardware is not required. Browse related Arduino boards when your project needs a different form factor or capability.
Specifications of Arduino Uno R3 (Clone)
- Microcontroller: ATmega328
- Operating Voltage: 5V
- Input Voltage (recommended): 7-12V (best less than 9V)
- Input Voltage (range): 6-20V
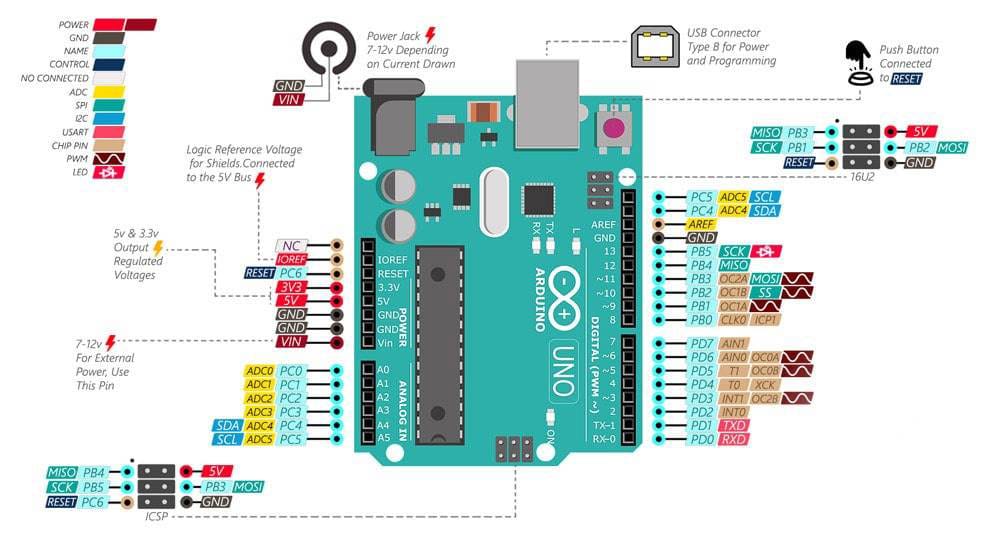
- Digital I/O Pins: 14 (6 used as PWM outputs)
- Analog Input Pins: 6
- DC Current per I/O Pin: 40 mA
- DC Current for 3.3V Pin: 50 mA
- Flash Memory: 32 KB (0.5 KB used by BootLoader)
- SRAM: 2 KB
- EEPROM: 1 KB
- Clock Speed: 16 MHz
- Dimensions: 68.6 mm x 53.4 mm
- Weight: About 55 g
- Total I/O Pins: 20
- Digital Pins: 0 to 13
- Analog Pins: A4 and A5 for I2C SDA and SCL
- SPI Pins: 10, 11, 12, and 13 for SS, MOSI, MISO, and SCK
- UART Pins: 0 and 1 for RX and TX
- GND Pins: 3
- 5V Pins: 1
- 3.3V Pins: 1
- USB-TTL: Atmega16U2 or Atmega8U2 USB-TTL
No cable is included. Add a USB A to USB B Cable for Arduino Uno/Mega for computer programming.
Arduino Uno R3 Clone Specifications and 5 V Limits
The ATmega328, 16 MHz clock, 32 KB Flash, 2 KB SRAM, and 1 KB EEPROM suit focused embedded sketches: reading sensors, driving a small display, handling buttons, generating PWM, or exchanging data over a serial bus. These resources are less suitable for large data buffers, memory-heavy libraries, or applications that need integrated networking.
| Capability | Why it matters |
|---|---|
| 14 digital I/O pins | These pins handle on/off inputs and outputs such as buttons, LEDs, switches, and digital sensors. Six can generate PWM signals for LED dimming or signal-level servo control with an appropriate external servo power arrangement. |
| 6 analog inputs | Analog inputs support variable-voltage sources such as potentiometers and analog sensors. The listed total of 20 I/O combines 14 digital pins and 6 analog inputs; it does not mean 20 interchangeable digital GPIO pins. |
| I2C, SPI, and UART | I2C uses A4/SDA and A5/SCL for compatible sensors and displays. SPI uses pins 10, 11, 12, and 13 for SS, MOSI, MISO, and SCK. UART uses pins 0 and 1 for RX and TX, so hardware connected there can interfere with serial uploads or debugging. |
| 5 V operating voltage | This is a 5 V logic board. Check every peripheral before connecting it: a 3.3 V-only device may need a level shifter unless its inputs are confirmed 5 V tolerant. |
| 68.6 mm x 53.4 mm footprint | The listed Uno-sized footprint helps when planning an enclosure or a standard Uno-style shield. Confirm the individual shield’s header arrangement and voltage requirements before purchase. |
The 40 mA figure is listed as the DC current per I/O pin, but it is not a normal GPIO load target. Design GPIO loads around 20 mA or less. Use external driver circuitry for motors, relays, solenoids, heaters, high-power LEDs, and other substantial loads.
The board is specified for 7-12 V input, best less than 9 V, with a 6-20 V input range. A regulated 5 V supply or an external supply below 9 V reduces linear-regulator heat compared with higher VIN or adapter-jack voltage. The 3.3 V pin is listed at 50 mA, but it should not be treated as a broad accessory-power budget without checking the requirements of connected hardware.
Need a compact board with 22 digital I/O pins and 8 analog inputs? The Nano with FT232RL is the better fit. For circuit development around the Uno footprint, an Arduino UNO Proto Shield Prototype Expansion Board with Breadboard provides a dedicated soldering and test surface.
Arduino Uno R3 Clone Compatibility and First Upload
This board supports the Arduino software workflow and Arduino IDE. Start with Arduino Uno as the board selection, then choose the serial port assigned to the connected board.
The listed USB-TTL interface is Atmega16U2 or Atmega8U2 USB-TTL, so no CH340 driver is needed for the listed USB interface. The board uses the Uno R3 pinout and is intended for standard Uno-style shields, though each shield should be checked for physical header fit and voltage compatibility.
First upload check
- Connect the board to a computer with a USB A-to-B data cable.
- Install Arduino IDE.
- Select Arduino Uno in the board menu.
- Select the board’s serial port.
- Open the Blink example and upload it.
- Confirm that the built-in LED turns on and off repeatedly.
If the first upload fails, check that the cable carries data rather than charging only, confirm the board and serial-port selections, and remove external wiring during the first test. A lit power LED only confirms that power is present; it does not confirm the USB or bootloader path. If a different USB interface is found on the physical board, use the CH340 driver troubleshooting guide only where applicable.
For a board explicitly identified with a CH340 programmer IC, choose the equivalent Arduino UNO (CH340 Clone). It requires separate CH340 driver installation and also does not include a programming cable.
Arduino Uno R3 Clone Limitations and Clone Variability
This is a clone board, and its layout and components may vary slightly from the original. The specified feature set remains useful for Uno-style projects, but a fixed OEM, PCB revision, USB bridge, regulator, bootloader, protection design, and component population are not established for every batch.
That variation matters when a project depends on repeatable USB behavior, regulator performance, protection circuitry, or long-term component traceability. Do not assume original Uno-quality control, identical bootloader behavior, or matching protection components. If driver behavior matters, confirm the exact USB interface fitted to the received board rather than assuming it matches every clone board.
First-use problems can include a board not being detected, a missing serial port, upload failure, an incorrect IDE board selection, a charge-only cable, or a bootloader issue. Power-related problems are also avoidable: do not treat the 6-20 V range as a preferred everyday operating range, and avoid elevated external input voltage where regulator heat is a concern.
GPIO pins are not load drivers. Motors, relays, solenoids, heaters, high-power LEDs, and similar loads need an external driver, suitable flyback protection where applicable, and a separate power arrangement. Verify voltage compatibility before connecting 3.3 V-only devices to this 5 V board.
For production, industrial, safety-sensitive, unattended, or traceability-dependent applications, select a more documented platform. For the original reference-board option for Arduino platform prototyping, the equivalent Arduino Uno R3 (Original) is the appropriate source choice. For handling, transport, or mounted builds, a Protective Transparent Acrylic Case for Arduino UNO adds physical protection.
Arduino Uno R3 Clone vs Original and Alternatives
The choice between this board and the Arduino Uno R3 (Original) is an exact-tier decision. This version is a clone listed at $5.95 each, while the original is the Arduino platform reference board. Both serve the standard Uno development role, so choose based on the source and documentation expectations for your project.
The Arduino UNO (CH340 Clone) is another equivalent Uno-style option. It is for buyers who specifically want a board identified with a CH340 programmer IC and are prepared to install its separate driver.
| Project requirement | Need-based option |
|---|---|
| Smaller, breadboard-friendly installation | Nano with CH340G is a Nano-format option with a mini USB port and CH340G USB-to-serial chip; it requires CH340 drivers. |
| Compact build with more I/O | Nano with FT232RL suits projects needing 22 digital I/O pins and 8 analog inputs in a compact footprint. |
| Uno-format project with integrated WiFi | Uno + WiFi R3 (Dual MCU) combines an ATmega328P and ESP8266, includes 32 MB memory, and requires manual jumper configuration between programming and operating modes. |
| Newer 32-bit Uno platform | UNO R4 Minima is a different approach with HID support, DAC, CAN Bus, and USB-C. AVR-specific libraries may be incompatible. |
| Integrated WiFi and Bluetooth on a newer Uno platform | UNO R4 WiFi combines a Renesas RA4M1 with an ESP32-S3 and includes a 12x8 LED matrix. Its pin current is limited to 8 mA, and wireless work involves two processors. |
| WiFi and automation on an R4 clone platform | UNO R4 WiFi (Clone) provides integrated wireless, 256 KB Flash, a 12x8 red LED matrix, and wider 24 V input voltage support. CAN bus use requires an external transceiver. |
| 32-bit Uno clone with DAC, OP AMP, and USB-C | UNO R4 Minima (Clone) is an alternative approach for those features while retaining existing shield compatibility; hardware internals require an external debugger through the SWD connector. |
Arduino Uno R3 Clone Accessories and Power Requirements
The board is supplied without a programming cable. Plan the supporting hardware before ordering so first setup does not stop at a missing cable or unsuitable power source.
Required
- USB A to USB B Cable for Arduino Uno/Mega: required for normal USB programming.
- Computer and Arduino IDE: required for the standard programming workflow.
- USB driver where applicable: no CH340 driver is needed for the listed Atmega16U2 or Atmega8U2 USB-TTL interface. A CH340 driver is relevant only if the received physical board uses a different USB interface.
Recommended
- Arduino UNO Proto Shield Prototype Expansion Board with Breadboard: useful for building and testing circuits around the Uno footprint.
- Breadboard, jumper wires, LEDs, resistors, sensors, and modules: choose these according to the intended project.
- External driver circuit, flyback protection where applicable, and a separate actuator supply: required for motors, relays, solenoids, heaters, and other substantial loads.
- Regulated 5 V supply or a conservative external supply below 9 V: reduces regulator heat when USB power is not being used.
- Level shifter: required when a connected peripheral is not 5 V tolerant.
Optional
- Protective Transparent Acrylic Case for Arduino UNO: useful for bench handling and mounted builds.
- Transparent ABS Case for Arduino UNO R3: an alternative enclosure for physical protection.
- ICSP programmer: useful only if bootloader recovery is needed.
- Uno-compatible shields: add these only after confirming their physical fit and voltage requirements.
Arduino Uno R3 Clone FAQ and Buying Checklist
Does Arduino Uno R3 (Clone) work with Arduino IDE?
Yes. It uses the Arduino software workflow and works with the same IDE. Begin with Arduino Uno selected as the board, then select the connected serial port.
Does Arduino Uno R3 (Clone) include a USB cable?
No. USB programming requires a USB A-to-B data cable, which must be supplied separately.
Does this Arduino Uno clone need a CH340 driver?
No CH340 driver is needed for the listed Atmega16U2 or Atmega8U2 USB-TTL interface. If the received board follows a different USB setup path, identify its fitted interface before choosing a driver.
Which board should I select in Arduino IDE?
Select Arduino Uno as the starting board setting, then select the serial port for the connected board.
Can I power Arduino Uno R3 (Clone) with 12 V?
The specified recommended input is 7-12 V, best less than 9 V. The listed range is 6-20 V, but regulated 5 V or an external supply below 9 V reduces regulator heat.
Can Arduino Uno R3 (Clone) drive a motor directly?
No. Use a motor driver, suitable flyback protection where applicable, and a separate motor power supply. Design GPIO loads around 20 mA or less.
Can I use 3.3 V sensors with this board?
Only after checking the sensor’s voltage tolerance. This is a 5 V logic board, so a 3.3 V-only peripheral may need a level shifter.
Will Uno shields fit?
The board is designed around the standard Arduino Uno R3 pinout. Confirm the particular shield’s header arrangement and voltage requirements before purchase.
Is this clone identical to an original Arduino Uno R3?
No. Component and layout variation is possible, so identical USB hardware, regulator design, protection circuitry, bootloader behavior, and quality-control process are not guaranteed.
Does Arduino Uno R3 (Clone) have WiFi or Bluetooth?
No integrated wireless capability is listed. For integrated WiFi, the Uno + WiFi R3 (Dual MCU) is the better fit when its manual jumper configuration suits the project.
Purchase decision
| Fit | Who it suits |
|---|---|
| Suited to | Learning classic Arduino programming, standard 5 V sensor and display projects, basic PWM and serial work, and low-cost classroom or prototype quantities. |
| Consider for | Uno shield projects after fit checks, small robotics projects with a separate motor driver and power supply, and bulk lab orders after incoming boards and batches are tested. |
| Avoid if | You need integrated WiFi, Bluetooth, CAN Bus, more memory, native 3.3 V logic, direct high-current load control, documented component sourcing, or a ready-to-use kit with cable and accessories. |
Buying checklist
- ✓ Confirm that 14 digital I/O pins, 6 PWM outputs, and 6 analog inputs are sufficient.
- ✓ Confirm that 32 KB Flash, 2 KB SRAM, and 1 KB EEPROM suit the intended sketch.
- ✓ Confirm that 5 V logic is safe for every connected module.
- ✓ Add a USB A-to-B data cable because none is included.
- ✓ Plan for Arduino IDE and the Arduino Uno board selection.
- ✓ Use regulated 5 V USB power or keep external VIN or adapter-jack input below 9 V where possible.
- ✓ Add external driver hardware and separate power for motors, relays, solenoids, and other substantial loads.
- ✓ Confirm shield fit and voltage compatibility for Uno-format accessories.
- ✓ Choose an integrated WiFi board if wireless connectivity is required.
- ✓ Choose a more traceable board if controlled components, predictable USB hardware, or production documentation are required.
For broader platform selection, see the Arduino Buying Guide: How to Choose the Right Arduino For Your Project.
| MCU/SoC | ATmega328 |
|---|---|
| Product Family | Arduino |
| Architecture | AVR |
| CPU Cores | 1 |
| Clock Speed (MHz) | 16 MHz |
| Flash | 32 KB |
| SRAM | 2 KB |
| EEPROM | 1 KB |
| GPIO Pins | 20 |
| SPI interface Pins | 1 |
| I2C interface Pins | 1 |
| UART interface Pins | 1 |
| USB Ports | 1 |
| CAN Bus Support | No |
| Ethernet Support | No |
| ADC Channels | 6 |
| DAC Channels | No |
| PWM Channels | 6 |
| Timers Count | 3 |
| Operating Voltage (V) | 5V |
| GPIO Voltage (V) | 5V |
| GPIO Current (mA) | 40 mA |
| Wireless | No |
| Form Factor | 68.6mm * 53.4mm |
| IDE Support | Arduino IDE |
| Input Voltage (V) | 7-12V |
| Antenna Type | No |
| Bluetooth Ver. | No |
Write Your Own Review

Please complete your information below to login.
Sign In
Create New Account