Product added to cart

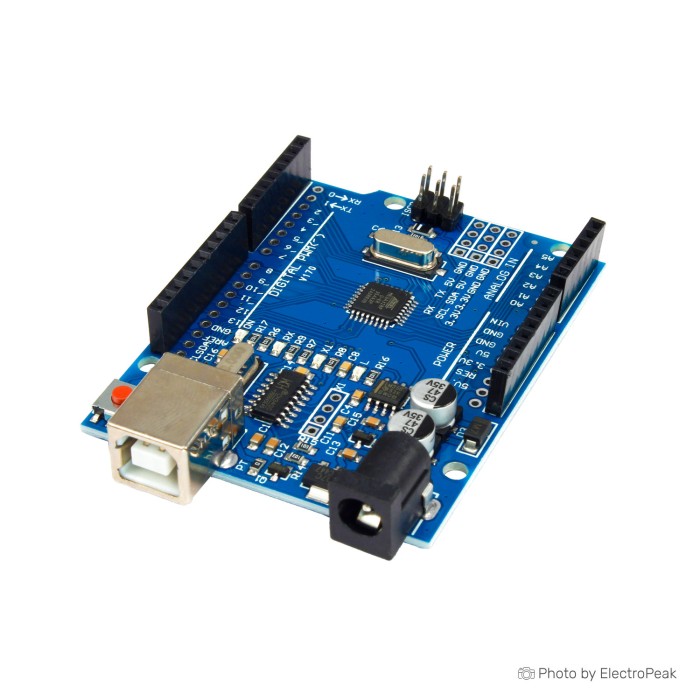


No, a USB cable is not included. This board uses a USB A to USB B cable for programming and power over USB, so it makes sense to add one with the board.

Creating an account has many benefits: check out faster, keep more than one address, track orders and more.



We offer free shipping on all orders over $100and under 2kg.
Please note that free shipping is only available for orders under 2kg.
DHL is a renowned shipping courier known for its global reach and reliable delivery services. With a vast network and advanced logistics capabilities, DHL offers fast and secure shipping solutions for international shipments.
For the majority of countries, DHL provides an estimated delivery time of 5 to 7 days.
In certain instances, DHL may not be available for shipments to EU countries. In such cases, we may opt to ship your order using FedEx instead of DHL. Rest assured, FedEx offers a comparable estimated time of arrival (ETA) and your package should typically arrive within 5-7 days.
The base shipping cost for DHL is $35. You can see the final shipping amount on the checkout page. If your order is over $300and less than 2kg, you will qualify for free shipping through DHL Express.
Economy Shipping is a cost-effective international delivery option using a network of trusted logistics partners. Depending on the destination country, the carrier may vary to ensure the most efficient and reliable delivery.
Estimated delivery time is typically 10–15 business days in most cases; But may take up to 20 days. Orders over $100 and under 2kg qualify for free Economy Shipping.
All shipments include tracking. You will receive a tracking number along with a tracking link after dispatch. Most shipments can be tracked via 17TRACK.
Our shipping term is FOB Shenzhen, which does not cover any customs fees. It is important to note that you may be responsible for paying any charges imposed by your country's government, such as duties, taxes, and additional fees imposed by the courier company.
 Arduino Leonardo Previous
This board is a clone version of Arduino UNO in the standard Uno form factor, built around an ATmega328P or ATmega328PB microcontroller with a CH340 USB interface. It works with Arduino IDE and fits the familiar Uno-style workflow for basic sensors, modules, LEDs, and classroom exercises.
The trade-off is clear: the CH340 driver must be installed separately, and no USB cable is included. That makes this board a practical low-cost pick for learning and simple prototypes, but not the first choice if you want the least setup friction or tighter board-to-board consistency.
If your goal is the classic Arduino layout at minimum cost, this board fits that role. If you want the reference-board route in the same form factor, Arduino Uno R3 Original is the direct equivalent. You can also browse more Arduino Boards or check the Arduino Buying Guide: How to Choose the Right Arduino For Your Project before you decide.
Before first use, add a USB A to USB B Cable for Arduino Uno/Mega if you do not already have one.
This board is compatible with Arduino IDE and follows the normal Uno-style development flow. In practice, that means writing or loading sketches in Arduino IDE, connecting over USB, and using the same general examples, libraries, and pin layout most Uno users expect.
The main compatibility checkpoint is the USB interface. This version uses CH340 instead of Atmega16U2 for USB-to-serial communication, so the CH340 driver must be installed separately. No USB cable is included, and the required connection is a USB A to USB B cable.
| Area | What to expect |
|---|---|
| Arduino software | Compatible with Arduino IDE |
| USB interface | CH340 programmer IC / CH340 USB interface |
| Driver requirement | CH340 driver must be installed separately |
| USB cable | USB A to USB B cable required; not included |
| Board selection | Uno programming in Arduino IDE is the normal starting point |
| Computer OS | Windows often needs CH340 driver installation; macOS and Linux commonly have broader CH340 support |
| Hardware ecosystem | Uno form factor and generally suited to standard Uno shields, sensors, and modules |
| Logic / operating voltage | 5 Volts |
| Power input | Recommended Input Voltage: 6-10 Volts; Maximum Input Voltage: 6-12 Volts |
| I/O | 14 digital I/O pins, 6 PWM outputs, 6 analog inputs |
| Typical attached hardware | Suitable for projects involving sensors and modules |
For many buyers, shield compatibility is the main reason to choose an Uno-shaped board instead of something smaller. This board follows the Uno layout, so it is the comfortable option when your project, enclosure, or lesson plan assumes standard Uno headers rather than a compact board format.
Computer setup is where expectations need to stay realistic. Windows systems often need the CH340 driver installed first, and Windows 11 can take more manual handling than some buyers expect. If built-in USB communication matters more than matching the Uno USB-serial approach, Arduino Leonardo with ATmega32U4 is the better fit.
If you are starting from scratch, keep these two references handy: How to Install CH340 Driver on Windows and How to Install Arduino IDE on Windows & MAC.
The raw specifications place this board firmly in the classic Uno class. That is enough for a large number of beginner and intermediate Arduino projects, but the usual Uno limits still apply: modest memory, limited pin count, and the need to plan power distribution carefully.
| Specification | What it means in practice |
|---|---|
| Operating Voltage: 5 Volts | This is a 5V logic board, which matches many classic Arduino sensors, relay modules, and shields. It is convenient for common 5V modules, but it is not the right electrical match for every modern 3.3V-only device. |
| Recommended Input Voltage: 6-10 Volts | This is the listed external input range to aim for when not powering by USB. At the low end, 6V leaves less margin under load, so conservative power planning matters more once you add peripherals. |
| Maximum Input Voltage: 6-12 Volts | This should be read as a practical board-level limit rather than a target to use casually. Higher input voltage increases regulator heat, especially if the board also has to feed attached hardware. |
| 14 digital I/O pins, 6 PWM outputs, 6 analog inputs | This is enough for LEDs, buttons, small sensor sets, relays, displays, and many student projects. If your design is already pin-heavy, you will outgrow this board faster than a Mega-based design. |
| Flash Memory: 32 Kilobytes; SRAM: 2 Kilobytes; EEPROM: 1 Kilobyte | This is the familiar small-AVR memory class. It handles straightforward sketches well, but larger libraries, more complex displays, or communication-heavy code can run into SRAM limits before flash becomes the main issue. |
| Clock Speed: 16 MHz | Performance matches the standard Uno expectation. Existing Uno examples and timing assumptions make sense here, but this is still an 8-bit 16 MHz board, not a faster 32-bit platform. |
| DC 3.3V Supply Current: 50 mA | The 3.3V output is suitable for light-duty support, not for hungry radios or larger peripherals. If a module needs more current, plan a separate regulated supply. |
| DC Current per Input/Output Pin: 40 mA | This is the listed figure, but it should not be treated as a normal continuous-use target for routine design. For reliable projects, use lower per-pin current and drive heavier loads through proper transistors, drivers, or external power stages. |
| Microcontroller: ATmega328P, ATmega328PB | Current stock may vary between these two listed parts. For most basic Arduino work the experience is similar, but buyers who need exact board-to-board matching should note that this is a stock-variation point. |
That is why the board works well for LEDs, sensor reading, simple relay control, and breadboard experiments, but starts to feel tight once code size, RAM use, or peripheral count grows. If you already know your project needs substantially more pins or larger sketch headroom, Arduino Mega 2560 R3 Clone is the cleaner step up.
For semi-permanent prototyping on the Uno headers, an Arduino UNO Proto Shield Prototype Expansion Board with Breadboard makes this form factor more useful on the bench.
First-time setup is simple once you know the order, but it is not plug-and-forget. You need the CH340 driver, Arduino IDE, and a USB A to USB B cable before you can do the first upload.
The expected result is simple: the sketch uploads successfully and the onboard LED blinks. That one test confirms the USB link, driver, IDE board selection, and basic bootloader path at the same time.
Windows 11 deserves a specific note because CH340 driver conflicts come up often enough to matter before purchase. If your priority is the smoothest possible first connection, this board is not the easiest path. If you want the same general Arduino ecosystem with different USB behavior, Arduino Leonardo with ATmega32U4 is worth considering.
If upload fails even though the board powers up, one known clone-family troubleshooting step is to retry with the old-bootloader workaround in Arduino IDE. That is not a guaranteed property of every unit, but it is a common enough family behavior to know before you return the board.
For the practical basics, keep these references nearby: How to Install CH340 Driver on Windows and How to Install Arduino IDE on Windows & MAC.
The low price is the main reason many buyers choose a CH340-based Uno clone, but the savings come with a few compromises worth knowing upfront. Most are manageable. They are just not invisible.
The power point matters more than many beginners expect. A small sensor is one thing; relays, motors, strips of LEDs, or several modules pulling current at once are different. If you plan to run the board from external DC, a 9V 1A DC Power Supply Adapter for Arduino is a practical option for the board itself, but heavier peripherals still deserve their own supply.
Another common mistake is buying this board when the real requirement is something else entirely: built-in USB HID, a lot more I/O, more memory, wireless, or a more predictable reference-board experience. If consistency matters more than minimum cost, Arduino Uno R3 Original is the safer reference-board path.
If you are unsure which trade-offs are acceptable, the Arduino Buying Guide: How to Choose the Right Arduino For Your Project helps narrow that down before ordering.
This board makes sense when you want the classic Uno layout and Arduino IDE workflow at the lowest board cost. This version is placed around $2.95–$3.68, which helps explain why it is a common classroom and hobby pick.
| Board | When it makes more sense | Main trade-off | Price info |
|---|---|---|---|
| Arduino Uno R3 Original | If you want the reference-board route rather than a clone | Price not supplied | Not supplied |
| Arduino Nano Clone | If you need a compact, breadboard-friendly ATmega328P board | Not compatible with most standard Arduino shields due to pin arrangement | Not supplied |
| Arduino Mega 2560 R3 Clone | If your project needs many more pins or much larger code space | Larger physical footprint than the standard Uno form factor | Not supplied |
| Arduino Leonardo with ATmega32U4 | If you need built-in USB communication without a secondary processor | Does not include a USB cable | Not supplied |
| Arduino UNO R4 Minima | If you want higher-performance Uno-form-factor development | Libraries depending on AVR-specific instructions will not work | Not supplied |
The real decision point is the bottleneck in your project. A Nano solves space. A Mega solves pin count and memory. A Leonardo changes the USB behavior. An UNO R4 Minima moves you to a faster 32-bit board while keeping the Uno layout. This board remains the straightforward answer when none of those changes are necessary.
For a wider look across the family, the Arduino Boards category and the Arduino Buying Guide: How to Choose the Right Arduino For Your Project are the best next places to check.
This board is inexpensive, but it is rarely the only item you need. The first missing piece is the programming cable, followed by the usual prototyping basics depending on how you plan to use the board.
No, a USB cable is not included. This board uses a USB A to USB B cable for programming and power over USB, so it makes sense to add one with the board.
Yes, the CH340 driver must be installed separately. This board uses a CH340-based USB interface rather than an Atmega16U2 USB-to-serial interface.
Yes, it is compatible with Arduino IDE. That keeps the software side familiar for standard Uno-style sketches and examples.
No, this is a clone version of Arduino UNO. It uses CH340 instead of Atmega16U2 for USB-to-serial communication.
It is suitable for projects involving sensors and modules. In practice, that includes LED exercises, basic digital I/O, common beginner sensors, simple relay control, classroom work, and breadboard prototyping.
It has 14 digital I/O pins, with 6 used for PWM output, plus 6 analog input pins. That is the standard classic Uno pin class for small to medium projects.
The listed values are Operating Voltage: 5 Volts, Recommended Input Voltage: 6-10 Volts, and Maximum Input Voltage: 6-12 Volts. In real use, higher input voltage and heavier 5V loads increase heat, so conservative power planning matters.
A clone-family bootloader mismatch is one known reason. If a normal upload attempt fails, retrying with the old-bootloader workaround is a common troubleshooting step on some boards in this family.
Choose this board for low-cost classic Uno projects. If your real need is compact size, use Arduino Nano Clone; for more I/O and memory, use Arduino Mega 2560 R3 Clone; for built-in USB communication, use Arduino Leonardo with ATmega32U4; for higher-performance Uno-form-factor work, use Arduino UNO R4 Minima.
| MCU/SoC | ATmega328P |
|---|---|
| Product Family | Arduino |
| Architecture | AVR |
| CPU Cores | 1 |
| Clock Speed (MHz) | 16 MHz |
| Flash | 32KB |
| SRAM | 2KB |
| EEPROM | 1KB |
| GPIO Pins | 14 |
| SPI interface Pins | 1 |
| I2C interface Pins | 1 |
| UART interface Pins | 1 |
| USB Ports | 1 |
| Ethernet Support | No |
| ADC Channels | 6 |
| DAC Channels | 0 |
| PWM Channels | 6 |
| Timers Count | 3 |
| Operating Voltage (V) | 5V |
| GPIO Voltage (V) | 5V |
| GPIO Current (mA) | 40 mA |
| Wireless | No |
| Form Factor | UNO |
| IDE Support | Arduino IDE |
| Input Voltage (V) | 6-12V |
| Antenna Type | No |
| Bluetooth Ver. | No |

Please complete your information below to login.
Sign In
Create New Account