
Contents

Arduino Buying Guide: How to Choose the Right Arduino For Your Project

Choosing an Arduino is easier when you start with your project constraints instead of the board catalog. For most first builds, the right answer is still a simple board like the Uno or Nano. If you need more I/O, a smaller footprint, native USB, or built-in wireless, other Arduino families make more sense. This Arduino Buying Guide focuses on those decisions first, then covers the board details that affect wiring, power, and compatibility.

Key Takeaways

  • Start with the default Arduino recommendations for beginners and common project types.
  • Choose a board based on pins, size, USB/HID, wireless, and battery requirements.
  • Check voltage and logic-level compatibility before mixing 5V and 3.3V boards.
  • Know the difference between official boards, compatibles, and counterfeit boards.
  • For IoT, decide whether Arduino or ESP8266/ESP32 is the better fit for the job.

Arduino Board Comparison and Quick Recommendations

If you want the short version, buy an Uno if you are new and want the least friction, a Nano if space matters, a Mega if pin count matters, a Leonardo or Pro Micro if you need keyboard/mouse USB behavior, and a wireless board if connectivity is a hard requirement from day one.

Which Arduino to buy?

Board MCU Clock Speed Logic Voltage Digital I/O Analog Inputs Connectivity USB Type Form Factor Best For
Uno ATMEGA328 16 MHz 5V 14 6 UART, SPI, I2C USB Type B Full-size, shield-friendly First projects, shields, general use
Nano ATMEGA328 16 MHz 5V 14 8 UART, SPI, I2C Mini USB (older) / Micro USB / USB-C (newer) Small, breadboard-friendly Compact builds
Mega ATMEGA2560 16 MHz 5V 54 16 4 serial ports USB Type B Large, shield-friendly Many sensors, many actuators
Leonardo ATMEGA32U4 16 MHz 5V 20 12 Native USB Micro USB Shield-compatible pin layout Keyboard/mouse/HID projects
Micro ATMEGA32U4 16 MHz 5V 20 12 Native USB Micro USB Small, breadboard-friendly HID plus compact size
Due ATSAM3X8E 84 MHz 3.3V 54 12 4 serial, 2 USB 2 micro USB ports Large, MEGA-like Faster processing, DAC, many I/O
Zero ATSAMD21G18 48 MHz 3.3V 14 6 USB 2 USB ports Compact dev board 32-bit projects, lower power
Uno R4 Minima / R4 WiFi Renesas RA4M1 (Arm Cortex-M4) 48 MHz 5V 14 6 Wi-Fi + BLE on WiFi model, CAN bus USB-C Uno-style, shield-compatible Users who want a current Uno-family board
MKR series SAMD21 (Cortex-M0+) or RP2040 48 MHz 3.3V Varies by model (typically 8–22) Varies by model (typically 7–8) WiFi, Bluetooth, or LoRa depending on model Micro USB Small, low-power oriented IoT and battery-powered builds
Nano 33 family Arm Cortex-M (e.g., nRF52840, STM32) 64 MHz (BLE) / 120 MHz (IoT) 3.3V 14 (IoT) / 12 (BLE) 8 (IoT) / 6 (BLE) BLE or Wi-Fi/Bluetooth depending on model Micro USB / USB-C Nano-sized Compact modern 3.3V projects
Nano ESP32 ESP32-C3 (RISC-V 32-bit) 160 MHz 3.3V 22 7 Wi-Fi, Bluetooth 5 (LE) USB-C Nano-sized Arduino-style ESP32 development

What is Arduino?

Arduino is an open-source electronics platform built around microcontroller boards and a software environment used to program them. In practice, that means you get hardware, an IDE, and a large library ecosystem that makes small embedded projects much faster to build.

By platform, we mean both hardware and software. The boards provide the processor, power circuitry, and I/O headers. On the software side, the Arduino IDE lets you write code, compile it, and upload it to the board over USB.

The original goal was to make microcontrollers cheaper and easier to use for students and non-specialists. That is still the main reason Arduino remains relevant: it lowers the setup cost, both financially and technically
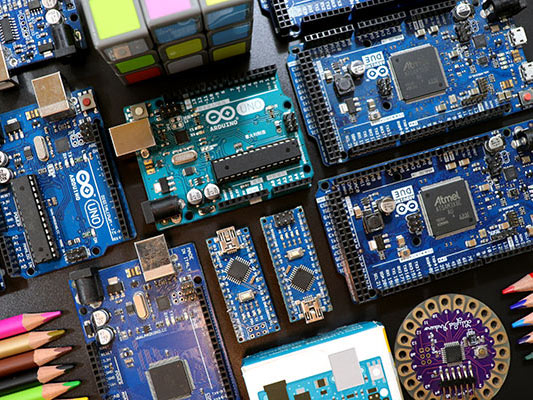
Arduino Selection Guide: Choose the Right Arduino Board for Your Projects

Start with the practical question: what is the main constraint in your project? Most board choices get much easier once you know whether the bottleneck is pins, size, USB behavior, wireless connectivity, or power source.

Info

Some older boards mentioned in this guide are legacy or discontinued. If you are buying today, prioritize currently sold families first and use older boards mainly as reference points.

Best Arduino for Beginners

For a first board, the Uno is still the safest pick. It is the most common reference board in tutorials, works with many shields, and has a pin layout that is easy to follow.

The original Arduino Uno R3 board is the best fit if you want maximum tutorial compatibility and standard shield support. It gives you 14 digital I/O pins, 6 analog inputs, UART shared with USB, plus SPI and I2C support.

If you want the same general entry point at lower cost, a compatible Arduino Uno R3 clone board is the closest alternative. Clones often use different USB-to-serial chips, so driver behavior may differ.

The Arduino Uno R4 is also part of the current beginner discussion. While many beginners still find the classic R3 path simpler when following older tutorials, the R4 represents the newer, more powerful direction for the Uno family.


Need More Pins

If your project needs many sensors, relays, motors, or serial devices, go straight to Mega. The MEGA board uses the ATMEGA2560 and gives you 54 digital input/output pins, 15 PWM outputs, 16 analog inputs, and 4 hardware serial ports.

That is why Mega works well for larger control panels, robotics, CNC-style control, or sensor-heavy automation. If your wiring diagram already looks crowded on paper, you will likely save time by starting with a Mega instead of stretching an Uno.

The Arduino Mega 2560 R3 board is the direct official-style option for that use case. A lower-cost Mega 2560 R3 clone board makes sense when you need the same general footprint and pin count for a budget build.

Need Smaller Size

Nano is the usual answer when the Uno is physically too large. It keeps the ATMEGA328-class workflow but in a much smaller, breadboard-friendly format.

The main tradeoff is convenience. You gain compact size and easier breadboard use, but you lose standard shield compatibility and usually the barrel jack. The Nano provides 14 digital I/O pins and 8 analog inputs.

A compact Arduino Nano compatible board is a practical choice for space-limited prototypes. If you prefer a newer connector, a Nano with USB Type-C can simplify cable availability compared to older mini-USB Nano variants.

If you need something even smaller and simpler, options like the Pro Mini, Mini, Gemma, and LilyPad are available, but these are more specialized and, in several cases, legacy-focused.

Need Native USB/HID

If the board must act like a USB keyboard, mouse, or joystick, use an ATMEGA32U4-based board. That family includes Leonardo and Micro.

The reason is simple: these boards include native USB support in the main MCU. Uno and Mega-class AVR boards usually rely on a separate USB-to-serial path, so they do not serve the same HID use case out of the box.

The Arduino Leonardo board is the straightforward choice when you want Uno-like shield compatibility with native USB behavior. For smaller builds, the Pro Micro compatible board targets the same ATMEGA32U4 use case in a more compact form factor.

Need IoT/Wireless

If wireless is a core requirement, choose that first and everything else second. Older official options include the UNO WiFi, Ethernet, and Yún, while current families include the MKR, Nano 33 IoT, and Nano ESP32.

For a current official Arduino-style wireless option, the Arduino Nano ESP32 board is the clearest fit from the provided product list. If you specifically want a current Uno-family wireless board, the Arduino UNO R4 WIFI is a related option, though you should verify the exact wireless module specifications on the official product page before purchasing.

Use official Arduino wireless families when you want Arduino ecosystem continuity first. Use ESP8266 or ESP32-class boards when wireless cost, integration, and price/performance matter more than strict Arduino branding.

Need Low Power/Battery

Battery-powered projects change the board choice quickly. Common 5V boards such as UNO, MEGA, NANO, MINI, LEONARDO, and YUN require input voltages above 5V, so they are not suited to direct single-cell lithium operation in the simple way readers often expect.

For single-cell lithium use, boards like the GEMMA, LILYPAD, PRO MINI, and FIO are common choices, sometimes featuring JST connectors to simplify battery hookup. Here, the board family matters less than the operating voltage and onboard power design.

MKR and other 3.3V-oriented modern Arduino families are also highly relevant to low-power work, though you should check the specific model’s datasheet for exact current consumption and battery management figures.

Beginner Buying Checklist

Before you buy, check these five things:

Item to Check Why It Matters What to Confirm
USB cable type Many Arduino boards use different connectors Uno/Mega: USB Type B; Leonardo/Micro: Micro USB; Nano: Mini USB (older), Micro USB, or USB-C (newer)
Header status Some boards ship with headers installed, others do not Breadboard use is easier with male headers; shields need the standard layout
Shield compatibility Not every small board fits Uno shields Uno, Leonardo, Mega, and Due are the main shield-friendly boards
Logic voltage 5V and 3.3V boards are not interchangeable at the pin level Check the board before wiring sensors or modules
Starter kit vs bare board A board alone is not very useful for learning If you are new, get at least a breadboard, jumper wires, resistors, and LEDs

Get to Know Arduino Components

Board selection gets easier once you understand which parts affect your project directly. You do not need every hardware detail, but you should know what controls programming, timing, power input, and I/O compatibility.

Processor

The processor determines the performance class, memory size, peripheral count, and often the board family itself.

Classic Arduino boards are grouped around a few main MCUs:

  • ATMEGA328 for UNO, MINI, NANO, PRO, FIO, ETHERNET, and LILYPAD, with 1-kilobyte EEPROM, 2-kilobyte SRAM, 32-kilobyte flash, and 1 serial port.
  • ATMEGA168 as an older, weaker variant used in some early LILYPAD, NANO, and PRO versions.
  • ATMEGA32U4 for LEONARDO, MICRO, LILYPAD USB, and YUN, mainly differentiated by native USB support and slightly more SRAM than ATMEGA328.
  • ATMEGA2560 for MEGA, with 4-kilobyte EEPROM, 8-kilobyte SRAM, 256-kilobyte flash, and 4 serial ports.
  • ATtiny85 for GEMMA-class simple projects.
  • ATSAMD21 for ZERO, a 32-bit 48 MHz board with 32-kilobyte SRAM and 256-kilobyte flash.
  • ATSAM3X8E for DUE, a 32-bit 84 MHz board with 96-kilobyte SRAM and 512-kilobyte flash.
  • Intel Curie for Arduino 101.

Arduino is not limited to Atmel-only parts across all board generations. The platform includes Intel Curie and Linux-based Yún architectures, and newer Arm and Nordic-based families are also available.

Programmer

Many Arduino boards use a USB-to-serial stage so the computer can talk to the main MCU. Official boards typically use ATMEGA16U2 or FTDI, while lower-cost compatibles sometimes use CH340.

This affects setup more than functionality. A different bridge chip can mean different driver behavior, especially on older operating systems. It usually does not change how your sketch runs once uploaded.

Boards based on ATMEGA32U4 and similar native-USB MCUs do not need this extra converter in the same way because the main processor already speaks USB.

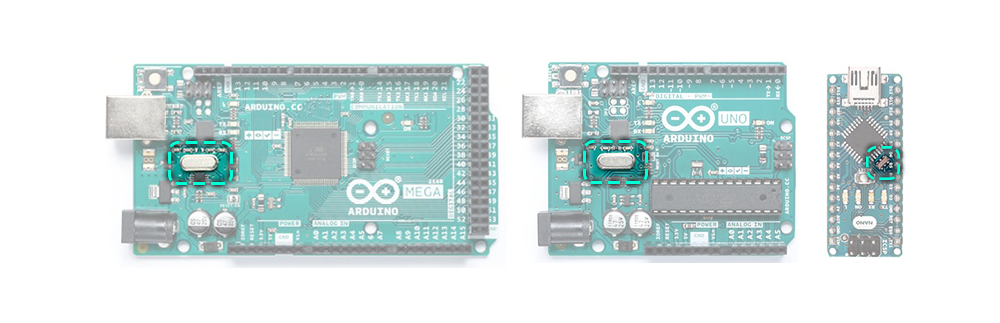
Crystal Oscillator

The oscillator sets the processor clock. Common frequencies include 8 MHz, 16 MHz, and, on some boards, up to 84 MHz.

That matters for timing assumptions, available performance, and sometimes power consumption. In the original AVR families, 5V boards commonly use 16 MHz and 3.3V versions may use 8 MHz.
Power Supply

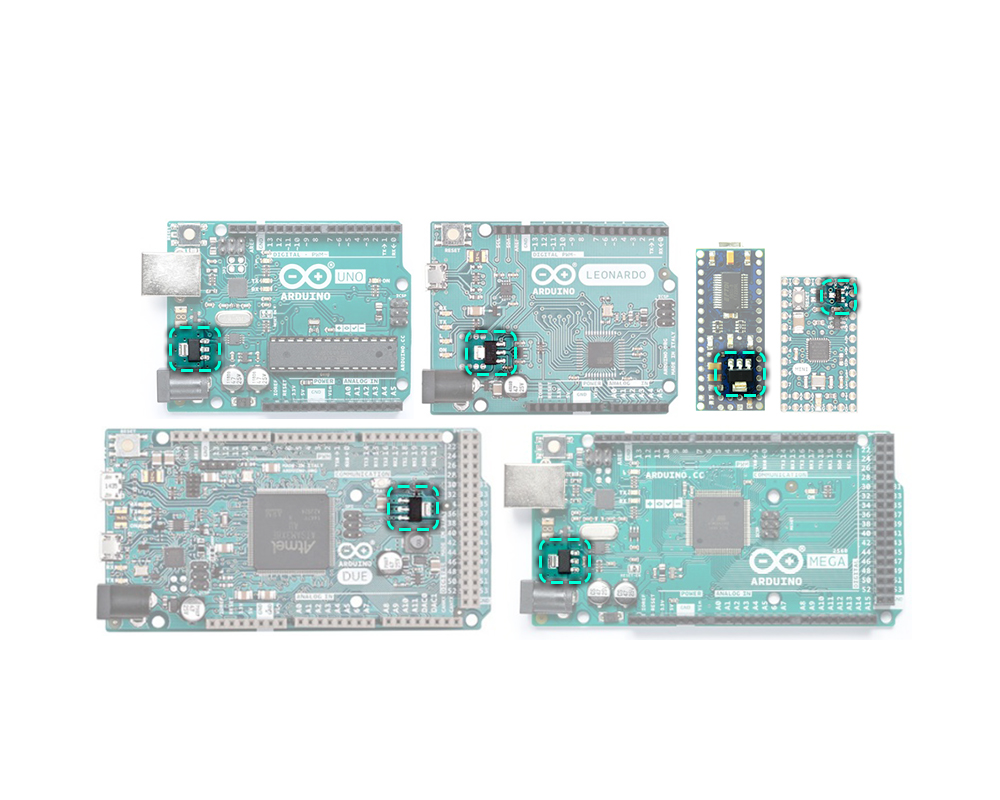
The board regulator bridges the gap between input voltage and MCU operating voltage. That distinction matters because the voltage you feed into the board is not always the same as the voltage the MCU pins use.

It is important to separate input voltage from operating voltage. The MCU and I/O pins work at the operating voltage, while VIN or the power jack typically accept a higher input that the regulator reduces.
Warning

Do not assume all Arduino boards use the same logic voltage. Feeding 5V signals into 3.3V boards such as Due, MKR, Nano 33, and similar 3.3V families can damage the board. Check the board’s I/O voltage before connecting sensors, shields, or another microcontroller.

Voltage Levels and Logic Compatibility

This is one of the easiest ways to damage a board.

Classic AVR boards, such as UNO, MEGA, NANO, LEONARDO, and many ATMEGA328 or ATMEGA32U4 designs, are presented as 5V-class boards. Other 3.3V boards and families include ZERO, MKR, and Nano 33 as clearly 3.3V families.

Practical rule:

Board/Family Logic Voltage
Uno, Mega, Nano, Leonardo, Micro, many classic AVR boards 5V
Zero 3.3V
Due 3.3V
MKR series 3.3V
Nano 33 family 3.3V
Nano ESP32 3.3V
Uno R4 family 5V

If you move from an Uno-based prototype to a Due, MKR, Nano 33, or similar 3.3V board, review every connected module. A sensor that worked fine at 5V signaling may need level shifting or a 3.3V-compatible version on the new board.

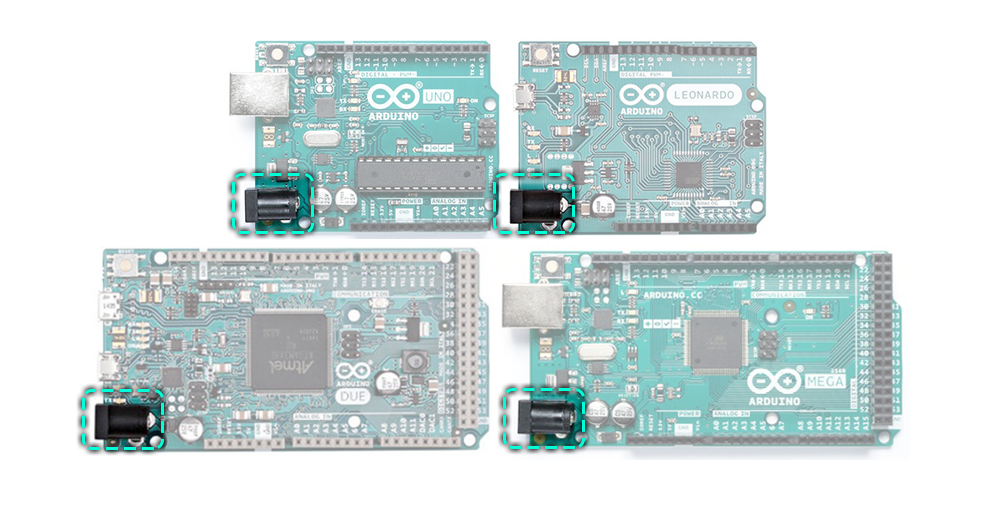
Jack Adapter

Many Arduino boards can be powered through VIN or a barrel jack, and that the jack usually receives 7 to 12 volts as input.

That is useful for boards such as Uno and Mega that include the jack. Smaller boards often omit it to save space.

For some 3.3V battery-oriented boards, a JST connector may replace the barrel jack.
USB Port

USB is the normal path for programming many Arduino boards, and in everyday prototyping it is also a common power source. The blanket statement against USB power needs qualification, so treat the exact power-path behavior as board-specific.

Boards use several USB connector types: Uno and Mega use USB Type B; Leonardo, Due, Micro, and LilyPad variants use micro USB; older Nano and Fio boards use mini USB (while newer models use Micro-USB or USB-C); and Yún uses USB Type A.

USB connector type

Warning

Power input is board-specific. USB is a normal programming path and often powers the board in development, but VIN, barrel jack, JST input, and USB do not always follow the same regulation path. Verify the exact board’s power method before connecting external supplies or batteries to avoid overvoltage or unstable power.

Input and Output Pins

Board I/O layout affects how easy the board is to integrate.

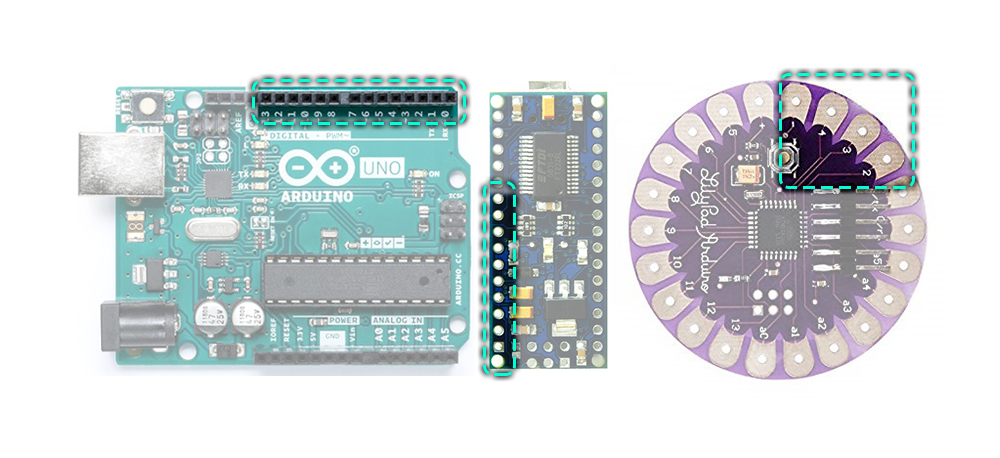
Uno, Mega, Leonardo, Yún, and Due use female headers that make shield stacking easy. Nano, Micro, Mini, and Fio commonly use male headers that fit breadboards better. LilyPad boards use pads instead of headers to reduce thickness.

That mechanical difference matters as much as pin count. A board with fewer pins but a better physical fit can still be the right choice if it simplifies the whole build.
Other Arduino Components

Most Arduino boards also include status LEDs and a reset button. Most boards include one power LED and two serial-port LEDs as common elements.

These do not usually affect board choice, but they help with debugging. If the power LED is off, you likely have a supply problem. If the serial LEDs blink during upload, the communication path is alive.

Arduino Boards Comparison by Processor and Features

This table is meant to compress the buying decision into board families rather than one-off products.


Board FamilyTypical MCULogic VoltageNative USBWirelessShield/Breadboard FitBest Use CaseCurrent Status
Uno / classic AVR full-sizeATMEGA3285VNoNoShield-friendlyLearning, simple control, shieldsCurrent and widely used
Nano / small AVRATMEGA3285VNoNoBreadboard-friendlyCompact prototypesCurrent family, connector varies by model (Mini USB, Micro USB, or USB-C)
MegaATMEGA25605VNoNoShield-friendly, largeHigh I/O countCurrent
Leonardo / Micro / Pro Micro classATMEGA32U45VYesNoLeonardo: shield-friendly, Micro/Pro Micro: compactHID and USB-device projectsCurrent/compatible ecosystem
DueATSAM3X8E3.3VYesNoLarge, MEGA-likeFaster 32-bit work with many pinsLegacy but still relevant for some uses
ZeroATSAMD213.3VYesNoStandard dev-board use32-bit general use, lower powerLegacy/current-family reference
MKR series32-bit microcontrollers (e.g., SAMD21)3.3VYesYes, model-dependent (Wi-Fi, LoRa, or NB-IoT)Small, low-power orientedIoT and battery-focused projectsCurrent
Nano 33 familyArm Cortex-M (e.g., nRF52840, STM32)3.3VYesBLE or Wi-Fi/Bluetooth depending on modelNano-sizedCompact modern connected buildsCurrent
Nano ESP32ESP32-C3 (RISC-V 32-bit)3.3VYesYes (Wi-Fi + Bluetooth 5 LE)Nano-sizedArduino-style ESP32 projectsCurrent
Yún / Ethernet / older IoT boardsATMEGA32U4, AR9331, or ATMEGA328 variants5VMixed (Yes on Yún/Leonardo-based)Mixed (Wi-Fi or Wired Ethernet)Standard board formatsOlder Arduino IoT approachesLegacy-focused

Arduino Board Sizes

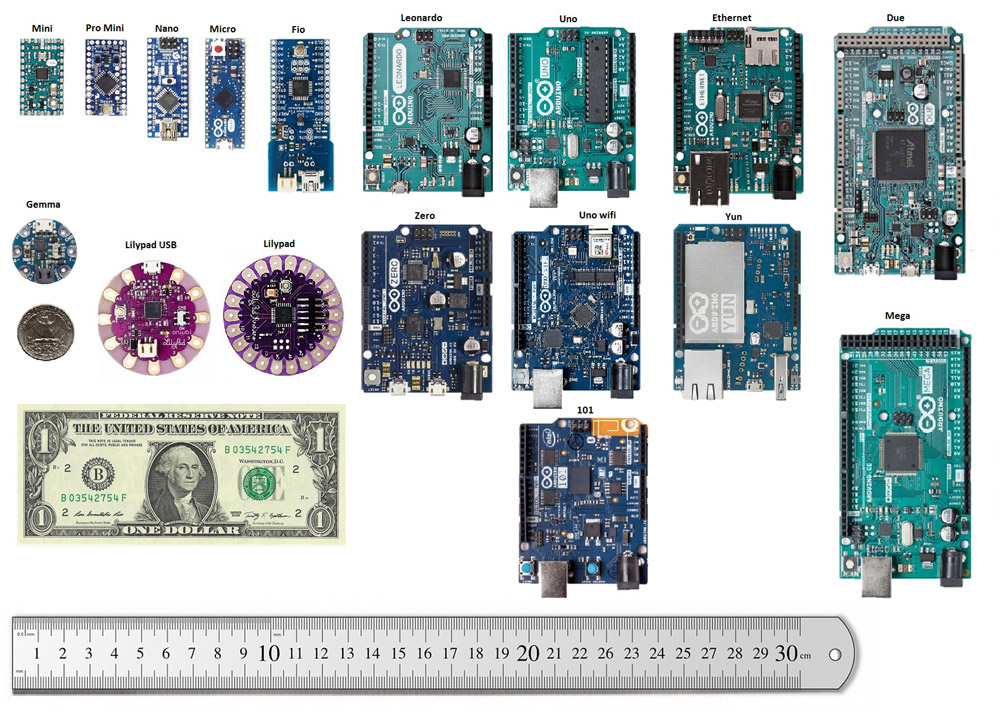
Physical size matters more than many beginners expect. It affects enclosure fit, breadboard use, cable strain, and whether you can reuse a shield.

Board Approx. Size/Form Factor Breadboard Friendly Headers Pre-Soldered Shield Compatible Best When Space Is Limited
Uno Full-size No Usually yes Yes No
Nano Very small Yes Often yes No Yes
Micro Small and narrow Yes Often yes No Yes
Pro Mini Small Yes Often no No Yes
Mega Large No Usually yes Yes No
Due Large, MEGA-like No Usually yes Yes No
Leonardo Uno-like No Usually yes Yes No
LilyPad Flat wearable format No No traditional headers No Yes, for wearables

Note that published PCB dimensions do not always include barrel jacks, USB connectors, and headers. That matters when you are checking enclosure clearance.
Arduino dimensions

side-by-side size comparison

Final Decision: Which Arduino to Choose?

If you want a decision in one minute, use this:

If your main need is… Start with… Why
First Arduino, broad tutorial support Uno Most common examples, shield support, simple setup
Small size, breadboard work Nano Compact and easy to embed
High pin count Mega 54 digital I/O, 16 analog inputs, 4 serial ports
Keyboard/mouse over USB Leonardo or Micro Native USB support
Official Arduino-style wireless Nano ESP32, MKR, or Uno R4 WiFi Modern connected options
Lowest-friction 5V classic ecosystem Uno R3 Most legacy examples target it
Battery-friendly or low-power direction 3.3V-focused families or specific battery-oriented boards Better fit for single-cell and low-power designs

The practical default is still simple: choose Uno unless you already know the project needs something else.

decision tree graphic mapping

Off-Brand Arduino

Because Arduino hardware is open source, you will see many boards that are compatible with Arduino but not made by Arduino. That is normal. The key distinction is between legitimate compatibles and counterfeit boards.

Info

Before buying a lower-cost compatible board, check the USB chip used, solder quality, whether headers are included, and whether the branding clearly identifies the actual manufacturer.

Certified Compatibles and Open-Source Clones

Open-source compatibles are legitimate boards built around Arduino-compatible designs without pretending to be official Arduino products. Examples include METRO, RedBoard, and DFRduino.

These boards often change practical details like USB connector type, onboard USB bridge, MCU package, or whether headers are soldered. That can be useful, not just cheaper. For example, a micro-USB or USB-C variant may simply be easier to live with than an older connector.

A compatible Arduino Nano Every clone can also make sense if you want a Nano-shaped board in a newer compatible family. The exact board behavior should still be checked against the seller’s listing.

Counterfeit Boards

Counterfeit boards are different. These are boards sold using Arduino’s name and logo in a way that falsely presents them as official products.

Two risks besides the copyright issue are that component quality may differ, and sellers may claim the same performance or current capability as official boards without matching the real hardware quality. It also notes that some use different USB chips, which can affect driver setup.

So the problem is not just ethics. It is also predictability.

Buyer Checklist for Official, Compatible, and Counterfeit Boards

Use this quick check before you buy:

Board Type What to Look For Buying Signal
Official Arduino Correct branding, expected color/finish, official packaging, known distributor Best for predictable documentation and support
Open-source compatible Different brand name, honest labeling, clear specs, known seller Good budget option if the seller is transparent
Counterfeit Arduino branding at suspiciously low price, unclear seller, vague part substitutions Avoid

If the listing does not clearly say who made the board and what USB chip or connector it uses, assume you may need extra setup work.

Battle of Arduino and Other IoT Boards

Wireless projects are where many buyers leave the classic Arduino path. That is not because Arduino is bad. It happens because the requirements shift: network stack, memory, wireless radios, and price start to matter more than shield compatibility.

Info

 Official Arduino IoT boards and ESP8266/ESP32 boards are not the same thing. Many ESP8266/ESP32 boards can use the Arduino IDE, but that does not make them official Arduino boards. 

Official Arduino IoT Boards

Arduino’s dedicated IoT-oriented options include UNO WiFi, Ethernet, and Yún

  • UNO WiFi is described as an Uno-class board with Wi-Fi capability.
  • Ethernet adds RJ45 networking and micro SD storage but gives up some convenience, including a built-in serial-to-USB converter.
  • Yún pairs a Linux-side AR9331 processor with an ATMEGA32U4 and adds Wi-Fi, micro SD, USB Type A, 20 I/O pins, 7 PWM pins, and 12 analog pins.

Those boards make sense if you want networking while staying close to Arduino’s own ecosystem and board style.

Arduino-Compatible ESP8266 and ESP32 Options

An important buying point is that many people choose ESP8266 or ESP32 boards for wireless projects because they are inexpensive and built around wireless from the start.

This shift is a major factor in the modern IoT market. NodeMCU-class boards and ESP32 boards can be programmed with the Arduino IDE, and they often cost less than official Arduino wireless boards while offering integrated Wi-Fi, and in ESP32’s case, Bluetooth as well.

If your project is mainly an IoT endpoint, the ESP8266 Arduino IDE setup guide is a useful next step for understanding that workflow.

Board Ecosystem Wireless Logic Voltage Programming Option Relative Cost Best For
UNO WiFi Official Arduino Wi-Fi 5V Arduino IDE Higher Arduino-first Wi-Fi projects
Yún Official Arduino Wi-Fi 5V Arduino IDE + Linux-side workflow Higher Hybrid Linux + MCU projects
Ethernet Official Arduino Wired Ethernet 5V Arduino IDE Mid Wired network nodes
MKR series Official Arduino Model-dependent 3.3V Arduino IDE Mid Modern Arduino IoT
Nano ESP32 Official Arduino family Wi-Fi + Bluetooth 3.3V Arduino IDE Mid Compact connected builds
ESP8266 boards Arduino-compatible Wi-Fi 3.3V Arduino IDE, NodeMCU (Lua), MicroPython, Espruino Lower Low-cost IoT
ESP32 boards Arduino-compatible Wi-Fi + Bluetooth 3.3V Arduino IDE, ESP-IDF (C/C++), MicroPython, CircuitPython Lower More capable low-cost IoT

Why Choose Arduino Boards?

Arduino remains popular because it reduces friction. The hardware is approachable, the software is consistent across many board families, and the ecosystem is large enough that you can usually find a starting point quickly.

Arduino: Compatible with All Operating Systems

A major practical advantage is that the Arduino IDE works seamlessly across all common operating systems, including Windows, Linux, and macOS.

That cross-platform support matters when a team is mixed or when you switch machines. It also lowers setup overhead in workshops, classrooms, and labs.

Arduino: Designed for Everyone

Arduino was built to make microcontrollers easier to use. That shows up in the C/C++-based environment, the large number of beginner examples, and the amount of community Q&A available.

For experienced users, that same simplicity often means faster prototyping. You can get from sensor hookup to first reading with very little setup.
Arduino: Affordable for All

Many Arduino boards fall in roughly the 10 to 30 dollar range. Even where exact prices shift over time, the point remains: Arduino-class boards are accessible enough for experimentation.

That matters because development boards are often not the final product hardware. They are the fastest route to proving a concept.
Arduino, Free for All!

The software and hardware openness is one of Arduino’s strongest design choices. The IDE is free, the board designs are open, and the ecosystem benefits from contributions by both the Arduino team and third parties.

That openness is also why the clone/compatible ecosystem exists at all. It creates both flexibility and buyer confusion, so you need to know how to separate transparent compatibles from counterfeit boards.
Arduino: User-Friendly Design

Arduino boards are designed to connect to real parts quickly. Key hardware ergonomics include DIP-style header access, USB programming, jumper-wire friendliness, and shield support.

That hardware ergonomics point is easy to underestimate. If a board is physically easy to wire, test, reset, and reflash, you will move faster.

If your project includes display work, an Arduino TFT LCD tutorial is a good example of the kind of shield/module workflow Arduino handles well.

Conclusion: Arduino, Yes or No?

For most simple embedded projects, Arduino is still a good choice. This Arduino Buying Guide comes down to one practical idea: pick the board that removes the biggest constraint in your build, not the board with the longest feature list.

Advantages and Facilities of Arduino

Arduino’s biggest advantage is the balance between hardware access and software simplicity. Most boards let you connect over USB, upload code quickly, and start talking to sensors or displays with minimal setup.

The platform also benefits from broad operating system support, many board choices, and a large body of libraries and examples. That makes it particularly strong for education, prototyping, and fast proof-of-concept work.

Arduino also works well when you need to connect to common modules. For example, adding storage with an SD card module on Arduino or timekeeping with a DS1307 RTC module on Arduino follows a well-established pattern.

Disadvantages and Limitations of Arduino

Arduino’s weaknesses show up when your project needs more integration out of the box. Classic boards often lack built-in wireless, use multiple USB connector styles across the product line, and can feel fragmented across generations.

No single board combines all of Arduino’s strengths. For example, the Due is powerful but large, while wireless and ultra-compact needs often push you toward other families or even non-Arduino boards.

Future of Arduino?

Arduino’s future likely depends on how well it keeps modernizing while preserving its core strengths. The ecosystem already influences adjacent platforms: many non-Arduino boards still target the Arduino IDE because that software model is familiar and productive.

As long as Arduino keeps improving current families, supporting modern connectivity, and maintaining the low-friction development flow that made it popular, it remains a strong platform for both learning and real prototyping.

FAQ

Which Arduino board should a beginner buy first?

For most beginners, the Arduino Uno is the best first board because it has the broadest tutorial support, standard shield compatibility, and a simple pin layout. If you already know your project needs a smaller board, choose a Nano instead. Otherwise, Uno is the safest default.

What is the difference between Arduino Uno, Nano, and Mega?

Uno is the standard general-purpose board. Nano offers similar core capability in a much smaller, breadboard-friendly format. Mega is the right choice when you need many more pins, more analog inputs, and multiple hardware serial ports for larger or more complex projects.

Should I buy an official Arduino board or a clone?

Buy an official Arduino if you want the most predictable documentation, support, and branding. Buy a transparent compatible board if cost matters and the seller clearly states the manufacturer, USB chip, and connector type. Avoid counterfeit boards that pretend to be official Arduino hardware.

Which Arduino boards use 3.3V logic instead of 5V?

Due, Zero, MKR series, and Nano 33 family boards use 3.3V logic. Classic AVR boards like Uno, Nano, Mega, Leonardo, and Micro are generally 5V-class boards. Always verify the exact model before wiring 5V sensors or modules to it.

Can I power an Arduino safely from USB, VIN, or a battery?

Yes, but the safe method depends on the specific board. USB is commonly used for programming and bench power, while VIN, barrel jack, and JST battery inputs follow different board-specific power paths. Always check the exact board’s official datasheet for recommended input voltage ranges before connecting external supplies to avoid damaging the onboard regulator.

Which Arduino board is best for IoT or Wi‑Fi projects?

If you want an official Arduino-style wireless path, look at boards such as Nano ESP32, MKR-family options, or Uno R4 WiFi. If low cost and built-in wireless matter most, ESP8266 or ESP32 boards programmable in Arduino IDE are often the more practical IoT choice.

What Arduino board works as a keyboard or mouse over USB?

Use a board with native USB support, typically one based on the ATMEGA32U4. Leonardo is the easiest full-size choice, while Micro or Pro Micro is a better fit when you need a compact board that can emulate a keyboard, mouse, or similar USB HID device.

How do I choose an Arduino board based on size and pin count?

Start with the enclosure and wiring needs. If space is tight, choose Nano, Micro, or Pro Mini-class boards. If the project needs many sensors, relays, or serial devices, choose Mega. If you need both small size and modern connectivity, look at Nano-family 3.3V boards.

Liked What You See?​
Get Updates And Learn From The Best​

Comments (15)

  • Graham Parkinson Reply

    This is a fantastic resource, it was both fair and in depth, demystifying my problem concepts. thank you, i have put it on my desktop for future reference

    August 7, 2020 at 3:18 pm
    • mohammad Reply

      Thank you. We get energy from your motivating comment.

      August 7, 2020 at 7:44 pm
    • chris Reply

      Agreed – very good.

      February 20, 2021 at 9:28 am
  • Deepak Gone Reply

    This is amazing resource . I am looking to introduce to my 8 year old who is interested in coding . Though it’s different platform this information given me some clarity .

    December 12, 2020 at 9:34 am
    • Mehran Maleki Reply

      You’re quite welcome. We’are happy to hear this has been a help for you.

      December 13, 2020 at 12:43 pm
  • Dawid Malan Reply

    Excellent overview.

    I am just starting out in the world of electronics and this article really helps a lot to demystify many of the (for me) quite complex new learning points.

    Thank you

    December 21, 2020 at 7:40 am
    • Mehran Maleki Reply

      You’re so welcome! You can also check other tutorials of the website to boost your learning.

      December 22, 2020 at 12:16 pm
  • SAJOB R.G Reply

    Excellently compiled guide of Audrino for all beginners who have so many questions. Hats off to the hard work put put in by this webpage owner. A big thanks.

    December 27, 2020 at 8:54 pm
    • Mehran Maleki Reply

      You’re most welcome. We get energy from such motivating comments.

      December 28, 2020 at 8:29 am
  • Designer Evening wear Reply

    I used to be suggested this blog via my cousin. I am not
    certain whether this post is written by way of him as no one
    else recognize such unique about my trouble. You’re wonderful!
    Thank you!

    June 6, 2021 at 12:07 am
    • Mehran Maleki Reply

      You’re so welcome! Thanks for the kind words!

      June 7, 2021 at 4:31 am
  • Robert P van Driel Reply

    Well written introductuon to arduino!
    Enjoyed it.

    September 20, 2021 at 9:24 am
    • Mehran Maleki Reply

      You’re welcome! Glad you enjoyed it.

      September 21, 2021 at 4:41 am
  • Davood Ghadagh Reply

    Excellent!!!
    Simply the best and most comprehensive reference for an introduction (and much much more and beyond) to Arduino !!!
    Keep up the good work!

    October 15, 2022 at 1:52 pm
  • Micro:bit vs. Arduino: Full Comparison [2024] - Electropeak Reply

    […] 2012, Arduino boards have been equipped with an integrated development environment (IDE). Many engineers and electronics […]

    January 2, 2024 at 9:45 am

Leave a Reply

Your email address will not be published. Required fields are marked *