
Product added to cart

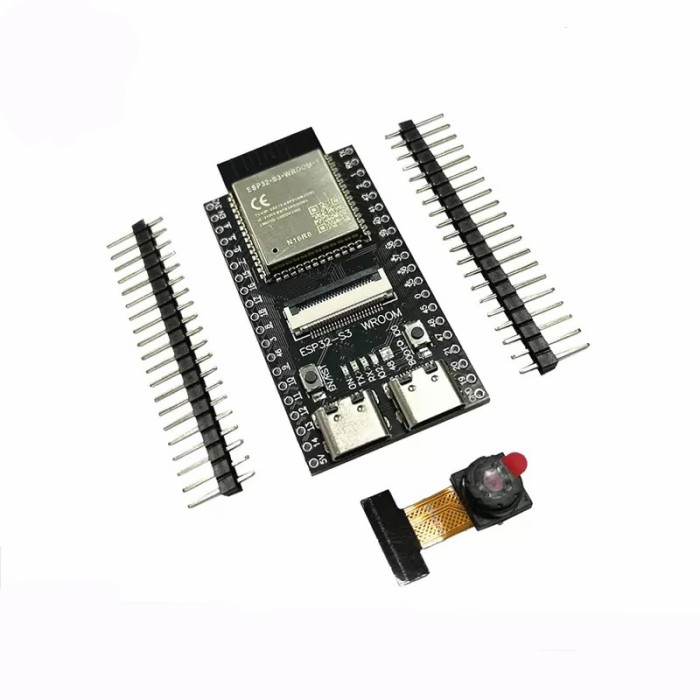
ESP32-S3 CAM Development Board
$10.2500
In stock
SKU
DEV-02-015
Volume discounts:
- +25 2 % $10.0500
- +50 3 % $9.9400
- +100 4 % $9.8400
- +300 5 % $9.7400
- +500 6 % $9.6400
Ships in 2-3 business days, then:
Free delivery in 12-15 days by Tracked Economic Shipping on orders over $100.
Free delivery in 7-10 days by Express Shipping on orders over $300.
More shipping info

Shop with confidence Learn More
 Waveshare ESP32 Universal Robot Driver Development Module Previous
ESP32-S3 CAM Development Board review and specifications
This ESP32-S3 CAM Development Board is an ESP32-S3-based wireless camera development board built on the newer dual-core LX7 platform, with Wi-Fi, Bluetooth LE, PSRAM, and support for optional camera sensors. It works well for hobby and prototyping projects, especially browser-based camera streaming, time-lapse capture, and basic embedded vision experiments.
It suits makers and intermediate builders who are comfortable selecting board settings, matching camera configuration, and doing some board-family troubleshooting when needed. Treat it as a flexible ESP32 maker platform, not as a tightly documented official kit.
Specifications of ESP32-S3 CAM Development Board
- Core: Xtensa Dual-Core 32-bit LX7 CPU, Frequency up to 240MHz
- Memories:
- 384kB of ROM
- 512kB of SRAM
- 16kB of RTCSRAM
- 8MB of PSRAM
- Working Voltage: 3V to 3.6V
- Up to 45 GPIOs
- 2x12-bit ADC (Up to 20 channels)
- Communication Interfaces: 2 x I2C, 2 x I2S, 4 x SPI, 3 x UART, 1 x USB OTG
- Operating Temperature Range: -40~65C
- Optional Camera Sensors: OV2640 (2MB) , OV5640 (5MB)
ESP32-S3 CAM camera compatibility: OV2640 vs OV5640
The camera choice matters more here than many buyers expect. In practical terms, the listed “OV2640 (2MB)” and “OV5640 (5MB)” refer to 2MP and 5MP camera resolution, not onboard memory capacity.
On this board family, OV2640 is the safer first choice. It gives lower resolution than OV5640, but it is the more established path for first boot, camera web server examples, and general troubleshooting on ESP32 camera projects.
OV5640 is the higher-resolution option, but it brings more setup risk on generic ESP32-S3-WROOM camera boards. Community use around this family shows recurring blank-stream cases, so buyers who want the highest chance of quick success should favor OV2640.
The exact camera included with this board is not specified. If your project depends on receiving a specific sensor, confirm that before ordering.
If you specifically want a more mature OV2640 path and do not mind using an external programmer, the ESP32-CAM with OV2640 is a reasonable alternative. For a more defined ESP32-S3 camera platform with better official documentation, look at the ESP32-S3-EYE with LCD.
ESP32-S3 CAM specifications explained
The raw spec list is solid for camera and IoT work. The main caution is the gap between chip-level capability and what is definitely exposed or documented on this exact board.
| Specification | Why it matters |
|---|---|
| Xtensa Dual-Core 32-bit LX7 CPU, up to 240MHz | This gives enough processing headroom for camera capture, Wi-Fi serving, and application logic at the same time. It is a good match for browser streaming, motion-detection demos, and sensor-plus-camera projects. |
| 8MB PSRAM | PSRAM is extra high-speed memory that helps with frame buffering, larger image handling, and more demanding camera workloads. For ESP32 camera boards, this is one of the most useful specs because camera examples often depend on it. |
| 384kB ROM, 512kB SRAM, 16kB RTCSRAM | These are the core memory resources of the ESP32-S3 platform. In practice, they support real firmware work beyond a simple sensor node, especially when paired with the listed PSRAM. |
| 2.4 GHz Wi-Fi and Bluetooth LE | Wi-Fi makes this suitable for self-hosted camera streams, wireless image transfer, and smart-home camera nodes. Bluetooth LE is useful for nearby provisioning, low-bandwidth peripherals, or hybrid projects that combine wireless control with camera features. |
| Up to 45 GPIOs | At the chip level, the ESP32-S3 offers a lot of I/O flexibility. On a camera board, actual free pins depend on how many lines are already used by the camera and board routing, so the practical number available to you may be lower. |
| 2 x I2C, 2 x I2S, 4 x SPI, 3 x UART | This covers displays, sensors, storage, serial peripherals, and audio-related experiments. If you plan to add modules during prototyping, a Breadboard Jumper Wire Kit - 140 Pieces makes that easier. |
| 1 x USB OTG | The ESP32-S3 platform supports USB OTG, which is useful from a chip-capability standpoint. It should not be read as guaranteed exposed USB host support for accessories on this exact board, because that board-level detail is not specified here. |
| Working Voltage: 3V to 3.6V | This is the module operating range from the specification sheet. It is not the same as saying the board should only be powered that way through its USB connection. |
| Flash size not specified | Flash size affects how much firmware, file content, and OTA update room you have. Many buyers expect it to be stated on an ESP32-S3 camera board, but it is not provided here, so it should not be assumed. |
For many projects, this combination lands in a useful middle ground. It is more capable than an older basic camera board, but still open-ended enough to suit custom builds. If your project is space-limited and can trade away GPIO access for a much smaller footprint, the XIAO ESP32S3 Sense is the more compact option.
For a different balance of size, camera integration, or expansion, you can browse more boards in the ESP32 category.
ESP32-S3 CAM limitations and setup gotchas
The main trade-off is not the ESP32-S3 chip itself. It is the generic board identity around it. Board-level documentation, revision history, exact dimensions, exact USB bridge, exact camera pinout, and official schematics are not supplied, which makes first setup less predictable than on a more defined platform.
Revision stability is another real concern. Generic board families can change regulators, USB parts, reset circuitry, or camera wiring details between batches, so examples found for one visually similar board may not map cleanly to another.
OV5640 support is the biggest practical caution. Higher resolution is appealing, but this board family has recurring blank-stream reports with OV5640, so it is not the right choice if you need a dependable 5MP experience without debugging.
Heat is worth planning for as well. Similar ESP32-S3 camera boards can run noticeably warm during sustained camera plus Wi‑Fi workloads, especially in long streaming sessions or enclosed installs. That is a family-level caution rather than a measured spec of this exact board, but it matters for reliability.
The listed USB OTG interface can also be misunderstood. It describes platform capability, not confirmed board-level USB host behavior for keyboards, storage, or other accessories.
For production deployments that need controlled revisions, stable documentation, and repeatable hardware identity, this board is the wrong fit. If official documentation and a more defined platform matter most, the ESP32-S3-EYE with LCD is the cleaner option. If you are specifically pursuing an OV5640 direction on a different board family, the ESP32-CAM Plus with Type-C is the relevant alternative.
ESP32-S3 CAM quick start check
First power-on should be treated as a short verification exercise, not a long integration session. The goal is simple: make sure the board enumerates, takes firmware, joins Wi‑Fi, and serves a camera page.
- Connect the board with a data-capable USB-A to USB Type-C Data Power Cable.
- Install Arduino IDE or PlatformIO, then add the ESP32 board package.
- Select the board profile commonly used for this family: ESP32S3 Dev Module.
- Enable PSRAM in the board settings used for this family.
- Load a basic camera web server example.
- Match the camera model and pin configuration to the hardware actually present on the board.
- Upload the sketch. If flashing does not start cleanly, use the BOOT and reset sequence required by the board.
- Open Serial Monitor, note the local IP address, and load it in a browser.
The expected result is straightforward: serial output shows a reachable local IP, and the browser loads the camera interface. On this board family, OV2640 is the lower-risk first test path.
Most first-time failures come from a charge-only cable, the wrong board profile, PSRAM not enabled, the wrong camera configuration, a missing Windows USB driver, or weak power during camera streaming. If the board is not recognized correctly on Windows, some generic boards in this family may need a CH340 or CH343 driver, though the exact USB bridge used here is not specified.
For the ESP32 setup side, this guide to installing the ESP32 board in Arduino IDE covers the board package step clearly. If you want a different camera-board path for first experiments, the ESP32-CAM with OV5640 and Micro USB gives integrated USB on a different board, while the ESP32-CAM with OV2640 remains a widely used option if you are comfortable with an external USB-to-TTL adapter.
ESP32-S3 CAM accessories and what else you need
A few basic accessories prevent most early frustration with camera boards. What matters is buying the items that solve setup problems, not just adding general-purpose parts.
Required
- USB-A to USB Type-C Data Power Cable for programming and power.
- Stable 5V power source with enough current for camera + Wi‑Fi loads.
Recommended
- SanDisk Micro SD Memory Card - 32GB, 120MBps (class 10) if your project stores images and the board version you receive supports microSD.
- 400 Points Half Size Breadboard - 5.5x8.5cm for prototyping sensors, testing GPIO, or trying add-on circuits before committing to wiring.
- Breadboard Jumper Wire Kit - 140 Pieces for expansion, peripheral testing, and pin-level troubleshooting.
Optional
- Cooling for long streaming sessions or enclosed installations.
- Ventilated enclosure planning if the board will run sustained camera workloads.
ESP32-S3 CAM vs ESP32-CAM and ESP32-S3-EYE
These three boards overlap, but they suit different priorities. The better choice depends less on raw specs alone and more on how much setup certainty, integration, and camera maturity you want.
| Board | Choose it if | Trade-off to accept |
|---|---|---|
| This board | You want an ESP32-S3 camera board with Wi‑Fi, Bluetooth LE, PSRAM, and a flexible maker-oriented platform for custom projects. | Board-level details are incomplete, sensor behavior is not equally smooth across options, and hardware revisions may be less predictable. |
| ESP32-CAM with OV2640 | You want a more mature OV2640 ecosystem and are comfortable using an external USB-to-TTL adapter for programming. | It does not have a built-in USB port on that version, so first setup is less convenient. |
| ESP32-S3-EYE with LCD | You want a more defined ESP32-S3 camera platform with official documentation, an integrated LCD, and additional onboard peripherals such as microphone and sensors. | It is a more integrated platform, so it is less of a bare flexible camera board and uses a 2MP camera rather than an OV5640-class option. |
Against the older ESP32-CAM, this board is the newer platform choice and makes more sense for buyers who want ESP32-S3 features and a stronger memory profile in the common board family. Against the ESP32-S3-EYE, the trade is flexibility versus documentation and integration.
If you are mainly comparing workflow and project style, choose this board when generic-board setup work is acceptable. Choose the ESP32-CAM when OV2640 maturity matters more than convenience. Choose the ESP32-S3-EYE when platform definition matters more than bare-board flexibility. For a look at the established ESP32 camera workflow, this ESP32-CAM video streaming and face recognition guide is a useful reference point.
ESP32-S3 CAM FAQ and buying checklist
FAQ
Does this board come with an OV2640 or OV5640 camera?
The board supports optional OV2640 and OV5640 sensors, but the included camera for this version is not specified. If your project depends on one specific sensor, confirm that before ordering.
Is OV5640 plug-and-play on this ESP32-S3 CAM board?
No, it should not be treated as plug-and-play. OV5640 offers higher resolution, but this board family has recurring blank-stream reports, so OV2640 is the easier path for most buyers.
What do “OV2640 (2MB)” and “OV5640 (5MB)” mean?
They refer to camera resolution in buyer terms: 2MP and 5MP. They do not describe onboard memory size.
What Arduino IDE board should I select?
ESP32S3 Dev Module is the board profile most commonly used for this family. PSRAM should also be enabled for camera examples that expect it.
Do I need a special USB driver?
Possibly, especially on Windows. Some generic boards in this family may need a CH340 or CH343 driver, and a data-capable cable is essential, but the exact USB bridge on this board is not specified.
Can I use the USB port for keyboards, mice, or other USB devices?
Do not assume that from the spec sheet alone. The platform lists 1 x USB OTG, but board-level USB host exposure is not specified, so it is safest to treat the USB connection primarily as a programming and setup path unless you have board-specific confirmation.
Does this board run hot?
It can run warm under sustained camera and Wi‑Fi workloads. Plan adequate power and ventilation if the board will stream for long periods or sit inside a tight enclosure.
Can I use this with Home Assistant or ESPHome?
Yes, it can be used for that kind of project, but exact pin mapping matters. Generic camera boards are less forgiving when firmware examples assume a different camera wiring layout.
Does it include a microSD card?
No microSD card is specified as included. MicroSD support is a separate project consideration, and the presence of a microSD slot on this exact board is not specified either.
Is this a good choice for production hardware?
Not if you need controlled revisions, board-specific documentation, and stable hardware identity. It makes more sense as a flexible development board for prototyping and maker use.
Buying checklist
Ideal for
- Makers who want an ESP32-S3-based Wi‑Fi camera platform with strong processing headroom and PSRAM.
- Buyers comfortable doing light board-family debugging and validating camera configuration.
- Projects centered on OV2640, browser streaming, time-lapse, or ESP32-S3 experimentation.
Maybe for
- Home Assistant or ESPHome users who can confirm pin mapping and accept generic-board uncertainty.
- Buyers who need higher camera resolution and are willing to troubleshoot OV5640 behavior.
- Educators demonstrating embedded vision on a flexible but not tightly standardized board.
Avoid if
- You need guaranteed board revision control, official schematics, or board-specific documentation.
- You need a dependable 5MP experience with minimal setup risk.
- You want a beginner-friendly camera board with fully defined setup details and package certainty.
- Your enclosure is thermally tight and you do not want to plan around heat.
- ✓ Decide which camera sensor you actually need: OV2640 for easier setup, or OV5640 with more risk.
- ✓ Check whether the package confirms which camera is included.
- ✓ Make sure you have a data-capable USB-A to USB Type-C Data Power Cable.
- ✓ Have a stable 5V power source ready for camera + Wi‑Fi testing.
- ✓ Be comfortable using Arduino IDE settings such as ESP32S3 Dev Module and PSRAM enablement.
- ✓ If you need storage, add a SanDisk Micro SD Memory Card - 32GB, 120MBps (class 10) and verify whether your board version supports microSD.
- ✓ Decide whether a generic development board is acceptable, or whether you need more defined hardware.
- ✓ Make sure your enclosure allows heat dissipation during streaming.
- ✓ If you need a much smaller ESP32-S3 camera setup, look at the XIAO ESP32S3 Sense.
- ✓ If you are specifically pursuing an OV5640 direction on a different board, compare the ESP32-CAM Plus with Type-C.
If you want to compare more options in the same ecosystem, browse the ESP32 category.
| MCU/SoC | ESP32-S3 |
|---|---|
| Product Family | ESP32 |
| Architecture | Tensilica Xtensa LX7 |
| CPU Cores | Dual-Core |
| Clock Speed (MHz) | 240MHz |
| SRAM | 512kB |
| External Memory | 8MB PSRAM |
| GPIO Pins | 45 |
| SPI interface Pins | 4 |
| I2C interface Pins | 2 |
| UART interface Pins | 3 |
| USB Ports | 1 x USB OTG |
| Ethernet Support | No |
| ADC Channels | 20 |
| Operating Voltage (V) | 3.3V |
| GPIO Voltage (V) | 3.3V |
| Wireless | Bluetooth LE, Wi-Fi 2.4GHz |
| IDE Support | Arduino IDE, MicroPython, ESP-IDF |
| Bluetooth Ver. | 5 |
| Operating Temp (°C) | -40 to 65C |
Write Your Own Review

Please complete your information below to login.
Sign In
Create New Account