
Product added to cart

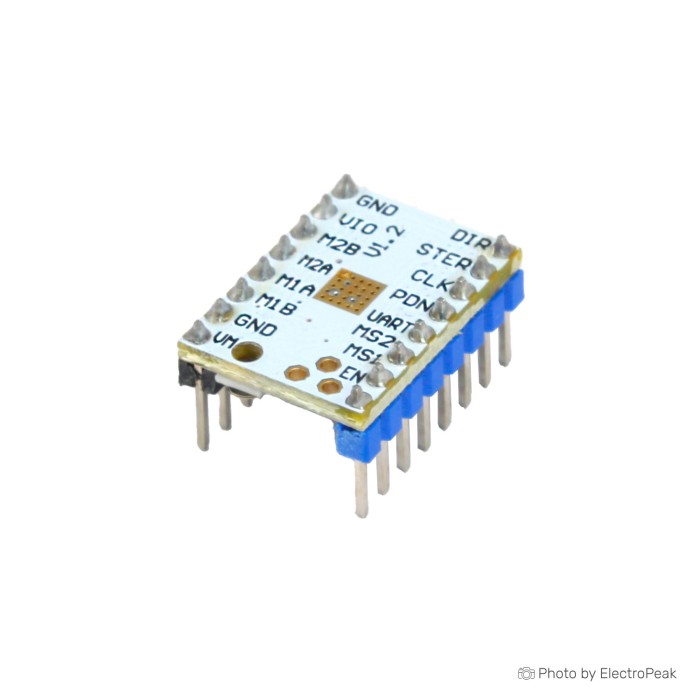
TMC2208 V1.2 Stepper Motor Driver Module (for 3D Printers)
$2.2500
In stock
SKU
3DP-01-112
Volume discounts:
- +50 4 % $2.1600
- +100 6 % $2.1200
- +300 8 % $2.0800
- +500 10 % $2.0300
- +1000 12 % $1.9900
Ships in 2-3 business days, then:
Free delivery in 12-15 days by Tracked Economic Shipping on orders over $100.
Free delivery in 7-10 days by Express Shipping on orders over $300.
More shipping info

Shop with confidence Learn More
 TMC2208 V3.0 Stepper Motor Driver Module (for 3D Printers) Previous
TMC2208 V1.2 Stepper Driver Review
The TMC2208 V1.2 Stepper Motor Driver Module is a compact StepStick-format driver for compatible 3D-printer, CNC, robotics, and bipolar-stepper motion systems. It combines quiet STEP/DIR motion with optional single-wire UART configuration for software-controlled motor parameters. It suits buyers who can verify socket orientation, match logic levels, and set motor current carefully. Avoid this module if your design requires sensorless homing, shared multi-driver UART addressing, verified board-level thermal data, or documented higher-current capability.
For an equivalent TMC2208 listing when stock availability differs, see the TMC2208 V3.0 Stepper Driver. It has identical core capabilities rather than representing a performance upgrade. You can also browse 3D printer electrical parts.
Specifications of TMC2208 V1.2 Stepper Motor Driver Module
- Operating Voltage: 4.75V to 36V DC
- Logic Voltage (VIO): 3.3-5V DC
- Continuous Output Current: Up to 1.2A (RMS) with proper cooling
- Peak Output Current: Up to 2.8A
- Motor Type: Two-phase stepper motor
- Microstepping Resolution: Up to 1/256 microstep
- Switching Frequency: 1 MHz
- Protection Features: Over-current, over-temperature, and short-circuit protection
- Size: 20 × 15 × 11 mm (L × W × H)
- Operating Temperature Range: -20°C to +60°C
- Storage Temperature Range: -40°C to +150°C
- Cooling Method: Heatsink
TMC2208 V1.2 Specifications and Motion Modes
The core appeal of a TMC2208 silent stepper driver is Trinamic's StealthChop2 voltage-chopper technology. StealthChop2 calculates motor voltage modulation from current draw and velocity, reducing the audible coil whine common in standard chopper drives at low to moderate speeds. For motion systems that need higher dynamic torque, rapid acceleration, or tighter positional tracking under changing loads, SpreadCycle provides cycle-by-cycle current control. SpreadCycle produces more audible switching noise than StealthChop2, but it avoids the positional lag or step-skipping tendencies that can occur when StealthChop2 is pushed beyond its dynamic limits.
The module lists microstepping resolution up to 1/256. In practice, this resolution comes through MicroPlyer interpolation: the internal sequencer interpolates incoming full-step or fractional-step pulses up to 256 microsteps for smooth current sine waves, rather than relying strictly on physical MS-pin logic states. In standalone mode, the driver uses standard STEP and DIR lines, with microstepping set by board pins. With UART wiring, motion parameters, chopper modes, and run currents can be configured directly in software.
Typical applications across the TMC2208 family include:
- 3D-printer axis and extruder upgrades: Quieting X, Y, and extruder stepper noise on compatible Cartesian, CoreXY, or delta printers using Marlin or Klipper firmware.
- Legacy A4988 retrofits: Upgrading older StepStick sockets on motion controllers, provided pinout, orientation, and reference voltage are manually matched.
- Microcontroller motion benches: Driving bipolar steppers from 3.3V or 5V logic boards using STEP/DIR signaling with an external motor power supply.
- Low-to-moderate-load automation: Powering quiet camera sliders, pan-tilt heads, plotters, and light CNC axes within the driver's thermal operating envelope.
A standard motor such as the NEMA 17HS8401 1.7A Stepper Motor can provide reliable torque for desktop motion axes when the continuous operating current is tuned conservatively to match the module's thermal dissipation limits. For a strictly standalone hardware configuration without a serial data bus, consider the TMC2100 Stepper Driver. It is a standalone silent-driver alternative configured through physical CFG pins and manual Vref tuning.
TMC2208 V1.2 Compatibility, UART and Installation
This module requires a two-phase bipolar stepper motor and two distinct power rails: a motor power rail (VM) between 4.75V and 36V DC, plus an isolated digital logic rail (VIO) between 3.3V and 5V DC. Never feed motor voltage into VIO. A common ground between your microcontroller and motor power supply is mandatory for stable STEP and DIR signaling. The driver's enable pin follows the standard StepStick active-low convention, so the output stages are active when the enable line is pulled low.
The form factor mirrors standard StepStick modules, but physical socket orientation varies between controller boards. Inserting a driver backward will destroy the driver and may also damage the host board when power is applied. Before seating the module, locate the ground (GND) and directional pins on both the controller socket and the driver.
For standalone STEP/DIR operation, the driver runs directly from pulse inputs. If you plan to use single-wire UART configuration, account for the following hardware constraints:
- PDN_UART wiring: Serial communication requires connecting the host microcontroller's TX/RX line, often combined with a 1k inline resistor, to the module's PDN_UART pin. On generic V1.2 modules, this may require soldering a jumper pad or header pin, depending on how the board traces are routed.
- Fixed UART address: The TMC2208 has a fixed hardware UART address. Unlike newer TMC2209 modules, multiple TMC2208 drivers cannot share a single bidirectional serial wire; each driver requires an independent microcontroller pin for UART communication.
- Firmware configuration: Firmware such as Klipper or Marlin natively supports TMC2208 UART definitions. If firmware is configured for UART mode while the driver is physically unbridged or missing serial wiring, the controller will halt with a communication error.
Host controller boards such as the RepRap Ramps 1.4 3D Printer Controller Board provide standard sockets for removable drivers. You must still verify jumper settings, socket orientation, and logic routing before applying power. Cut DC power completely before connecting or disconnecting motor phase wires. Unplugging a stepper motor while the driver is energized creates high-voltage inductive kickback that will destroy the output MOSFETs instantly.
TMC2208 V1.2 Limitations: Current, Cooling and StallGuard
Two specification details need close attention before you purchase this module:
1. StallGuard and Sensorless Homing Conflict: Although the original listing mentions StallGuard technology, official Trinamic architectural documentation confirms that the TMC2208 IC family does not include StallGuard or StallGuard4. This driver cannot perform sensorless homing or virtual endstop detection. Axis referencing requires standard mechanical, optical, or inductive physical limit switches.
2. Peak Current vs. Continuous Thermal Limits: The listing cites a peak output current up to 2.8A. That figure reflects comparative ratings from related driver families rather than sustainable TMC2208 operation. Datasheet limits place the TMC2208 IC in an up-to-2A class, while continuous operation on this compact PCB is rated at up to 1.2A RMS with proper cooling. In real-world desktop environments without forced-air ventilation, continuous current should be set well below 1.0A RMS to prevent thermal shutdown.
Because this is an unbranded V1.2 module, the exact current-sense resistor (Rsense) value is not documented. It is typically 0.11 ohm on many generic boards, but it occasionally varies. Do not blindly copy a reference voltage (Vref) setting from online forums or another printer. Measure the onboard sense resistors with magnification, or test conservatively, to calculate the proper Vref using the formula for your board's specific sense resistance. Setting Vref too high causes thermal cycling and skipped steps; setting it too low results in insufficient motor holding torque.
Cooling is mandatory. The module relies on a top-mounted heatsink to draw heat away from the IC package. In a 3D-printer chassis or when driving loads above 0.8A RMS, active airflow from a dedicated cooling fan is necessary. Internal over-temperature and short-circuit protections help protect the silicon under fault conditions, but they are fail-safes rather than thermal-management tools.
For applications requiring higher continuous phase currents or supply rails above 36V, the DRV8825 Stepper Driver offers up to 2.5A per coil across an 8.2V to 45V operating range. Its trade-off is a limit of 1/32 microstepping and no silent chopper modes.
TMC2208 vs Stepper Drivers for 3D Printers
The right StepStick module depends on whether acoustic noise reduction, drive current capacity, or hardware-level simplicity is your priority.
| Driver Module | Operating Voltage | Max / Continuous Current | Max Microstepping | Primary Configuration | Key Trade-Off |
|---|---|---|---|---|---|
| TMC2208 V1.2 | 4.75V – 36V DC | 1.2A RMS continuous (2.8A listed peak) | Up to 1/256 (interpolated) | STEP/DIR or single-line UART | No StallGuard; fixed UART address; needs cooling |
| TMC2100 | 5.5V – 45V DC | 1.2A RMS continuous | Up to 1/256 | STEP/DIR and CFG pins | Runs hot (>150°C at 1A); no UART software control |
| A4988 Reprap | 8V – 35V DC | Up to 2A per coil | Up to 1/16 | STEP/DIR and MS pins | Audible motor noise; limited to 1/16 stepping |
| DRV8825 | 8.2V – 45V DC | Up to 2.5A per coil | Up to 1/32 | STEP/DIR and MS pins | Audible motor whine; low-current waveform artifacts |
| LV8729 | 6V – 36V DC | 1.8A max (0.8A default) | Up to 1/128 | STEP/DIR or CLK input | Requires active cooling; complex pin configuration |
For fine microstepping without software configuration, the LV8729 Stepper Driver provides up to 1/128 microstepping and CLK input control on a 4-layer PCB. It still requires active cooling under load.
Buyers often compare the TMC2208 with the newer TMC2209 family. Both use StealthChop2 and SpreadCycle for quiet motion, but the TMC2209 architecture adds StallGuard4 for sensorless homing, CoolStep for load-adaptive current scaling, lower internal RDSon resistance for cooler operation at equal current, and two selectable UART address pins that allow up to four drivers to share a single serial bus. Choose a TMC2209 when you need virtual endstops or simpler multi-driver serial wiring. For machines using mechanical endstops and standard STEP/DIR sockets, the TMC2208 provides the same quiet stepping performance.
TMC2208 V1.2 Accessories and Setup Check
A reliable motion-control axis requires the driver module to be paired with appropriate peripheral hardware:
Required Hardware
- Bipolar Stepper Motor: A 4-wire, two-phase stepper such as the NEMA 17HS8401 1.7A Stepper Motor, sized to remain within the driver's continuous current limit.
- Compatible Controller Board: A StepStick-compatible mainboard such as the RepRap Ramps 1.4 3D Printer Controller Board, capable of supplying STEP/DIR pulses.
- DC Power Supply: A 12V to 36V DC power source with sufficient current capacity, wired with a shared common ground to the controller logic.
- Tuning Tools: A digital multimeter and a ceramic or insulated adjustment screwdriver for safely setting the analog Vref potentiometer.
Recommended Hardware
- Heatsink and Cooling Fan: An aluminum heatsink attached with thermally conductive tape to the module's thermal landing area, supported by directed airflow if enclosed.
- Firmware Configuration Backup: A saved copy of your controller's firmware source files, Marlin Configuration.h or Klipper printer.cfg, before modifying driver types.
Optional Additions
- Expansion Board: A standalone breakout such as the 3D Printer A4988/DRV8825 Stepper Motor Expansion Board for external axis additions, provided pinout and logic supply lines are checked before seating the driver.
- UART Hookup Wire: Dedicated signal wire and a 1k pull-up/coupling resistor if modifying the module for single-wire serial control.
For general StepStick-format driver connections to microcontrollers, consult our related Arduino stepper-driver wiring guide.
Installation and Verification Sequence
- Visual Inspection: Examine the board under good lighting. Identify the GND, VM, and VIO pins, and inspect whether the PDN_UART trace is routed to a header pin or left on a solder pad.
- Power Isolation: Disconnect all power sources, including USB and the DC main supply, from the controller before inserting the module.
- Socket Alignment: Align the module's pinout with your controller socket. Match DIR and GND instead of relying on board silkscreen colors.
- Verify Coil Pairs: Use a multimeter to verify motor coil continuity. Ensure coil phase A (pins 1A/1B) and coil phase B (pins 2A/2B) match the driver pin assignments.
- Initial Current Calibration: Apply logic power only, or main power with the motor disconnected if required by the board design. Measure DC voltage between the potentiometer wiper and GND. Adjust to a conservative starting Vref.
- Low-Speed Motion Test: Connect the motor with power off. Reapply power and issue a short, low-speed movement command (10–20 mm/s). Verify the correct rotation direction.
- Thermal and Accuracy Check: Execute a 10-minute continuous motion test. Check module and motor temperatures. If the driver cuts out intermittently, lower the current setting or increase airflow.
TMC2208 V1.2 Stepper Driver FAQ
Does this TMC2208 V1.2 support sensorless homing or StallGuard?
No. Sensorless homing requires StallGuard circuitry, which is not present in the TMC2208 silicon. Any machine equipped with TMC2208 drivers must use physical mechanical, optical, or inductive limit switches for axis homing.
Is the listed 2.8A peak-output-current figure correct for a TMC2208?
No. The 2.8A peak figure in the product specifications is an uncorrected rating. Official Trinamic documentation places the TMC2208 in an up-to-2A peak class, with sustainable continuous performance reaching roughly 1.2A RMS only under active cooling.
Can this replace an A4988 driver?
Yes, provided you verify socket pinout, orientation, supply voltage, and current settings before installation. An A4988 board cannot simply be swapped without recalibrating Vref and matching microstepping settings in your controller firmware.
For an existing straightforward StepStick setup where silent chopper profiles are not needed, the standard A4988 Reprap Stepper Driver is a reliable replacement choice with 1/16 stepping.
Do I need UART to use this TMC2208 driver?
No. The module operates out of the box in standalone mode using conventional STEP and DIR pulse signals. UART is an optional configuration path for software-based current setting and mode switching.
Can multiple TMC2208 drivers share one UART line?
No. TMC2208 drivers have a fixed internal UART address. Connecting multiple drivers to the same microcontroller serial pin causes bus contention; each TMC2208 requires its own dedicated UART control pin on the host MCU.
What power supply and logic voltage does it use?
The motor power rail (VM) accepts 4.75V to 36V DC, while the logic rail (VIO) operates between 3.3V and 5V DC. Both rails must receive clean DC voltage within their specified limits and share a common ground.
For standalone printer builds that need an upgraded host platform with external driver sockets, consider the RepRap Ramps 1.6 3D Printer Controller Board as a compatible 3D-printer controller board option.
Do I need a heatsink or fan?
Yes. The module requires a heatsink for normal operation, and active fan cooling is strongly recommended when your motor runs above 0.8A RMS or inside a heated machine enclosure. Without cooling, the driver will quickly trigger thermal shutdown.
Why can a TMC2208 motor run quietly but still lose steps?
StealthChop2 optimizes current waveforms for acoustic silence, which can introduce positional lag or reduced dynamic torque under aggressive acceleration. Switching the driver to SpreadCycle mode resolves step-skipping issues when moving heavy axes or printing at high speeds.
How do I set TMC2208 Vref?
Measure DC voltage from the onboard potentiometer wiper to ground with a multimeter. Calculate the target voltage using your motor's rated current and the specific sense resistor value on your board; do not copy Vref values from other machines without verifying the onboard resistor markings.
For an identical replacement module under an alternate product entry, view the TMC2208 V3.0 Stepper Driver.
Purchase Decision Summary
- Ideal for: Builders and 3D-printer owners who want quieter axis movement on compatible STEP/DIR controller boards, operate within 4.75V–36V DC, and are comfortable setting Vref manually and using physical limit switches.
- Maybe for: Embedded robotics, camera sliders, and CNC axes running low-to-moderate torque loads, or firmware-managed setups where UART pads can be verified and wired individually.
- Consider another option if: You need sensorless homing (StallGuard), multi-driver shared UART wiring, verified thermal performance above 1.2A RMS, or drop-in operation without manual Vref calibration.
Buying Checklist
- Confirm your motor is a two-phase bipolar stepper (4 wires).
- Confirm your controller uses standard StepStick-compatible STEP/DIR sockets.
- Confirm your motor power supply provides between 4.75V and 36V DC.
- Confirm your controller logic voltage is between 3.3V and 5V DC.
- Verify that your machine uses physical endstops; do not buy this module for sensorless homing.
- Do not size motors based on the listed 2.8A peak rating; plan for up to 1.2A RMS under active cooling.
- Ensure you have a multimeter and adjustment tool to calibrate the reference voltage.
- Confirm whether your setup requires a heatsink and cooling fan for enclosed operation.
Write Your Own Review

Please complete your information below to login.
Sign In
Create New Account