
Product added to cart

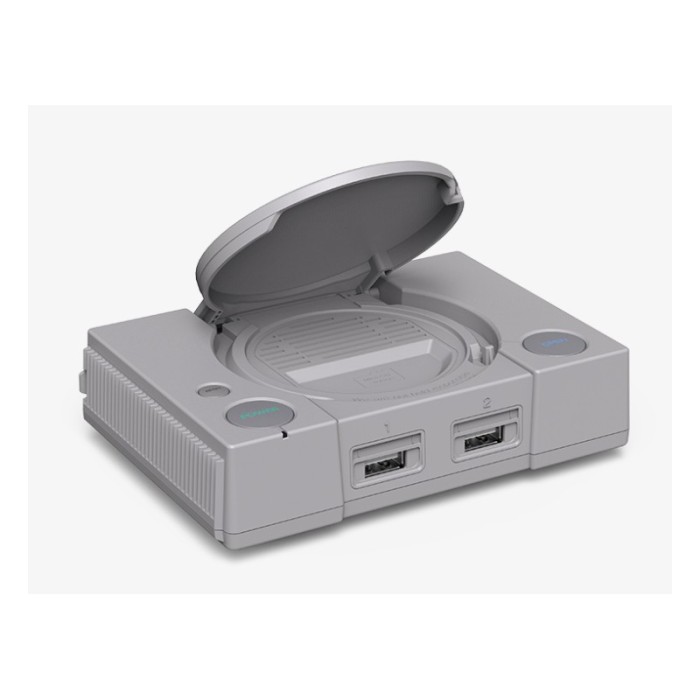
Retroflag PS Pi Case For Raspberry Pi 5
$23.9500
In stock
SKU
DEV-27-009
Volume discounts:
- +25 4 % $23.0300
- +50 6 % $22.5700
- +100 8 % $22.1200
- +300 10 % $21.6600
- +500 11 % $21.2000
Ships in 2-3 business days, then:
Free delivery in 12-15 days by Tracked Economic Shipping on orders over $100.
Free delivery in 7-10 days by Express Shipping on orders over $300.
More shipping info

Shop with confidence Learn More
 Raspberry Pi 5 Official Case Previous
Retroflag PS Pi Case for Raspberry Pi 5 review
This Raspberry Pi 5 enclosure combines a retro-console exterior with functional power and reset buttons, LED status indication, and accessible ports. Safe shutdown and reset require scripts. It suits controller-and-HDMI-based retro builds; HAT users and buyers expecting an out-of-the-box power-button setup should choose a different case.
For other enclosure styles or mounting approaches, see our Raspberry Pi cases. You will also need a compatible board, such as the Raspberry Pi 5 - 4GB RAM, Raspberry Pi 5 - 8GB RAM, or Raspberry Pi 5 - 16GB RAM.
Specifications of PlayStation 1 Case for Raspberry Pi 5
- Compatibility: Raspberry Pi 5
- Design Style: Inspired by the classic PlayStation console
- Safe Shutdown and Reset: Supports safe shutdown and reset (requires scripts)
- LED Indicator: Displays power status
- Functional Buttons: Power and reset buttons
- Easy Access: To SD card and all ports without opening the case
- MicroSD Slot: Side-mounted for better accessibility
- Backside Ports: USB-C power input, dual Micro HDMI outputs, 3.5mm audio port
- Side Ports: USB 3.0 and LAN
- Installation Holes: Compatible with RF PiStation LCD
Retroflag PS Pi Case ports and Raspberry Pi 5 compatibility
This case is designed strictly around the Raspberry Pi 5 board layout. Designated cutouts serve the main connections: rear USB-C power input, dual Micro HDMI display outputs, and a 3.5mm audio jack. Side access covers Gigabit LAN and USB 3.0 interfaces for networking and peripherals, while front-facing ports provide quick access for wired gaming controllers without lifting the main cover.
Confirm storage access before settling on a final chassis position. The listing notes a side-mounted MicroSD opening, but manufacturer documentation places the MicroSD card slot on the bottom panel. Visually check your specific production model before mounting the hardware in an enclosed rack or tight space. For stable boot performance, use a reliable card such as the SanDisk Micro SD Memory Card - 32GB.
| Interface | Location on Enclosure | Hardware Function |
|---|---|---|
| USB-C Power | Rear panel | Direct connection for official 27W power adapter |
| Dual Micro HDMI | Rear panel | Primary and secondary digital video/audio output |
| 3.5mm Jack | Rear cutout | Dedicated analog audio output |
| Ethernet & USB 3.0 | Side hatch | Wired networking and high-speed data accessories |
| Controller USB | Front panel | Standard gamepads and input devices |
| MicroSD Slot | Side-listed / Bottom access | Primary OS storage card access |
Retroflag PS Pi Case safe shutdown and power button setup
The external power and reset buttons do not provide automated safe shutdown straight out of the box. Although the buttons physically engage internal switches, a software trigger must signal the operating system so it can unmount storage cleanly before power is removed. Without this configuration, switching off the unit creates an abrupt hardware disconnect that can corrupt operating system files.
The case hardware needs no specialized device driver, but making the switches functional requires this straightforward setup process:
- Mount the Raspberry Pi 5 securely inside the chassis and connect the internal cooling fan and GPIO lead assembly according to the case instructions.
- Insert your configured MicroSD card running a GPIO-compatible distribution such as Raspberry Pi OS, RetroPie, Recalbox, or Batocera.
- Connect your display and provide reliable operating current using an Official Raspberry Pi 5 27W USB-C Power Supply.
- Boot the system, open a command-line terminal, and run the official RetroFlag safe-shutdown installation script from their public repository.
- Reboot the system so the script daemon initializes.
After rebooting, test the buttons. The power switch should prompt the operating system to begin an orderly shutdown sequence before cutting power, and the reset button should trigger a clean reboot. If either button does not respond, verify that the internal GPIO headers are properly aligned and that your chosen OS permits standard GPIO script control. Need an active-cooled Pi 5 enclosure with an integrated external power button and a reserved GPIO ribbon cable cutout? Consider the Metal Active Cooling Case with Power Button.
Retroflag PS Pi Case cooling, HAT limits, and WiFi considerations
Sustained Raspberry Pi 5 performance needs adequate thermal management. This enclosure uses an active cooling arrangement with an aluminum heatsink, an internal fan, and pre-cut thermal pads contacting the core system components. One independent review recommends opening the top console lid during sustained heavy gaming to improve convective airflow. Measured internal temperature and acoustic decibel ratings for fully closed-lid operation are not formally documented.
This case does not accommodate Raspberry Pi HAT modules. Internal clearance and the button-wiring harness block standard mezzanine expansion boards. Choose another option if your design requires a HAT or general open-frame GPIO access. For a general Raspberry Pi 5 build needing stacking and a removable lid, consider the Official Raspberry Pi 5 Case. The Aluminum Case with Dual Fan suits demanding computing tasks centered on dual-fan cooling. For hybrid cooling and a top cover screw for port protection, consider the Argon NEO 5 Case.
Wireless performance is another consideration. Specific wireless attenuation benchmarks for this housing are not published, but active USB 3.0 data lines combined with enclosed cases can introduce interference across the 2.4 GHz spectrum. Use 5 GHz Wi-Fi bands or a direct wired Ethernet cable for a substantially more dependable connection during network transfers and streaming.
Retroflag PS Pi Case vs Raspberry Pi 5 cooling cases
The right enclosure depends on whether your project prioritizes retro aesthetics with integrated controls, raw thermal surface area, or physical hardware expandability. This table compares supplied design specifications across compatible enclosures:
| Feature | Retroflag PS Pi Case | Official Raspberry Pi 5 Case | Aluminum Case with Dual Fan | Metal Active Cooling Case | Argon NEO 5 Case |
|---|---|---|---|---|---|
| Enclosure Material | ABS plastic | ABS plastic | Full aluminum | Aluminum body | Aluminum alloy and ABS composite |
| Cooling Hardware | Aluminum heatsink, fan, thermal pads | PWM fan (8000 RPM, 2.79 CFM), 12x17x4mm heatsink | Dual 30x30mm DC brushless fans | Single active fan | Hybrid passive cooling with built-in fan |
| Power Controls | Power and reset buttons (script required) | Direct access to board power button | Direct access to board power button | Integrated external power button | Direct access to board power button |
| HAT / GPIO Cable Access | No HAT support | Removable lid for GPIO access | Not supplied | Reserved GPIO ribbon cutout | Removable top cover |
| Form Factor Design | Retro console | Stackable modular case | Compact metal heatsink (85x56x22mm) | Industrial metal shell | Slim desktop profile |
Retroflag PS Pi Case accessories for Raspberry Pi 5
The enclosure protects and organizes the board, but a working system still needs several core hardware components. Assemble your setup with these hardware categories:
Required Hardware
- Raspberry Pi 5 Board: Choose a memory configuration for your emulation demands, such as the Raspberry Pi 5 - 4GB RAM, Raspberry Pi 5 - 8GB RAM, or Raspberry Pi 5 - 16GB RAM.
- USB-C Power Adapter: The Raspberry Pi 5 requires stable 5V/5A power negotiation to prevent throttling under heavy processing loads. Use an Official Raspberry Pi 5 27W USB-C Power Supply to meet these power rails reliably.
- Boot Storage: Operating system files and emulation firmware load from flash memory. The SanDisk Micro SD Memory Card - 32GB provides the required Class 10 speeds for clean boot and save states.
- Video Interface: A Micro-HDMI to standard HDMI cable or passive adapter is required to connect the board's rear display output to a monitor or television.
Recommended Additions
- 5 GHz Wi-Fi or Ethernet: A 5 GHz wireless network or standard RJ-45 patch cable provides dependable local networking and mitigates potential 2.4 GHz USB 3.0 interference.
- Compatible OS Image: Use a modern, GPIO-aware distribution that supports shell script execution to enable safe-shutdown routines.
Optional Additions
- USB Gamepads: Choose front-accessible controller hardware suited to your intended gaming platforms.
- External Wi-Fi Adapter: Useful in environments with significant local 2.4 GHz interference.
- Thermal Compound: An optional substitute for users who prefer paste over the standard thermal pads included for the heatsink.
Retroflag PS Pi Case FAQ for Raspberry Pi 5
Does the Retroflag PS Pi Case work with Raspberry Pi 4?
No. This enclosure is engineered specifically for the physical layout and port configuration of the Raspberry Pi 5. The earlier Raspberry Pi 4 uses a different port arrangement and fits Retroflag's separate PiStation case rather than this chassis.
Do the Retroflag PS Pi Case power and reset buttons work without setup?
No. Safe shutdown and reset require software configuration. Install the official RetroFlag safe-shutdown script on a GPIO-compatible operating system before the buttons can execute controlled software shutdowns instead of hard power cuts.
Can I use a HAT with the Retroflag PS Pi Case?
No. Standard Raspberry Pi HAT modules cannot be mounted inside this enclosure. The internal active cooling assembly and power control wiring occupy the vertical clearance directly above the GPIO header.
Where is the MicroSD card slot on the Retroflag PS Pi Case?
The listing states that the card slot is side-mounted, while manufacturer technical references place it on the bottom panel. Confirm your current case revision visually before permanently mounting the console in an enclosure or fixture.
Will 2.4 GHz WiFi work reliably in the Retroflag PS Pi Case?
It depends on your environment, and interference can occur. Specific shielding data for this housing is not published, but high-speed USB 3.0 lines on the Pi 5 are known to create noise on 2.4 GHz frequencies. Connecting through 5 GHz Wi-Fi or wired Ethernet provides a significantly more stable connection.
Do I need to keep the lid open during gaming or other heavy Raspberry Pi 5 loads?
Opening the lid helps during long, intensive workloads. The internal fan, heatsink, and thermal pads manage routine heat output, while open-air venting improves heat dissipation during high-demand emulation tasks.
Does the Retroflag PS Pi Case work with the RF PiStation LCD?
Compatibility with the RF PiStation LCD remains unverified. The original LCD panel was designed around the dimensions and ports of the Pi 4 PiStation case, and documentation does not confirm physical or electrical fitment on this Pi 5 model.
For other chassis formats, mounting plates, or passive enclosures, see the available options in our Raspberry Pi cases catalog.
Purchase Decision Summary
- Ideal for: Raspberry Pi 5 emulation and retro gaming builds using HDMI screens, standard USB controllers, and a script-configured power switch.
- Maybe for: Media-center setups and compact living-room boxes that prioritize console styling and easily accessible front USB ports over raw internal access.
- Avoid if: You need GPIO expansion for HATs, require documented silent thermal operation with a permanently closed top lid, or intend to use the Pi 4-era PiStation LCD screen.
Buying Checklist
- Confirm you are using a Raspberry Pi 5 (earlier Pi boards will not fit).
- Verify that your project does not require an internal HAT or GPIO daughterboard.
- Ensure you have a 27W USB-C power source, a MicroSD card, and a Micro-HDMI cable.
- Plan to execute the RetroFlag safe-shutdown script installation after booting.
- Inspect your unit to confirm whether MicroSD access is positioned on the side or bottom panel.
- Prepare to use wired Ethernet or 5 GHz wireless networking to avoid potential 2.4 GHz USB noise.
Write Your Own Review

Please complete your information below to login.
Sign In
Create New Account