

Overview
What You Will Learn
- How the joystick module works
- How to set up a joystick module
- How to optimize joystick data
- Operate servo motor with a joystick
- Connect to Processing and use the joystick
How 2-Axis Joystick Works?
Gamers are very well familiar with joysticks. A Joystick is a device translating your hand movements to electric signals. Its simplicity and ease of use help you feel like you are actually inside the game or the robot you control.
The structure of this joystick module is the same as a ‘PlayStation 2’ joystick. Module’s lever is usually at the center. The joystick moves smoothly to the side and the self-centering spring brings it back to the center once released. The module includes a push button.
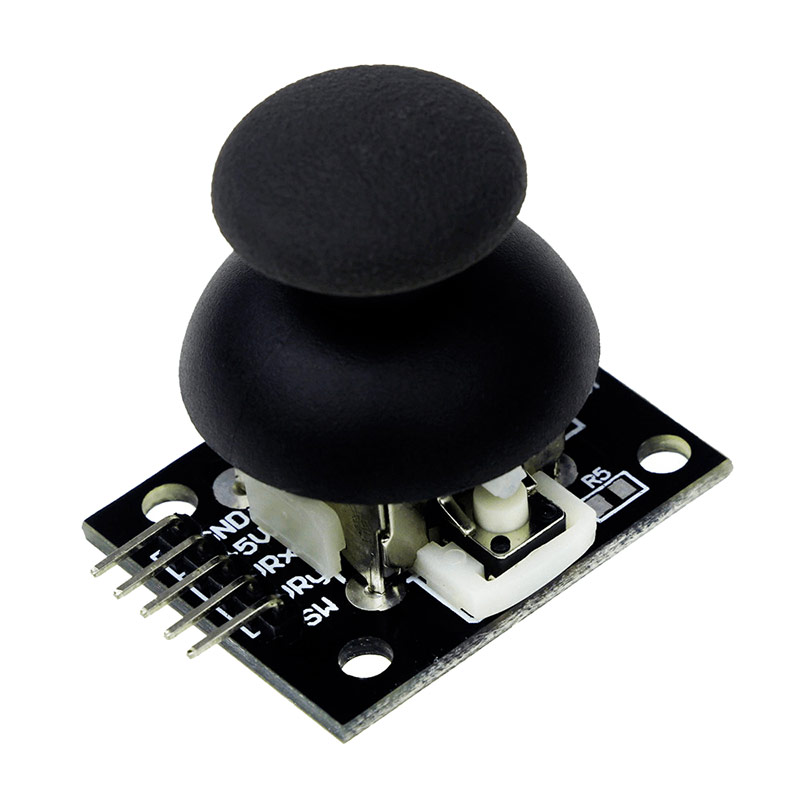
Joystick operates based on the resistance change of two potentiometers (usually 10-kilo ohms). By changing resistance in x and y directions, Arduino receives varying voltages which are interpreted to x and y coordinates. The processor needs an ADC unit to change the joystick’s analog values into digital values and perform necessary processing.
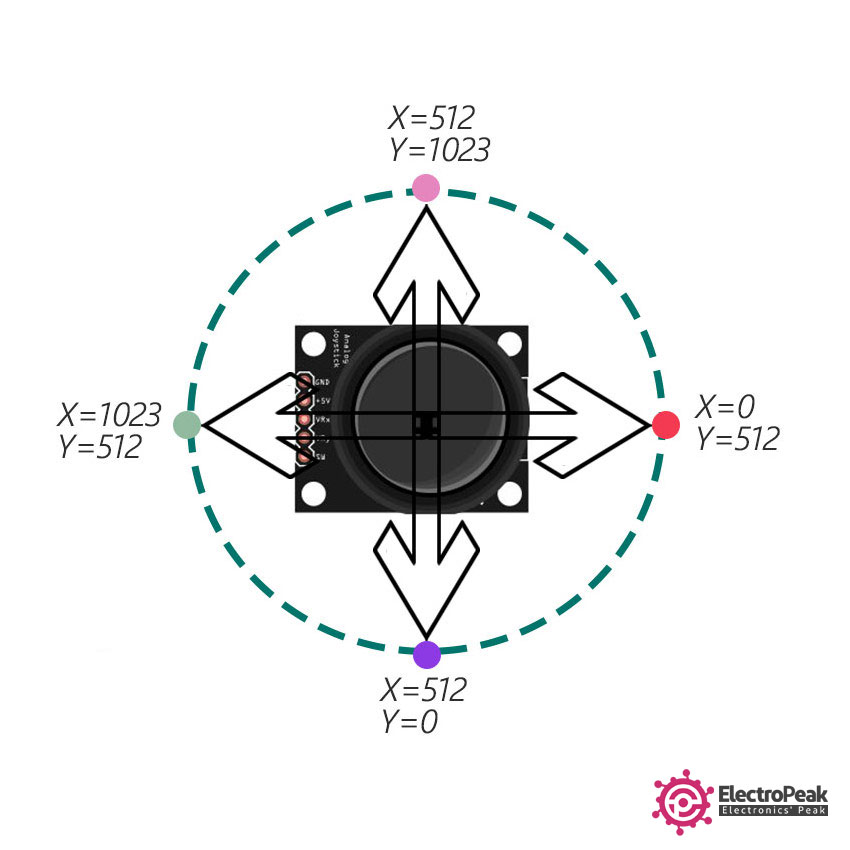
Arduino boards have six 10-bits ADC channels. It means the Arduino’s reference voltage (5 volts) is divided to 1024 segments. When joystick moves along the x-axis, the ADC value rises from 0 to 1023, with the value 512 in the middle. The image below displays the ADC approximate value based on the joystick position.
Note
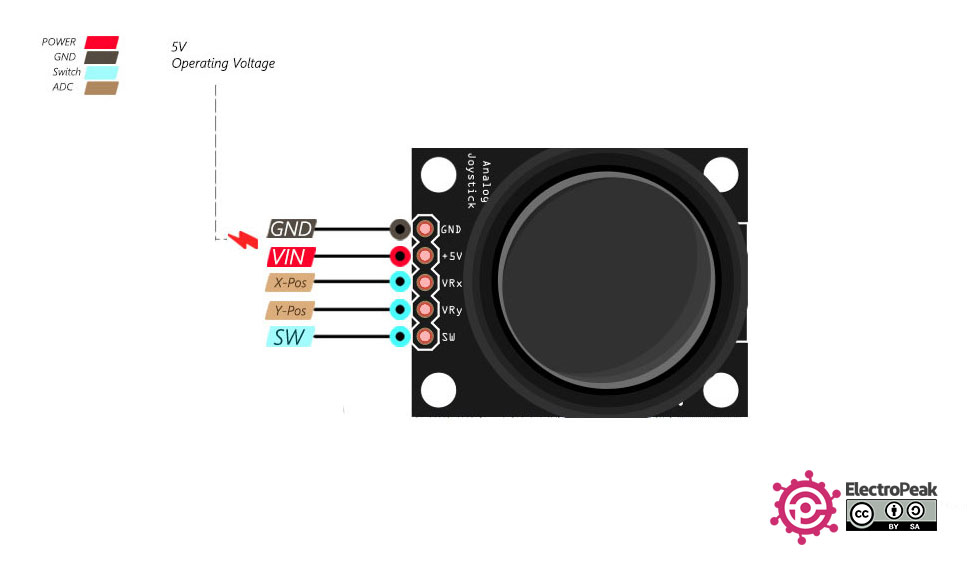
GND pin connects to the circuit’s ground.
Vcc pin is used to supply the 5-volt power to the module.
VRx pin is the analog output pin for X-axis (left and right).
VRy pin is the analog output pin for Y-axis (up and down).
SW pin is connected to the pull-up button. Once the button is pressed, SW pin outputs 0.
Required Materials
Hardware Components
** Servo motor is used in “controlling servo motor with joystick” example.
Software Apps
Interfacing Joystick with Arduino
In order to use the joystick module with Arduino, you just need to read the ADC values from VRx and VRy pins.
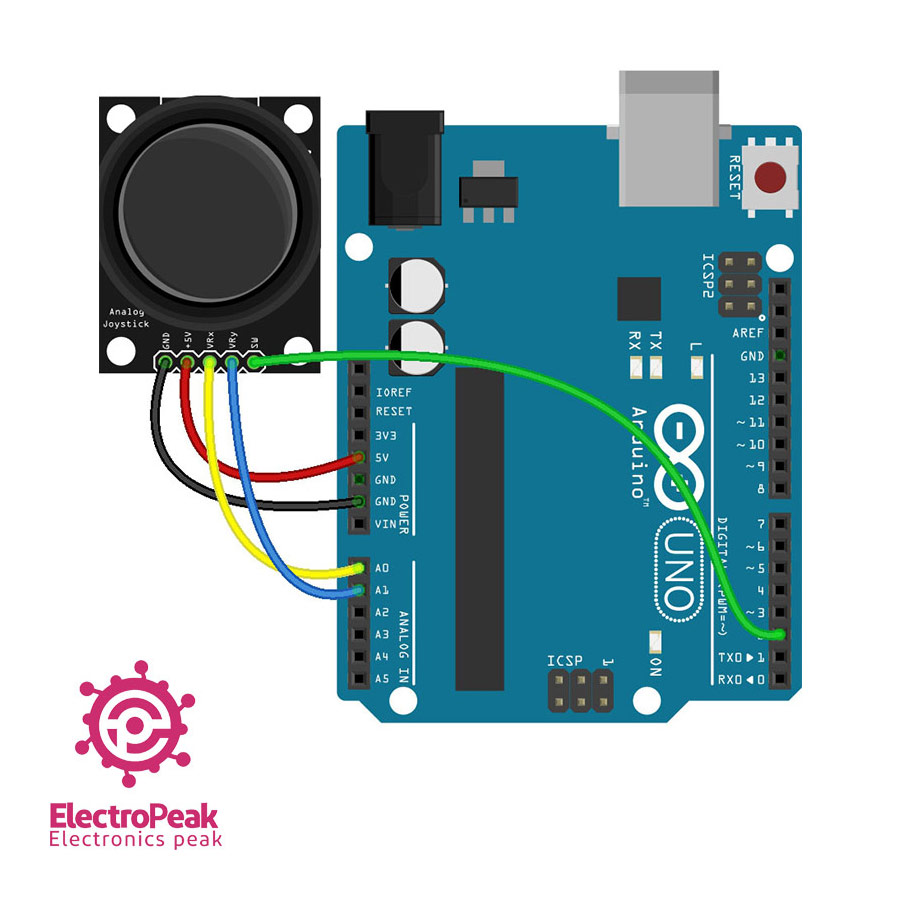
Circuit
Connect the module to the Arduino according to the following circuit.
Code
Upload the following code to your Arduino board and view the output in the serial monitor window. No library is necessary to operate the joystick module.
/*
  Joystick and Arduino

  modified on 21 Jul 2019
  by Saeed Hosseini @ Electropeak
  Home
*/

const int SW = 2; // SW
const int X = 0; // VRx
const int Y = 1; // VRy

void setup() {

  pinMode(SW, INPUT_PULLUP);
  Serial.begin(9600);

}

void loop() {

  Serial.print("Switch:  ");
  Serial.print(digitalRead(SW));
  Serial.print("\t\t");
  Serial.print("VRx: ");
  Serial.print(analogRead(X));
  Serial.print("\t\t");
  Serial.print("VRy: ");
  Serial.println(analogRead(Y));
  Serial.println("____________________________________________________________");
  delay(500);
}
Read the analog values using the analogRead(Pin) command and use those values.
How to Optimize the Joystick Data?
A major problem with joystick modules is the nonlinearity. ADC value does not change linearly with the joystick lever movement. This causes problems especially in projects requiring high precision, such as controlling flying robots.
Using the averaging techniques, you can make joystick data smoothen, so that nonlinearity wouldn’t be too problematic.
Upload the following code to your Arduino board. View the output in the Serial Monitor window and compare data with the initial simple setup.
Code
/*
  Joystick Smoothing

  modified on 21 Jul 2019
  by Saeed Hosseini @ Electropeak
  Home
  This code is based on https://www.arduino.cc/en/Tutorial/Smoothing
*/

const int X = 0;
const int Y = 1;

const int MaxReadings = 10;

int Xreadings[MaxReadings];
int XreadIndex = 0;
int Xtotal = 0;
int X_Pos = 0;

int Yreadings[MaxReadings];
int YreadIndex = 0;
int Ytotal = 0;
int Y_Pos = 0;

void Smoother(int x_pin, int y_pin)
{
  Xtotal = Xtotal - Xreadings[XreadIndex];
  Ytotal = Ytotal - Yreadings[YreadIndex];
  delay(1);
  Xreadings[XreadIndex] = analogRead(x_pin);
  Yreadings[YreadIndex] = analogRead(y_pin);
  delay(1);
  Xtotal = Xtotal + Xreadings[XreadIndex];
  Ytotal = Ytotal + Yreadings[YreadIndex];
  delay(1);
  XreadIndex = XreadIndex + 1;
  YreadIndex = YreadIndex + 1;
  if (XreadIndex >= MaxReadings) XreadIndex = 0;
  if (YreadIndex >= MaxReadings) YreadIndex = 0;
  delay(1);
  X_Pos = Xtotal / MaxReadings;
  Y_Pos = Ytotal / MaxReadings;

}
void setup() {
  Serial.begin(9600);
  for (int i = 0; i < MaxReadings; i++) {
    Xreadings[i] = 0;
    Yreadings[i] = 0;
  }
}
void loop() {
  Smoother(X,Y);
  Serial.print("VRx: ");
  Serial.print(X_Pos);
  Serial.print("\t\t");
  Serial.print("VRy: ");
  Serial.println(Y_Pos);
  Serial.println("____________________________________________________________");
  delay(100);
}
The MaxReading variable sets the averaging count. Higher averaging count makes data smoother and more linear, but decreases module’s speed. You can choose the proper balance between precision and speed according to the project requirements.
Controlling a Servo Motor with Joystick
In order to better understand how the joystick module works, we are going to control a servo motor with this module.
Circuit

Code
/*
  Joystick and servo motor

  modified on 21 Jul 2019
  by Saeed Hosseini @ Electropeak
  Home
  This code is based on https://www.arduino.cc/en/Tutorial/Smoothing
*/
#include <Servo.h>

Servo myservo;

const int X = 0;
const int Y = 1;

const int MaxReadings = 10;

int Xreadings[MaxReadings];
int XreadIndex = 0;
int Xtotal = 0;
int X_Pos = 0;

int Yreadings[MaxReadings];
int YreadIndex = 0;
int Ytotal = 0;
int Y_Pos = 0;

int Servo_Pos = 0, Pos = 0;

void Smoother(int x_pin, int y_pin)
{
  Xtotal = Xtotal - Xreadings[XreadIndex];
  Ytotal = Ytotal - Yreadings[YreadIndex];
  delay(1);
  Xreadings[XreadIndex] = analogRead(x_pin);
  Yreadings[YreadIndex] = analogRead(y_pin);
  delay(1);
  Xtotal = Xtotal + Xreadings[XreadIndex];
  Ytotal = Ytotal + Yreadings[YreadIndex];
  delay(1);
  XreadIndex = XreadIndex + 1;
  YreadIndex = YreadIndex + 1;
  if (XreadIndex >= MaxReadings) XreadIndex = 0;
  if (YreadIndex >= MaxReadings) YreadIndex = 0;
  delay(1);
  X_Pos = Xtotal / MaxReadings;
  Y_Pos = Ytotal / MaxReadings;

}


void setup() {

  Serial.begin(9600);
  myservo.attach(9);
  for (int i = 0; i < MaxReadings; i++) {
    Xreadings[i] = 0;
    Yreadings[i] = 0;
  }
}

void loop() {
  Smoother(X, Y);
  Servo_Pos = map(X_Pos, 0, 1023, 0, 180);
  myservo.write(Servo_Pos);
  Serial.println(Servo_Pos);
  delay(20);
}
We use the averaging method to receive the joystick data. Since servo motor position changes from 0 to 180 degrees, we need to convert joystick data which goes from 0 to 1023. We use map(X_Pos, 0, 1023, 0, 180) command for this purpose.
Joystick Communication with Processing
Processing is a set of Java libraries alongside a programming environment developed in 2001. It provides a visual interactive environment for education. Easy connection to boards such as Arduino and the graphical interactive environment has made Processing quite popular. Processing comes completely free of charge and can be downloaded here.


Processing can receive information from mouse, keyboard and serial ports. In this project, Processing joystick data goes through the computer’s serial port and Processing receives and processes these data.
Therefore we need two sets of codes for this part:
Extracting the joystick coordinates (x,y) and Sending it to Processing Using Arduino
Upload the following code to the Arduino:
/*
  Joystick and Processing

  modified on 21 Jul 2019
  by Saeed Hosseini @ Electropeak
  Home
*/

const int X = 0;
const int Y = 1;


int b = 0;
int x = 0;
int y = 0;

const int MaxReadings = 10;

int Xreadings[MaxReadings];
int XreadIndex = 0;
int Xtotal = 0;
int X_Pos = 0;

int Yreadings[MaxReadings];
int YreadIndex = 0;
int Ytotal = 0;
int Y_Pos = 0;

void Smoother(int x_pin, int y_pin)
{
  Xtotal = Xtotal - Xreadings[XreadIndex];
  Ytotal = Ytotal - Yreadings[YreadIndex];
  delay(1);
  Xreadings[XreadIndex] = analogRead(x_pin);
  Yreadings[YreadIndex] = analogRead(y_pin);
  delay(1);
  Xtotal = Xtotal + Xreadings[XreadIndex];
  Ytotal = Ytotal + Yreadings[YreadIndex];
  delay(1);
  XreadIndex = XreadIndex + 1;
  YreadIndex = YreadIndex + 1;
  if (XreadIndex >= MaxReadings) XreadIndex = 0;
  if (YreadIndex >= MaxReadings) YreadIndex = 0;
  delay(1);
  X_Pos = Xtotal / MaxReadings;
  Y_Pos = Ytotal / MaxReadings;

}


void setup()
{
  Serial.begin(9600) ;
  pinMode(2, INPUT_PULLUP) ;
  for (int i = 0; i < MaxReadings; i++) {
    Xreadings[i] = 0;
    Yreadings[i] = 0;
  }
}

void loop()
{
  Smoother(X,Y);
  x = map(X_Pos, 0, 1023, 0, 512);
  y = map(Y_Pos, 0, 1023, 0, 512);
  b = digitalRead(2);

  Serial.print(x, DEC);
  Serial.print(",");
  Serial.print(y, DEC);
  Serial.print(",");
  Serial.print(!b);

  Serial.print("\n");

  delay(10);
}
You should separate the data with “,” and use “\n” to declare the ending for the Processing software.
Receiving Joystick Data via Serial Port and Processing Them
Copy the following code to the Processing software and execute the code:
/*
  Joystick and Processing
  modified on 21 Jul 2019
  by Saeed Hosseini @ Electropeak
  Home
  Thanks to http://learningprocessing.com/examples/
*/
import processing.serial.*;
Serial myPort;
int VRx;
int VRy;
int but;
String val;
int maxImages = 5;
int imageIndex = 0;
int i = 1;
PImage[] img = new PImage[maxImages];
PImage image;
void setup() {
  size(512, 512);
  myPort = new Serial(this, "COM5", 9600);
  myPort.bufferUntil('\n');
  background(0);
}
void draw() {
  game();
}
void serialEvent( Serial myPort)
{
  // read the data until the newline n appears
  val = myPort.readStringUntil('\n');
  if (val != null)
  {
    val = trim(val);

    // break up the decimal and new line reading
    int[] vals = int(splitTokens(val, ","));
    // we assign to variables
    VRx = vals[0];
    VRy = vals[1] ;
    but = vals[2];
  }
}
void game() {
  img[i] = loadImage( "p" + i + ".jpg" );
  image = img[i];
  loadPixels();
  img[i].loadPixels();
  for (int x = 0; x < image.width; x++ ) {
    for (int y = 0; y <image.height; y++ ) {

      // Calculate the 1D pixel location
      int loc = x + y*image.width;

      // Get the R,G,B values from image
      float r = red  (image.pixels[loc]);
      float g = green(image.pixels[loc]);
      float b = blue (image.pixels[loc]);

      // Calculate an amount to change brightness
      // based on proximity to the mouse
      float distance = dist(x, y, VRy, VRx);

      // The closer the pixel is to the mouse, the lower the value of "distance"
      // We want closer pixels to be brighter, however, so we invert the value using map()
      // Pixels with a distance of 50 (or greater) have a brightness of 0.0 (or negative which is equivalent to 0 here)
      // Pixels with a distance of 0 have a brightness of 1.0.
      float adjustBrightness = map(distance, 0, 50, 1, 0);
      r *= adjustBrightness;
      g *= adjustBrightness;
      b *= adjustBrightness;

      // Constrain RGB to between 0-255
      r = constrain(r, 0, 255);
      g = constrain(g, 0, 255);
      b = constrain(b, 0, 255);

      // Make a new color and set pixel in the window
      color c = color(r, g, b);
      pixels[loc] = c;

      if (but == 1) i++;
      if (i>4) i = 1;
    }
  }

  updatePixels();
}
Pressing the center button displays the next image.
In the “float adjustBrightness = map(distance, 0, 50, 1, 0)” command, you can change the initial value (50) to make the game harder or easier.
Note
To establish the serial connection, disconnect and reconnect the Arduino board from the computer after making any changes in the program. Then run our code in the Processing.
What’s Next?
- Try to make a gaming joystick using two joystick modules.
- Try to use the NRF24L01 to make the gaming joystick wireless.

Comments (2)
Dear sir/Madam,
My name is Ger from the Netherlands and enjoy your article to become wiser.
there is only one question:
Where does the variable Smoother(int x_pin, int y_pin) come from.
Thanks for an answer,
Regards Ger
Hi.
thanks for your compliment dear Ger.
about the Smoother function, it has been defined by author and also same as the variables x_pin and y_pin.
so, you can define the variables in function like below(this is usual method in c Program) :
void function(char i , int j)
{
}