

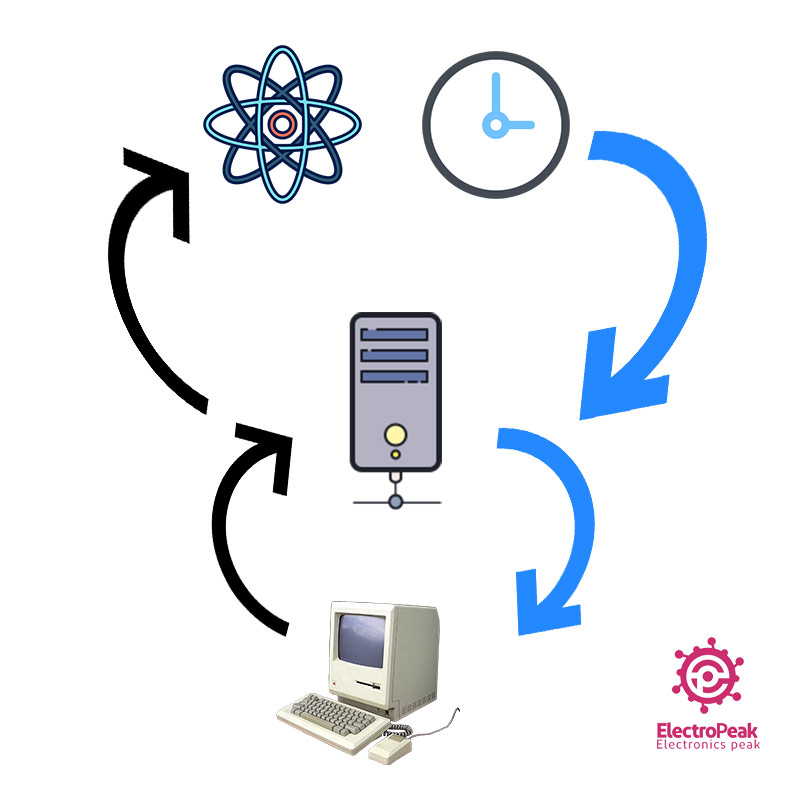
Overview
In electronic projects, performing operations at a specific time or showing the time to the user has always been one of the challenges ahead. The first common solution to this challenge is to use RTC ICs such as DS1307, Which are not usually accurate (for more information, see “How to Use DS1307 RTC Module with Arduino & Make a Remider?”). A newer and more accurate solution is to receive the time and date from a central server via the Internet.
What You Will Learn
- Get to know with the concept of NTP
- Build NTP clock with Nodemcu
- Build NTP clock with ESP32 and OLED display
What is NTP and how does it work?
Required Materials
Hardware Components
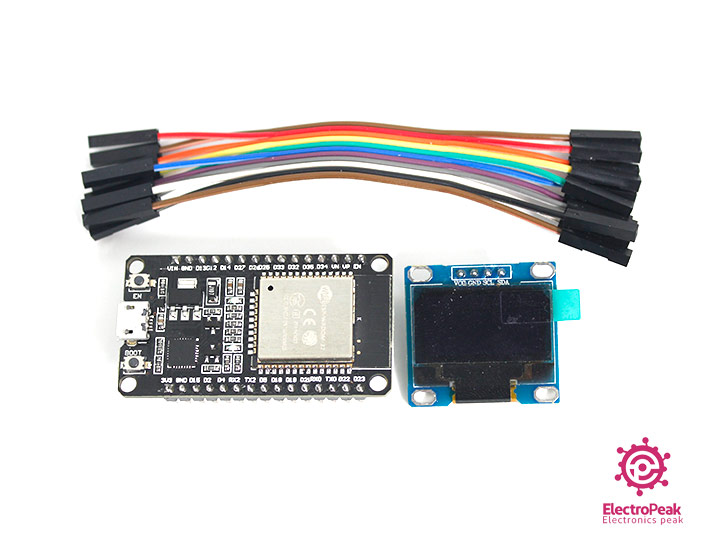
Software Apps
Getting Date and Time from NTP Server Using ESP8266
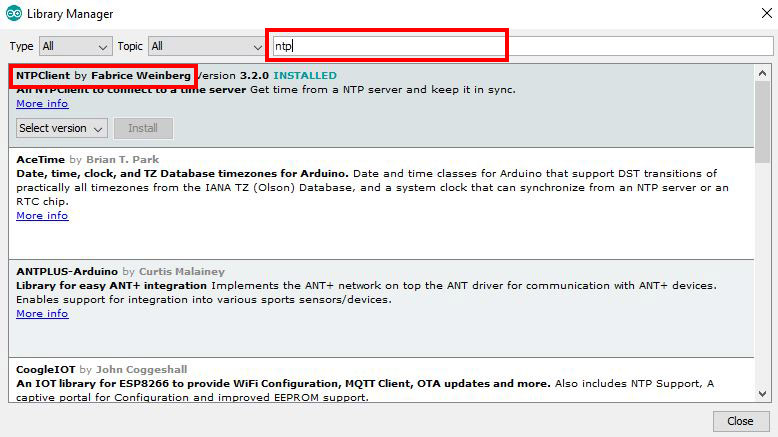
To get date and time from NTP using Nodemcu module or other ESP8266 based modules, you must first install the NTP library by searching Library Management.
Now program the following code on your NodeMcu board and see the result in Serial Monitor:
/*
  NTP Clock with NodeMCU
  modified on 18 DEC 2019
  by Saeed Hosseini @ Electropeak
  Home
*/
#include <NTPClient.h>
#include <ESP8266WiFi.h>
#include <WiFiUdp.h>
const char *ssid     = "YOUR SSID";
const char *password = "YOUR SSID PASSWORD";
const long utcOffsetInSeconds = 12600;
char daysOfTheWeek[7][12] = {"Sunday", "Monday", "Tuesday", "Wednesday", "Thursday", "Friday", "Saturday"};
// Define NTP Client to get time
WiFiUDP ntpUDP;
NTPClient timeClient(ntpUDP, "pool.ntp.org", utcOffsetInSeconds);

void setup(){
  Serial.begin(115200);

  WiFi.begin(ssid, password);

  while ( WiFi.status() != WL_CONNECTED ) {
    delay ( 500 );
    Serial.print ( "." );
  }

  timeClient.begin();
}

void loop() {
  timeClient.update();

  Serial.print(daysOfTheWeek[timeClient.getDay()]);
  Serial.print(", ");
  Serial.print(timeClient.getHours());
  Serial.print(":");
  Serial.print(timeClient.getMinutes());
  Serial.print(":");
  Serial.println(timeClient.getSeconds());
  //Serial.println(timeClient.getFormattedTime());

  delay(1000);
}
First we add the necessary libraries to the code, then we enter the name and password of our WiFi router.
Modify the utcOffsetInSeconds variable according to your location, you can find your country’s UTC coefficient here.
For example, the UTC coefficient for the United States is calculated as follows:
UTC = -11:00
utcOffsetInSeconds = -11*60*60 = -39600
Our server for receiving NTP is the pool.ntp.org server.
Then after connecting to the Internet with time client, we can get the date and time.
Getting Date & Time From NTP Server Using ESP32
If you are not familiar with ESP32 boards and how to add and program them with the Arduino IDE, see “Getting Started with the ESP32 on Arduino IDE“.
Now program the following code on your ESP32 and see the result Serial Monitor.
#include <WiFi.h>
#include "time.h"
const char* ssid = "YOUR_SSID";
const char* password = "YOUR_PASS";
const char* ntpServer = "pool.ntp.org";
const long gmtOffset_sec = 12600;
const int daylightOffset_sec = 3600;
void printLocalTime()
{
struct tm timeinfo;
if(!getLocalTime(&timeinfo)){
Serial.println("Failed to obtain time");
return;
}
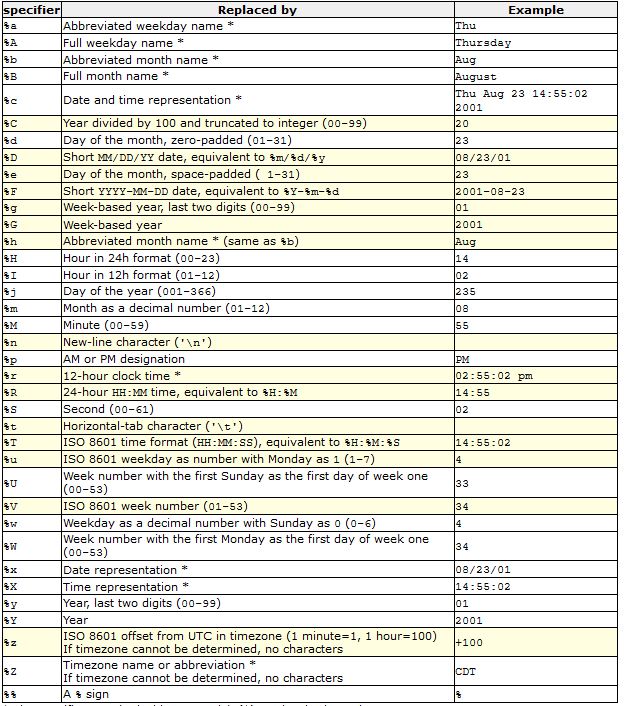
Serial.println(&timeinfo, "%A, %B %d %Y %H:%M:%S");
}
void setup()
{
Serial.begin(115200);
//connect to WiFi
Serial.printf("Connecting to %s ", ssid);
WiFi.begin(ssid, password);
while (WiFi.status() != WL_CONNECTED) {
delay(500);
Serial.print(".");
}
Serial.println(" CONNECTED");
//init and get the time
configTime(gmtOffset_sec, daylightOffset_sec, ntpServer);
printLocalTime();
//disconnect WiFi as it's no longer needed
WiFi.disconnect(true);
WiFi.mode(WIFI_OFF);
}
void loop()
{
delay(1000);
printLocalTime();
}
We first configure WiFi as in the NodeMcu project.
As before, we calculate and change gmtOffset_sec, in the case of the daylightOffset_sec variable, if your country is one of the countries where there is a clock change law (you can see a list of these countries here), set it to 3600, otherwise set it to 0. The NTP server is the same as before pool.ntp.org. The printLocalTime () function also extracts and displays the necessary information from the timeinfo according to the NTP structure table.
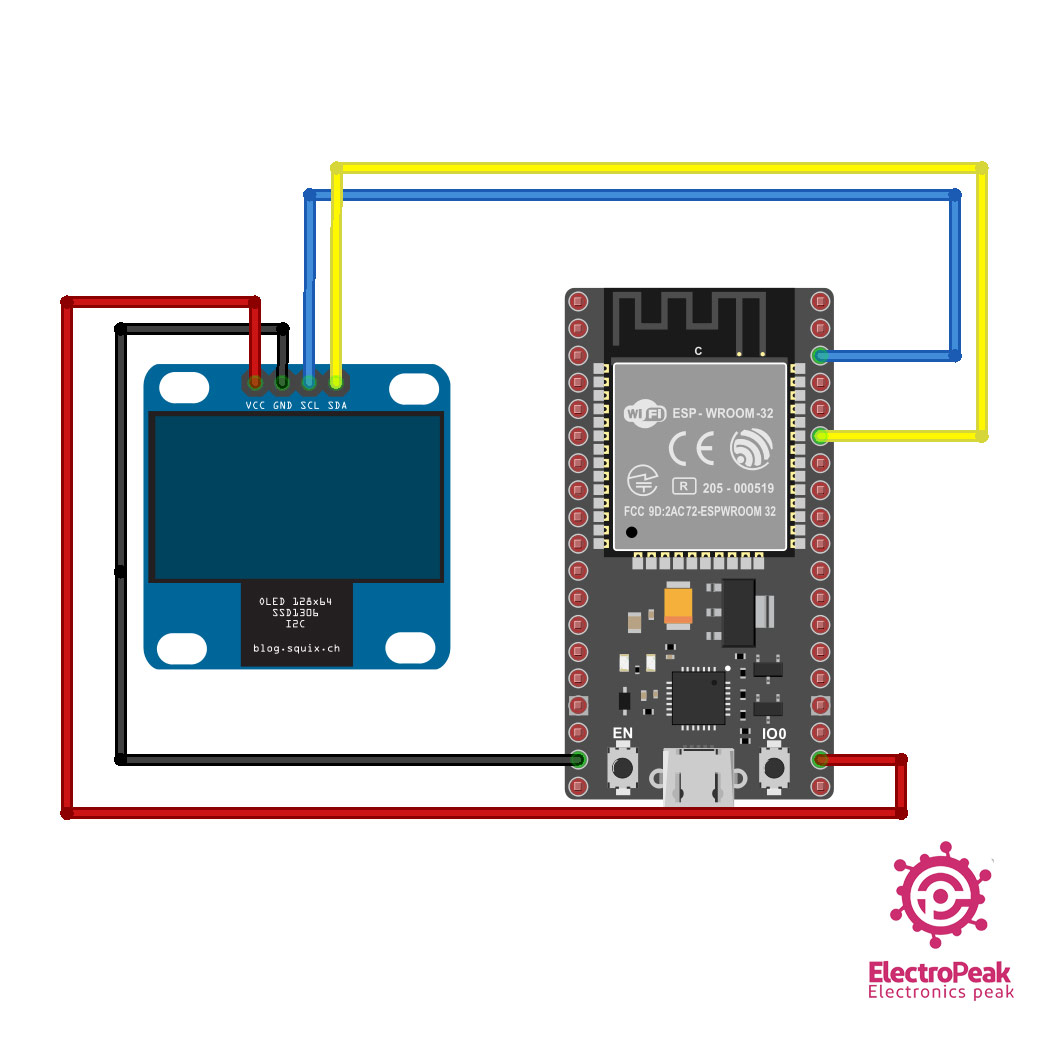
Building An Accurate Clock Using OLED and ESP32
To make the watch project more beautiful and practical with NTP, we display it on a 0.96 ”I2C OLED display.
Circuit
Code
Upload the following code to your ESP32 and view the result on the screen.
/*
  NTP Clock with ESP32 and OLED
  modified on 18 DEC 2019
  by Saeed Hosseini @ Electropeak
  Home
*/
#include <Wire.h>
#include <Adafruit_GFX.h>
#include <Adafruit_SSD1306.h>
#include "logo.h"
#include <WiFi.h>
#include "time.h"
#define SCREEN_WIDTH 128
#define SCREEN_HEIGHT 64
#define OLED_RESET     -1

Adafruit_SSD1306 display(SCREEN_WIDTH, SCREEN_HEIGHT, &Wire, OLED_RESET);
const char* ssid       = "CafeRobot Inc.";
const char* password   = "caferobot.ir";
const char* ntpServer = "pool.ntp.org";
const long  gmtOffset_sec = 12600;
const int   daylightOffset_sec = 3600;

void diplay_logo(int x, int y, const uint8_t *bitmap, int w, int h) {
  display.drawBitmap(x, y, bitmap, w, h, WHITE);
}

void display_text(int sz, int x, int y, String str) {
  display.setTextSize(sz);
  display.setTextColor(WHITE);
  display.setCursor(x, y);
  display.println(str);
}

void display_number(int sz, int x, int y, double num) {
  display.setTextSize(sz);
  display.setTextColor(WHITE);
  display.setCursor(x, y);
  display.println(num);
}

void system_setup() {
  Serial.begin(115200);
  display.begin(SSD1306_SWITCHCAPVCC, 0x3C);
  display.clearDisplay();
  diplay_logo(13, 20, Electropeak, 128, 32);
  display.display();
  delay(1000);
  display.clearDisplay();
  //  while (WiFi.status() != WL_CONNECTED) {
  //    loading();
  //  }
}

void loading() {
  display_text(2, 0, 25, "Loading");
  display_text(2, 85, 25, ".");
  display.display();
  delay(500);
  display_text(2, 95, 25, ".");
  display.display();
  delay(500);
  display_text(2, 105, 25, ".");
  display.display();
  delay(500);
  display.fillRect(85, 25, 40, 20, BLACK);
  display.display();
  delay(500);
}

void printLocalTime()
{
  String s = "";
  char h [80];
  char m [80];
  char p [80];

  struct tm timeinfo;
  if (!getLocalTime(&timeinfo)) {
    Serial.println("Failed to obtain time");
    return;
  }
  Serial.println(&timeinfo, "%H:%M:%S");
  strftime (h, 80, "%I", &timeinfo);
  strftime (m, 80, "%M", &timeinfo);
  strftime (p, 80, "%p", &timeinfo);

  display_text(3, 15, 30, h);
  display_text(3, 50, 30, ":");
  display_text(3, 65, 30, m);
  display_text(1, 108, 45, p);
  display.display();
}

void setup() {
  system_setup();
  WiFi.begin(ssid, password);
  while (WiFi.status() != WL_CONNECTED) {
    loading();
  }
  display.clearDisplay();
  diplay_logo(0, 0, Wifi, 16, 16);
  display.display();
  configTime(gmtOffset_sec, daylightOffset_sec, ntpServer);
  printLocalTime();

  //disconnect WiFi as it's no longer needed
  WiFi.disconnect(true);
  WiFi.mode(WIFI_OFF);

}

void loop() {
  printLocalTime();
  delay(10000);
  display.clearDisplay();
  diplay_logo(0, 0, Wifi, 16, 16);
  display.display();

}
The only difference between this code and the previous code is that with the strftime we separate the amount of hour, minute and AM / PM from timeinfo and save them in a string and then display them in clock format on the display.
What’s Next?
- Try to show the date in the display as well.
- Try to create a smart alarm with NTP clock.

Comments (2)
Hi where can i download a copy of the logo.h file ?
The link you need to download the “logo.h” file is given in this article. It’s right under the first sentence of the Code part.