
Overview
In this tutorial, you will explore the input and output pins of the Raspberry Pi and learn how to control them using the powerful Python 3 programming language. We will focus on two widely used libraries, Gpiozero and Rpi.GPIO, to facilitate GPIO (General Purpose Input/Output) pin control and interaction.
What You Will Learn
- introduction to GPIO pins
- How to install the Rpi.GPIO and GPIOZero libraries
- LED control, key, bar graph, RGB LED and LDR

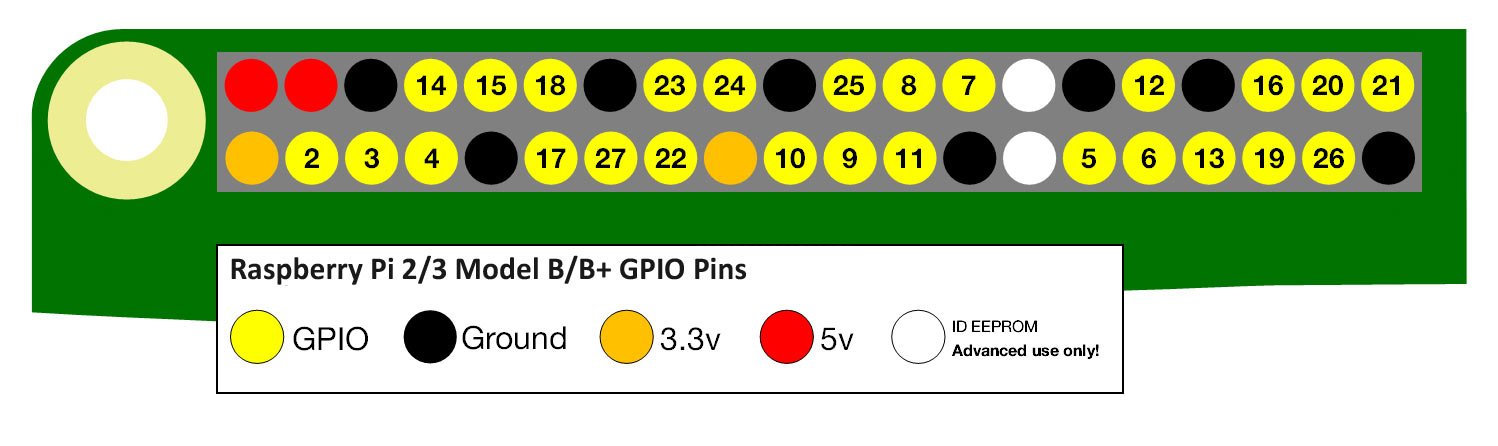
Raspberry Pi Pinout
GPIO stands for general-purpose-input/output. Raspberry Pi boards have 40 pins that you can use them to communicate with other components.
All Raspberry Pi boards share the same GPIO header with similar functionality. Therefore, the information provided in this guide is applicable to both versions 3 and 4 of the Raspberry Pi:
- Raspberry Pi 4B 2GB RAM
- Raspberry Pi 4B 4GB RAM
- Raspberry Pi 4B 8GB RAM
- Raspberry Pi 3B
- Raspberry Pi 3B+
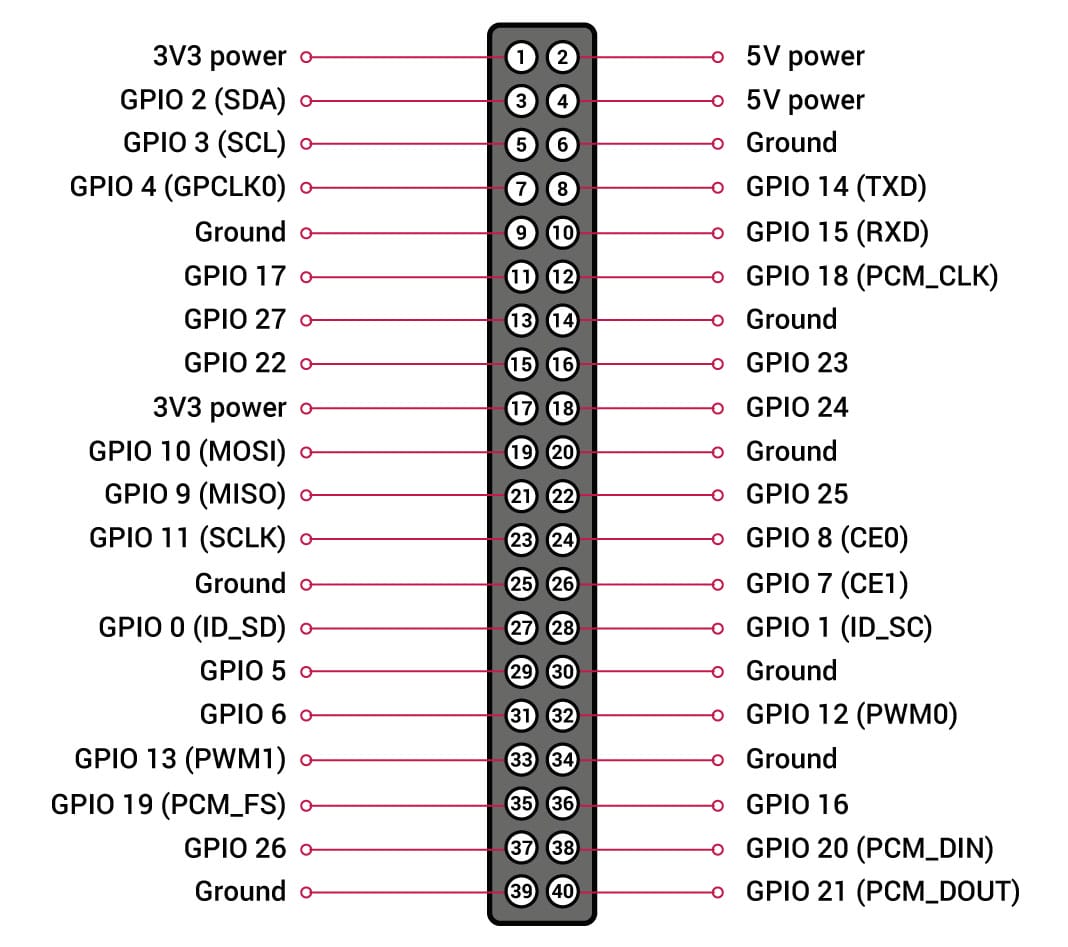
The arrangement of the pins is as follows:

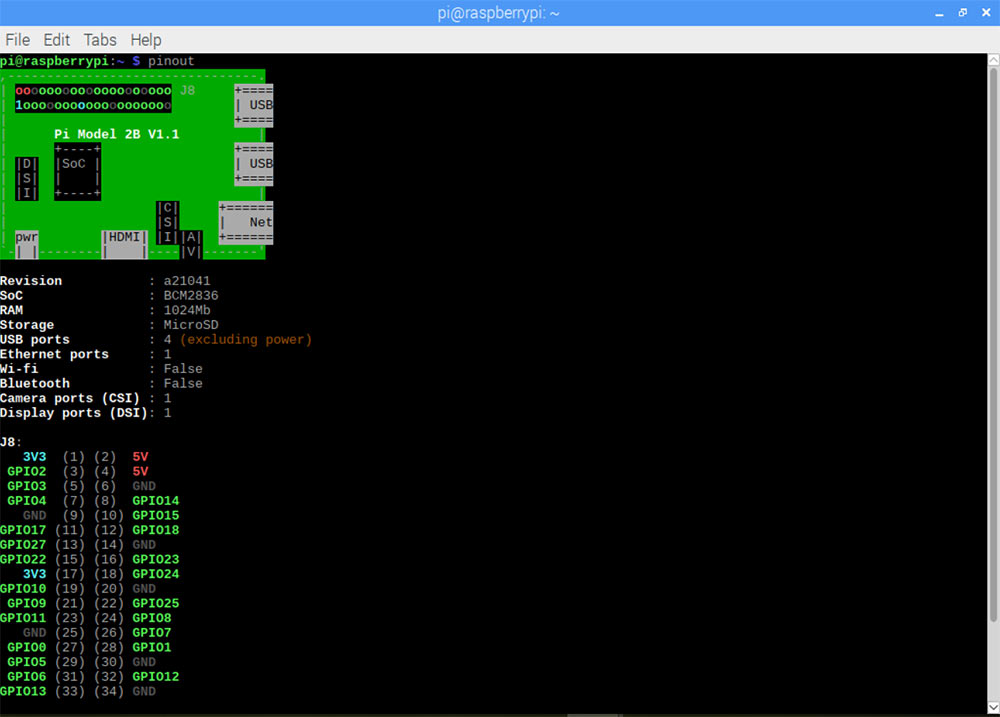
If your Raspberry board operating system is Raspberry Pi OS (formerly called Raspbian), then you can see pins arrangement by entering pinout command in terminal.
These pins have different capabilities, including:
- PWM (pulse-width modulation)
- Software PWM available on all pins
- Hardware PWM available on GPIO12, GPIO13, GPIO18, GPIO19
- SPI (Serial Peripheral Interface)
- SPI0: MOSI (GPIO10); MISO (GPIO9); SCLK (GPIO11); CE0 (GPIO8), CE1 (GPIO7)
- SPI1: MOSI (GPIO20); MISO (GPIO19); SCLK (GPIO21); CE0 (GPIO18); CE1 (GPIO17); CE2 (GPIO16)
- I2C (Inter-Integrated Circuit)
- Data: (GPIO2); Clock (GPIO3)
- EEPROM Data: (GPIO0); EEPROM Clock (GPIO1)
- Serial
- TX (GPIO14); RX (GPIO15)
How to Use Raspberry Pi GPIO Pins with Python
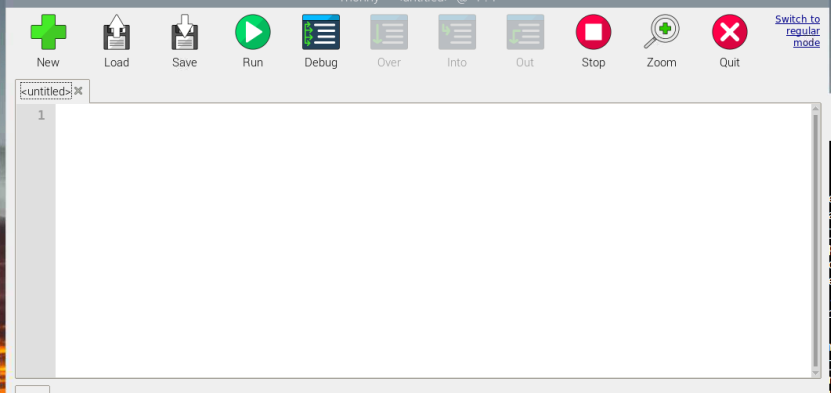
Raspberry Pi OS includes a pre-installed Python editor known as Thonny Python IDE, enabling users to program the GPIO pins in Python. The steps for creating a Python code using the Thonny Python editor are detailed below, accompanied by an illustrative example:
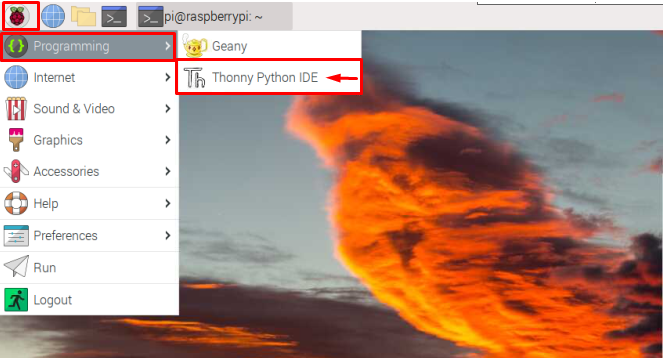
Step 1: Launch Python Editor
Access the Python editor by navigating to the Application Menu and selecting the “Programming” option to initiate the Thonny Python IDE on the Raspberry Pi desktop.
Step 2: Importing GPIO Module
To initiate the use of GPIO pins, it is necessary to import the GPIO library using the code:
import RPi.GPIO as GPIO
This library, which comes pre-installed on the Raspberry Pi system, facilitates GPIO pin control.
By using this command, we are just importing this RPi.GPIO module and calling it as GPIO so that we can just simply use the GPIO instead of writing the whole name again and again in the code.

Python Gpiozero API Library for Raspberry Pi GPIO
The Gpiozero library is one of the most comprehensive libraries available to control the Raspberry pi GPIO pins in Python language.
Many components have already been defined in this library. (such as an LED, Button, Baragraph LED, and etc) so working with this library is very easy and you can easily control different components with it.
Note
This library contains distinct classes for each component, with each class offering a variety of methods. While it’s not necessary to have prior knowledge of object-oriented programming for this tutorial, we highly recommend learning it to enhance your comprehension of the program.
How to Setup Gpiozero
This library is available on Raspberry PI OS default and you don’t need to install it.
Note: if you are not using Raspberry PI OS, you can install the library using the following commands:
For python3:
sudo pip3 install gpiozero
For python2:
sudo pip install gpiozero
To use this library, just import it into the Python programming environment.
The first method:(recommended)
from gpiozero import [name of class]
second method: import gpiozero
Basic Commands
When you have imported the library, you can use the commands defined within it to control GPIO pins.
LED-related commands
| led = LED(# of pin) | Determine the pin that is connected to the LED |
|---|---|
| on() | Turning on |
| off() | Turning off |
| toggle() | Changing status* |
| blink() | blinking |
*Turn LED on if it’s off and vice-versa.
Button-related commands
| button = Button(# of a pin) | Determine the pin that is connected to button |
|---|---|
| wait_for_press () | Wait until a button is pressed |
| wait_for_release () | Wait until a button is released |
| is_pressed | If a button is pressed returns 1 otherwise returns 0 |
| when_pressed | Do specific function when a button is pressed |
| when_released | Do specific function when a button is released |
Bar graph-related commands
| graph = LEDBarGraph(# of pins) | Determine the pin that is connected to Bargraph |
|---|---|
| graph.value = value | Turning some LEDs on |
Buzzer-related commands
| buzzer = Buzzer (# of a pin) | Determine the pin that is connected to Buzzer |
|---|---|
| on() | Turning on |
| off() | Turning off |
| toggle() | Changing status |
RGB-related commands
| led = RGBLED(red=#, green=#, blue=#) | Determine the pins wich are connected to RGB |
|---|---|
| led.red = value | Turning on in red |
| led.green = value | Turning on in green |
| led.blue = value | Turning on in blue |
| on() | Turning on off all colors |
| off() | Turning off all colors |
| toggle() | Changing the status |
LDR-related commands
| sensor = LightSensor(# of a pin) | Determine the pin which is connected to photocell |
|---|---|
| wait_for_dark () | Waiting for the environment to light down then executes the next commands |
| wait_for_light () | Waiting for the environment to light up then executes the next commands |
| light_detected | If the environment is clear, it returns 1 and otherwise returns 0. |
| when_dark | Performing a specific function when the environment is dark |
| when_light | Performing a specific function when the environment is clear |
For more information check the following link:
Raspberry Pi GPIO Python API Library
Another famous library in launching input and output pins is the Raspberry Pi GPIO library. You can use this library in python programming.
How to Setup the Raspberry Pi GPIO Library
The Raspberry Pi GPIO library is also available on Raspbian operating system by default and you don’t need to install it. To use this library, just import it into your Python programming environment using the following command:import RPi.GPIO
Basic Raspberry Pi GPIO Commands
The GPIO set mode(GPIO.BCM)
GPIO.setmode(GPIO.BCM): Using pins BCM numbersGPIO.setup(# of pin, GPIO.IN): Determine the pin as inputGPIO.setup(# of pin, GPIO.OUT): Determine the pin as an outputGPIO.setup(# of pin, GPIO.OUT, initial=GPIO.HIGH): Initialization outputGPIO.input(# of pin): Reading input pinGPIO.output(# of pin, state): Writing on the output pin
Note
If you have used the same pin in several scripts at the same time, you will see a warning when the code is running. To disable this alert, use the following command before setting up the pins:
GPIO.setmode(GPIO.BCM)
Raspberry Pi GPIO Examples
Here are some examples of how you can utilize GPIO pins with the Raspberry Pi to grasp the fundamentals of Raspberry Pi GPIO programming.
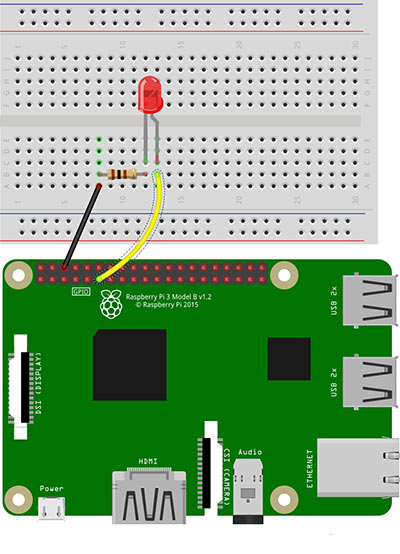
Example 1: Control LED with Raspberry Pi GPIO
Circuit
Connect a LED to GPIO17 pin using a resistance.
Code
- Turn On and OFF LED w/ Gpiozero
from gpiozero import LED
from time import sleep

red = LED(17)

while True:
    red.on()    #turn led on
    sleep(1)    #delay for 1 second
    red.off()   #turn led off
sleep(1):- Turning LED on and off with RPi.GPIO
import RPi.GPIO as GPIO
from time import sleep
GPIO.setwarnings(False)

GPIO.setmode(GPIO.BCM)
GPIO.setup(17, GPIO.OUT)
GPIO.output(17, True)
sleep(2)
GPIO.output(17, False)- Blinking LED w/ Gpiozero
 from gpiozero import LED
from signal import pause
red = LED(17)
red.blink(2,1,5) #2second on, 1second off, 5 times blink - Blinking LED w/ RPi.GPIO
import RPi.GPIO as GPIO
from time import sleep
GPIO.setwarnings(False)

GPIO.setmode(GPIO.BCM)
GPIO.setup(17, GPIO.OUT)

while True:
    GPIO.output(17, True)
    sleep(1)
    GPIO.output(17, False)
sleep(1) - LED with variable brightness w/ Gpiozero
from gpiozero import PWMLED
from time import sleep
led = PWMLED(17)
while True:
    led.value = 0    # off
    sleep(1)
    led.value = 0.2  # 20% brightness
    sleep(1)
    led.value = 0.4  # 40% brightness
    sleep(1)
    led.value = 0.6  # 60% brightness
    sleep(1)
    led.value = 1    # full brightness
sleep(1) - Gpiozero (Method 2)
from gpiozero import PWMLED
from signal import pause

led = PWMLED(17)
led.pulse(1,1,3) #fade_in in 1s, fade_out in 1s, do it for 3 times
pause() - LED with variable brightness w/ RPi.GPIO
import RPi.GPIO as GPIO
from time import sleep
GPIO.setwarnings(False)
GPIO.setmode(GPIO.BCM)
GPIO.setup(17, GPIO.OUT)
p = GPIO.PWM(17, 100) # 100 is frequency
dc = 0
p.start(dc) # where dc is the duty cycle (0.0 <= dc <= 100.0)
for x in range(3):
for i in range(0, 10):
dc += 10
p.ChangeDutyCycle(dc) # where 0.0 <= dc <= 100.0
sleep(0.2)
for i in range(0, 10):
dc -= 10
p.ChangeDutyCycle(dc) # where 0.0 <= dc <= 100.0
sleep(0.2)
p.stop()
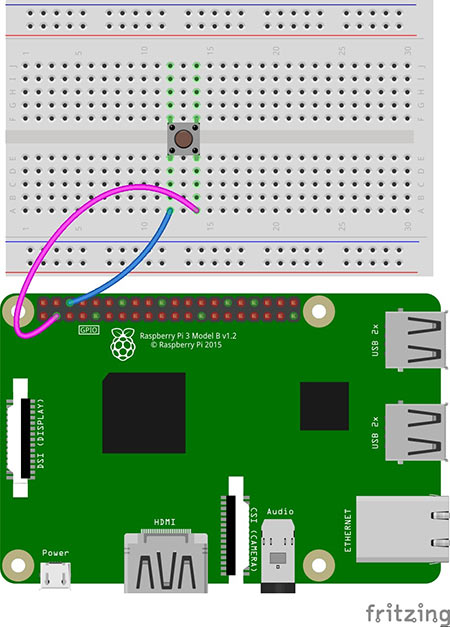
GPIO.cleanup() Example 2: Control a Button with Raspberry Pi GPIO
Circuit
connect button to Pin2. Pin2 is always pulled up bu default.
Code
- Check if a Button is pressed w/ Gpiozero:
from gpiozero import Button
from time import sleep
button = Button(2)
while True:
    if button.is_pressed:
        print("Button is pressed")
sleep(0.25)- Check if a Button is pressed w/ RPi.GPIO
import RPi.GPIO as GPIO
from time import sleep
GPIO.setwarnings(False)
GPIO.setmode(GPIO.BCM)
GPIO.setup(2, GPIO.IN)
while True:
    if GPIO.input(2) == 0:
        print("Button is pressed")
sleep(0.25)- Run a function every time the button is pressed and released (w/ Gpiozero)
from gpiozero import Button
from signal import pause
def say_hello():
    print("Hello!")
def say_goodbye():
    print("Goodbye!")
button = Button(2)
button.when_pressed = say_hello
button.when_released = say_goodbye
pause()- Shutdown Button w/ Gpiozero
By pressing and holding the button for 2 seconds, your PC will shut down.
from gpiozero import Button
from subprocess import check_call
from signal import pause
def shutdown():
    print("system shutdown")
    check_call(['sudo', 'poweroff'])
shutdown_btn = Button(2, hold_time=2)
shutdown_btn.when_held = shutdown
pause()
Example 3: Control a Button and LED
Circuit
Control a LED with button

from gpiozero import LED, Button
from signal import pause
led = LED(17)
button = Button(2)
button.when_pressed = led.on
button.when_released = led.off
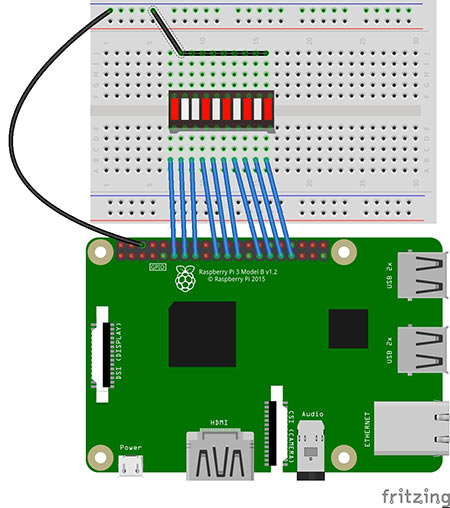
pause()Example 4: Control a Bargraph with Raspberry Pi GPIO
Controlling the number of on LEDs on a bargraph
Circuit
Warning: some versions of Bargraphs may need resistance.
Code using GPIOZero:
from gpiozero import LEDBarGraph
from time import sleep
graph = LEDBarGraph(17, 27, 22, 10, 9, 0, 11, 5, 6, 13)
graph.value = 1 # (1, 1, 1, 1, 1, 1, 1, 1, 1, 1)
sleep(1)
graph.value = 1/2 # (1, 1, 1, 1, 1, 0, 0, 0, 0, 0)
sleep(1)
graph.value = -1/2 # (0, 0, 0, 0, 0, 1, 1, 1, 1, 1)
sleep(1)
graph.value = 2/10 # (1, 1, 0, 0, 0, 0, 0, 0, 0, 0)
sleep(1)
graph.value = -2/10 # (0, 0, 0, 0, 0, 0, 0, 0, 1, 1)
sleep(1)
graph.value = -1 # (1, 1, 1, 1, 1, 1, 1, 1, 1, 1)
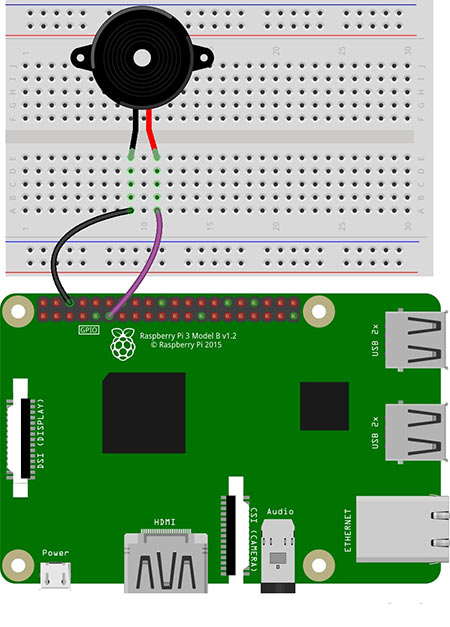
sleep(1)Example 5: Control a Buzzer with Raspberry Pi GPIO
Switching a buzzer on and off using the Raspberry Pi board
Circuit
Code using GPIO Zero
from gpiozero import Buzzer
from time import sleep
bz = Buzzer(17)
while True:
bz.on()
sleep(1)
bz.off()
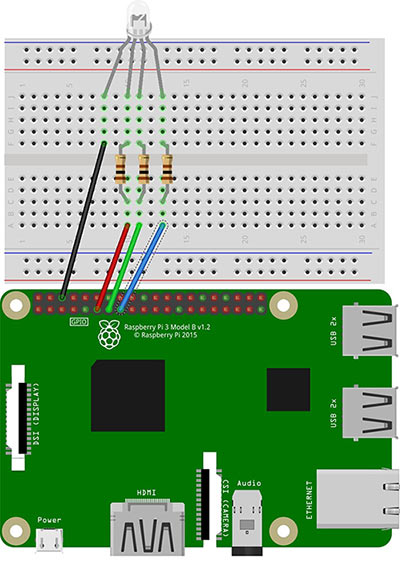
sleep(1)Example 6: Control an RGB LED
Controlling a RGB using Raspberry Pi board
Circuit
Code using GPIOZero
from gpiozero import RGBLED
from time import sleep
led = RGBLED(red=17, green=27, blue=22)
led.red = 1 # full red
sleep(1)
led.red = 0.5 # half red
sleep(1)
led.color = (0, 1, 0) # full green
sleep(1)
led.color = (1, 0, 1) # magenta
sleep(1)
led.color = (1, 1, 0) # yellow
sleep(1)
led.color = (0, 1, 1) # cyan
sleep(1)
led.color = (1, 1, 1) # white
sleep(1)
led.color = (0, 0, 0) # off
sleep(1)
# slowly increase intensity of blue
for n in range(100):
led.blue = n/100
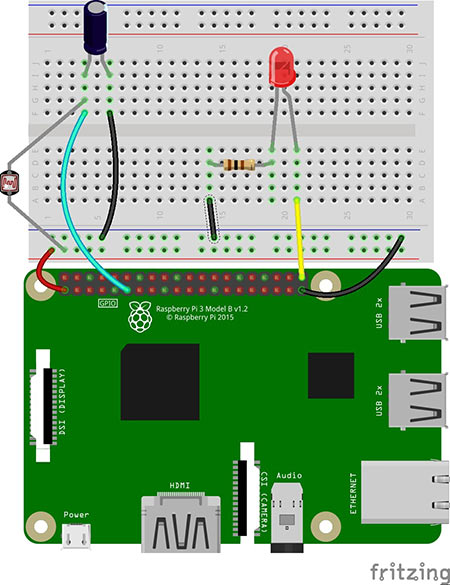
sleep(0.1)Example 7: Control an LDR with Raspberry Pi GPIO
When the environment is dark, the LED turns on and it turns off when the environment is clear.
Circuit
Code using GPIO Zero
from gpiozero import LightSensor, LED
from signal import pause

sensor = LightSensor(17)
led = LED(21)

sensor.when_dark = led.on
sensor.when_light = led.off

pause()
What’s Next?
- change the number of on LEDs in a Bargraph with two keys. Each time the first key is pressed, the number of bright LEDs will be added and if the second key is pressed, the number of bright LEDs will be reduced by one.
- Detect the motion using a motion sensor (PIR) and alarm the buzzer in case of motion.
By mastering the control of Raspberry Pi GPIO pins using Python and libraries like Gpiozero and Rpi.GPIO, you can unlock a wide range of possibilities for interacting with various components and building exciting projects.
Remember to refer to the official documentation for comprehensive information on the Gpiozero and Rpi.GPIO libraries, including detailed instructions and examples.

Comments (12)
Hi,
This was a great tutorial. Thank you!
I am new to programing these devices and I was hoping if you could point me in the right direction.
I am saving video feed to a micro sd card that needs to go through a Rasberry Pi and then through an Ethernet. The camera has a slot for a micro sd card. I plan on connected a male micro sd extender strip to the Pi’s GPIO pins (male end enters into camera and strip connects to GPIO) and coding the Pi to pull data from the camera and save to the Pi. Do you know of any libraries that are designed to do this?
Hello.
We are glad for your interest in this project.
That’s a cool idea.
Unfortunately, we don’t know any proper lib for your project.
r u sure graph for Button + LED is correct ?
Hi, yes they are all correct.
I can’t see if the button used is normally open or normally closed. Could you clarify please.
the button is normally open
hi
my RP pin has a default voltage. About 0.50 v in grand pin and 3.3 in other one.
RPi3 B+
I can’t change voltage with python and gpio library.
I ran python and Hadn’t any error ,but the voltage didn’t change.
Mr. Saeed can you help me and tell me my problem.
Thanks .
Hi,
There are only two explanations why you’re facing this issue, whether something goes wrong in the way you’re programming the GPIO pins using python or there is something wrong with your Raspberry Pi board itself. To see if your RP board is correct, you can try another way for programming its GPIO pins. For example, check the following tutorial and see if it makes any difference: “https://electropeak.com/learn/node-red-raspberry-pi-tutorial-guide/”
GPIO.setup(# of pin, GPIO.OUT, initial=GPIO.HIGH: Initialization output is WRONG correct is:
GPIO.setup(# of pin, GPIO.output, initial=GPIO.HIGH: Initialization output
Has anyone used this on a Rapi 4B?
With your buzzer example, I get this when I run the code:
Traceback (most recent call last):
File “/usr/lib/python3/dist-packages/gpiozero/pins/pi.py”, line 101, in pin
pin = self.pins[n]
KeyError: 17
During handling of the above exception, another exception occurred:
Traceback (most recent call last):
File “/home/cassious/./buzz2.py”, line 3, in
buzzer = Buzzer(17)
File “/usr/lib/python3/dist-packages/gpiozero/devices.py”, line 108, in __call__
The code in the library is broken.
Hi cheapskate,
use this command in Terminal
sudo apt-get install python3-fullthis may help you