GML692 Load Cell Sensor Features
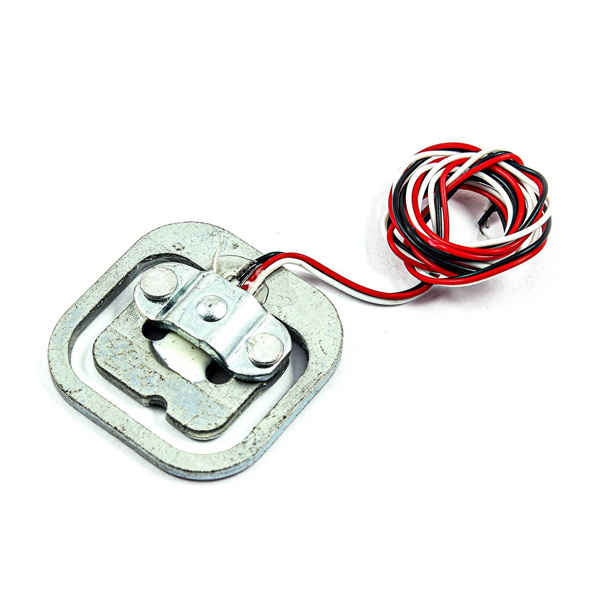
Load cells are electronic sensors used to measure weight and force. The structure of a load cell is made of an alloy body and a number of tensile strengths that change value by applying force and return to their original value by removing force. The capacity of a load cell is the maximum amount of force it can withstand.
Note
To measure tensile strength changes, we use the HX711 module. It is a high-precision analog-to-digital converter.
Note 2
If you want to set up this sensor, you need to use at least 2 or 4 of this sensor, or you can use two 1 kOhm resistors to complete the Watson bridge
You can download the datasheet of this module here.
GML692 Load Cell Sensor Pinout
This sensor has 3 pins:
- VIN: Module power supply – 5 V
- GND: Ground
- OUT: Digital output
You can see the pinout of this module in the image bellow.

Required Material
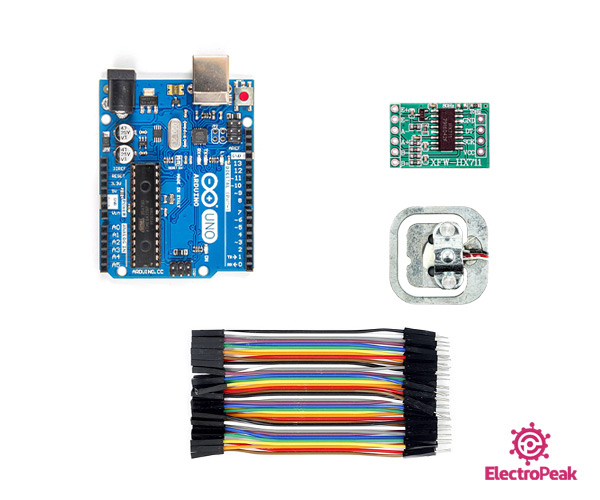
Hardware Components
Software Apps
Interfacing GML692 Weighing Load Cell Sensor with Arduino
Step 1: Circuit
The following circuit shows how you should connect Arduino to GML692 module. Connect wires accordingly.
Tip
Connect the first sensor black wire to the second sensor white wire and vice versa.

Step 2: Code
Install the following library on your Arduino first.
Tip
If you need more help with installing a library on Arduino, read this tutorial: How to Install an Arduino Library
Step 3: Code
Upload the following code to your Arduino.
/*
modified on Sep 21, 2020
Modified by MohammedDamirchi from https://github.com/sparkfun/HX711-Load-Cell-Amplifier base on https://circuitjournal.com/50kg-load-cells-with-HX711
Home
*/

/*
   This example file shows how to calibrate the load cell and optionally store the calibration
   value in EEPROM, and also how to change the value manually.
   The result value can then later be included in your project sketch or fetched from EEPROM.

   To implement calibration in your project sketch the simplified procedure is as follow:
       LoadCell.tare();
       //place known mass
       LoadCell.refreshDataSet();
       float newCalibrationValue = LoadCell.getNewCalibration(known_mass);
*/

#include <HX711_ADC.h>
#include <EEPROM.h>

//pins:
const int HX711_dout = 3; //mcu > HX711 dout pin
const int HX711_sck = 2; //mcu > HX711 sck pin

//HX711 constructor:
HX711_ADC LoadCell(HX711_dout, HX711_sck);

const int calVal_eepromAdress = 0;
long t;

void setup() {
  Serial.begin(57600); delay(10);
  Serial.println();
  Serial.println("Starting...");

  LoadCell.begin();
  long stabilizingtime = 2000; // preciscion right after power-up can be improved by adding a few seconds of stabilizing time
  boolean _tare = false; //set this to false if you don't want tare to be performed in the next step
  LoadCell.start(stabilizingtime, _tare);
  if (LoadCell.getTareTimeoutFlag() || LoadCell.getSignalTimeoutFlag()) {
    Serial.println("Timeout, check MCU>HX711 wiring and pin designations");
    while (1);
  }
  else {
    LoadCell.setCalFactor(1.0); // user set calibration value (float), initial value 1.0 may be used for this sketch
    Serial.println("Startup is complete");
  }
  while (!LoadCell.update());
  calibrate(); //start calibration procedure
}

void loop() {
  static boolean newDataReady = 0;
  const int serialPrintInterval = 0; //increase value to slow down serial print activity

  // check for new data/start next conversion:
  if (LoadCell.update()) newDataReady = true;

  // get smoothed value from the dataset:
  if (newDataReady) {
    if (millis() > t + serialPrintInterval) {
      float i = LoadCell.getData();
      Serial.print("Load_cell output val: ");
      Serial.println(i);
      newDataReady = 0;
      t = millis();
    }
  }

  // receive command from serial terminal
  if (Serial.available() > 0) {
    float i;
    char inByte = Serial.read();
    if (inByte == 't') LoadCell.tareNoDelay(); //tare
    else if (inByte == 'r') calibrate(); //calibrate
    else if (inByte == 'c') changeSavedCalFactor(); //edit calibration value manually
  }

  // check if last tare operation is complete
  if (LoadCell.getTareStatus() == true) {
    Serial.println("Tare complete");
  }

}

void calibrate() {
  Serial.println("***");
  Serial.println("Start calibration:");
  Serial.println("Place the load cell an a level stable surface.");
  Serial.println("Remove any load applied to the load cell.");
  Serial.println("Send 't' from serial monitor to set the tare offset.");

  boolean _resume = false;
  while (_resume == false) {
    LoadCell.update();
    if (Serial.available() > 0) {
      if (Serial.available() > 0) {
        float i;
        char inByte = Serial.read();
        if (inByte == 't') LoadCell.tareNoDelay();
      }
    }
    if (LoadCell.getTareStatus() == true) {
      Serial.println("Tare complete");
      _resume = true;
    }
  }

  Serial.println("Now, place your known mass on the loadcell.");
  Serial.println("Then send the weight of this mass (i.e. 100.0) from serial monitor.");

  float known_mass = 0;
  _resume = false;
  while (_resume == false) {
    LoadCell.update();
    if (Serial.available() > 0) {
      known_mass = Serial.parseFloat();
      if (known_mass != 0) {
        Serial.print("Known mass is: ");
        Serial.println(known_mass);
        _resume = true;
      }
    }
  }

  LoadCell.refreshDataSet(); //refresh the dataset to be sure that the known mass is measured correct
  float newCalibrationValue = LoadCell.getNewCalibration(known_mass); //get the new calibration value

  Serial.print("New calibration value has been set to: ");
  Serial.print(newCalibrationValue);
  Serial.println(", use this as calibration value (calFactor) in your project sketch.");
  Serial.print("Save this value to EEPROM adress ");
  Serial.print(calVal_eepromAdress);
  Serial.println("? y/n");

  _resume = false;
  while (_resume == false) {
    if (Serial.available() > 0) {
      char inByte = Serial.read();
      if (inByte == 'y') {
#if defined(ESP8266)|| defined(ESP32)
        EEPROM.begin(512);
#endif
        EEPROM.put(calVal_eepromAdress, newCalibrationValue);
#if defined(ESP8266)|| defined(ESP32)
        EEPROM.commit();
#endif
        EEPROM.get(calVal_eepromAdress, newCalibrationValue);
        Serial.print("Value ");
        Serial.print(newCalibrationValue);
        Serial.print(" saved to EEPROM address: ");
        Serial.println(calVal_eepromAdress);
        _resume = true;

      }
      else if (inByte == 'n') {
        Serial.println("Value not saved to EEPROM");
        _resume = true;
      }
    }
  }

  Serial.println("End calibration");
  Serial.println("***");
  Serial.println("To re-calibrate, send 'r' from serial monitor.");
  Serial.println("For manual edit of the calibration value, send 'c' from serial monitor.");
  Serial.println("***");
}

void changeSavedCalFactor() {
  float oldCalibrationValue = LoadCell.getCalFactor();
  boolean _resume = false;
  Serial.println("***");
  Serial.print("Current value is: ");
  Serial.println(oldCalibrationValue);
  Serial.println("Now, send the new value from serial monitor, i.e. 696.0");
  float newCalibrationValue;
  while (_resume == false) {
    if (Serial.available() > 0) {
      newCalibrationValue = Serial.parseFloat();
      if (newCalibrationValue != 0) {
        Serial.print("New calibration value is: ");
        Serial.println(newCalibrationValue);
        LoadCell.setCalFactor(newCalibrationValue);
        _resume = true;
      }
    }
  }
  _resume = false;
  Serial.print("Save this value to EEPROM adress ");
  Serial.print(calVal_eepromAdress);
  Serial.println("? y/n");
  while (_resume == false) {
    if (Serial.available() > 0) {
      char inByte = Serial.read();
      if (inByte == 'y') {
#if defined(ESP8266)|| defined(ESP32)
        EEPROM.begin(512);
#endif
        EEPROM.put(calVal_eepromAdress, newCalibrationValue);
#if defined(ESP8266)|| defined(ESP32)
        EEPROM.commit();
#endif
        EEPROM.get(calVal_eepromAdress, newCalibrationValue);
        Serial.print("Value ");
        Serial.print(newCalibrationValue);
        Serial.print(" saved to EEPROM address: ");
        Serial.println(calVal_eepromAdress);
        _resume = true;
      }
      else if (inByte == 'n') {
        Serial.println("Value not saved to EEPROM");
        _resume = true;
      }
    }
  }
  Serial.println("End change calibration value");
  Serial.println("***");
  }
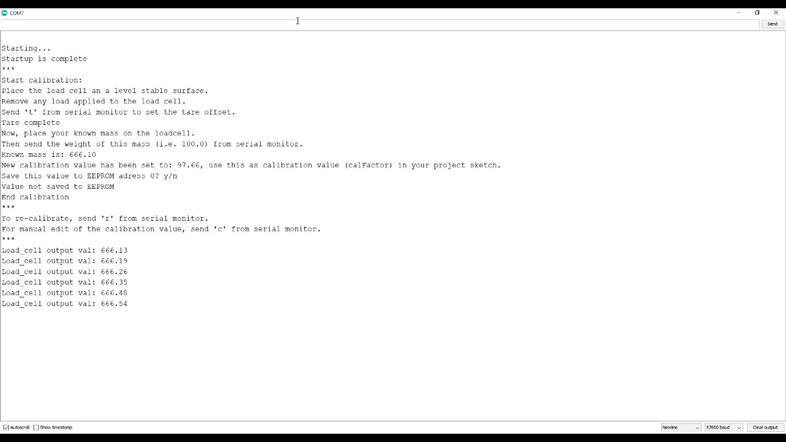
After uploading the code, you can see the results in the serial monitor.
Lift the weights from the module and send the letter t.
Then put a specific weight on the sensor and enter its weight.
The module is now ready to work.