
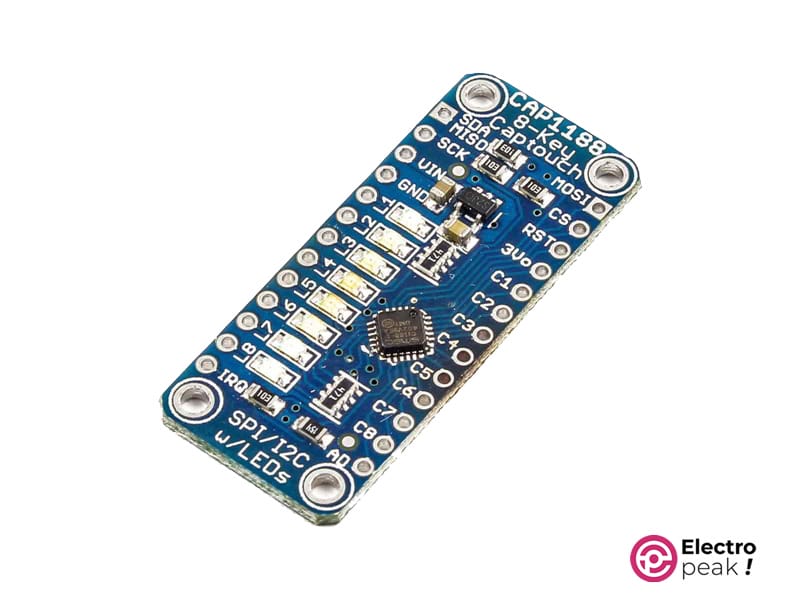
CAP1188 8-Key Capacitive Touch Sensor Features
The CAP1188 8-Key Capacitive Touch Sensor is like having a magic touch for your projects! It’s super easy to use and can sense touch on up to eight different buttons, giving you a bunch of options for your creations. What’s cool is that you don’t need to be a tech wizard to set it up – it’s user-friendly and perfect for beginners. Imagine just gently touching a button, and voila, your project responds! It’s like adding a touch of magic to DIY projects or interactive displays. Plus, it plays well with different microcontrollers, making it a handy tool for a variety of cool ideas. So, if you want to bring a touch of magic to your creations, the CAP1188 is your go-to touch sensor!
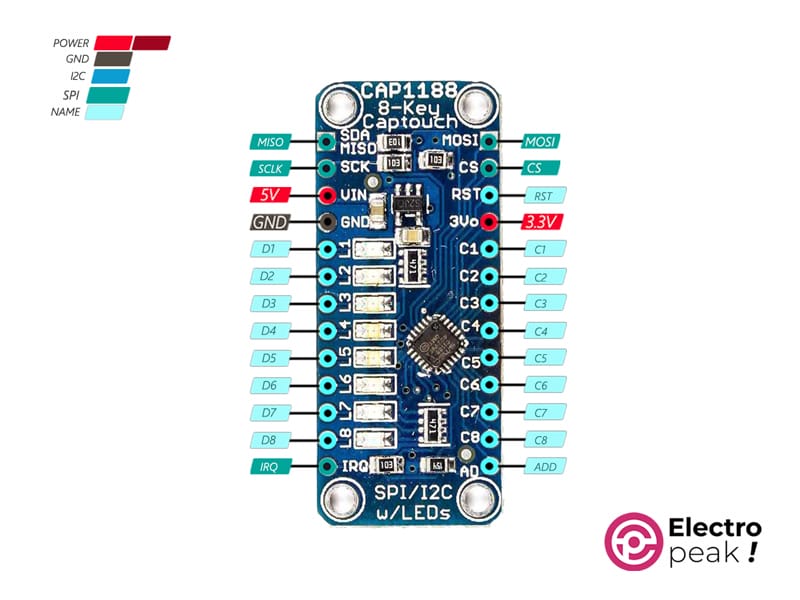
CAP1188 8-Key Capacitive Touch Sensor Pinout
The CAP1188 8-Key Capacitive Touch Sensor has 26 pins:
- VDD: Power supply input for the CAP1188 module.
- GND: Ground reference, ensuring a stable electrical connection.
- MOSI: Master Out Slave In, Serial Data Line for communication with microcontrollers.
- MISO (SDA): Master In Slave Out, Serial Data Line for bi-directional communication.
- CS: Chip Select, enabling communication with the CAP1188 module.
- SCK (SCL): Serial Clock Line for synchronizing data transfer.
- RST: Reset pin for resetting the module.
- IRQ: Interrupt Request pin for signaling touch events to a microcontroller.
- 0-7 Channels: Individual touch-sensitive channels for detecting touch input.
- LED (0-7 Channels): Channels designated for controlling external LEDs.
- ADR0: Address selection pin for configuring the module’s I2C address.
You can see the pinout of this module in the image below.
Required Material

Interfacing CAP1188 8-Key Capacitive Touch Sensor with Arduino
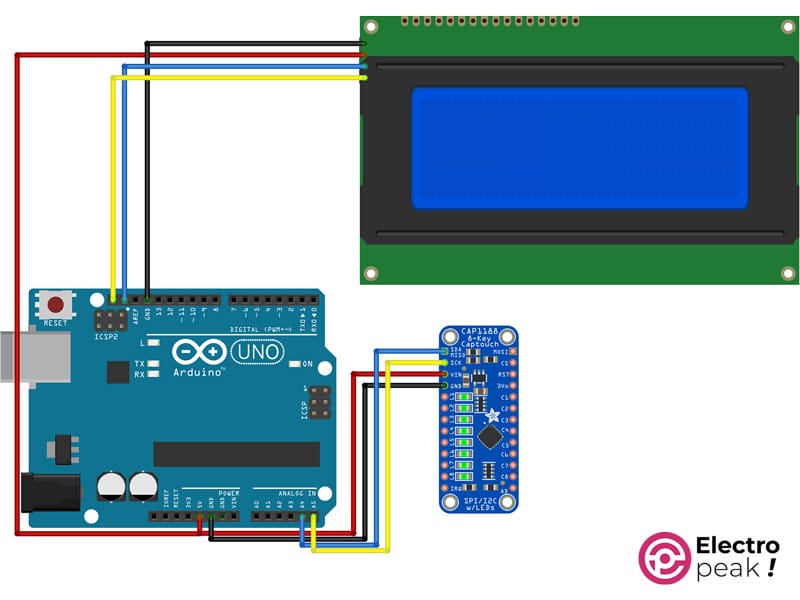
Step 1: Circuit
The following circuit shows how you should connect Arduino to CAP1188 8-Key Capacitive Touch Sensor. Connect wires accordingly.
You don’t have to connect the display if you don’t need it.
Step 2: Installing Library
Step 3: Code
To interface the board without a display, upload the following code to your Arduino.
/*
Create on January 16, 2024
Create by MohammedDamirchi base of https://electropeak.com/cap1188-capacitive-touch-module
<blockquote class="wp-embedded-content" data-secret="uSqZnAG7Qc"><a href="https://electropeak.com/learn/">Home</a></blockquote><iframe class="wp-embedded-content" sandbox="allow-scripts" security="restricted" style="position: absolute; clip: rect(1px, 1px, 1px, 1px);" title="“Home” — Electropeak" src="https://electropeak.com/learn/embed/#?secret=R2CEqwfXzU#?secret=uSqZnAG7Qc" data-secret="uSqZnAG7Qc" width="600" height="338" frameborder="0" marginwidth="0" marginheight="0" scrolling="no"></iframe>
*/
#include <Arduino.h>
#include <Wire.h>
#include <Adafruit_CAP1188.h>
// Use I2C, no reset pin!
Adafruit_CAP1188 cap = Adafruit_CAP1188();
void setup()
{
Serial.begin(115200);
Serial.println("CAP1188 test!");
// Initialize the sensor, if using i2c you can pass in the i2c address
// if (!cap.begin(0x28)) {
if (!cap.begin())
{
Serial.println("CAP1188 not found");
while (1)
;
}
Serial.println("CAP1188 found!");
}
void loop()
{
uint8_t touched = cap.touched();
if (touched == 0)
{
// No touch detected
return;
}
for (uint8_t i = 0; i < 8; i++)
{
if (touched & (1 << i))
{
Serial.print("C");
Serial.print(i + 1);
Serial.print("\t");
}
}
Serial.println();
delay(50);
}
After uploading the code, open the serial monitor to view the received data.
If you need help running the display, you can refer to the following link:
To interface the board with a display, upload the following code to your Arduino.
Also, download the myLCD file and put it into your project folder.

/*
Create on January 16, 2024
Create by MohammedDamirchi base of https://electropeak.com/cap1188-capacitive-touch-module
<blockquote class="wp-embedded-content" data-secret="uSqZnAG7Qc"><a href="https://electropeak.com/learn/">Home</a></blockquote><iframe class="wp-embedded-content" sandbox="allow-scripts" security="restricted" style="position: absolute; clip: rect(1px, 1px, 1px, 1px);" title="“Home” — Electropeak" src="https://electropeak.com/learn/embed/#?secret=R2CEqwfXzU#?secret=uSqZnAG7Qc" data-secret="uSqZnAG7Qc" width="600" height="338" frameborder="0" marginwidth="0" marginheight="0" scrolling="no"></iframe>
*/
#include <Arduino.h>
#include <Wire.h>
#include <LiquidCrystal_I2C.h>
#include <Adafruit_CAP1188.h>
LiquidCrystal_I2C lcd(0x27, 20, 4); // set the LCD address to 0x27 for a 16 chars and 2 line display
Adafruit_CAP1188 cap = Adafruit_CAP1188();
void setup()
{
lcd.init(); // initialize the lcd
lcd.init();
// Print a message to the LCD.
lcd.backlight();
Serial.begin(115200);
lcd.setCursor(4, 0);
lcd.print("ElectroPeak");
lcd.setCursor(0, 1);
lcd.print("CAP1188 test!");
lcd.setCursor(0, 2);
// Initialize the sensor, if using i2c you can pass in the i2c address
// if (!cap.begin(0x28)) {
if (!cap.begin())
{
lcd.print("CAP1188 not found");
while (1)
;
}
lcd.print("CAP1188 found!");
delay(3000);
lcd.clear();
lcd.setCursor(0, 0);
lcd.print("C1");
lcd.setCursor(10, 0);
lcd.print("C2");
lcd.setCursor(0, 1);
lcd.print("C3");
lcd.setCursor(10, 1);
lcd.print("C4");
lcd.setCursor(0, 2);
lcd.print("C5");
lcd.setCursor(10, 2);
lcd.print("C6");
lcd.setCursor(0, 3);
lcd.print("C7");
lcd.setCursor(10, 3);
lcd.print("C8");
}
void loop()
{
uint8_t touched = cap.touched();
if (touched == 0)
{
// No touch detected
lcd.setCursor(5, 0);
lcd.print("R");
lcd.setCursor(15, 0);
lcd.print("R");
lcd.setCursor(5, 1);
lcd.print("R");
lcd.setCursor(15, 1);
lcd.print("R");
lcd.setCursor(5, 2);
lcd.print("R");
lcd.setCursor(15, 2);
lcd.print("R");
lcd.setCursor(5, 3);
lcd.print("R");
lcd.setCursor(15, 3);
lcd.print("R");
return;
}
else
{
for (uint8_t i = 0; i < 8; i++)
{
if (touched & (1 << i))
{
switch (i)
{
case 0:
lcd.setCursor(5, 0);
lcd.print("T");
break;
case 1:
lcd.setCursor(15, 0);
lcd.print("T");
break;
case 2:
lcd.setCursor(5, 1);
lcd.print("T");
break;
case 3:
lcd.setCursor(15, 1);
lcd.print("T");
break;
case 4:
lcd.setCursor(5, 2);
lcd.print("T");
break;
case 5:
lcd.setCursor(15, 2);
lcd.print("T");
break;
case 6:
lcd.setCursor(5, 3);
lcd.print("T");
break;
case 7:
lcd.setCursor(15, 3);
lcd.print("T");
break;
default:
break;
}
}
else
{
switch (i)
{
case 0:
lcd.setCursor(5, 0);
lcd.print("R");
break;
case 1:
lcd.setCursor(15, 0);
lcd.print("R");
break;
case 2:
lcd.setCursor(5, 1);
lcd.print("R");
break;
case 3:
lcd.setCursor(15, 1);
lcd.print("R");
break;
case 4:
lcd.setCursor(5, 2);
lcd.print("R");
break;
case 5:
lcd.setCursor(15, 2);
lcd.print("R");
break;
case 6:
lcd.setCursor(5, 3);
lcd.print("R");
break;
case 7:
lcd.setCursor(15, 3);
lcd.print("R");
break;
default:
break;
}
}
}
}
delay(50);
}
After uploading the code, you can view the sensor output on your display as shown in the video below.
