Interfacing BTS7960 43A High Power Motor Driver Module with Arduino
Written by
Amir Mohammad Shojaei
Learn how to interface the BTS7960 43A high-power motor driver module with Arduino. This guide covers the key features of the BTS7960 motor driver, its pinout configuration, and provides step-by-step instructions for circuit connection and code implementation. Take control of your motors with this versatile and powerful motor driver.
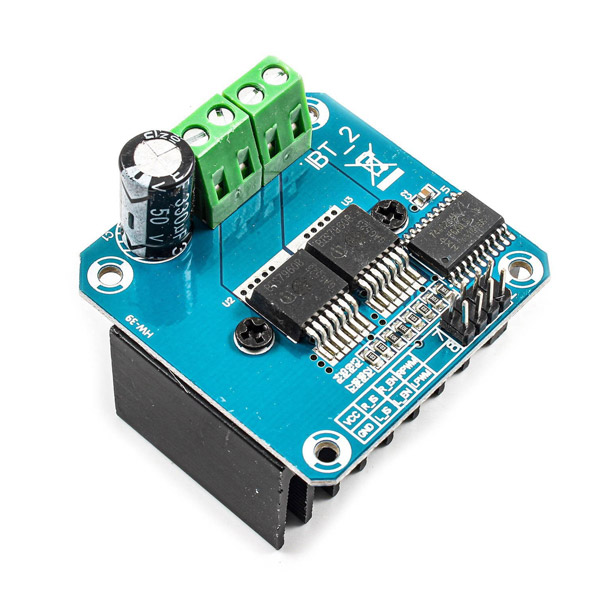
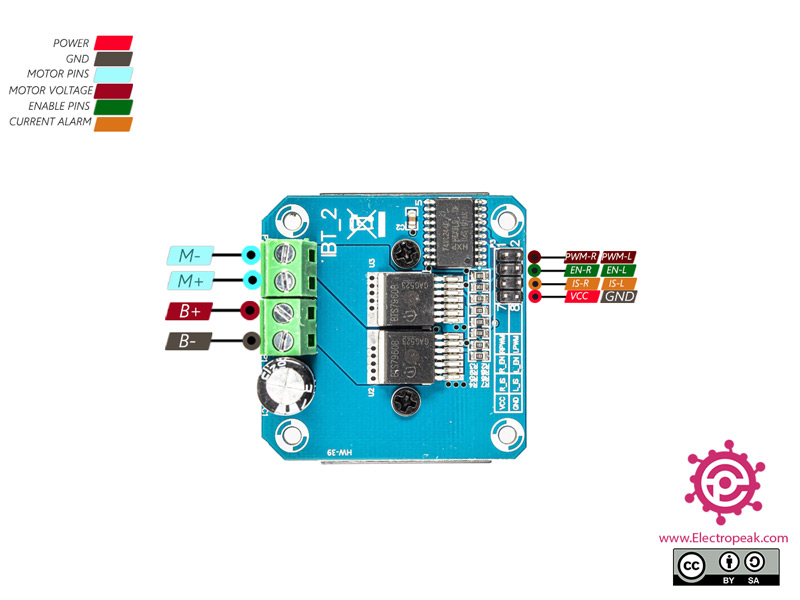
BTS7960 43A Motor Driver Features
The BTS7960 is a high-current full-bridge motor driver module. The Key features are:
Input voltage: 6V to 27V
Maximum allowable current: 43 A
PWM capability: up to 25 kHz
Two PWM output pins for speed control in direct and reverse directions
Two EN output pins to control motors
Two IS input pins to protect against high current and heat
These modules control DC motors using PWM (Pulse Width Modulation) technique. These modules convert a constant input voltage to a variable voltage for motor. The speed can be controlled by changing the DC motor voltage. PWMs usually have a fixed frequency and can be controlled by controlling the time that the pulse is HIGH (Duty Cycle).
You can download the datasheet of this module here.
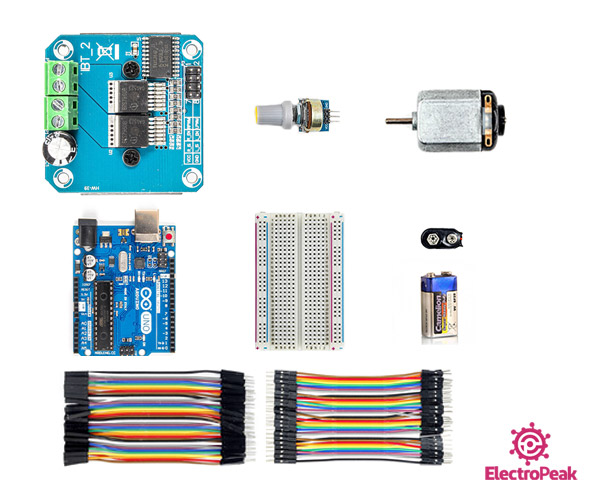
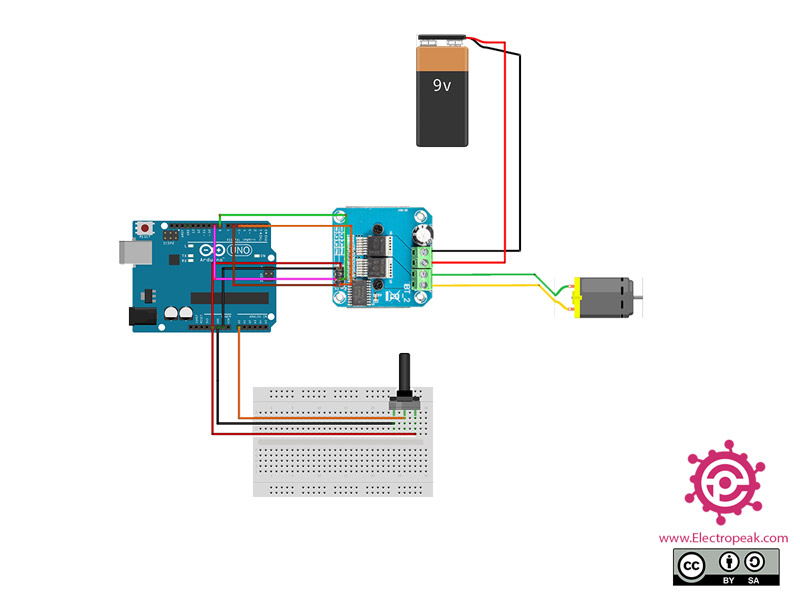
In this code, by turning potentiometer completely the motor can be controlled in two direction: Forward and reverse. If the input value is greater than 512, the motor rotates in the forward direction and if it is less than 512, it rotates the opposite direction. We have set EN pins to High and controlled the motor with PWM pins.
Warning
Be careful not to fully turn the potentiometer because your motor is a 6 volt DC motor and the input voltage is 9 volts. So the motor may be damaged. Of course, you can use a lower voltage power supply or a higher voltage motor.
Hi,
The pins IS-R and IS-L should be connected to pins 8 and 9 of Arduino Uno, respectively. Also, please ask your questions in English so others can help you too. I used google translate to somehow get what mean.
There is an error in the code, on line 44. LPWM and RPWM are not supposed to be high simultaneously, doing so will short the IC and render the driver useless. Instead modify the code as
Hi abhay,
The maximum speed depends on the power supply you put in place of the battery.
This value also depends on the type of your motor, and you should not exceed your maximum voltage of motor.
hi, I was wondering how I can control the motor direction from its pins as you wrote besides current sensing one is reverse rotation and the other is straight rotation.
Hello. Is it possible to feed 4 different analog signals to the Arduino Uno R3, not from a potentiometer, so that the effect is: 1 slow forward, 2 slow reverse, 3 fast forward, 4 fast reverse? Do need different Arduino code?
Hello,
Yes, the Arduino UNO has 8 analog pins. You can connect your analog signals to pins A0 to A3 and use the `analogRead()` function to read their values.
If you have a single analog signal divided into 4 sections (one for each command), connect it to pin A0. Then, use the `analogRead()` function along with 4 `if` conditions to separate each section and execute the corresponding commands. Adjust the code to match your specific setup.


Comments (19)
thank you
You are welcome!
In the past I used a L298 motor driver that I could use to send 5v to the arduino Vin. Does the BTS7960 motor driver not have this capability?
No, the BTS7960 doesn’t provide a 5V supply.
Hi
Please koi bata sakta ha kay iss motor driver ma r.is or l.is ki pins ha os ko high karna ha ya low karna ha
Hi,
The pins IS-R and IS-L should be connected to pins 8 and 9 of Arduino Uno, respectively. Also, please ask your questions in English so others can help you too. I used google translate to somehow get what mean.
There is an error in the code, on line 44. LPWM and RPWM are not supposed to be high simultaneously, doing so will short the IC and render the driver useless. Instead modify the code as
line44: analogWrite(RPWM,0);
line45: analogWrite(LPWM,out2);
similarly at line 37 also.
Hi
I think you make mistake.
for dc motor to run backward or forward , it is not different first put 0 or data pulse on 2 pins.
Hi Please let me know that what should be the value of potentiometer for a 350w pmdc motor for same circuit
Hi Abhay,
The value of the potentiometer isn’t important, as long as it’s at least 1K ohms.
how should increase the speed of a 9v motor changing the code
Hi abhay,
The maximum speed depends on the power supply you put in place of the battery.
This value also depends on the type of your motor, and you should not exceed your maximum voltage of motor.
how to operate 24v dc motor using same circuit what are the changes requierd in code to run motor at maximum speed
Hi abhay,
Just use a 24V power supply as input of driver.
hi, I was wondering how I can control the motor direction from its pins as you wrote besides current sensing one is reverse rotation and the other is straight rotation.
Request for Quotation :
BTS7960 43A Double DC High Power Motor Driver Module
QTY – 50 Pcs
Hello,
For a quotation, please email [email protected] or use our online chat.
Hello. Is it possible to feed 4 different analog signals to the Arduino Uno R3, not from a potentiometer, so that the effect is: 1 slow forward, 2 slow reverse, 3 fast forward, 4 fast reverse? Do need different Arduino code?
Hello,
Yes, the Arduino UNO has 8 analog pins. You can connect your analog signals to pins A0 to A3 and use the `analogRead()` function to read their values.
If you have a single analog signal divided into 4 sections (one for each command), connect it to pin A0. Then, use the `analogRead()` function along with 4 `if` conditions to separate each section and execute the corresponding commands. Adjust the code to match your specific setup.