APDS-9960 Infrared Gesture Sensor Module Features
The APDS-9960 Infrared Gesture Sensor Module is an advanced device that enables intuitive interaction with electronic devices through hand gestures. This sensor module uses infrared technology to accurately detect hand movements, offering a hands-free control option for various applications. With its ability to recognize gestures such as swipes, taps, and scrolls, the APDS-9960 is perfect for touchless control interfaces, gaming consoles, and smart appliances. Its compact design and easy integration make it suitable for both hobbyists and professionals, providing a seamless solution for adding gesture recognition functionality to electronic projects. Experience the convenience of gesture-based interaction with the APDS-9960 Infrared Gesture Sensor Module, enhancing the usability and accessibility of your devices.
For more information, you can read this datasheet
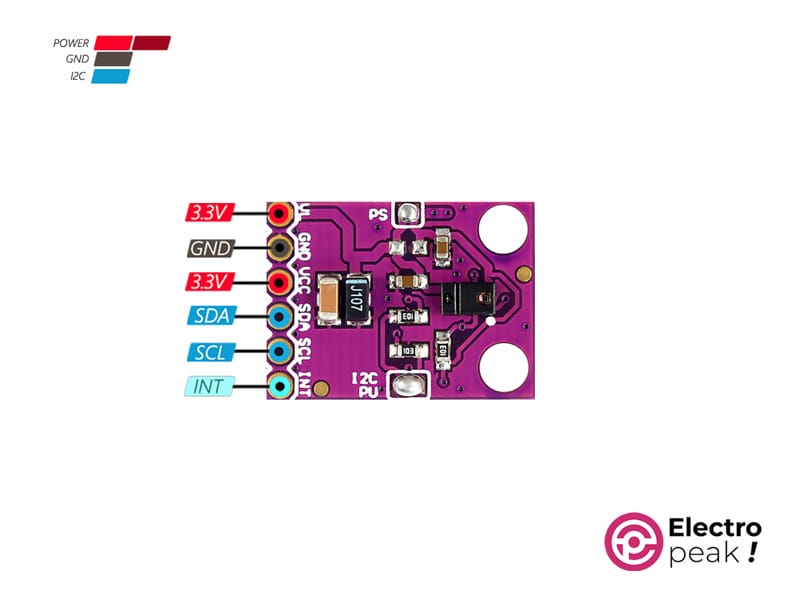
APDS-9960 Infrared Gesture Sensor Module Pinout
The APDS-9960 Infrared Gesture Sensor Module has 6 pins:
- VCC/VL: Power supply input for the APDS-9960 module (3.3V).
- GND: Ground reference, ensuring a stable electrical connection.
- SCL: Serial Clock Line for communication with microcontrollers.
- SDA: Serial Data Line for configuring the module’s settings.
- INT: Interrupt Request pin to a microcontroller.
You can see the pinout of this module in the image below.
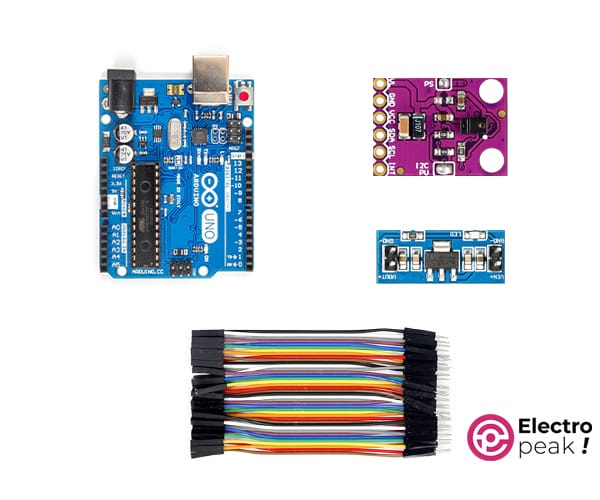
Required Material
Hardware Components
Interfacing APDS-9960 Infrared Gesture Sensor Module with Arduino
Step 1: Circuit
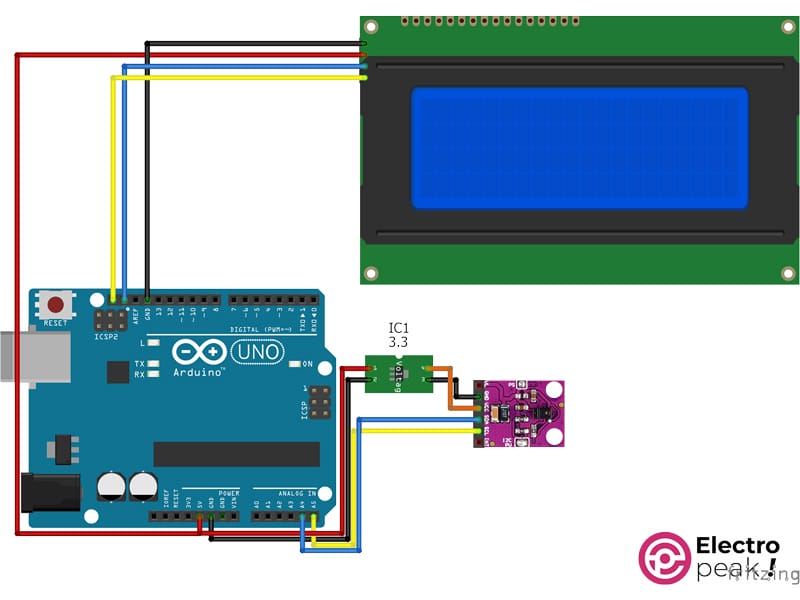
The following circuit shows how you should connect Arduino to APDS-9960 Infrared Gesture Sensor Module. Connect wires accordingly.
You don’t have to connect the display if you don’t need it.
Step 2: Installing Library
Install the library below on your Arduino IDE.
Install this library to use the display
Step 3: Code
To interface the board without a display, upload the following code to your Arduino.
/*
Create on February 07, 2024
Create by MohammedDamirchi base of https://electropeak.com/apds-9960-infrared-gesture-sensor-module
<blockquote class="wp-embedded-content" data-secret="5rHkSe1bZ0"><a href="https://electropeak.com/learn/">Home</a></blockquote><iframe class="wp-embedded-content" sandbox="allow-scripts" security="restricted" style="position: absolute; clip: rect(1px, 1px, 1px, 1px);" title="“Home” — Electropeak" src="https://electropeak.com/learn/embed/#?secret=I1q0NvUemM#?secret=5rHkSe1bZ0" data-secret="5rHkSe1bZ0" width="600" height="338" frameborder="0" marginwidth="0" marginheight="0" scrolling="no"></iframe>
*/
#include <Arduino.h>
#include <Arduino_APDS9960.h>
void setup()
{
Serial.begin(9600);
while (!Serial)
;
if (!APDS.begin())
{
Serial.println("Error initializing APDS-9960 sensor.");
}
Serial.println("Color Sensor ...");
}
void loop()
{
// check if a color reading is available
while (!APDS.colorAvailable())
{
delay(5);
}
int r, g, b;
// read the color
APDS.readColor(r, g, b);
// print the values
Serial.print("r = ");
Serial.println(r);
Serial.print("g = ");
Serial.println(g);
Serial.print("b = ");
Serial.println(b);
Serial.println();
// wait a bit before reading again
delay(1000);
}
/*
Create on February 07, 2024
Create by MohammedDamirchi base of https://electropeak.com/apds-9960-infrared-gesture-sensor-module
<blockquote class="wp-embedded-content" data-secret="5rHkSe1bZ0"><a href="https://electropeak.com/learn/">Home</a></blockquote><iframe class="wp-embedded-content" sandbox="allow-scripts" security="restricted" style="position: absolute; clip: rect(1px, 1px, 1px, 1px);" title="“Home” — Electropeak" src="https://electropeak.com/learn/embed/#?secret=I1q0NvUemM#?secret=5rHkSe1bZ0" data-secret="5rHkSe1bZ0" width="600" height="338" frameborder="0" marginwidth="0" marginheight="0" scrolling="no"></iframe>
*/
#include <Arduino.h>
#include <Arduino_APDS9960.h>
#include <myLCD.h>
void setup()
{
Serial.begin(9600);
beginLCD("APDS9960");
while (!Serial)
;
if (!APDS.begin())
{
Serial.println("Error initializing APDS-9960 sensor.");
fail();
}
success();
printLCD("APDS9960 Color Sensor", 0, true);
printLCD("Red: ", 1);
printLCD("Green: ", 2);
printLCD("Blue: ", 3);
Serial.println("Color Sensor ...");
}
void loop()
{
// check if a color reading is available
while (!APDS.colorAvailable())
{
delay(5);
}
int r, g, b;
// read the color
APDS.readColor(r, g, b);
// print the values
Serial.print("r = ");
Serial.println(r);
Serial.print("g = ");
Serial.println(g);
Serial.print("b = ");
Serial.println(b);
Serial.println();
printLCD(String(r), 1, false, 8);
printLCD(String(g), 2, false, 8);
printLCD(String(b), 3, false, 8);
// wait a bit before reading again
delay(1000);
}
After uploading the code, you can view the module output as shown in the video below.
For Gesture mode use this code
To interface the board without a display, upload the following code to your Arduino.
/*
Create on February 07, 2024
Create by MohammedDamirchi base of https://electropeak.com/apds-9960-infrared-gesture-sensor-module
<blockquote class="wp-embedded-content" data-secret="5rHkSe1bZ0"><a href="https://electropeak.com/learn/">Home</a></blockquote><iframe class="wp-embedded-content" sandbox="allow-scripts" security="restricted" style="position: absolute; clip: rect(1px, 1px, 1px, 1px);" title="“Home” — Electropeak" src="https://electropeak.com/learn/embed/#?secret=I1q0NvUemM#?secret=5rHkSe1bZ0" data-secret="5rHkSe1bZ0" width="600" height="338" frameborder="0" marginwidth="0" marginheight="0" scrolling="no"></iframe>
*/
#include <Arduino.h>
#include <Arduino_APDS9960.h>
void setup()
{
Serial.begin(9600);
while (!Serial)
;
if (!APDS.begin())
{
Serial.println("Error initializing APDS-9960 sensor!");
}
APDS.activeAll();
// for setGestureSensitivity(..) a value between 1 and 100 is required.
// Higher values make the gesture recognition more sensitive but less accurate
// (a wrong gesture may be detected). Lower values makes the gesture recognition
// more accurate but less sensitive (some gestures may be missed).
// Default is 80
// APDS.setGestureSensitivity(80);
Serial.println("Detecting gestures ...");
}
void loop()
{
if (APDS.gestureAvailable())
{
// a gesture was detected, read and print to Serial Monitor
int gesture = APDS.readGesture();
switch (gesture)
{
case GESTURE_UP:
Serial.println("Detected UP gesture");
break;
case GESTURE_DOWN:
Serial.println("Detected DOWN gesture");
break;
case GESTURE_LEFT:
Serial.println("Detected LEFT gesture");
break;
case GESTURE_RIGHT:
Serial.println("Detected RIGHT gesture");
break;
default:
// ignore
break;
}
}
}
After uploading the code, you can see gesture code in Serial monitor.
If you need help running the display, you can refer to the following link:
To interface the board with a display, upload the following code to your Arduino.
Also, download the myLCD file and put it into your project folder:
/*
Create on February 07, 2024
Create by MohammedDamirchi base of https://electropeak.com/apds-9960-infrared-gesture-sensor-module
<blockquote class="wp-embedded-content" data-secret="5rHkSe1bZ0"><a href="https://electropeak.com/learn/">Home</a></blockquote><iframe class="wp-embedded-content" sandbox="allow-scripts" security="restricted" style="position: absolute; clip: rect(1px, 1px, 1px, 1px);" title="“Home” — Electropeak" src="https://electropeak.com/learn/embed/#?secret=I1q0NvUemM#?secret=5rHkSe1bZ0" data-secret="5rHkSe1bZ0" width="600" height="338" frameborder="0" marginwidth="0" marginheight="0" scrolling="no"></iframe>
*/
#include <Arduino.h>
#include <Arduino_APDS9960.h>
#include <myLCD.h>
void setup()
{
Serial.begin(115200);
beginLCD("APDS9960");
while (!Serial)
;
if (!APDS.begin())
{
Serial.println("Error initializing APDS-9960 sensor!");
fail();
}
APDS.activeAll();
// for setGestureSensitivity(..) a value between 1 and 100 is required.
// Higher values make the gesture recognition more sensitive but less accurate
// (a wrong gesture may be detected). Lower values makes the gesture recognition
// more accurate but less sensitive (some gestures may be missed).
// Default is 80
// APDS.setGestureSensitivity(80);
success();
printLCD("APDS9960 Gestures", 0, true);
Serial.println("Detecting gestures ...");
}
void loop()
{
if (APDS.gestureAvailable())
{
// a gesture was detected, read and print to Serial Monitor
int gesture = APDS.readGesture();
switch (gesture)
{
case GESTURE_UP:
Serial.println("Detected UP gesture");
printLCD("Detected UP", 2, true);
break;
case GESTURE_DOWN:
Serial.println("Detected DOWN gesture");
printLCD("Detected DOWN", 2, true);
break;
case GESTURE_LEFT:
Serial.println("Detected LEFT gesture");
printLCD("Detected LEFT", 2, true);
break;
case GESTURE_RIGHT:
Serial.println("Detected RIGHT gesture");
printLCD("Detected RIGHT", 2, true);
break;
default:
// ignore
break;
}
}
}
After uploading the code, you can view the module output as shown in the video below.


