Contents

Interfacing 9-Axis GY-801 IMU Module with Arduino

GY-801 IMU Module Features

The GY-801 sensor module is a precise 9-axis sensor which includes L3G4200D (Gyroscope), ADXL345 (Accelerometer), MMC5883MC (Magnetometer) and BMP180 (Barometric Pressure/Temperature) ICs.

All these ICs use I2C protocol for communication. This module is also used in the development of ground and flying robots.

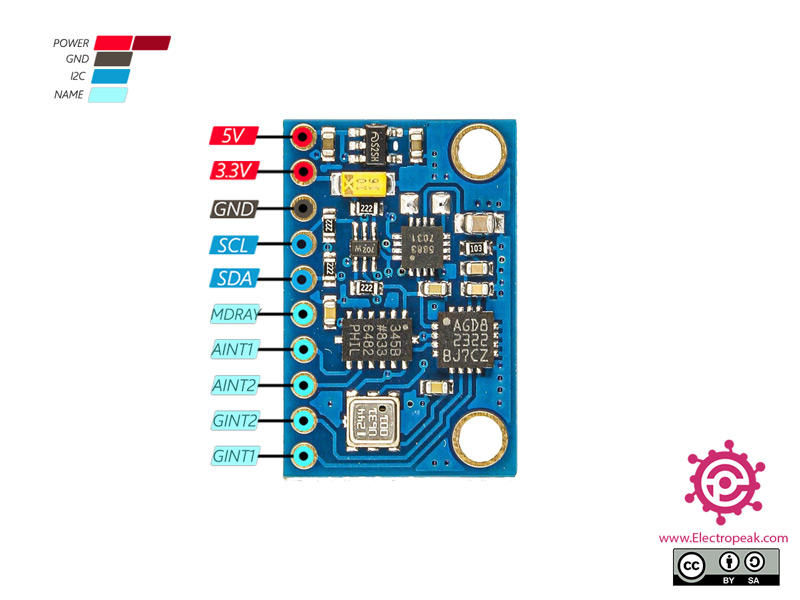
To download the datasheet of GY-801 module, click here.

To download the datasheet of L3G4200D sensor, click here.

To download the datasheet of ADXL345 sensor, click here.

To download the datasheet of MMC5883MC sensor, click here.

To download the datasheet of BMP180 sensor, click here.

GY-801 IMU Module Pinout

The GY-801 IMU Module has 10 pins:

  • VIN: Module power supply – 5V
  • 3.3V: Module power supply – 3.3V
  • GND: Ground
  • SCL: I2C Serial Clock
  • SDA: I2C Serial Data
  • M_DRDY: Data Ready Pin for the MMC5883L IC
  • A_INT1: Data Ready Pin for the ADXL345 IC
  • A_INT2: Data Ready Pin for the ADXL345 IC
  • G_INT1: Data Ready Pin for the L3G4200D IC
  • G_INT2: Data Ready Pin for the L3G4200D IC

You can see the pinout of this module in the image below.

Required Materials

Hardware Components

Arduino UNO R3 × 1
GY-801 Module × 1
Male to Female jumper wire × 1

Software Apps

Arduino IDE

Interfacing GY-801 IMU Module with Arduino

Step 1: Circuit

The following circuit shows how you should connect Arduino to this module. Connect wires accordingly.

Step 2: Code

Download all files needed from this link and put them in one folder. Then, upload the following code to your Arduino.

/*
  Create on May 19, 2021
  Create by MohammedDamirchi base of https://github.com/DMohammed/GY-801
  
Home
*/ #include <Arduino.h> #include "Wire.h" #include "MMC5883.h" #include <I2Cdev.h> #include "L3G4200D.h" #include "ADXL345.h" #include <Adafruit_Sensor.h> #include "Adafruit_BMP085_U.h" L3G4200D gyro; ADXL345 accel; MMC5883MA MMC5883(Wire); Adafruit_BMP085_Unified bmp = Adafruit_BMP085_Unified(10085); int16_t ax, ay, az; int16_t avx, avy, avz; double baseline; // baseline pressure void setup() { Serial.begin(9600); Wire.begin(); Serial.println("Initializing I2C devices..."); gyro.initialize(); accel.initialize(); // verify connection Serial.println("Testing device connections..."); Serial.println(gyro.testConnection() ? "L3G4200D connection successful" : "L3G4200D connection failed"); Serial.println("Testing device connections..."); Serial.println(accel.testConnection() ? "ADXL345 connection successful" : "ADXL345 connection failed"); // data seems to be best when full scale is 2000 gyro.setFullScale(2000); if (!bmp.begin()) Serial.print("Ooops, no BMP085 detected ... Check your wiring or I2C ADDR!"); Serial.print("MMC5883MA "); MMC5883.begin(); MMC5883.calibrate(); } void loop() { Serial.print(MMC5883.readData()); Serial.print(" "); gyro.getAngularVelocity(&avx, &avy, &avz); Serial.print("gyro X:"); Serial.print(avx); Serial.print("\tY:"); Serial.print(avy); Serial.print("\tZ:"); Serial.print(avz); // read raw accel measurements from device accel.getAcceleration(&ax, &ay, &az); // display tab-separated accel x/y/z values Serial.print("\taccel X:"); Serial.print(ax); Serial.print("\tY:"); Serial.print(ay); Serial.print("\tZ:"); Serial.print(az); /* Get a new sensor event */ sensors_event_t event; bmp.getEvent(&event); /* Display the results (barometric pressure is measure in hPa) */ if (event.pressure) { /* Display atmospheric pressue in hPa */ Serial.print("\tPressure:"); Serial.print(event.pressure); Serial.print(" hPa"); /* First we get the current temperature from the BMP085 */ float temperature; bmp.getTemperature(&temperature); Serial.print("\tTemp:"); Serial.print(temperature); Serial.print(" C"); /* Then convert the atmospheric pressure, and SLP to altitude */ /* Update this next line with the current SLP for better results */ float seaLevelPressure = SENSORS_PRESSURE_SEALEVELHPA; Serial.print("\tAltitude:"); Serial.println(bmp.pressureToAltitude(seaLevelPressure, event.pressure)); } else { Serial.println("BME Sensor error"); } delay(1000); }

You can see the results in the Serial Monitor.

Liked What You See?​
Get Updates And Learn From The Best​

Leave a Reply

Your email address will not be published. Required fields are marked *