
Overview
In this article, we will explore the process of setting up an ESP32-based web server using the popular Arduino IDE, accompanied by practical examples to illustrate the key concepts. By the end of this guide, you will have a solid understanding of how to harness the power of the ESP32 microcontroller to create your own web server.
If you are a beginner to ESP32, we recommend reading Getting Started with the ESP32 on Arduino IDE
What You Will Learn
- Getting to know the web server
- Creating an ESP32 webserver
- A short introduction to HTML and CSS commands

What is a Web Server?
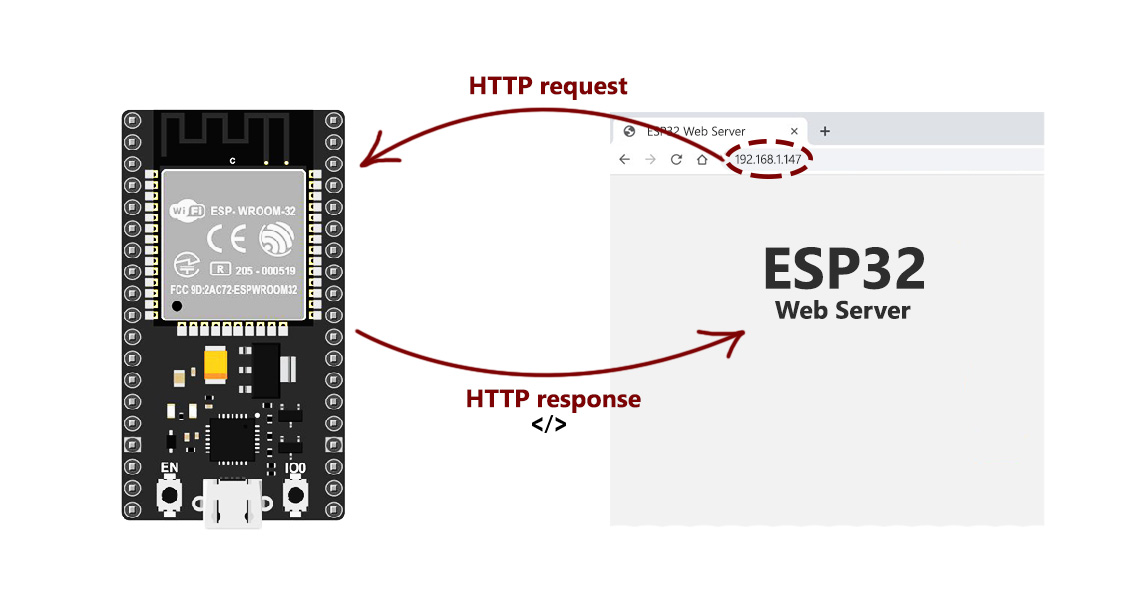
The web server is a place to send and receive information, process the information and store it. The web server can also display this information on a web page.
the server communicates with the user through a protocol called the Hypertext Transfer Protocol (HTTP).
When a request is sent to this server (for example, its address is searched in the browser), the server returns a code as a response (for example, code 200, which means the connection is established correctly, or code 404, which indicates that the address is not correct). You can find the full list of these codes here
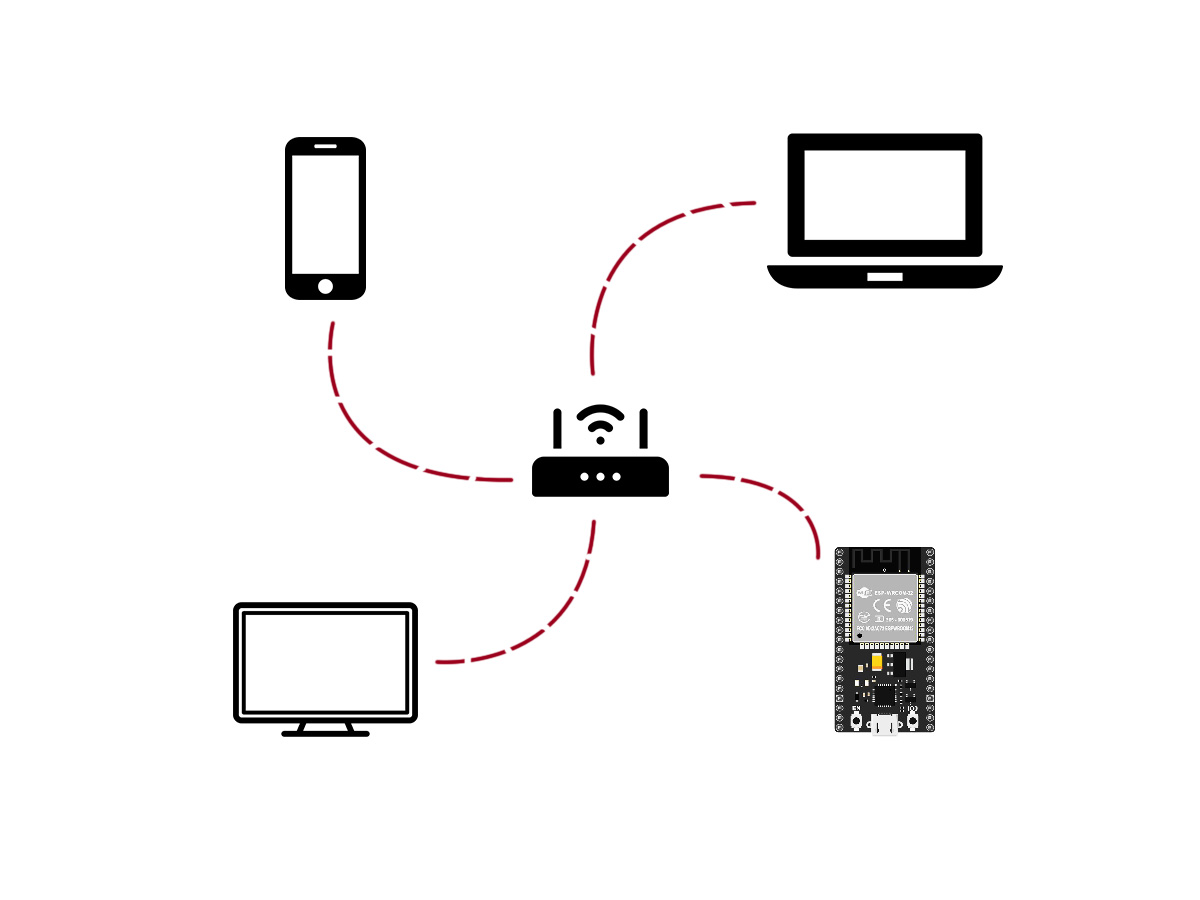
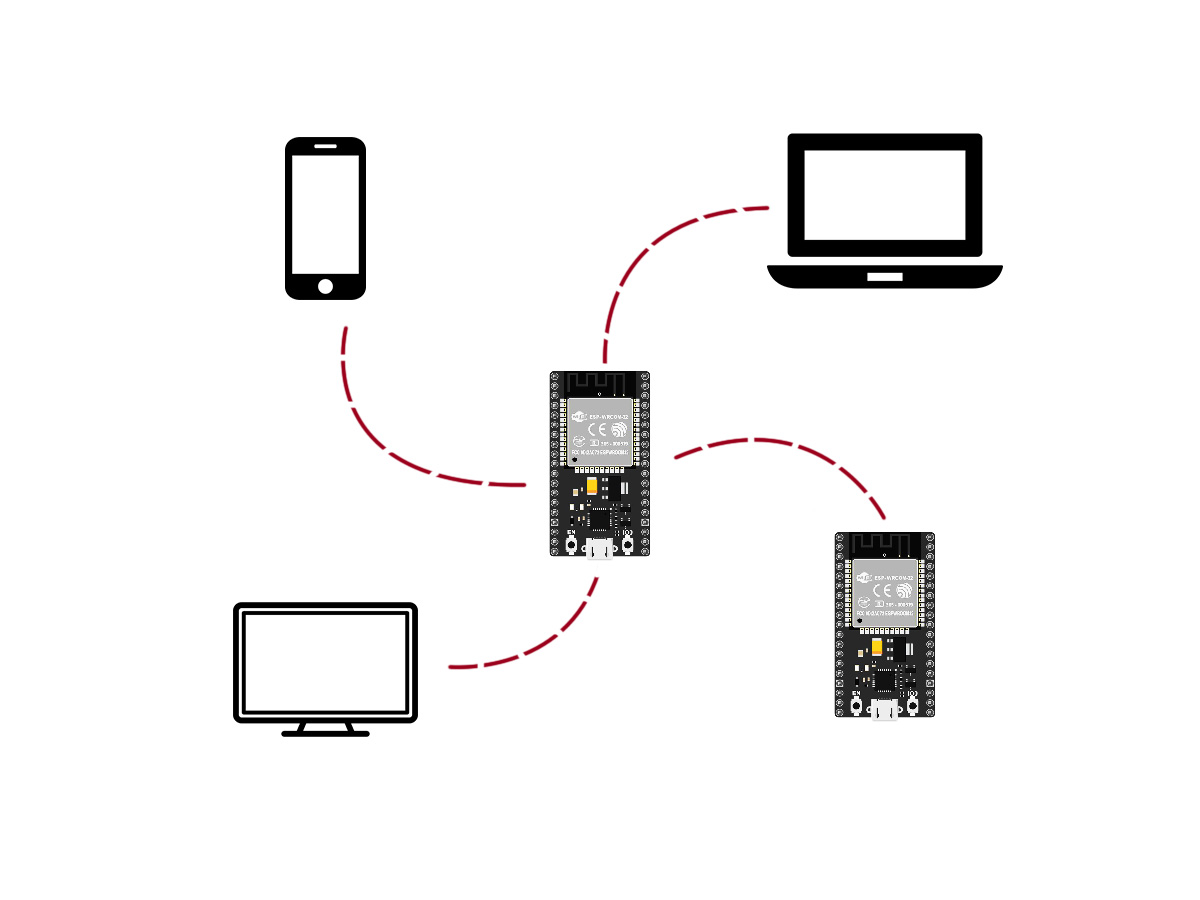
ESP32 Web Server: Setting up ESP32 in Station Mode (STA)
In this case, the ESP32 module is connected to the Wi-Fi router as a Client and can access the Internet through the router. You can use any of the ESP32 boards such as ESP-WROOM-32 or ESP-WROOM-32 Development Board.
ESP32 Web server Code
To start the ESP32 web server in STA mode, just upload the following code on the board. If you are a beginner to ESP32, we recommend reading Installing the ESP32 Board in Arduino IDE.
/*
ESP32 Web Server - STA Mode
modified on 25 MAy 2019
by Mohammadreza Akbari @ Electropeak
Home
*/
#include <WiFi.h>
#include <WebServer.h>
// SSID & Password
const char* ssid = "*****"; // Enter your SSID here
const char* password = "*****"; //Enter your Password here
WebServer server(80); // Object of WebServer(HTTP port, 80 is defult)
void setup() {
Serial.begin(115200);
Serial.println("Try Connecting to ");
Serial.println(ssid);
// Connect to your wi-fi modem
WiFi.begin(ssid, password);
// Check wi-fi is connected to wi-fi network
while (WiFi.status() != WL_CONNECTED) {
delay(1000);
Serial.print(".");
}
Serial.println("");
Serial.println("WiFi connected successfully");
Serial.print("Got IP: ");
Serial.println(WiFi.localIP()); //Show ESP32 IP on serial
server.on("/", handle_root);
server.begin();
Serial.println("HTTP server started");
delay(100);
}
void loop() {
server.handleClient();
}
// HTML & CSS contents which display on web server
String HTML = "<!DOCTYPE html>\
<html>\
<body>\
<h1>My First Web Server with ESP32 - Station Mode 😊</h1>\
</body>\
</html>";
// Handle root url (/)
void handle_root() {
server.send(200, "text/html", HTML);
}Once you’ve uploaded the code, open the serial monitor window. If you’ve entered the correct SSID and password, after a few seconds, ESP32 will connect to the router and give you an IP address.
Great Job, Your ESP32 webserver is now running!
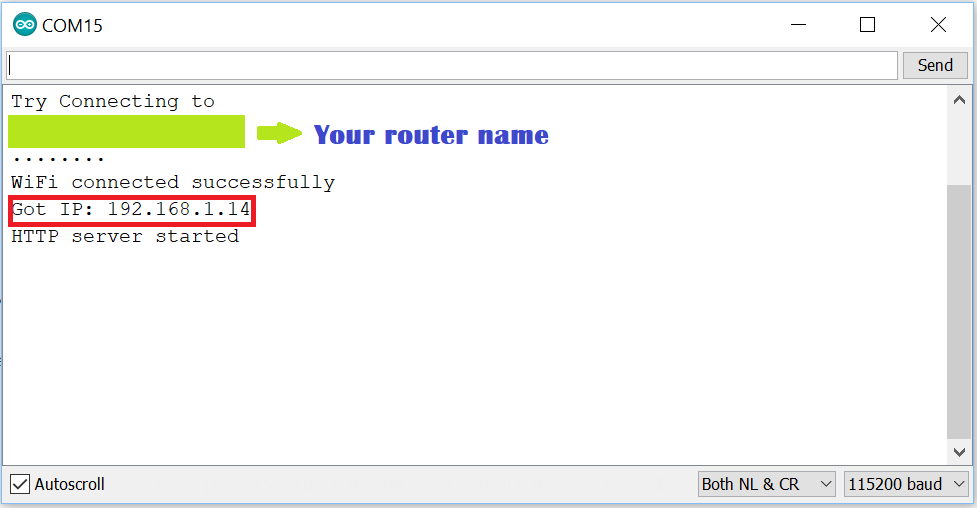
By entering this IP in your browser you can see the web page you have just created.
Note

Code Cracking
#include <WiFi.h>
#include <WebServer.h>Two required libraries have been added at the beginning of the code. The WiFi.h library is used to set up the wifi section and WebServer.h library to build a web page.
const char* ssid = "****";
const char* password = "****";
Enter the SSID and the password of your router in these two lines.
WebServer server(80);This command defines an object called the server from the webserver class. With this object, you can create a web page on Port 80.
In the setup section, serial communication is initially started.
WiFi.begin(ssid, password);With the WiFi.begin command, ESP32 attempts to connect to your wifi router with the SSID and the password that is defined in the code.
while (WiFi.status() != WL_CONNECTED) {
  delay(1000);
  Serial.print(".");
  }
  Serial.println("");
Serial.println("WiFi connected successfully");Serial.print("Got IP: ");
Serial.println(WiFi.localIP());server.on("/", handle_root);In the above code, when the main address (place a / after the IP) is searched in the browser, the handle_root function is called.
Finally, with the server. begin command, your ESP32 web server starts working.
In the loop section, only the handleClient method is called, so your code (the server that you built) is always checking the web server to manage the events occurring on the server.
String HTML = "<!DOCTYPE html>\
<html>\
<body>\
<h1>My First Web Server with ESP32 - Station Mode 😊</h1>\
</body>\
</html>";The HTML string contains the code that should be displayed on the web page. At the end of this tutorial, you can find a basic tutorial on HTML coding for beginners.
Tip
void handle_root() {

  server.send(200, "text/html", HTML);

}ESP32 Web Server: Setting up ESP32 in Access Point Mode (AP)
In this case, ESP32 server acts as a router and creates a local wifi network with the desired name and password. Since there is a limited number of devices that can connect to this connection point, it is also referred to as the Soft Access Point.
Let’s go on and set up the ESP32 web server in Access Point mode.
Code
/*
ESP32 Web Server - AP Mode
modified on 25 MAy 2019
by Mohammadreza Akbari @ Electropeak
Home
*/
#include <WiFi.h>
#include <WebServer.h>
// SSID & Password
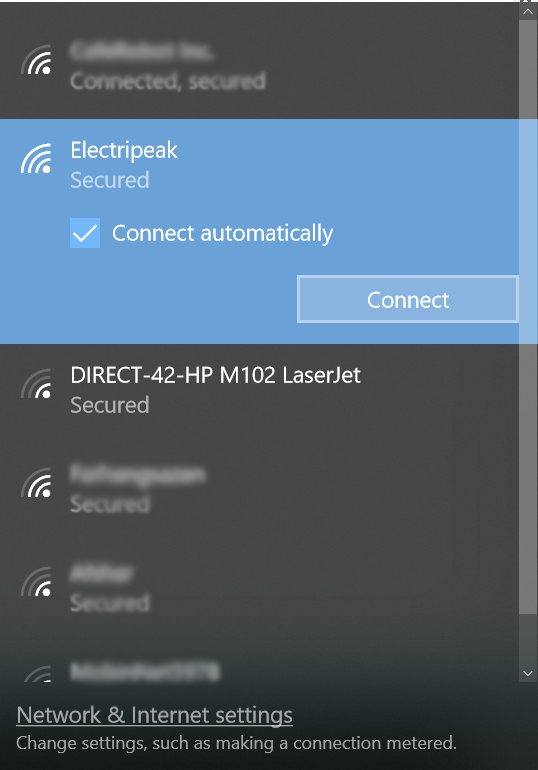
const char* ssid = "Electripeak"; // Enter your SSID here
const char* password = "123456789"; //Enter your Password here
// IP Address details
IPAddress local_ip(192, 168, 1, 1);
IPAddress gateway(192, 168, 1, 1);
IPAddress subnet(255, 255, 255, 0);
WebServer server(80); // Object of WebServer(HTTP port, 80 is defult)
void setup() {
Serial.begin(115200);
// Create SoftAP
WiFi.softAP(ssid, password);
WiFi.softAPConfig(local_ip, gateway, subnet);
Serial.print("Connect to My access point: ");
Serial.println(ssid);
server.on("/", handle_root);
server.begin();
Serial.println("HTTP server started");
delay(100);
}
void loop() {
server.handleClient();
}
// HTML & CSS contents which display on web server
String HTML = "<!DOCTYPE html>\
<html>\
<body>\
<h1>My First Web Server with ESP32 - AP Mode 😊</h1>\
</body>\
</html>";
// Handle root url (/)
void handle_root() {
server.send(200, "text/html", HTML);
}

Code Cracking
const char* ssid = "Electropeak";

const char* password = "123456789";IPAddress local_ip(192, 168, 1, 1);
IPAddress gateway(192, 168, 1, 1);
IPAddress subnet(255, 255, 255, 0);WiFi.softAP(ssid, password);
WiFi.softAPConfig(local_ip, gateway, subnet);Basic HTML and CSS Commands for ESP32 Webserver
HTML has tags that place between <>. All HTML commands should be placed between these tags. You can use this link to test your codes online.
CSS stands for Cascading Style Sheets. CSS commands specify how HTML code and instructions are displayed to the user.
The first line of each HTML code should be . This command is not an HTML command. With this code, you are anouncing the browser which version of HTML you used to write the web page.
<!DOCTYPE html><html> codes… <\html>Inserting Headlines
You can use the tags to to create headlines in different sizes.
<h1>This is heading 1</h1>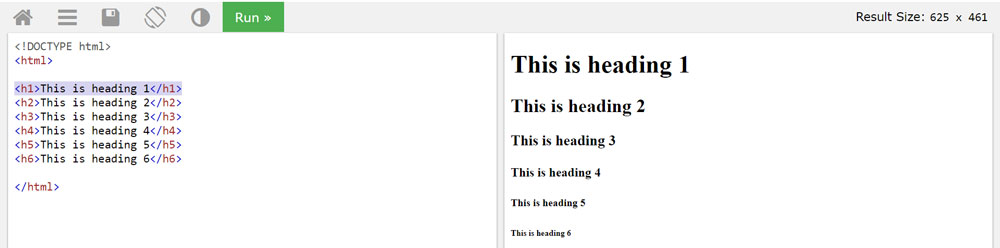
Inserting Paragraphs
Use the tag to insert a new paragraph and write your text between it.
<p>Your first paragraph.</p>
<p>Your second paragraph.</p>
Bold Texts
You can use the HTML tag or the CSS command to bold the texts.
<b>This is bold text</b>
Adding a Link
With the tag you can place the URL as a link in your page.
<a href="https://electropeak.com/">Visit Electropeak</a>
Adding Images
You can add images using the tag.
<img src="image URL" alt="Smiley face" width="42" height="42">
Adding Buttons
With the <button> tag you can add a button to your web page.

To learn more about HTML and CSS commands, visit w3schools.

Comments (32)
Hi, my name Nur Ahmad. You can call me Wiwid like others.
I try your code to build the web server inside the esp, i think this code unique. because use String HTML to create the Web Server.
I had try code with Client.println() to build the web server like Github share what they did.
But, your code not give feedback when client connect to ur server.
And i combine both, the coe from Github and your code to build script that give feedback when client connect to your server.
But, combination not working. Because different style script when build the HTML web server
with your style script , can you help me to script ESP32 to give feedback when client connect to our server?
thank you
Hi Wiwid.
We will check it 🙂
Very interesting! Now. as a newbie, my question is related to:
Click Me! …
is there a way to send a digitalWrite command to the ESP32 board when the button is clicked?
Thanks in advance 🙂
Hi Antonio. It’s very easy to do that. Follow this link.
https://randomnerdtutorials.com/esp32-web-server-arduino-ide/
Hello
I’m not able to insert the images, do you have any examples that can help me? I used the same code from the reference above and inserted a line of code for the image I want, but it doesn’t work, can you help me?
In the code
img src="image URL", you should replace “image URL” with a real valid image URL. This one should work:https://electropeak.com/learn/wp-content/uploads/2019/07/webserver-cover-400x300-1.jpgBit confused about inserting an image. If this is an access point then an image can only be displayed from SPIFFS how would you integrate a request to get the image from the SPIFFS?
Hi james,
If you’re creating a webpage on an ESP, I recommend using Fully SPIFFS (SPI Flash File System). This entails organizing all your HTML, CSS, images, and other files into a single folder and uploading them to SPIFFS. Then, you’ll call the main page (like index.html) in your code. To reference your files correctly, for example, for a font, you’ll add a line like this in your code:
server.on("/font/Vazir-FD-WOL.woff", HTTP_GET, font);In the font function, you’ll have:
void favicon(){
Serial.println("-Font");
server.send(200, "text/html", readFile("/html/font/Vazir-FD-WOL.woff")); // Send web page
}
And in the readFile function:
String readFile(const char *path){
String value = "";
File file = SPIFFS.open(path);
if (!file)
{
Serial.println("Failed to open file for reading");
return "";
}
while (file.available())
{
value = file.readString();
}
file.close();
return value;
}
This ensures that your files are read and served correctly from SPIFFS.
Thanks for the examples. I found that the AP mode required me to set a manual IP address. The line:
WiFi.softAPConfig(local_ip, gateway, subnet);
Seems to disable DHCP. Commenting it out allowed DHCP to work, but I had to add the lines:
Serial.print(“My IP address: “);
Serial.print(WiFi.softAPIP());
To confirm what IP Address the ESP32 gave itself
Thanks for sharing.
Hello, thats a great example but I’ve one question? Where I can find the libary “WebServer.h”? I’ve tried to find in web but I’ve no access. Is it a standard libary, if yes what the name in the libary manager?
Thanks, Marcel.
Hi Marcel K. “WebServer.h” will automatically install when you install esp32 on Arduino IDE. If not, follow the link below to install it again.
https://electropeak.com/learn/getting-started-with-the-esp32/
I hope this tutorial helps you to install it.
Is it possible to have a files repo stored on the board so that I can host an existing webpage? (HTML, CSS and some images) Or maybe link the file tree to the board? Thanks in advance!
Yes, it’s possible. You can do that based on the tutorial explained in this article. But in order to make a public webpage, you will need static IP and config your rooter/modem.
An execllent posting from you, all helpful in stuffing my head
up with helpful knowledge. I’ve also taken the time to
share this on Twitter 🙂
You’re most welcome! And thanks for sharing.
Your website has provided me a lot of useful info, and for that I thank you very much.
This informative article is one of the best I’ve read up to now on your
web site, so I felt I needed to take the time to comment.
You have given myself a variety of tips to help me in the foreseeable future.
You’re most welcome! We’re filled up with energy by such motivating comments.
I’m having a problem after uploading the code in the board.
It says: “leaving… Hard resetting via RTS pin”
what should I do?
I’m connecting the esp32 directly at the USB of my computer, with no resistance and stuff.
I’m trying to make the web server to work, with ssid and password filled correctly.
Thanks for the explaining, it was pretty good.
Hi Vinicius,
You’ve got no problem actually! This message means that the uploading has been successfully done.
I see… thanks for the information. One more thing: Is it normal that the serial monitor is completely empty? It is completely white… and i can’t access the server even with my correct ip address.
Wow! It worked! I just had to press the RTS button to the module run the uploades code.
Thanks a lot Mehran! Have a nice life!
You’re quite welcome!
You too!
very intersting
Thanks!🙏
hi..
it is amazing
but i have a question please
how can i handle Input Fields with webserver.h esp32? and reading query parameters in url?
is there a clear documents for webserver ?
and thank you so much
Hi,
I need to publish this web page globally from internet so how we can explore ? Locally it is accessible as you have mention so how it would be accessible from anywhere from internet
Hello
To connect different types of network modules to the Internet through your own internal network, you need to do the following.
1. Having a static ip from your internet provider.
2. Set up the port forward in the modem / router settings (which external port of yours should be connected to which internal port and ip of yours.
After setting these items, you can access your esp page through your external static ip address and the set port.
Of course, depending on the country, you can also use ddns for this issue.
I’ve tested the awesome Station Mode Access Point and it works. My need is…
1) Multiple ESP32 camera servers (not sending at the same time).
2) One receiver at my PC that receives photos and saves them to my hard drive.
3) The receiver does not initiate the capture – it just receives and saves photos.
What would you suggest for the receiver: access point – station mode or something else?
I Like it
So interesting!!
Thanks for the tutorial. My code works most time but sometimes the server does not respond.
After server.begin(); I get reply “HTTP server started” but it will not respond to the web browser or to a ping and I have to reset. Most times that will get it working.
Does server.begin(); return any error codes and if not is there a way in the code that I can test if the server is functioning correctly ?
Hello,
In the library file “WiFiServer.cpp,” we encounter a void function, which indicates that this function doesn’t return any information.
This could hint at another issue, such as a poor connection to the network. I recommend conducting a ping test to verify the connection or adding a function to test the connection or any other potential problem. You can make a access to this function from the serial port and use it to test each section of your code.