
Introduction
What You Will Learn
- General information about Bluetooth protocol
- How to send data using Bluetooth
- How to send AT-Command to HC05
A Brief Introduction to Bluetooth Communication and Protocol
There are several ways for wireless communication such as NRF, ZigBee, Wi-Fi and Bluetooth.
Bluetooth protocol; an affordable communication method in PAN network, with maximum data rate of 1Mb/S, working in nominal range of 100 meters using 2.4 G frequency is a common way of wireless communicating.
HC05 module is a Bluetooth module using serial communication, mostly used in electronics projects.
You can download the HC05 Bluetooth module datasheet here.
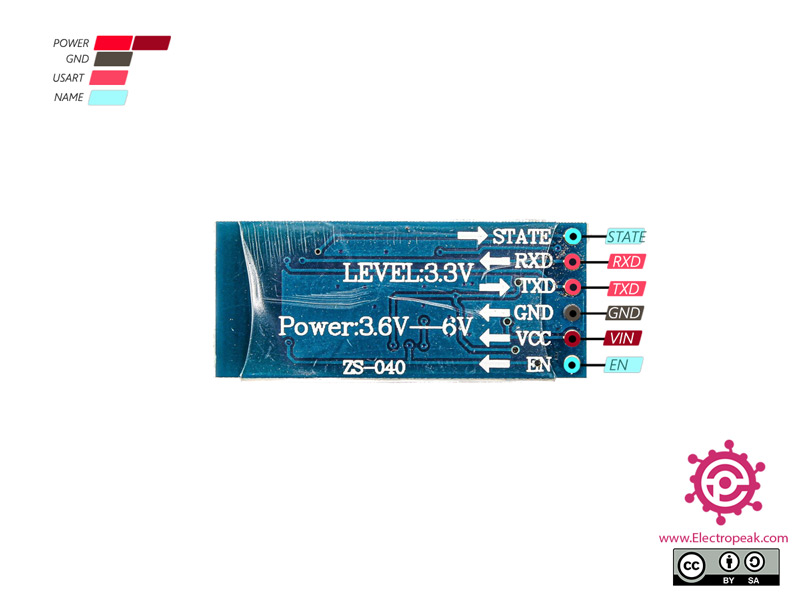
HC05 Bluetooth Module Pinout
This module has 6 pins:
- VIN: Module power supply – 3.6-6V
- GND: Ground
- STATE: Connection State
- EN: Enable AT Command settings
- RX: Receive Serial Data
- TX: Transmit Serial Data
You can see the pinout of this module here.
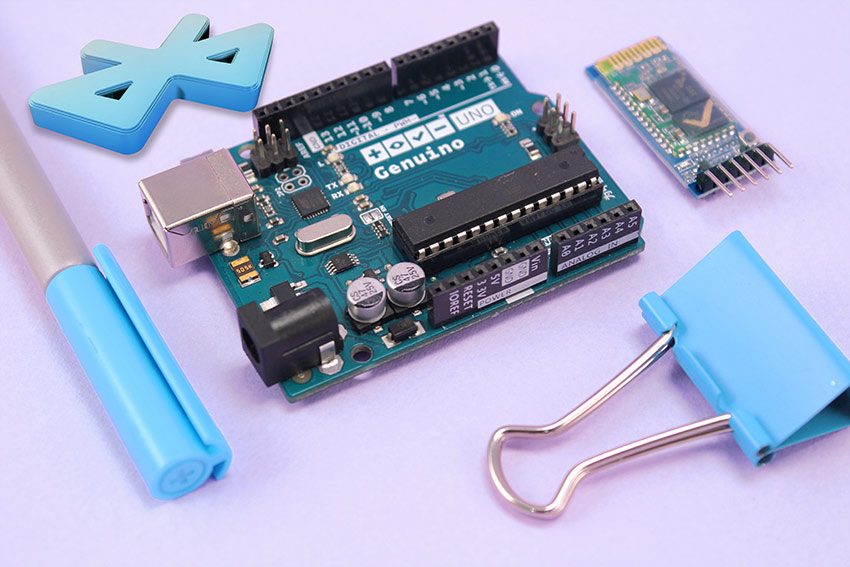
Required Material
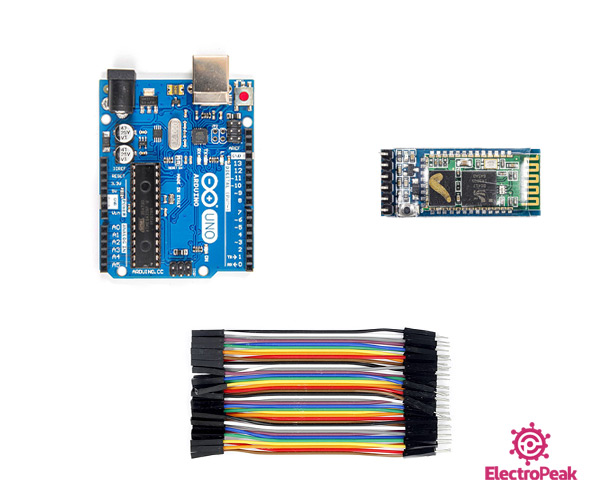
Hardware component
Software Apps
Sending Data from Bluetooth to Arduino
HC05 module has an internal 3.3v regulator and that is why you can connect it to 5v voltage.
Interfacing HC05 Bluetooth Module with Arduino
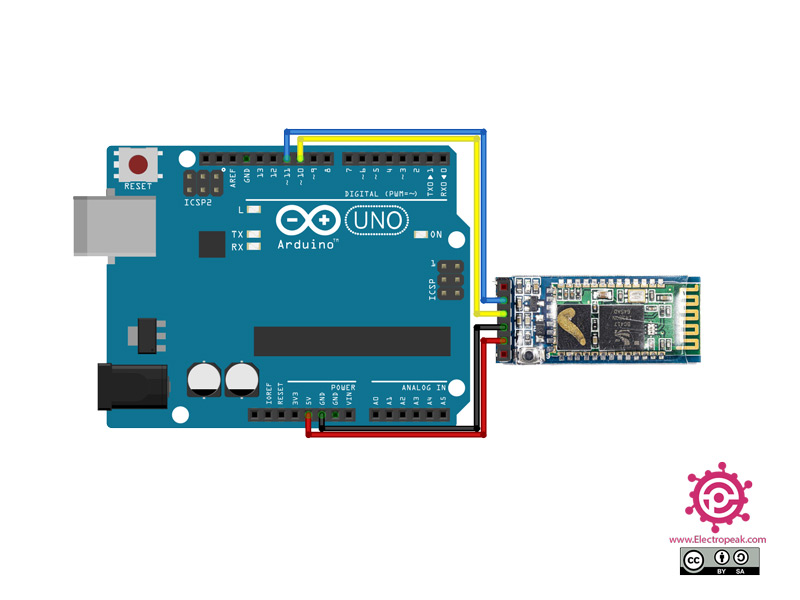
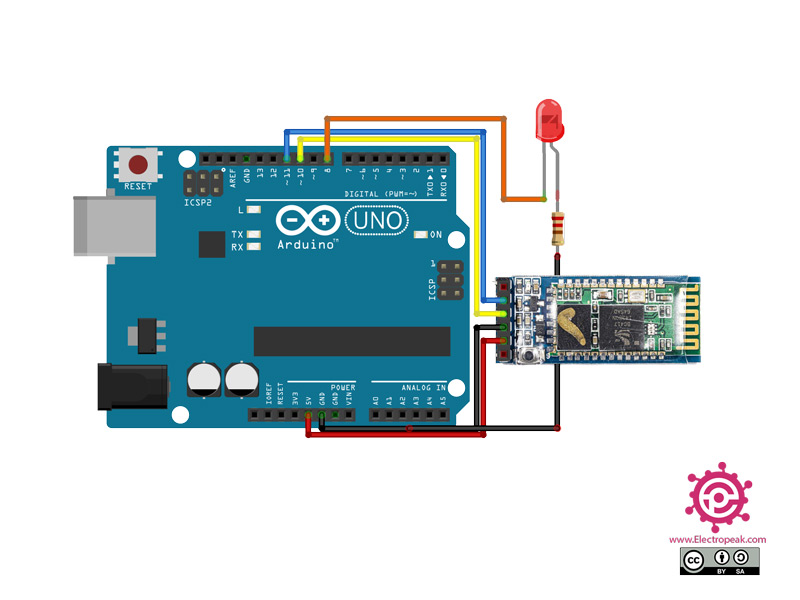
Step 1: Circuit
The following circuit shows how you should connect the Arduino to the HC05 module. Connect wires accordingly.
Step 2: Library
Install the following library on your Arduino IDE.
Step 3: Code
Upload the following code to the Arduino board.
 /*
  Modified on March 09, 2021
  Modified by MohammedDamirchi from https://github.com/PaulStoffregen/SoftwareSerial
  Home
*/


#include <SoftwareSerial.h>

SoftwareSerial mySerial(10, 11); // RX, TX

void setup() {
  // Open serial communications and wait for port to open:
  Serial.begin(9600);
  while (!Serial) {
    ; // wait for serial port to connect. Needed for native USB port only
  }

  // set the data rate for the SoftwareSerial port
  mySerial.begin(9600);
}

void loop() { // run over and over
  if (mySerial.available()) {
    Serial.write(mySerial.read());
  }
  if (Serial.available()) {
    mySerial.write(Serial.read());
  }
}
This code is to test the connection between the Arduino serial monitor and the device connected to the Bluetooth module.
Control an LED via Android Phone Bluetooth
Step 1: Circuit
This code is to test the connection between the Arduino serial monitor and the device connected to the Bluetooth module.
Step 2: Code
In order to communicate with HC05 using Bluetooth, you need a Bluetooth terminal application on your phone. You can use this one:
link
Now for start transferring data, upload this code on your arduino and connect HC05 using the app you have just installed. Communication name is HC05, the password is 1234 or 0000 and the transfer boud rate is 9600 by default.
/*
HC05 - Bluetooth AT-Command mode
modified on 10 Feb 2019
by Saeed Hosseini
https://electropeak.com/learnfarsi/
*/
#include <SoftwareSerial.h>
SoftwareSerial MyBlue(10, 11); // RX | TX
String flag;
int LED = 8;
void setup()
{
  Serial.begin(9600);
  MyBlue.begin(9600);
  pinMode(LED, OUTPUT);
  Serial.println("Ready to connect\nDefualt password is 1234 or 000");
}
void loop()
{
  if (MyBlue.available())
    flag = MyBlue.read();
    flag.trim();
  if (flag == '1')
  {
    digitalWrite(LED, HIGH);
    Serial.println("LED On");
  }
  else if (flag == '0')
  {
    digitalWrite(LED, HIGH);
    Serial.println("LED Off");
  }
}
Let’s take a deeper look at the code and see what each line means:
#include <SoftwareSerial.h>library you need for software serial communication
SoftwareSerial MyBlue(10, 11);Software definition for serial pins; RX10 & TX11
MyBlue.begin(9600);Configuring software serial baud rate at 9600
void loop()
{
  if (MyBlue.available())
    flag = MyBlue.read();
    flag.trim();
  if (flag == '1')
  {
    digitalWrite(LED, HIGH);
    Serial.println("LED On");
  }
  else if (flag == '0')
  {
    digitalWrite(LED, HIGH);
    Serial.println("LED Off");
  }
}Sending AT-Commands to HC05 Bluetooth Module and Changing Its Settings
By pressing and holding the button the module switches into AT-command mode; Otherwise it works in the communication mode.
Some modules have a push button in their packages and there is no need to add one anymore.
The default baud rate to enter At-command mode is 38400.
Now upload this code on your board and set commands using Serial Monitor.
/*
HC05 - Bluetooth AT-Command mode
modified on 10 Feb 2019
by Saeed Hosseini
https://electropeak.com/learnfarsi/guides
*/
#include "SoftwareSerial.h"
SoftwareSerial MyBlue(10, 11); // RX | TX
void setup()
{
  Serial.begin(9600);
  MyBlue.begin(38400);  //Baud Rate for AT-command Mode.
  Serial.println("***AT commands mode***");
}
void loop()
{
  //from bluetooth to Terminal.
  if (MyBlue.available())
    Serial.write(MyBlue.read());
  //from termial to bluetooth
  if (Serial.available())
    MyBlue.write(Serial.read());
}| Command | Response | Description |
|---|---|---|
| AT | OK | Just test |
| AT+RESET | OK | Reset module |
| AT+VERSION? | +VERSION: OK | Firmware version of module |
| AT+ORGL | OK | Restore to default |
| AT+ADDR? | +ADDR: OK | Module address |
| AT+NAME? | +NAME: OK | Module name |
| AT+NAME=your name\r\n | OK | Change module name |
| AT+RNAME?param1\r\n | +NAME: OK | Bluetooth device name |
| AT+ROLE? | +ROLE: | Module role(0 is slave & 1 is master) |
| AT+ROLE=(0 as slave,1 as master)\n\r | OK | Change module role |
| AT+PSWD? | PSWD: OK | Module password |
| AT+PSWD=your pass\r\n | OK | Change module password |
| AT+UART? | P3: Parity +UART= OK | P1: Baud rate P2: Stop bit P3: Parity |
For more commands, refer to the HC05 datasheet.

Comments (4)
I am Trying to controlling the light using Text Message Via Bluetooth and i worked out using bt.write and read command the serial data will displaying but in receiving side of blue-tooth module but led was not operating (ON & OFF ) can any solution to workout this Code
Did you fallow the tutorial completely?
Dear Saeed Hosseini,
I have a flowmeter, and i’m calculating the total volume being output in a time interval. I want to send this output volume to the bluetooth terminal. How would I be able to send a calculation i.e. a number with the time of recording?
Hi,
The bluetooth communication protocol works pretty much like the serial communication protocol. So, to send the calculated number along with the time of recording, you can just put them beside each other and use a comma to separate them. Then, you can send the result to the bluetooth terminal using the commands explained in the tutorial.