Contents

Interfacing SHT20 Temperature and Humidity Sensor with Arduino

SHT20 Temperature and Humidity Sensor Features

The SHT20 temperature and humidity module is high-precious, full calibrated, with very low power consumption and high response speed. This sensor is a combination of a capacitive humidity sensor and a silicon band gap temperature sensor. The key features are:

  • Temperature measurement range: -40 to +125 °C
  • Temperature measurement accuracy: 0.3 °C
  • Humidity measurement range: 0 to 100%
  • Humidity measurement accuracy: 3% RH
  • Communication Protocol: I2C

SHT20 Temperature and Humidity Sensor Pinout

This module has 4 pins:

  • VCC: Module power supply – 2.1-3.6 V
  • GND: Ground
  • SDA: Serial Data Input/Output for I2C protocol
  • SCL: Serial Clock Input for I2C protocol

You can see the pinout of this module here.

Required Materials

Hardware Components

Arduino UNO R3 × 1
SHT20 Temperature and Humidity Sensor × 1
Male to Female jumper wire × 1

Software Apps

Arduino IDE

Interfacing SHT20 Temperature and Humidity Sensor with Arduino

Step 1: Circuit

The following circuit shows how you should connect your Arduino Board to the SHT20 module. Connect wires accordingly.

Step 2: Library

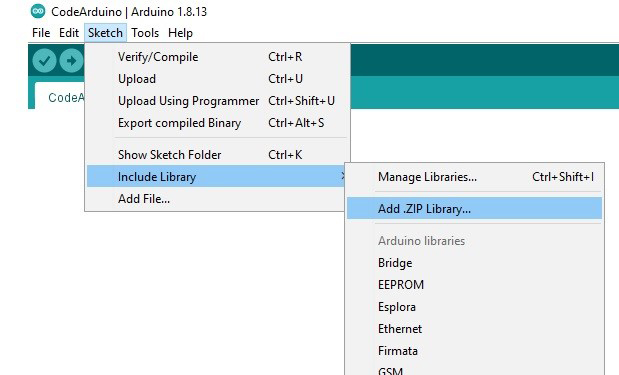
Download the DFRobot_SHT20-master library here.

Then go to Include Library and install the library.

Tip

If you need more help with installing a library on Arduino, read this tutorial: How to Install an Arduino Library

Step 3: Code

Upload the following code to the Arduino. Then open the Serial Monitor.

/*
modified on Apr 10, 2021
Modified by MehranMaleki from Arduino Examples
Home
*/ #include <Wire.h> #include "DFRobot_SHT20.h" DFRobot_SHT20 sht20; void setup() { Serial.begin(9600); Serial.println("SHT20 Example!"); sht20.initSHT20(); // Init SHT20 Sensor delay(100); sht20.checkSHT20(); // Check SHT20 Sensor } void loop() { float humd = sht20.readHumidity(); // Read Humidity float temp = sht20.readTemperature(); // Read Temperature Serial.print(" Temperature: "); Serial.print(temp, 1); Serial.print("C"); Serial.print("\t Humidity: "); Serial.print(humd, 1); Serial.println("%"); delay(1000); }

In the above code, at first, the relevant library is included and the sensor starts working. Then, every second, we take the temperature and humidity data from the sensor and display it on the Serial Monitor.

Liked What You See?​
Get Updates And Learn From The Best​

Comments (2)

  • hisham Reply

    hi..
    how can i change i2c address? i have multi device i2c on i2c bus.

    August 15, 2021 at 3:00 pm
    • Mehran Maleki Reply

      Hi,
      It’s not possible to change the I2C address of a module in the code. Some modules have an “I2C address” pin, which allows us to change its I2C address. But most of the modules do not have that capability. To solve the problem in such cases, there are some I2C expansion modules that we can use to connect multiple I2C modules with the same address to a single I2C buss. For example, “TCA9548A module” is an 8-channel I2C expansion module that you can use to connect 8 modules with the same I2C address to a single I2C buss. Here’s the link for it: “https://electropeak.com/tca9548a-1-to-8-i2c-8-way-multi-channel-expansion-board”

      August 16, 2021 at 10:26 am

Leave a Reply

Your email address will not be published. Required fields are marked *