
To access all sensors in GY-87 module, you need to use the corresponding library. Download these libraries below. Then go to the Include Library and install them.


To access all sensors in GY-87 module, you need to use the corresponding library. Download these libraries below. Then go to the Include Library and install them.

Comments (19)
Hi I am trying to connect an GY-87-12C IC 10 DOF MPU6050 to my mega
will try your code
if you send your email
i will forward the results back
your library “SIMPLE” does not compile
does your code work
pls send the results along with the code
Hi dear
it should be work.
All codes are tested before uploading
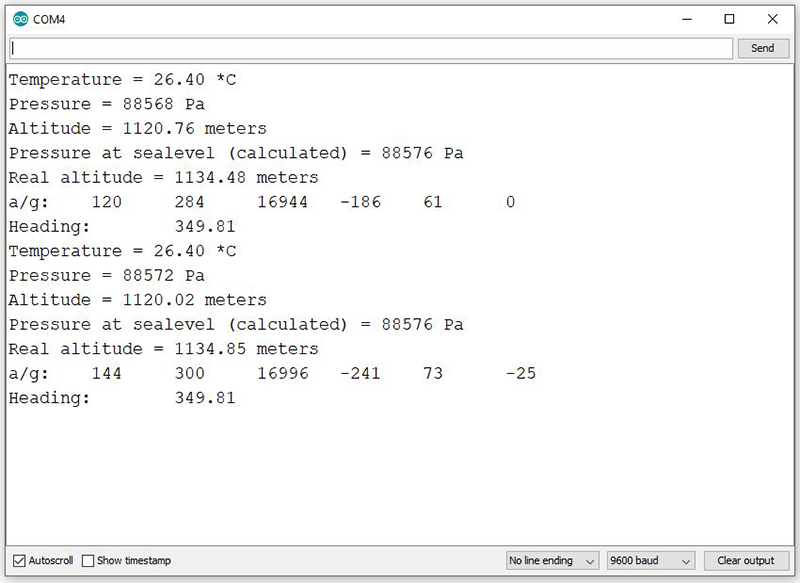
Actually, the magnetometer date is stuck and does not give any correct value. You can also see in your example output the value has not changed.
Hi.
If the sensor gets close to the magnet/electromagnet field, chances are it will be harmed
Hello, how can I fix the error : “MPU6050 connection failed” ?
Hi Martin,
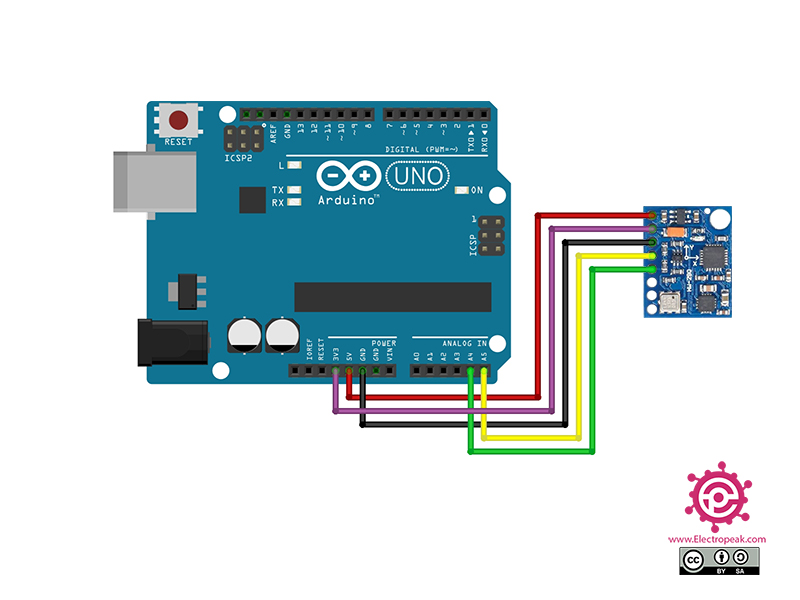
This error is usually for incorrect wiring of the module.
Notice that this board uses I2C and you should find the I2C pins on your micro and connect the wires to them.
You can also find your module ID by using the I2C Scanner example in the Arduino IDE examples section and uploading it to the board. Change this ID if necessary.
I am getting “Could not find a valid BMP085 sensor, check wiring!”
Hello,
To determine the ID of your sensor, you can utilize the I2C Scanner example.
If you don’t receive any ID, it’s advisable to verify your wiring.
Keep in mind that the I2C pin varies for each Arduino model or any board. Once you obtain the ID, compare it with the default ID specified in the library.
You may need to modify the ID to ensure proper data retrieval.
Hello, I’m glad everything works fine except to the mpu5060 sensor library part, it seems I cant download the file as it says “sorry, file not found”. To compensate to the missing libraries, I tried to add every possible MPU6050 libraries I could and test them out. But to no avail, it never works and always says MPU5060 connection failed. I also tried the solution of “You can also find your module ID by using the I2C Scanner example in the Arduino IDE examples section and uploading it to the board. Change this ID if necessary” by Mohammad Damirchi. I believe the code for that was #define MPU6050_ADDRESS 0x77 .Still doesn’t work, please help I’m really frustrated and been finding the solution for almost 14 hours. I woul really appreicate the help, thanks!
Hello Javra,
The issue with the download link has been resolved. You can now try downloading the file without any problems. Additionally, you can access the library used for this article through the following link.
Thank you for the reply, really means a lot. I just wanna say that the download link are working fine, but it seems that the MPU6050 Sensor Library gave me a file named HMC5883L_Simple. This is the same file to the HMC5883L_Simple library. I checked both libraries content, and still the same.
Hi javra,
I’ve updated the file again. If you encounter any further issues, you can download it from this link.
Hello!May I ask if the a/g in the code refers to the acceleration/magnetic rotation ratio?
Why didn’t I find any data on magnetic field strength?
If I want to measure the size of a magnetic field, how should the code be written?
Hello John,
The “a/g” refers to accelerometer/gyroscope (as noted in the code comment).
To obtain magnetic readings, we utilize the HMC5883L sensor and retrieve the heading in degrees using `GetHeadingDegrees`. If you need to gather all the data at once, use this command:
// Read compass values

compass.read();

x = compass.getX();

y = compass.getY();

z = compass.getZ();
For further details, please consult the associated article.
hey, what about using the DMP chip on the MPU6050 using the Magnetometer with the auxiliary i2c interface??? is the HMC5883L is connected internally (on chip) to the i2c auxiliary interface of the MPU6050??
Hello,
Yes, the HMC5883 sensor is connected via the MPU6050, which acts as a gateway. This configuration is enabled in the code at line 41 with the following command:
accelgyro.setI2CBypassEnabled(true); // Set bypass mode for gateway to HMC5883LThis line allows the MPU6050 to pass through I2C communications, enabling direct interaction with the HMC5883 sensor through the shared I2C bus.
Thanks! The above code works great!