
Download the datasheet of GUVA-S12S module here.


Download the datasheet of GUVA-S12S module here.

Comments (10)
What is the accuracy and is the data reliable enough to be publish in research article?
Hi Mayur,
It’s advisable to consult the datasheet of the sensor for comprehensive information. Based on that, you can determine whether the sensor is suitable for your intended application or not.
It would be useful to know the output stage of the device to apply it for measuring ultraviolet without using Arduino.
Hello Boris,
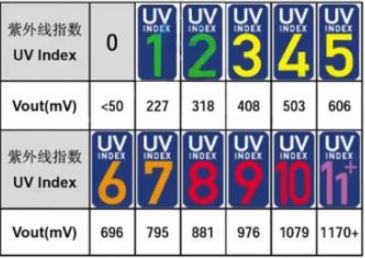
The sensor outputs an analog voltage that varies between 0 and 1 Volt. Based on the image in this article, each voltage level corresponds to a certain degree of change. If you want to use this module without an Arduino, you can use an operational amplifier, such as the LM358, to read the analog voltage. If the voltage exceeds a certain threshold, the op-amp can make the output switch to a high state (similar to a digital signal).
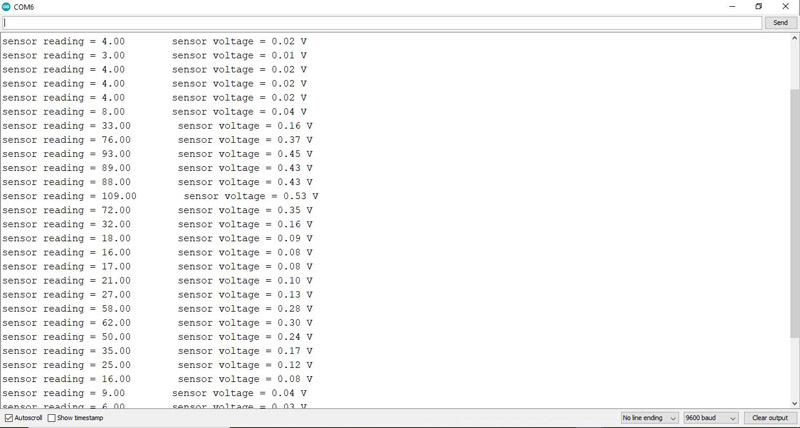
Where can I see the outputs of the sensor? I can’t find anything in Arduino IDE to see the UV data. Is there a specific place that I need to go?
Hi Kyle,
In the Arduino IDE, there is an option called “Serial Monitor.” When you open the Serial Monitor window, you will be able to see the sensor output. You can access it by clicking the top right corner icon in the main page, or you can use the shortcut Ctrl+Shift+M. More details can be found here
How does dividing by 1024 and then multiplying by 5.0 give us the output voltage of the UV-Sensor? Is there a link to the information you got this from?
Hi Julian,
Dividing by 1024 and then multiplying by 5.0 converts the raw sensor reading (which is a number between 0 and 1023) into the actual voltage that the sensor is detecting.
The analog-to-digital converter (ADC) in the microcontroller reads the sensor value as a fraction of the 5V input range, so dividing by 1024 normalizes this reading, and multiplying by 5.0 scales it back to the real voltage (since the full range is 0 to 5V). This method is standard in converting analog sensor readings to voltage in electronics.
Where did you get the diagramm from that Plots Voltage and the UV-Index?
It’s based on the datasheet.