Contents

Interfacing BMP280 Barometric Pressure Sensor Module with Arduino

BMP280 Pressure Sensor Features

The BMP280 barometric pressure module is a tiny sensor to measure barometric pressure. Its small dimensions and its low power consumption allow for the implementation in battery powered devices such as mobile phones, GPS modules or watches.

The key features are:

  • Pressure range: 300 to 1100 hPa
  • Capable of measuring temperature
  • Pressure measurement accuracy: 0.12 hPa
  • Support I2C communication up to 3.4 MHz
  • Support SPI communication up to 10 MHz

Applications:

  • Indoor navigation
  • Weather forecast
  • Vertical velocity indication
  • GPS
  • Outdoor equipment
Note

Each hPa is equal to 100 Pa.

You can download the datasheet of this module here.

BMP280 Pressure Sensor Pinout

This Module has 6 pins:

  • VCC: Module power supply
  • GND: Ground
  • SDA: I2C Data
  • SCL: I2C Clock
  • CSB: Chip Select
  • SDO: Serial Data Output


Note

In I2C communication, we use two pins: SDA and SCL, and in SPI communication, we use all four pins.

You can see the pinout of this module in the image below.

Required Material

Hardware component

Arduino UNO R3 × 1
BMP280 Barometric Pressure Sensor Module × 1
Male to Female jumper wire × 1

Software Apps

Arduino IDE

Interfacing BMP280 Pressure Sensor with Arduino

Step 1: Circuit

The following circuit show how you should connect Arduino to BMP280 sensor. Connect wires accordingly.

Note

In this tutorial we have used I2C protocol. Therefore, we use DPA SDA and SCL to interface module.

Step 2: Library

Go to Library manager and search for BMP280, install Adafruit_BMP280_Library.

Tip

If you need more help with installing a library on Arduino, read this tutorial: How to Install an Arduino Library

Step 3: Code

Upload the following code to your Arduino.

  /*
  BMP280-Barometric-Pressure-Sensor-Module
  modified on 05 Jan 2021
  by Amir Mohammad Shojaee @ Electropeak
  
Home
Based on Adafruit Example */ #include <Wire.h> #include <SPI.h> #include <Adafruit_BMP280.h> #define BMP_SCK (13) #define BMP_MISO (12) #define BMP_MOSI (11) #define BMP_CS (10) Adafruit_BMP280 bmp; // I2C //Adafruit_BMP280 bmp(BMP_CS); // hardware SPI //Adafruit_BMP280 bmp(BMP_CS, BMP_MOSI, BMP_MISO, BMP_SCK); void setup() { Serial.begin(9600); Serial.println(F("BMP280 test")); if (!bmp.begin()) { Serial.println(F("Could not find a valid BMP280 sensor, check wiring!")); while (1); } /* Default settings from datasheet. */ bmp.setSampling(Adafruit_BMP280::MODE_NORMAL, /* Operating Mode. */ Adafruit_BMP280::SAMPLING_X2, /* Temp. oversampling */ Adafruit_BMP280::SAMPLING_X16, /* Pressure oversampling */ Adafruit_BMP280::FILTER_X16, /* Filtering. */ Adafruit_BMP280::STANDBY_MS_500); /* Standby time. */ } void loop() { Serial.print(F("Temperature = ")); Serial.print(bmp.readTemperature()); Serial.println(" *C"); Serial.print(F("Pressure = ")); Serial.print(bmp.readPressure()); Serial.println(" Pa"); Serial.print(F("altitude = ")); Serial.print(bmp.readAltitude(1013.25)); /* Adjusted to local forecast! */ Serial.println(" m"); Serial.println(); delay(2000); }

At the beginning of the code, we included 3 needed libraries. At the end, these parameters appear on Serial Monitor: pressure in hPa, temperature in degrees Celsius and altitude in meter. Altitude is calculated using pressure.

Note

This code is written for both I2C and SPI communication protocols.

The output is as follows. You can see the three parameters: pressure, temperature and altitude.

Liked What You See?​
Get Updates And Learn From The Best​

Comments (4)

  • Ali Khalili Reply

    I use that on arduino mega 2560 but not working. are there difftent bitwin UNO & MEGA?

    January 2, 2022 at 10:16 pm
    • Mehran Maleki Reply

      Hi.
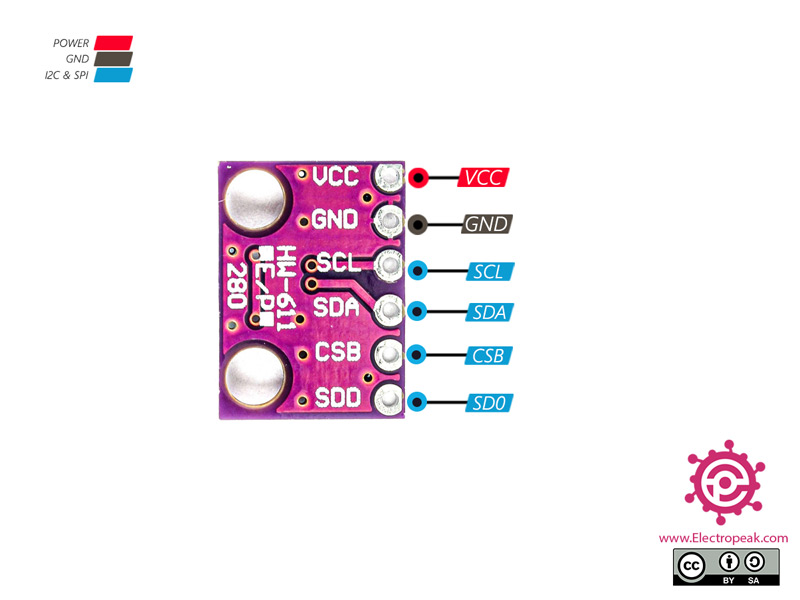
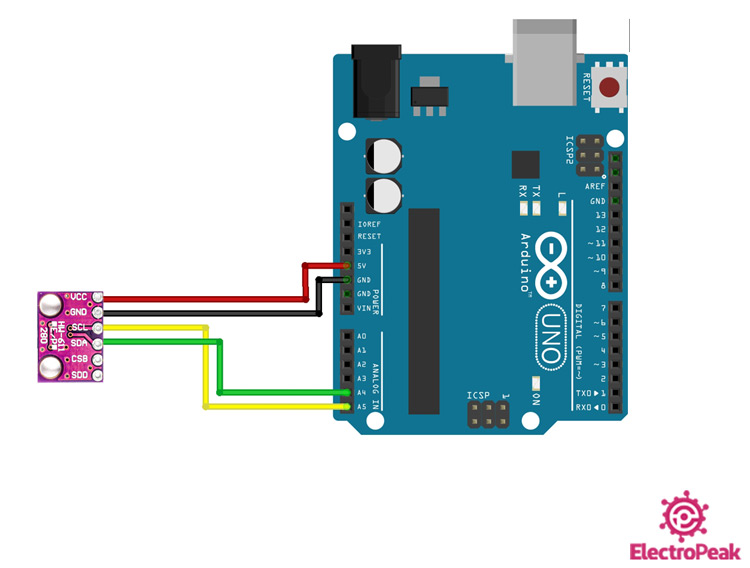
      The code is the same for both of them. But, the I2C pins of Arduino Mega are different from the I2C pins of Arduino Uno. The I2C pins of Arduino Mega are pins 20 and 21. So, just for the wiring, you should connect the SCL and SDA pins of the module to pins 20 and 21 of your board.

      January 3, 2022 at 5:45 am
  • Richard van Raay Reply

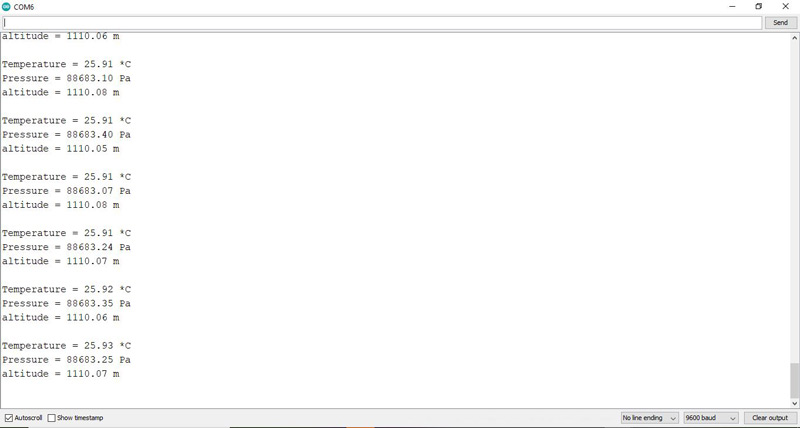
    Is there any way to change the code so it only shows the maximum altitude?

    April 5, 2022 at 9:52 am
    • Mehran Maleki Reply

      Yes, just comment the lines 41-47 of the code.

      April 7, 2022 at 7:42 am

Leave a Reply

Your email address will not be published. Required fields are marked *