

ADS1118 16-Bit ADC Module Features
Almost all microcontrollers come with ADC pins, but they lack high precision. In a lot of projects, analog values need to be measured with high accuracy, or the voltage level of the measured signal is not within the microcontroller measurement range, or even the microcontroller used doesn’t have an ADC pin. In such cases, analog to digital converter modules are used.
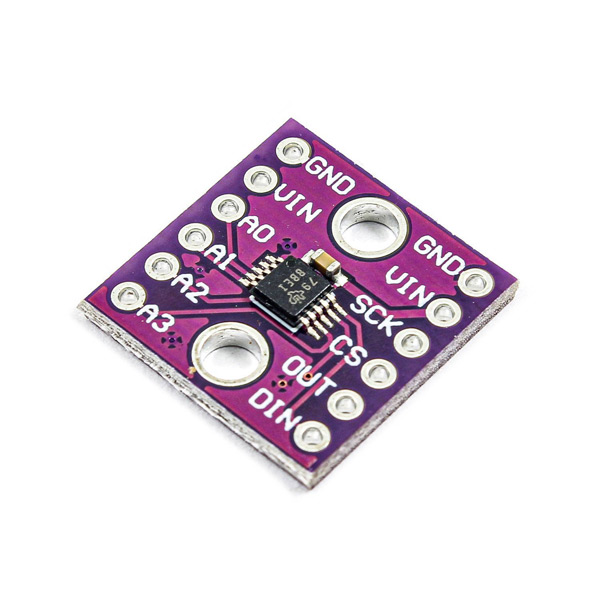
ADS1118 module is an analog to digital converter module that has 16-bit precision and can measure a maximum voltage of 7 volts. This module measures the potential difference between two input pins.
To download the datasheet of ADS1118 module, click here.
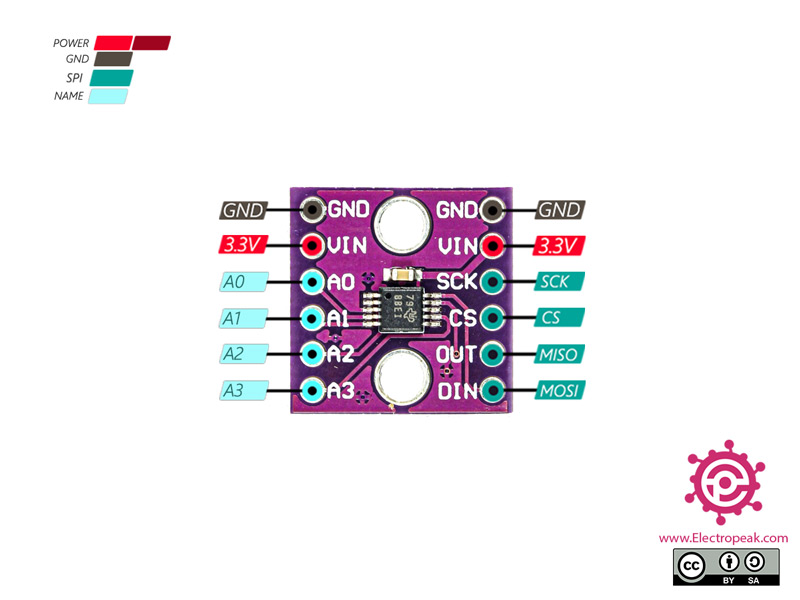
ADS1118 16-Bit ADC Module Pinout
The ADS1118 ADC Module has 10 pins:
- VIN: Module power supply – 3.3V
- GND: Ground
- SCK: SPI Clock
- MOSI: SPI Data Receiving Pin
- MISO: SPI Data Transmitting Pin
- CS: SPI Chip Select Pin
- A0-3: Analog Inputs 0-3
You can see the pinout of this module in the image below.
Required Material
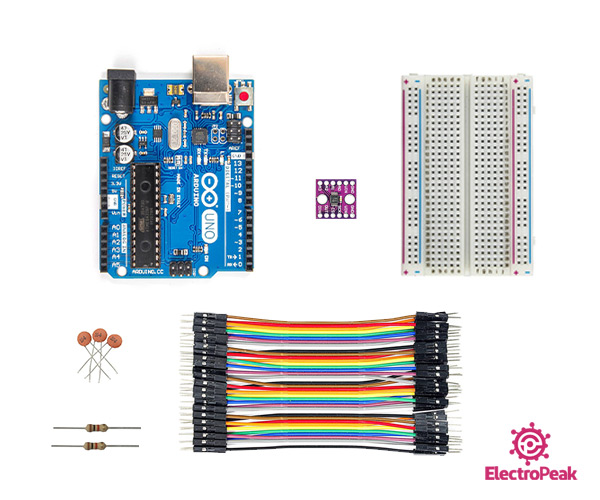
Hardware Components
Software Apps
Interfacing ADS1118 16-Bit ADC Module with Arduino
Step 1: Circuit
The following circuit shows how you should connect Arduino to ADS1118 module. Connect wires accordingly.
Note
A potentiometer has been used to test the module, which you can replace that with a temperature sensor or other sensors.

Step 2: Installing Library
Install the library below on your Arduino IDE.
Note
If you need more help with installing a library on Arduino, read this tutorial: How to Install an Arduino Library
Note
To measure the voltage more accurately, you need to adjust the setFullScaleRange value. You can do that according to the table below.
| Gain value | Max Voltage |
|---|---|
| FSR_6144 | ±6.144V |
| FSR_4096 | ±4.096V |
| FSR_2048 | ±2.048V |
| FSR_1024 | ±1.024V |
| FSR_0512 | ±0.512V |
| FSR_0256 | ±0.256V |
Step 3: Code
Upload the following code to Arduino.
/*
Modify on May 16, 2021
  Modify by MohammedDamirchi base of https://github.com/denkitronik/ADS1118
  Home
*/


/**
*  Example for Arduino Library for Texas Instruments ADS1118 - 16-Bit Analog-to-Digital Converter with
*  Internal Reference and Temperature Sensor
*
*  @author Alvaro Salazar <[email protected]>
*  http://www.denkitronik.com
*
*/

#include "ADS1118.h"
#include <SPI.h>

//Definition of the Arduino pin to be used as the chip select pin (SPI CS pin). Example: pin 5
#define CS 10

//Creating an ADS1118 object (object's name is ads1118)
ADS1118 ads1118(CS);


void setup(){
    Serial.begin(115200);
    ads1118.begin(); //Initialize the ADS1118. Default setting: PULLUP RESISTOR, ADC MODE, RATE 8SPS, SINGLE SHOT, ±0.256V, DIFFERENTIAL AIN0-AIN1

    /*
     *  EXAMPLES:
     *  The lines above in this method are needed only if you want to change the default setting. Use them to fit your needs
     *  If you need to take care of noise and the ENOB (Effective Number of Bits) see the tables at the end of this file
     */

    /* Changing the sampling rate.
       Available values: RATE_8SPS, RATE_16SPS, RATE_32SPS, RATE_64SPS, RATE_128SPS, RATE_250SPS, RATE_475SPS, RATE_860SPS */
    ads1118.setSamplingRate(ads1118.RATE_16SPS);             //Using the setter method to change the sampling rate
    //ads1118.configRegister.bits.rate=ads1118.RATE_8SPS;   //Driving the config register directly. Uncomment if you want to use this way

    /* Changing the input selected.
       Available values: Diferential inputs: DIFF_0_1, DIFF_0_3, DIFF_1_3, DIFF_2_3.
                         Single ended input: AIN_0, AIN_1, AIN_2, AIN_3*/
    ads1118.setInputSelected(ads1118.DIFF_0_1);             //Using the setter method to change the input selected
    //ads1118.configRegister.bits.mux=ads1118.DIFF_0_1;     //Driving the config register directly. Uncomment if you want to use this way

    /* Changing the full scale range.
       Available values: FSR_6144 (±6.144V)*, FSR_4096(±4.096V)*, FSR_2048(±2.048V), FSR_1024(±1.024V), FSR_0512(±0.512V), FSR_0256(±0.256V).
       (*) No more than VDD + 0.3 V must be applied to this device. */
    ads1118.setFullScaleRange(ads1118.FSR_0256);            //Using the setter method to change the full scale range
    //ads1118.configRegister.bits.pga=ads1118.FSR_0256;     //Driving the config register directly. Uncomment if you want to use this way


    /* Setting to continuous conversion mode */
    ads1118.setContinuousMode();                            //Using the setter method to set it to continuous mode
    //ads1118.configRegister.bits.operatingMode=CONTINUOUS; //Driving the config register directly. Uncomment if you want to use this way

    /* Setting to single shot conversion mode */
    ads1118.setSingleShotMode();                            //Using the setter method to set it to "single shot conversion and power down" mode
    //ads1118.configRegister.bits.operatingMode=SINGLE_SHOT;//Driving the config register directly. Uncomment if you want to use this way

    /* Disabling the pull-up resistor */
    ads1118.disablePullup();                                //Using the setter method to disable the pull-up resistor in Dout
    //ads1118.configRegister.bits.pullUp=PULLUP;            //Driving the config register directly. Uncomment if you want to use this way

    /* Enabling the pull-up resistor */
    ads1118.enablePullup();                                 //Using the setter method to enable the pull-up resistor in Dout
    //ads1118.configRegister.bits.pullUp=NO_PULLUP;         //Driving the config register directly. Uncomment if you want to use this way
}


void loop(){
//    Serial.println(String(ads1118.getTemperature(),6)+" C"); //Getting temperature
    Serial.println(String(ads1118.getMilliVolts(),10)+"mV"); //Getting millivolts measured in the input selected

    //Serial.println(String(ads1118.getMilliVolts(ads1118.DIFF_0_1),10)+"mV"); //Specifying the input to be selected

    delay(200); //You can use a delay to save power. The ADS1118 will be in power down state during all the delay time. Optional

}

/*
              Table 1. Noise in μVRMS (μVPP) at VDD = 3.3 V   [1]
                DATA RATE FSR (Full-Scale Range)
  (SPS) ±6.144 V        ±4.096 V     ±2.048 V       ±1.024 V        ±0.512 V        ±0.256 V
  8     187.5 (187.5)   125 (125)    62.5 (62.5)    31.25 (31.25)   15.62 (15.62)   7.81 (7.81)
  16    187.5 (187.5)   125 (125)    62.5 (62.5)    31.25 (31.25)   15.62 (15.62)   7.81 (7.81)
  32    187.5 (187.5)   125 (125)    62.5 (62.5)    31.25 (31.25)   15.62 (15.62)   7.81 (7.81)
  64    187.5 (187.5)   125 (125)    62.5 (62.5)    31.25 (31.25)   15.62 (15.62)   7.81 (7.81)
  128   187.5 (187.5)   125 (125)    62.5 (62.5)    31.25 (31.25)   15.62 (15.62)   7.81 (12.35)
  250   187.5 (252.09)  125 (148.28) 62.5 (84.03)   31.25 (39.54)   15.62 (16.06)   7.81 (18.53)
  475   187.5 (266.92)  125 (227.38) 62.5 (79.08)   31.25 (56.84)   15.62 (32.13)   7.81 (25.95)
  860   187.5 (430.06)  125 (266.93) 62.5 (118.63)  31.25 (64.26)   15.62 (40.78)   7.81 (35.83)


      Table 2. ENOB from RMS Noise (Noise-Free Bits from Peak-to-Peak Noise) at VDD = 3.3 V
                DATA RATE FSR (Full-Scale Range)
  (SPS)   ±6.144 V    ±4.096 V   ±2.048 V     ±1.024 V    ±0.512 V    ±0.256 V
  8       16 (16)     16 (16)    16 (16)      16 (16)     16 (16)     16 (16)
  16      16 (16)     16 (16)    16 (16)      16 (16)     16 (16)     16 (16)
  32      16 (16)     16 (16)    16 (16)      16 (16)     16 (16)     16 (16)
  64      16 (16)     16 (16)    16 (16)      16 (16)     16 (16)     16 (16)
  128     16 (16)     16 (16)    16 (16)      16 (16)     16 (16)     16 (15.33)
  250     16 (15.57)  16 (15.75) 16 (15.57)   16 (15.66)  16 (15.96)  16 (14.75)
  475     16 (15.49)  16 (15.13) 16 (15.66)   16 (15.13)  16 (14.95)  16 (14.26)
  860     16 (14.8)   16 (14.9)  16 (15.07)   16 (14.95)  16 (14.61)  16 (13.8)


  [1] Texas Instruments, "ADS1118 Ultrasmall, Low-Power, SPIâ„¢-Compatible, 16-Bit Analog-to-Digital
  Converter with Internal Reference and Temperature Sensor", ADS1118 datasheet, SBAS457E [OCTOBER 2010–REVISED OCTOBER 2015].

  Note: This information is taken from http://www.ti.com
        Copyright © 2010–2015, Texas Instruments Incorporated
*/
This code is for calculating the potential difference between pins A0 and A1.

Comments (2)
Tried using the library on a Teensy 4.1 and getting errors. No response from the author yet…
Compilation error: no matching function for call to ‘ADS1118::ADS1118(int)’
Hi Chuck,
This tutorial is about Arduino and ESP boards in the Arduino IDE software.
I’m not sure that Teensy 4.1 will work too.