
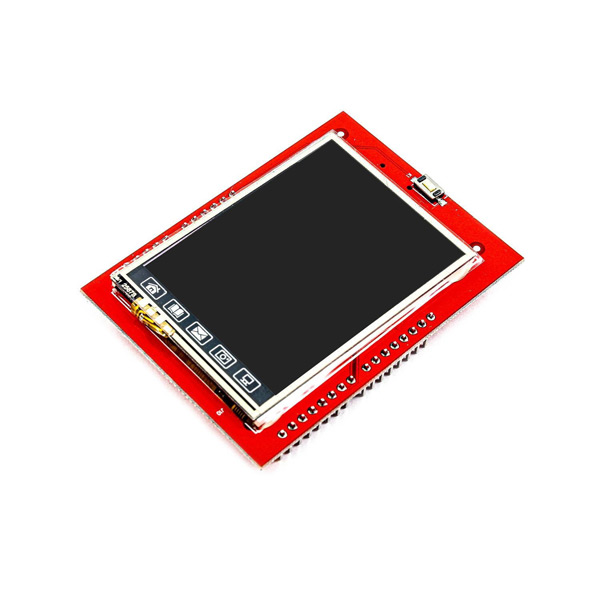
You can download the datasheet of this module here.

You need the Adafruit TouchScreen, LCDWIKI_KBV, and LCDWIKI GUI libraries to use this display module.
To install these 3 libraries, download the file below and put its contents in the Arduino libraries folder.
First, download the following file.
Open the downloaded file and upload the main.ino code on your Arduino Board. This code is for testing the display module and comes with full screen calibration.

Comments (22)
There are so many how to guides, however I like this one as it’s pretty much to the point without waffling and with the info I need. I only have one question, are the PlatformIO software files meant to be installed on the SD card to fit into the touch screen?
Hi
thank you for your Attention, that’s our honer.
no,we use SD Card for any high resolution data like image or video.
not for PlatformIO software.
can this work with ESP32?
Hi Tony,
To work with ESP32, u should use the TFT_eSPI Library.
you could use this link Interfacing 2.8 INCH TFT LCD Touch Screen with ESP32
Hi, in the code you posted here, the IDE tells me that it can’t find “LCDhelper.h” (“Compilation error: LCDHelper.h: No such file or directory”), but I’ve installed everything from the dependencies zip file. What am I missing?
Hi ike,
LCDHelper files are in the main.zip file. You should extract them and the main.ino file in a folder named main and then run it.
Hi Mohamed,
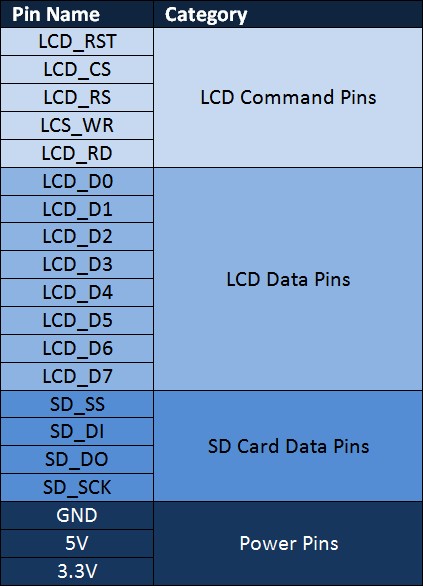
further up you write: …Arduino pins 2, 3, A5, and A4 are free while using this shield, and you can use them to for other purposes.
But looks like pin 2, 3 are used as LCD_D2, LCD_D3. Only RX and TX are not connected. But also not free for other purposes.
Pin A4 is LCD_RST
Only A5 is not in use?
Regards, Bater
Hi Bater
Thank you so much.
Yes, you are right. I fixed it.
Where and how do you configure the library for the TFT Sheild?
Hi Norman,
you can config your LCD type in the LCDHelper.cpp file.
after i uplod the progra, why my tft lcd just white screen
Hi fluffy,
What is your board model?
the driver st7789v doesn’t work
i’ve tried other,the letters appears backwards
Hi Magdi,
this LCD uses ILI9341,
if u have any problems with Mirroring, visit this link i put on github.
Hello
I am using 2.4 TFT LCD Shield with Arduino Uno. Please, is there any way to display images without using the SD card?
Could you please suggest to me another LCD that can be connected to the computer to display images and has almost same size with the 2.4 TFT LCD Shield?
Hi Ghanem,
Unfortunately, Arduino Uno and similar models have limited RAM capacity, making it challenging to display images directly from internal storage.
However, you can opt for an ESP32 board coupled with a TFT LCD that supports the SPI protocol. By using libraries like TFT_eSPI and JPEGDecoder, along with the SPIFFS file system of the ESP32, you can display images stored within the ESP32’s memory.
Moreover, since ESP32 boards come with Wi-Fi capabilities, you can set up a web server to receive input images, save them in SPIFFS, and then display them on your TFT LCD.
Hello
It would be great if I could get the reference link if available or the guide video for it.
Thank you
Hello,
This article contains all the information needed to set up this product.
We used LCD-Wiki for the setup.
code Download link not working, gives error file not found .
Thank you! The link has been updated.
You can also find the latest version of this code in the repository.
Hi, this helped me a lot. Thank you, but can I cut the TX and RX pins in the shield because it looks like they are not connected at all?
I need to connect a few other things to my Arduino. With this screen, I try to connect another Uno, but I can’t. Is cutting these two pins(tx/rx) the best way, or is there any other way?
I’m really thankful for your help
Hello Zakaria,
The RX and TX pins on your Arduino are mainly used for programming and serial communication. You can connect these pins to a sensor or another Arduino for communication, but make sure to disconnect them before uploading your code, then reconnect after programming is done.
Also, when using this shield, pins A5 and digital pins D10, D11, D12, D13 (if the SD card is not in use) are available for other uses — you can connect sensors or other modules to them.
If you need more pins for multiple sensors, consider using an Arduino Mega, which has more digital and analog pins available.