Overview
Create a cool fire simulation effect with Wi-Fi wireless control. A mobile app (for Android smartphones) with a good looking interface is ready to install to play with your creation! We will also use Arduino and ESP8266 to control the flame.
What You Will Learn
- How NeoPixels work.
- How to program ESP8266 and control variables over wifi
- How to create a cool fire effect with Neopixels
An Introduction to Neopixels
Individually addressable LEDs or often called Neopixles have been around for quite some time now and you probably know them but, if you don’t, they are like normal RGB LED’s but as the name suggests the color of each one of them can be addressed individually, allowing infinitely cool patterns and animations to be made. For WS2812b you only need 3 wires, 2 for power and 1 for data. That means you just need one free Arduino pin to control a ton of LEDs!
In this project, we are going to use these smart LEDs to create a fire effect. For controlling LED’s we are going to use the awesome FastLED library. We will use the Fire2012 sketch example of the library written by Mark Kriegsman. We use 6 strips of LEDs each having 30 LEDs (a total of 180 LEDs) we stick this LEDs on a piece of PVC pipe and place them in a glass cylinder (these glass cylinders are usually used as vases). We have to diffuse the light of the LEDs to make them look continuous, to do that we used tracing paper which lets light through and diffuses light.
Required Materials
Hardware Components
Software Apps
Hand Tools
| Hot glue gun |
| Soldering iron |
Construction
First off get a proper glass cylinder, our cylinder has a length of 60cm and a diameter of 12cm.
If you can find frosted glass cylinder that will be nice but if it’s a clear glass you can use tracing paper to cover the cylinder surface (either inner or outer surface), tracing paper does a good job of diffusing the light and yields good results.
After getting a glass cylinder measure its internal length and then cut the PVC pipe so that it fits inside the cylinder. Our glass cylinder has a height of 60cm (excluding base it has an internal length of 59cm) so we cut our PVC pipe to 59cm. You will stick LED strips on this pipe, a pipe with diameter of 4cm would be perfect.
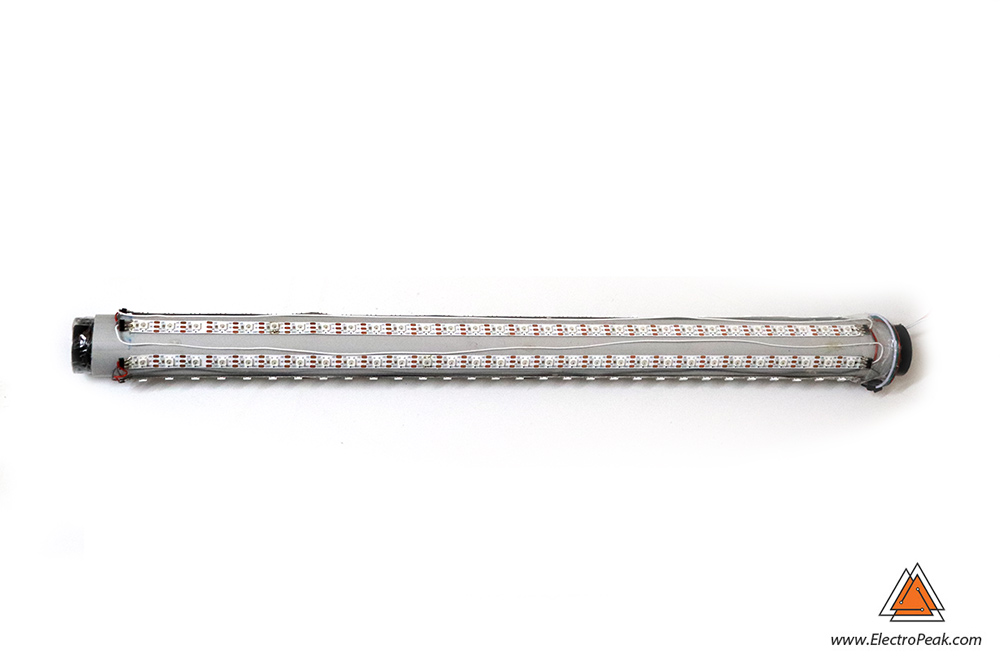
Next we have to cut our led strip to 6 equal parts here we use 60LEDs/m density strip (you can use higher densities for better effects if you want to) we use six 50cm lengths, that means we need 3 meters. Space the six lengths equally around the PVC pipe and stick the strips to the pipe. Here’s how it should look like.
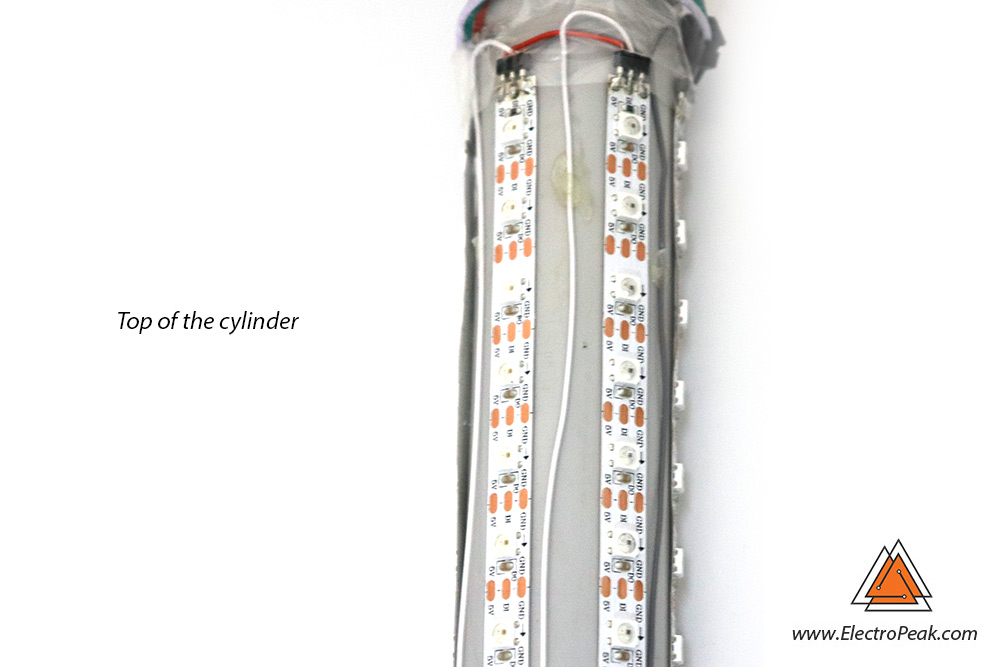
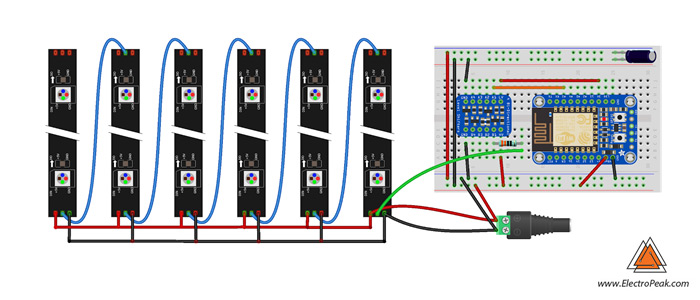
To the LED strips together you can either directly solder wires to the strip according to the following drawing or first solder pinheaders to the strips and then use breadboard wires to connect them.
When all LED strip conectioins are done you have to place the pipe inside the cylinder. To Center the pipe inside the cylinder you can use foam to cut a circle which has an outer diameter equal to inside diameter of the glass cylinder and an inner diameter equal to outer diameter of the PVC pipe. Prepare two of these for each side of the pipe. Attach these parts to the ends and gently put the pipe inside the cylinder.
Code
We use Arduino IDE for coding and uploading to ESP8266. You have to use a board which has an ESP8266 with 3MB of SPIFFS if you want to upload the controller software files on the SPIFFS. SPIFFS is short for “Serial Peripheral Interface Flash File System” you can upload the controller files to this memory to serve the files from that location. By doing this you can open your browser (either on your phone or notebook) and go the address of your ESP (the default is 192.168.4.1) and you will get the controller interface in your browser without having to install the app, if you have an iPhone or iPad this is your only choice.
Upload the following sketch onto your ESP board. We need FastLED library, so first add it to your Arduino IDE if you haven’t already (You can download it here). The fire simulation code is Mark Kriegsman’s fire2012 sketch which you can find in the examples. That example is for one strip of led but, here we have modified the code to use a variable number of strips. The more the number of strips/leds the greater the effect will be.
The logic of the fire simulation is clearly described in the example file. If you want to know how it works read the source code of the example.
Necessary Files and Downloads:
#include "ESP8266WiFi.h"
#include "ESP8266WebServer.h"
#include "FastLED.h"
#include "EEPROM.h"
#include "FS.h"  //required for SPIFFS

#define DATA_PIN 5
#define LED_TYPE WS2811
#define COLOR_ORDER GRB
#define NUM_LEDS 30
#define NUM_STRIPS 6
#define CHIPSET     WS2812B

//addresses to save data to EEPROM to preserve the state of fire simulation
#define cs0Adr 0
#define cs1Adr 3
#define cs2Adr 6
#define cs3Adr 9
#define BriAdr 15
#define FpsAdr 16
#define SparkingAdr 17
#define CoolingAdr 18
#define EEPROMCheckAdr 20 //if this value is 250 we assume we have previously saved to EEPROM and load data from that

CRGB leds[NUM_STRIPS * NUM_LEDS];

String inData;
uint8_t FPS = 100; //FRAMES_PER_SECOND
uint8_t SPARKING = 150;
uint8_t COOLING = 90;
uint8_t BRIGHTNESS = 100;
uint8_t csRGB[4][3] = {{0, 0, 0},
                       {255, 0, 0},
                       {255, 127, 0},
                       {255, 255, 255}};

unsigned long previousMillis = 0;
bool change = false;            //if true we go to save to EEprom.
unsigned long changeMillis = 0; //changes will be saved 1 minute after no change is applied to avoid EEPROM wear.

bool initSetup = true;


CRGBPalette16 gPal;

ESP8266WebServer server(80); //Web server object. Will be listening in port 80 (default for HTTP)

void setup()
{
  EEPROM.begin(200);
  cWiFi();
  setupFastLED();
  loadConfig();
  gPal = CRGBPalette16( CRGB(csRGB[0][0],csRGB[0][1],csRGB[0][2]),
                        CRGB(csRGB[1][0],csRGB[1][1],csRGB[1][2]),
                        CRGB(csRGB[2][0],csRGB[2][1],csRGB[2][2]),
                        CRGB(csRGB[3][0],csRGB[3][1],csRGB[3][2]));

}

inline void setupFastLED()
{
  delay(1000); // sanity delay
  FastLED.addLeds<CHIPSET, DATA_PIN, COLOR_ORDER>(leds, NUM_STRIPS * NUM_LEDS).setCorrection(TypicalLEDStrip);
  FastLED.setBrightness(BRIGHTNESS);
}

void loop()
{

  server.handleClient(); //Handling of incoming requests
  if (change)
  {
    if (millis() - changeMillis > 60000)
    {
      change = false;
      saveToEEPROM();
    }
  }
  fire();
  FastLED.show();
  FastLED.delay(1000 / FPS);
}


void Fire2012WithPalette(int stripNo)
{
  static byte heat[NUM_STRIPS][NUM_LEDS];

  // Step 1.  Cool down every cell a little
    for( int i = 0; i < NUM_LEDS; i++) { heat[stripNo][i] = qsub8( heat[stripNo][i], random8(0, ((COOLING * 10) / NUM_LEDS) + 2)); }
// Step 2. Heat from each cell drifts 'up' and diffuses a little
for( int k= NUM_LEDS - 1; k >= 2; k--) {
      heat[stripNo][k] = (heat[stripNo][k - 1] + heat[stripNo][k - 2] + heat[stripNo][k - 2] ) / 3;
    }

    // Step 3.  Randomly ignite new 'sparks' of heat near the bottom
    if( random8() < SPARKING ) {
      int y = random8(5);
      heat[stripNo][y] = qadd8( heat[stripNo][y], random8(160,200) );
    }

    // Step 4.  Map from heat cells to LED colors
    for( int j = 0; j < NUM_LEDS; j++) {
      // Scale the heat value from 0-255 down to 0-240
      // for best results with color palettes.
      byte colorindex = scale8( heat[stripNo][j], 240);
      CRGB color = ColorFromPalette( gPal, colorindex);

      leds[j+stripNo*NUM_LEDS] = color;
    }
}

void fire(){
  for (int i=0; i<NUM_STRIPS; i++){ Fire2012WithPalette(i); } } int str2int(String InputStr) { return InputStr.toInt(); } boolean EveryNSec(uint8_t period) { unsigned long currentMillis = millis(); if (currentMillis - previousMillis >= period * 1000)
  {
    // save the last time you blinked the LED
    previousMillis = currentMillis;
    return true;
  }
  else
  {
    return false;
  }
}

void EEPROMupdate(byte address, byte value)
{
  if (EEPROM.read(address) != value)
  {
    EEPROM.write(address, value);
    EEPROM.commit();
  }
  return;
}

void saveToEEPROM()
{
  EEPROMupdate(BriAdr, BRIGHTNESS);
  EEPROMupdate(FpsAdr, FPS);
  EEPROMupdate(SparkingAdr, SPARKING);
  EEPROMupdate(CoolingAdr, COOLING);
  for (uint8_t i = 0; i < 4; i++)
  {
    for (uint8_t j = 0; j < 3; j++)
    {
      EEPROMupdate((i * 3 + j), csRGB[i][j]);
    }
  }
}

void handleCS0Change(){
    csRGB[0][0] = str2int(server.arg("R"));
    csRGB[0][1] = str2int(server.arg("G"));
    csRGB[0][2] = str2int(server.arg("B"));
    gPal = CRGBPalette16( CRGB(csRGB[0][0],csRGB[0][1],csRGB[0][2]), CRGB(csRGB[1][0],csRGB[1][1],csRGB[1][2]), CRGB(csRGB[2][0],csRGB[2][1],csRGB[2][2]),  CRGB(csRGB[3][0],csRGB[3][1],csRGB[3][2]));
    changeMillis = millis();
    change = true;
}
void handleCS1Change(){
    csRGB[1][0] = str2int(server.arg("R"));
    csRGB[1][1] = str2int(server.arg("G"));
    csRGB[1][2] = str2int(server.arg("B"));
    gPal = CRGBPalette16( CRGB(csRGB[0][0],csRGB[0][1],csRGB[0][2]), CRGB(csRGB[1][0],csRGB[1][1],csRGB[1][2]), CRGB(csRGB[2][0],csRGB[2][1],csRGB[2][2]),  CRGB(csRGB[3][0],csRGB[3][1],csRGB[3][2]));
    changeMillis = millis();
    change = true;
}
void handleCS2Change(){
    csRGB[2][0] = str2int(server.arg("R"));
    csRGB[2][1] = str2int(server.arg("G"));
    csRGB[2][2] = str2int(server.arg("B"));
    gPal = CRGBPalette16( CRGB(csRGB[0][0],csRGB[0][1],csRGB[0][2]), CRGB(csRGB[1][0],csRGB[1][1],csRGB[1][2]), CRGB(csRGB[2][0],csRGB[2][1],csRGB[2][2]),  CRGB(csRGB[3][0],csRGB[3][1],csRGB[3][2]));
    changeMillis = millis();
    change = true;
}
void handleCS3Change(){
    csRGB[3][0] = str2int(server.arg("R"));
    csRGB[3][1] = str2int(server.arg("G"));
    csRGB[3][2] = str2int(server.arg("B"));
    gPal = CRGBPalette16( CRGB(csRGB[0][0],csRGB[0][1],csRGB[0][2]), CRGB(csRGB[1][0],csRGB[1][1],csRGB[1][2]), CRGB(csRGB[2][0],csRGB[2][1],csRGB[2][2]),  CRGB(csRGB[3][0],csRGB[3][1],csRGB[3][2]));
    changeMillis = millis();
    change = true;
}

void handleConf()
{
  if (server.arg("brightness") != "")
  {
    BRIGHTNESS = str2int(server.arg("brightness"));
    FastLED.setBrightness(BRIGHTNESS);
    changeMillis = millis();
    change = true;
  }
  if (server.arg("fps") != "")
  {
    FPS = str2int(server.arg("fps"));
    changeMillis = millis();
    change = true;
  }
  if (server.arg("sparking") != "")
  {
    SPARKING = str2int(server.arg("sparking"));
    changeMillis = millis();
    change = true;
  }
  if (server.arg("cooling") != "")
  {
    COOLING = str2int(server.arg("cooling"));
    changeMillis = millis();
    change = true;
  }

  server.sendHeader("Connection", "close");
  server.sendHeader("Access-Control-Allow-Origin", "*");
  server.send(200, "text/plain", ""); //Returns the HTTP response
}

void loadConfig()
{

  if (EEPROM.read(EEPROMCheckAdr) == 250)
  {
    BRIGHTNESS = EEPROM.read(BriAdr);
    SPARKING = EEPROM.read(SparkingAdr);
    COOLING = EEPROM.read(CoolingAdr);
    FPS = EEPROM.read(FpsAdr);
    if (FPS == 0)
      FPS = 100;

    for (uint8_t i = 0; i < 4; i++)
    {
      for (uint8_t j = 0; j < 3; j++)
      {
        csRGB[i][j] = EEPROM.read(i * 3 + j);
      }
    }
  }else{
    EEPROMupdate(BriAdr,BRIGHTNESS);
    EEPROMupdate(FpsAdr,FPS);
    EEPROMupdate(CoolingAdr,COOLING);
    EEPROMupdate(SparkingAdr, SPARKING);
    for (uint8_t i = 0; i < 4; i++)
    {
      for (uint8_t j = 0; j < 3; j++)
      {
        EEPROMupdate((i*3+j) , csRGB[i][j]);
      }
    }
    EEPROMupdate(EEPROMCheckAdr, 250);
  }
}

void cWiFi()
{
  WiFi.softAP("ElectroPeak's Flame", ""); //set a password here if you want i.e. WiFi.softAP("ElectroPeak's Flame", "12345678");

  IPAddress myIP = WiFi.softAPIP();
  server.on("/cs0", handleCS0Change);
  server.on("/cs1", handleCS1Change);
  server.on("/cs2", handleCS2Change);
  server.on("/cs3", handleCS3Change);
  server.on("/conf", handleConf);
  server.serveStatic("/", SPIFFS, "/", "max-age=86400");
  server.begin(); //Start the server
}
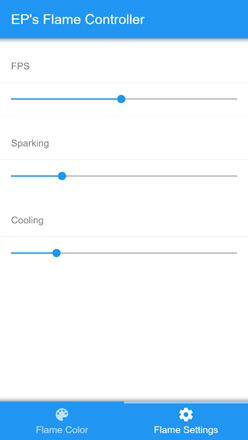
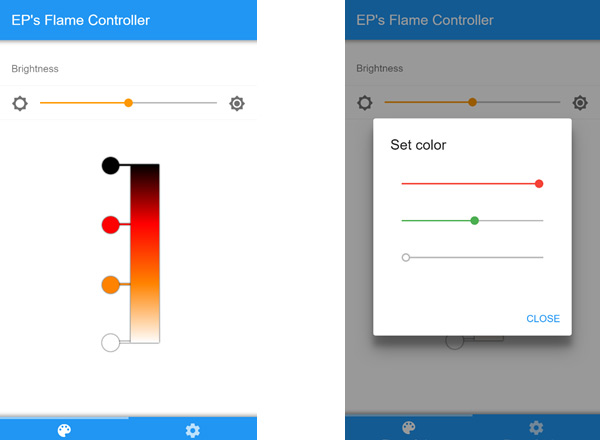
To control the “look and feel” of the fire there are two variables to play with: SPARKING and COOLING, which you can dynamically control in the controller software uploaded to the SPIFFS or the android app you can download. You can also control FPS here.
The color of the fire is controlled with a color palette which is also changeable through the controller software (through 4 color stops). Just click/tap each color circle representing a color stop to set the color, after setting the color hit close to close the dialog and see the change.
How to upload to SPIFFS?
To upload the files to the SPIFFS memory using Arduino IDE first you need to create a folder called “data” inside the sketch’s folder and place all the files you want to be uploaded in that folder. The file uploaded here contains both the sketch and this folder.
Next, you need Arduino ESP8266 filesystem uploader plugin for Arduino. Follow the instructions on its Github page and install the plugin. When installed you will find ESP8266 Sketch Data Upload under tools menu. Put your ESP into programming mode and click that. Be patient and let the files upload, that might take a little while. Note: set “upload speed” to 921600 to make it faster.
How does it work?
The sketch uploaded onto the ESP8266 board creates a web server on that, which responds to the requests sent from the app. The app simply sends GET requests to the server (ESP8266). The data of color to create the palette are sent as arguments in the get request, the same is true for other parameters such as Sparking and Cooling parameters.
For example, to set the brightness, the following request is sent by the app
http://192.168.4.1/conf?brightness=224
there is a handler for this request in the sketch that when gets this request sets the brightness. Review the code to find out more.
Android App
Android app is created using Phonegap. It is a technology that allows you to create cross-platform mobile apps using web technologies (HTML, CSS, Javascript). You can get the source code from the following link.




Comments (16)
Arduino:1.8.2 (Windows 10), 開發板:”NodeMCU 1.0 (ESP-12E Module), 80 MHz, Flash, Disabled, All SSL ciphers (most compatible), 4M (1M SPIFFS), v2 Lower Memory, Disabled, None, Only Sketch, 115200″
In file included from C:\Users\lovem\OneDrive\??辣\Arduino\ESP8266FireLED00120190729\ESP8266FireLED00120190729.ino:3:0:
C:\Users\lovem\OneDrive\文件\Arduino\libraries\FastLED-master/FastLED.h:14:21: note: #pragma message: FastLED version 3.002.010
# pragma message “FastLED version 3.002.010”
^
In file included from C:\Users\lovem\OneDrive\文件\Arduino\libraries\FastLED-master/FastLED.h:65:0,
from C:\Users\lovem\OneDrive\??辣\Arduino\ESP8266FireLED00120190729\ESP8266FireLED00120190729.ino:3:
C:\Users\lovem\OneDrive\文件\Arduino\libraries\FastLED-master/fastspi.h:115:23: note: #pragma message: No hardware SPI pins defined. All SPI access will default to bitbanged output
# pragma message “No hardware SPI pins defined. All SPI access will default to bitbanged output”
^
C:\Users\lovem\OneDrive\??辣\Arduino\ESP8266FireLED00120190729\ESP8266FireLED00120190729.ino: In function ‘void setup()’:
ESP8266FireLED00120190729:51: error: ‘cWiFi’ was not declared in this scope
ESP8266FireLED00120190729:53: error: ‘loadConfig’ was not declared in this scope
C:\Users\lovem\OneDrive\??辣\Arduino\ESP8266FireLED00120190729\ESP8266FireLED00120190729.ino: In function ‘void loop()’:
ESP8266FireLED00120190729:77: error: ‘saveToEEPROM’ was not declared in this scope
ESP8266FireLED00120190729:80: error: ‘fire’ was not declared in this scope
C:\Users\lovem\OneDrive\??辣\Arduino\ESP8266FireLED00120190729\ESP8266FireLED00120190729.ino: In function ‘void Fire2012WithPalette(int)’:
ESP8266FireLED00120190729:92: error: ‘k’ was not declared in this scope
C:\Users\lovem\OneDrive\??辣\Arduino\ESP8266FireLED00120190729\ESP8266FireLED00120190729.ino: At global scope:
ESP8266FireLED00120190729:96: error: expected unqualified-id before ‘if’
ESP8266FireLED00120190729:102: error: expected unqualified-id before ‘for’
ESP8266FireLED00120190729:102: error: ‘j’ does not name a type
ESP8266FireLED00120190729:102: error: ‘j’ does not name a type
ESP8266FireLED00120190729:110: error: expected declaration before ‘}’ token
exit status 1
‘cWiFi’ was not declared in this scope
This report would have more information with
“Show verbose output during compilation”
option enabled in File -> Preferences.
Dear John,
Could you please explain how you faced this issue?
Give us some more details so we can help you better.
Program cannot be burned
is Error message
Before you do this project, I recommend you to read this tutorial: https://electropeak.com/learn/using-esp8266-wifi-module-arduino-ide-full-guide/
I hope it helps you.
Hi
I had same issue but solved it.
When the program is copies from this webpage, the program has an error which results in the fact that the loops are incorrectly declared. The copy process results in step 2 joining with step 1 and the end of loop bracket is commented out. this puts everything out of sync
Simple answer is to edit lines 83 -87 to :
// Step 1. Cool down every cell a little
for( int i = 0; i = 2; k–) {
heat[stripNo][k] = (heat[stripNo][k – 1] + heat[stripNo][k – 2] + heat[stripNo][k – 2] ) / 3;
}
Thanks for sharing your experience!
Hi there, I am trying to alter this code without the Android information, so that I can just upload it to a controller (Gemma M0) from my computer and do not need to control on the go. Is it possible to show just the code without the Android lines?
Hello. Yes, you can. That will work.
Hi,
I downloaded the sketch, but I don’t see the files for the web server to serve up. I need the files to put into the SPIFFS because Phonegap no longer works, and your app won’t install on my phone.
I am using this with a flexible 8×8 matrix. Unfortunately the strips are arranged left-right-left-right in a zigzag pattern, rather than left to right, left to right. If anyone else uses one of these, change the last line of code in Fire2012WithPalette with this
if(stripNo % 2 == 1)
{
leds[(NUM_LEDS-j-1) + stripNo*NUM_LEDS] = color;
}
else
{
leds[j+stripNo*NUM_LEDS] = color;
}
This will reverse the order of the leds on every other row. If you are using yours the other way up, change the if statement to if(stripNo % 2 == 0)
The files are missing, what there is here is full of errors. Waste of time
What errors do you get? Maybe something goes wrong in the process of copying the code. Make sure you have downloaded the code correctly.
this code is not good at all: first as mentioned by Chros. Next – wehere are the files to be pu in sketch data folder for SPIFFS upload? I flashed the code to esp01 and using only 1×8 led strip however the animation doesn’t look like a fire and it keeps hanging every time esp is doing something with wifi. ..
hi, please could you post (or repost) a link to the static files that will need to be uploaded to SPIFFS?
They don’t seem to be on your page – I can see:
– the ino. code for uploading via the Arduino IDE – no download, just displayed in a code block
– a link to “EP’s Flame Android app” – a 2.41Mb APK
– a link to “EP’s Flame Android app (Source)
The instructions mention uploading files to SPIFFS for the webserver to use, but I can’t find the files to upload.
It says “To upload the files to the SPIFFS memory using Arduino IDE first you need to create a folder called “data” inside the sketch’s folder and place all the files you want to be uploaded in that folder. The file uploaded here contains both the sketch and this folder.” Where is *the file uploaded here* it refers to?
Thanks for any help!
Couldn’t make the sketch work with Michael’s solution. But now it works okay and the neopixels are making fire, as the correct way to edit lines 83 -87 is the following:
// Step 1. Cool down every cell a little
for( int i = 0; i = 2; k–) {
heat[stripNo][k] = (heat[stripNo][k – 1] + heat[stripNo][k – 2] + heat[stripNo][k – 2] ) / 3;
}
The Electropeak site does not have the app online anymore, it seems: Invalid File Type (/home/admin/domains/electropeak.com/public_html/learn/wp-content/uploads/download-manager-files/EPs_Flame_android.apk)!
However, the phone lets connect to the wifi network, but the server does not attribute an ip-address and thus, the app does not want to connect, so after all no connection possible to change the settings of the ESP8266…
Haven’t found the solution to this yet!!
android app download link is incorect and not working