Contents

How to Interface A Rotary Encoder with Arduino

HN3808-AB Rotary Encoders Features

A photoelectric rotary encoder is an electromechanical device that has an internal shaft inside a cylindrical space that looks like an motor. The circular plate inside it has two slits. An optical transmitter sensor is located on one side and an optical receiver sensor is located on the other side. When a gap is placed between the two sensors, the sensors and finally the receiver are connected to the microcontroller.
Rotary encoder is commonly used to determine the position of the motor shaft, its direction of rotation and also its speed.
HN3808-AB rotary encoder series have two phases A and B and are available in 100, 200, 360, 400 and 600 pulse/round.

Note
You can understand how it works by analyzing the two output signals A and B. If the rotation is clockwise, signal A will be ahead of signal B and vice versa.

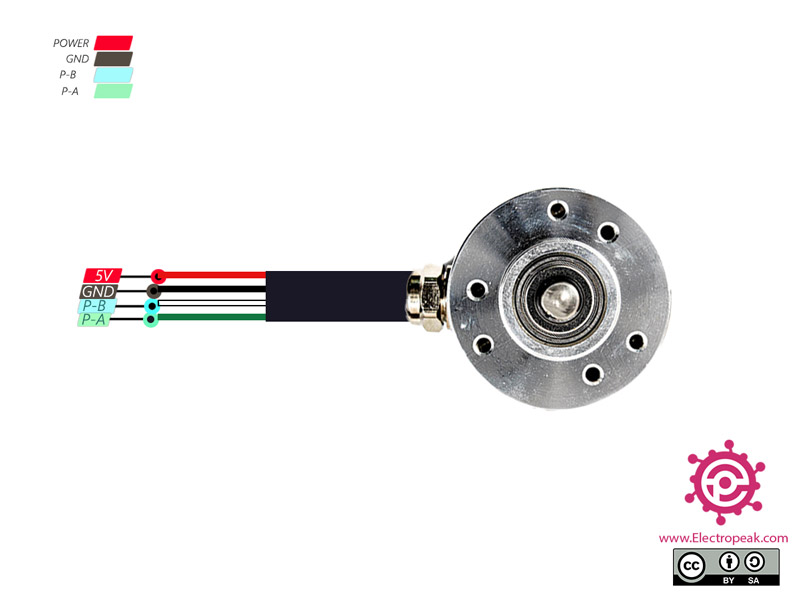
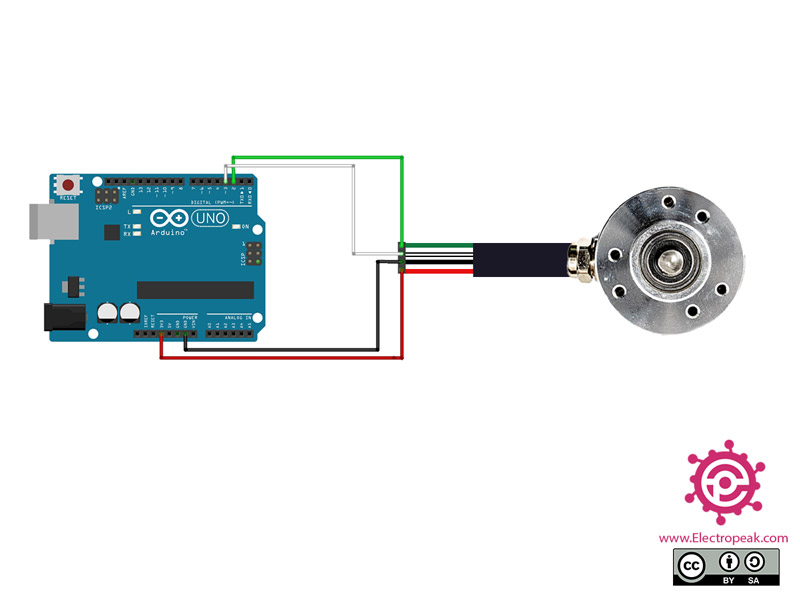
You can download the datasheet of this sensor here.  

HN3806-AB Rotary Encoder Pinout

The HN3806 rotary encoders have four wires in red, black, green, and blue, and one wire without protection called the shield. These pins are:

  • VCC: Red – Encoder power supply – 3 to 24 V
  • GND: Black – Ground
  • Phase-A: White – First output
  • Phase-B: Green – Second output

You can see pinout of this module in the image below.

Required Materials

Hardware Components

Arduino UNO R3 × 1
HN3806 Rotary Encoder – 100 P/R × 1
HN3806 Rotary Encoder – 200 P/R ×
HN3806 Rotary Encoder – 400 P/R ×
HN3806 Rotary Encoder – 600 P/R ×

Software Apps

Arduino IDE
Note
You can use any of the rotary types of encoders for this tutorial.

Interfacing HN3806-AB Rotary Encoder with Arduino

Step 1: Circuit

The following circuit shows how you should connect Arduino to HN3806-AB encoder. Connect wires accordingly.

Step 2: Code

Upload the following code to Arduino. This code determines the direction of motor rotation.

    /*
  HN3806-AB-Rotary-Encoder
  modified on 12 oct 2020
  by Amir Mohamad Shojaee @ Electropeak
  
Home
Based on electricdiylab.com Example */ //This variable will increase or decrease depending on the rotation of encoder volatile long x , counter = 0; void setup() { Serial.begin (9600); pinMode(2, INPUT_PULLUP); pinMode(3, INPUT_PULLUP); attachInterrupt(0, A, RISING); attachInterrupt(1, B, RISING); } void loop() { // Send the value of counter if( counter != x ){ Serial.println (counter); x = counter; } } void A() { if(digitalRead(3)==LOW) { counter++; }else{ counter--; } } void B() { if(digitalRead(2)==LOW) { counter--; }else{ counter++; } }

As you can see, the sensor outputs are connected to Arduino interrupt pins 2 and 3. Two interrupt functions with a rising edge are responsible for counting. In the main loop, this data is also displayed in the Serial Monitor. If it is rotated clockwise, the value will decrease and otherwise it will increase.

The output is as follows. First rotate clockwise and then counterclockwise.

Liked What You See?​
Get Updates And Learn From The Best​

Comments (2)

  • Christof Ecker Reply

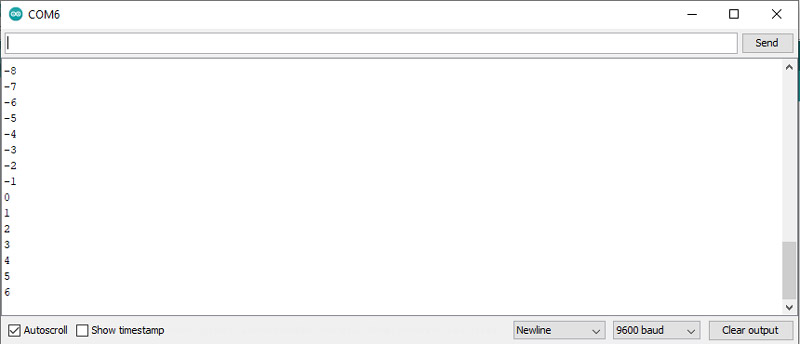
    Although the program seems to work, the code is definitely wrong:
    – Events should be rising _and_ falling
    – Gray code has error transitions, which should be ignored, see https://en.wikipedia.org/wiki/Incremental_encoder

    I did like the simplicity of your solution at first. While playing with it I found, that it is very susceptible for errors which add up over time.

    April 3, 2022 at 9:07 am
    • Mehran Maleki Reply

      Thanks for your explanations. We will try to use them to improve our program.

      April 4, 2022 at 5:49 am

Leave a Reply

Your email address will not be published. Required fields are marked *