

WS2812 - LED RGB Module Features
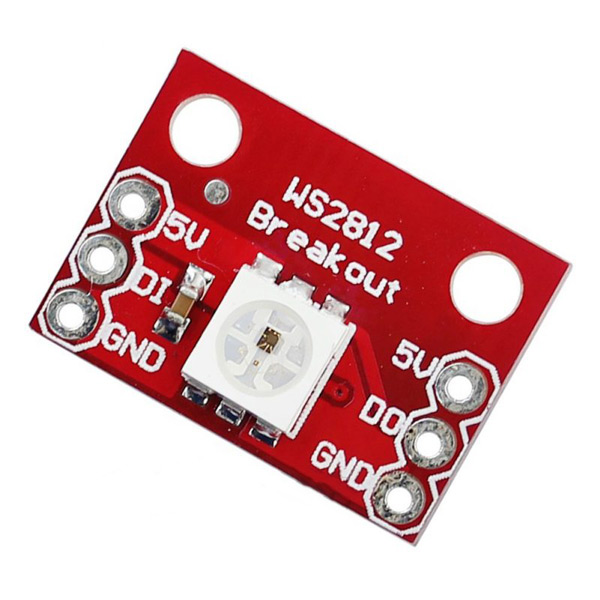
This is a breakout board for the WS2812B RGB LED. The WS2812B (or NeoPixel) is actually an RGB LED with a WS2811 built right into the LED! This module has a 5mm RGB LED on it, which has the ability to create 16777216 colors.
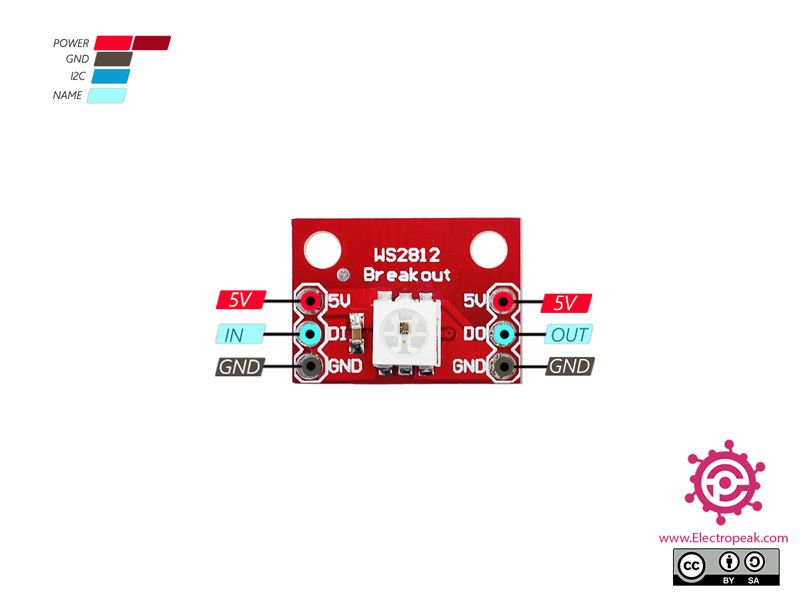
WS2812 RGB Module Pinout
This module has 4 pins:
- VCC: Module power supply – 5 V
- GND: Ground
- DI: Input data from the previous micro or module
- DO: Output data to next module
You can see pinout of this module in the image below.
You can download the datasheet of this module here.
Required Materials

Use one of the STM32 or Arduino microcontrollers based on your needs.
Hardware Components
* Choose one of the STM32 or Arduino microcontrollers based on your needs.
Software Apps
Interfacing WS2812 Module with Arduino
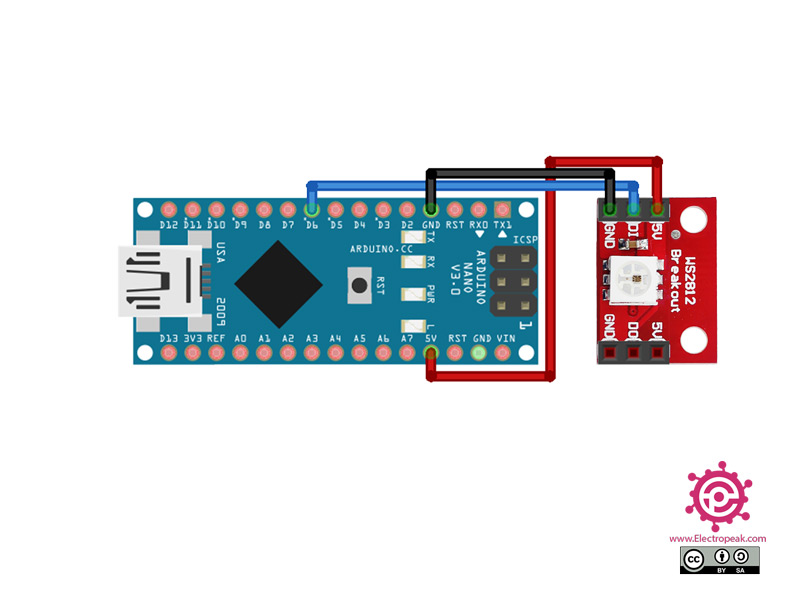
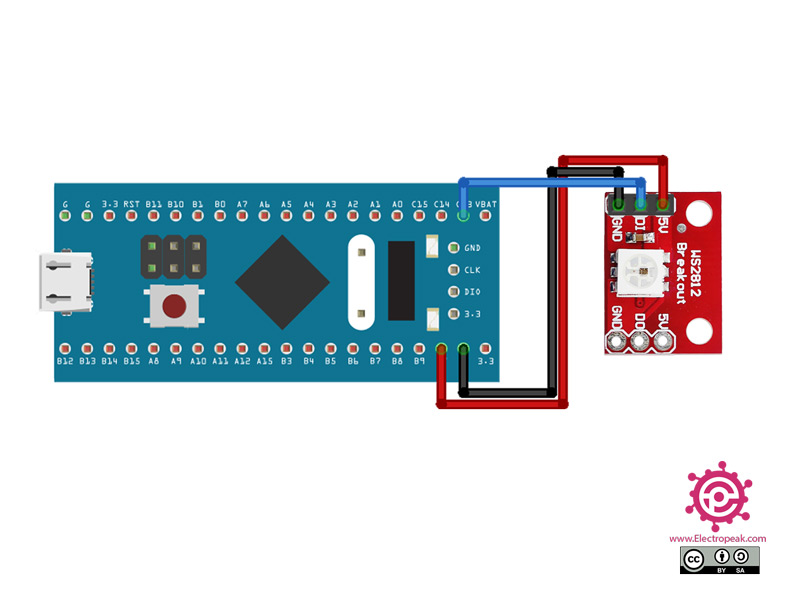
Step 1: Circuit
The following circuit shows how you should connect STM32 or Arduino to RGB WS2812 module. Connect wires accordingly.
Step 2: Code
Install the following library on your Arduino.
For Arduino board
https://github.com/FastLED/FastLED
For STM32 board
https://github.com/FearlessNight/bluepill_ws2812
Tip
If you need more help with installing a library on Arduino, read this tutorial: How to Install an Arduino Library
Upload the following code to your Arduino.
/*
modified on Sep 8, 2020
Modified by MohammedDamirchi from https://github.com/FastLED/FastLED
Home
*/
#include <FastLED.h>

#define LED_PIN     6
#define NUM_LEDS    1
#define BRIGHTNESS  64
#define LED_TYPE    WS2811
#define COLOR_ORDER GRB
CRGB leds[NUM_LEDS];

#define UPDATES_PER_SECOND 100

// This example shows several ways to set up and use 'palettes' of colors
// with FastLED.
//
// These compact palettes provide an easy way to re-colorize your
// animation on the fly, quickly, easily, and with low overhead.
//
// USING palettes is MUCH simpler in practice than in theory, so first just
// run this sketch, and watch the pretty lights as you then read through
// the code.  Although this sketch has eight (or more) different color schemes,
// the entire sketch compiles down to about 6.5K on AVR.
//
// FastLED provides a few pre-configured color palettes, and makes it
// extremely easy to make up your own color schemes with palettes.
//
// Some notes on the more abstract 'theory and practice' of
// FastLED compact palettes are at the bottom of this file.


CRGBPalette16 currentPalette;
TBlendType    currentBlending;

extern CRGBPalette16 myRedWhiteBluePalette;
extern const TProgmemPalette16 myRedWhiteBluePalette_p PROGMEM;


void setup() {
    delay( 3000 ); // power-up safety delay
    FastLED.addLeds<LED_TYPE, LED_PIN, COLOR_ORDER>(leds, NUM_LEDS).setCorrection( TypicalLEDStrip );
    FastLED.setBrightness(  BRIGHTNESS );

    currentPalette = RainbowColors_p;
    currentBlending = LINEARBLEND;
}


void loop()
{
    ChangePalettePeriodically();

    static uint8_t startIndex = 0;
    startIndex = startIndex + 1; /* motion speed */

    FillLEDsFromPaletteColors( startIndex);

    FastLED.show();
    FastLED.delay(1000 / UPDATES_PER_SECOND);
}

void FillLEDsFromPaletteColors( uint8_t colorIndex)
{
    uint8_t brightness = 255;

    for( int i = 0; i < NUM_LEDS; i++) {
        leds[i] = ColorFromPalette( currentPalette, colorIndex, brightness, currentBlending);
        colorIndex += 3;
    }
}


// There are several different palettes of colors demonstrated here.
//
// FastLED provides several 'preset' palettes: RainbowColors_p, RainbowStripeColors_p,
// OceanColors_p, CloudColors_p, LavaColors_p, ForestColors_p, and PartyColors_p.
//
// Additionally, you can manually define your own color palettes, or you can write
// code that creates color palettes on the fly.  All are shown here.

void ChangePalettePeriodically()
{
    uint8_t secondHand = (millis() / 1000) % 60;
    static uint8_t lastSecond = 99;

    if( lastSecond != secondHand) {
        lastSecond = secondHand;
        if( secondHand ==  0)  { currentPalette = RainbowColors_p;         currentBlending = LINEARBLEND; }
        if( secondHand == 10)  { currentPalette = RainbowStripeColors_p;   currentBlending = NOBLEND;  }
        if( secondHand == 15)  { currentPalette = RainbowStripeColors_p;   currentBlending = LINEARBLEND; }
        if( secondHand == 20)  { SetupPurpleAndGreenPalette();             currentBlending = LINEARBLEND; }
        if( secondHand == 25)  { SetupTotallyRandomPalette();              currentBlending = LINEARBLEND; }
        if( secondHand == 30)  { SetupBlackAndWhiteStripedPalette();       currentBlending = NOBLEND; }
        if( secondHand == 35)  { SetupBlackAndWhiteStripedPalette();       currentBlending = LINEARBLEND; }
        if( secondHand == 40)  { currentPalette = CloudColors_p;           currentBlending = LINEARBLEND; }
        if( secondHand == 45)  { currentPalette = PartyColors_p;           currentBlending = LINEARBLEND; }
        if( secondHand == 50)  { currentPalette = myRedWhiteBluePalette_p; currentBlending = NOBLEND;  }
        if( secondHand == 55)  { currentPalette = myRedWhiteBluePalette_p; currentBlending = LINEARBLEND; }
    }
}

// This function fills the palette with totally random colors.
void SetupTotallyRandomPalette()
{
    for( int i = 0; i < 16; i++) {
        currentPalette[i] = CHSV( random8(), 255, random8());
    }
}

// This function sets up a palette of black and white stripes,
// using code.  Since the palette is effectively an array of
// sixteen CRGB colors, the various fill_* functions can be used
// to set them up.
void SetupBlackAndWhiteStripedPalette()
{
    // 'black out' all 16 palette entries...
    fill_solid( currentPalette, 16, CRGB::Black);
    // and set every fourth one to white.
    currentPalette[0] = CRGB::White;
    currentPalette[4] = CRGB::White;
    currentPalette[8] = CRGB::White;
    currentPalette[12] = CRGB::White;

}

// This function sets up a palette of purple and green stripes.
void SetupPurpleAndGreenPalette()
{
    CRGB purple = CHSV( HUE_PURPLE, 255, 255);
    CRGB green  = CHSV( HUE_GREEN, 255, 255);
    CRGB black  = CRGB::Black;

    currentPalette = CRGBPalette16(
                                   green,  green,  black,  black,
                                   purple, purple, black,  black,
                                   green,  green,  black,  black,
                                   purple, purple, black,  black );
}


// This example shows how to set up a static color palette
// which is stored in PROGMEM (flash), which is almost always more
// plentiful than RAM.  A static PROGMEM palette like this
// takes up 64 bytes of flash.
const TProgmemPalette16 myRedWhiteBluePalette_p PROGMEM =
{
    CRGB::Red,
    CRGB::Gray, // 'white' is too bright compared to red and blue
    CRGB::Blue,
    CRGB::Black,

    CRGB::Red,
    CRGB::Gray,
    CRGB::Blue,
    CRGB::Black,

    CRGB::Red,
    CRGB::Red,
    CRGB::Gray,
    CRGB::Gray,
    CRGB::Blue,
    CRGB::Blue,
    CRGB::Black,
    CRGB::Black
};


// Additionl notes on FastLED compact palettes:
//
// Normally, in computer graphics, the palette (or "color lookup table")
// has 256 entries, each containing a specific 24-bit RGB color.  You can then
// index into the color palette using a simple 8-bit (one byte) value.
// A 256-entry color palette takes up 768 bytes of RAM, which on Arduino
// is quite possibly "too many" bytes.
//
// FastLED does offer traditional 256-element palettes, for setups that
// can afford the 768-byte cost in RAM.
//
// However, FastLED also offers a compact alternative.  FastLED offers
// palettes that store 16 distinct entries, but can be accessed AS IF
// they actually have 256 entries; this is accomplished by interpolating
// between the 16 explicit entries to create fifteen intermediate palette
// entries between each pair.
//
// So for example, if you set the first two explicit entries of a compact
// palette to Green (0,255,0) and Blue (0,0,255), and then retrieved
// the first sixteen entries from the virtual palette (of 256), you'd get
// Green, followed by a smooth gradient from green-to-blue, and then Blue.
If you are using an STM32 board, upload this code:
/*
modified on Sep 8, 2020
Modified by MohammedDamirchi from https://github.com/FearlessNight/bluepill_ws2812
Home
*/
//--------------------------------------------------------------
// Blue Pill STM32F103C8 WS2812 Neopixel driver example
// Color Wheel display
// Connect WS2812 LED string to pin PC13 (use level up-shifter)

#include "bluepill_ws2812.h"
bluepill_neopixel PIX;       // a string of pixels
#define NUM_PIXELS 1     //   number of pixels in the string
pixel string[NUM_PIXELS]; //   rgb data buffer
#define string_port GPIOC //   pin string is connected to
#define string_pin  13

// RGB color wheel
void wheel( pixel *p, uint8_t w )
{
  if(w < 85)
  { p->rgb.r = 255 - w * 3;
    p->rgb.g = 0;
    p->rgb.b = w * 3;
  }
  else if(w < 170)
  { w -= 85;
    p->rgb.r = 0;
    p->rgb.g = w * 3;
    p->rgb.b = 255 - w * 3;
  }
  else
  { w -= 170;
    p->rgb.r = w * 3;
    p->rgb.g = 255 - w * 3;
    p->rgb.b = 0;
  }
}

// dim pixel down
void attenuate( pixel *p, uint8_t factor )
{
  p->rgb.r /= factor;
  p->rgb.g /= factor;
  p->rgb.b /= factor;
}

void setup()
{
  PIX.begin(string_port, string_pin); // set pin to output
}

void loop()
{
  static uint8_t wheel_index = 0; // color wheel

  // fill pixel buffer
  for (uint8_t i=0; i < NUM_PIXELS; i++)
  { wheel( &string[i], wheel_index + i*(256/NUM_PIXELS) );
    attenuate( &string[i], 8 );
  }

  // output pixel buffer to string
  PIX.paint( string[0].bytes, NUM_PIXELS, string_port, string_pin );

  // loop
  wheel_index++;
  delay(10);
}
  Serial.println(" ");delay(100); delay(100);   delay(100);  Serialrial  }
