
Overview
What You Will Learn
- What IR is and how it works
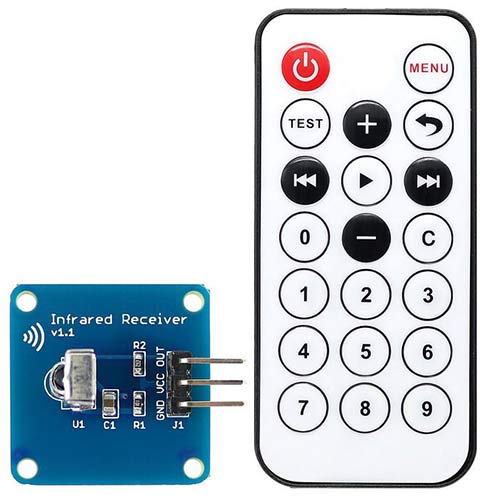
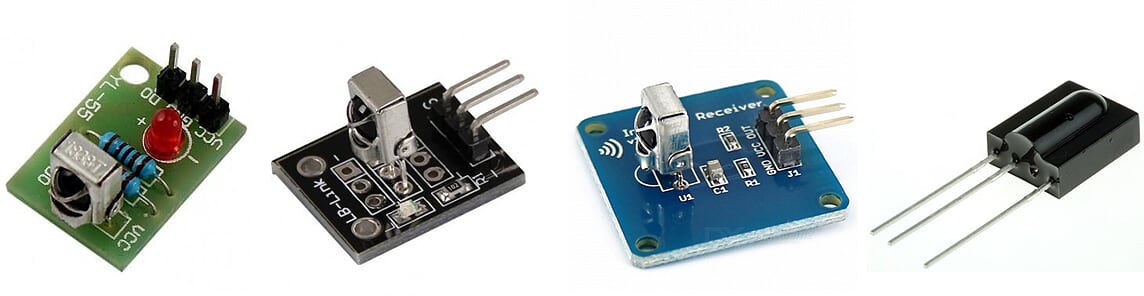
- Introduction of IR Receiver Modules
- How to use an IR module with Arduino
- Controlling keyboard with IR remote control
Introduction to IR Protocol
- IR or infrared communication is one of the most common methods of wireless communication due to being easy to use and having an affordable price. Infrared light, with a wavelength longer than visible light, is not within the range of human vision. That’s why it’s a good option for wireless communications. When you press a button on your TV control, an LED on your control turns on and off continuously and causes a modulated infrared signal to send from the control to your TV. The command will execute after the signal is demodulated. IR receiver modules are used to receive IR signals. These modules work in 3,8 KHz frequency. When the sensor is not exposed to any light at its working frequency, the VOUT output has a value equal to VS (power supply). With exposing to a 38 kHz infrared light, this output will be zero.
Required Materials
Hardware Components
Software Apps
Find the Code for each Remote Control Button
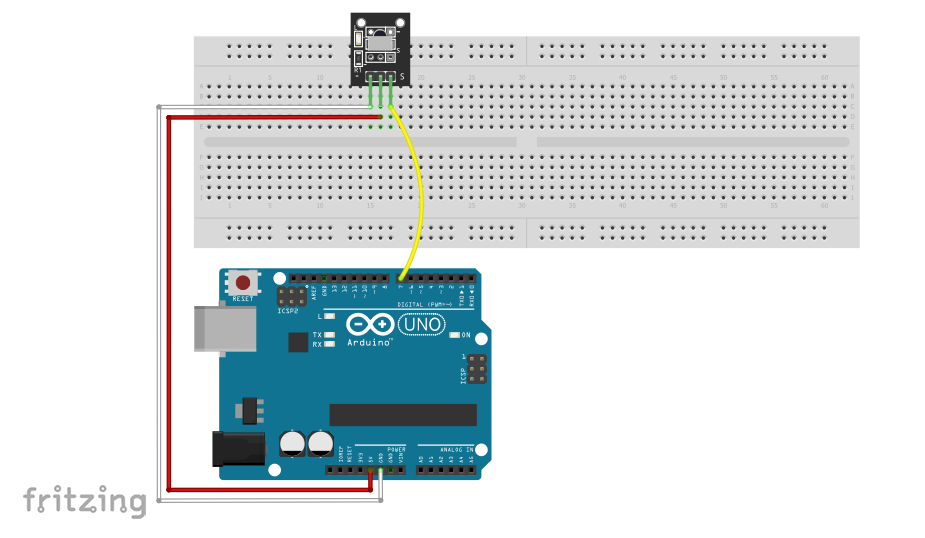
Circuit
Code
You need to install the IR library to use an IR module. Download the library from the following link and in the Sketch window, open the Include library option and select IRRemote.h.
This library may be available in your Arduino libraries by default. In this case, you don’t need to install it.
/*

 *  IR read codes

 *  by Hanie kiani

 *  https://electropeak.com/learn/

 */

#include <IRremote.h>  //including infrared remote header file

int RECV_PIN = 7; // the pin where you connect the output pin of IR sensor

IRrecv irrecv(RECV_PIN);

decode_results results;

void setup()

{
Serial.begin(9600);
irrecv.enableIRIn();
}

void loop()
{
if (irrecv.decode(&results))// Returns 0 if no data ready, 1 if data ready.
 {
  int result = results.value ;// Results of decoding are stored in result.value
  Serial.println(" ");
  Serial.print("Code: ");
  Serial.println(results.value); //prints the value a a button press
  Serial.println(" ");
  irrecv.resume(); // Restart the ISR state machine and Receive the next value
}
}
Let’s take a closer look to the code:
int RECV_PIN = 7;

IRrecv irrecv(RECV_PIN);irrecv.enableIRIn();if (irrecv.decode(&results))irrecv.decode(&results) function decodes the received IR signal and store it in variable result. It returns 0 when nothing is received. Controlling an RGB LED Colors Using the IR Remote Control
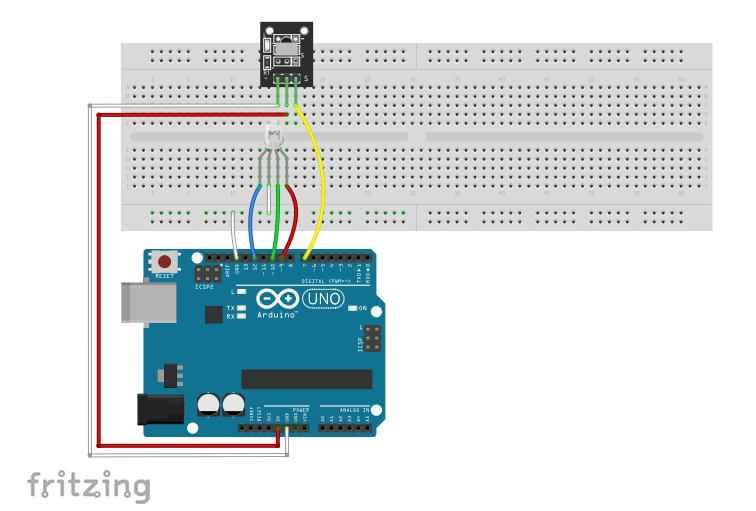
After you found the code for each button, you can use it to control the commands. In this example, we connected an RGB LED to Arduino and use the remote control to change the colors. To do this, specify a few buttons on the remote control and save their code. In this example, buttons 1 to 3 are used. Then assign a specific color to each button. At the end by pressing any of the 1 to 3 keys, the LED changes its color.
For more colors, you can find the code for each color here.
Circuit
Code
/*

 *  IR read codes

 *  by Hanie kiani

 *  https://electropeak.com/learn/

 */

#include <IRremote.h>


 int RECV_PIN =6;

 int bluePin = 11;

 int greenPin = 10;

 int redPin = 9;

IRrecv irrecv(RECV_PIN);

decode_results results;


void setup(){

  Serial.begin(9600);

  irrecv.enableIRIn();

  pinMode(redPin, OUTPUT);

  pinMode(greenPin, OUTPUT);

    pinMode(bluePin, OUTPUT);

}


void loop(){

    if (irrecv.decode(&results)){

int value = results.value;

Serial.println(value);

        switch(value){

          case 12495: //Keypad button "1"

          //set color red

          analogWrite(redPin, 0xFF);

          analogWrite(greenPin,0x08);

          analogWrite(bluePin, 0xFB);

          }


        switch(value){

          case -7177: //Keypad button "2"

          //set color skyblue

          analogWrite(redPin, 0x00);

          analogWrite(greenPin,0xFF);

          analogWrite(bluePin, 0xFF);

          }

          switch(value){

          case 539: //Keypad button "3"

           //set color pink

          analogWrite(redPin, 0x1F);

          analogWrite(greenPin,0x00);

          analogWrite(bluePin, 0x8F);

          }

          switch(value){

          case 25979: //Keypad button "4"

          //set color light green

          analogWrite(redPin, 0x11);

          analogWrite(greenPin,0x5F);

          analogWrite(bluePin, 0x01);

          }


        irrecv.resume();

    }

}
Use the IR Remote Control to Play Super Mario!
Circuit

Code
In order to control the keyboard, you need the keyboard.h library. You can find it in the following link:
/*

 *  IR REMOTE CONTROL + RGB

 *  by Hanie Kiani

 *  https://electropeak.com/learn/

 */


#include <IRremote.h>

#include  <Keyboard.h>


int RECV_PIN = 11;

IRrecv irrecv(RECV_PIN);

decode_results results;


void setup()

{

  Serial.begin(9600);

  irrecv.enableIRIn(); // Start the receiver

  Keyboard.begin();

}


void loop() {

  if (irrecv.decode(&results))

  {  int value = results.value;

Serial.println(value);

      switch(value)

      {


        //Backward key is used for left key operation

        case 8925:  Keyboard.press(KEY_LEFT_ARROW); //left key

                         delay(100);

                         Keyboard.releaseAll();

                         break;

        //Forward Key is used for right key operation

        case 765:  Keyboard.press(KEY_RIGHT_ARROW); //right  key

                         delay(100);

                         Keyboard.releaseAll();

       //Play Key is used for up key operation

        case -15811:  Keyboard.press(KEY_UP_ARROW); //up  key

                         delay(100);

                         Keyboard.releaseAll();

                         break;

      }

    irrecv.resume(); // Receive the next value

  }

}
Note
What’s Next?
- Try to control a robot using IR remote control

Comments (3)
In your first set of code above it gives the following error:
a function-definition is not allowed here before ‘{‘ token
Make sure you copy the whole code, notice the last closing brace: }
Where i find the library irremote ?