
Introduction
Are you tired of manually logging data from your ESP32? Would you like to automate the process? Well, the good news is that it’s very simple. In this article, we will cover a comprehensive, step-by-step process on how to send data from either an ESP32 or ESP8266 to Google Sheets.
Esp32 is a powerful microcontroller capable of connecting to WiFi, different devices, and sensors. To effectively collect data from other devices and manage it, you need an intelligent system that can store a significant amount of data while allowing for remote control and management.
This is where Google Sheets comes in handy as a free, popular, and above all, reliable service. This platform offers many features and interacts well with other Google Services via APIs.
Benefits of Data Logging to Google Sheets
By logging data to Google Sheets, you can easily access it from anywhere.
Here are some benefits of using Google Sheets for logging ESP32 data:
- Simplicity (no need for external services)
- Easy data collection and analysis using available functions
- Accessible data from any device connected to the Internet
- Formatted data for improved readability and analysis
In this project, we use ESP32 for communicating with Google Sheets, sending and reading data.
You can also use ESP8266, as all steps remain the same.

What You Will Learn
• Using “Google Sheets API” and “Google Apps Script” to send data from ESP32
• Creating files in Google Sheets by ESP32
• Logging data to Google Sheets or reading it by ESP32
• Formatting text and using functions in Google Sheets
Methods of Logging Data from ESP32 to Google Sheets
There are different methods available to exchange data between ESP32 and Google Sheets. We will introduce three of them.
1- Send ESP32 Data Using Google Apps Script
In this method, all you need is a Google account: Just do some simple settings and enter a “script” in Google Sheets. This enables communication between a device connected to the internet (such as ESP32) and Google Sheets.
The Benefit of this method: when loading data into your Google Sheets, you only need to open one URL with a specified format on ESP32.

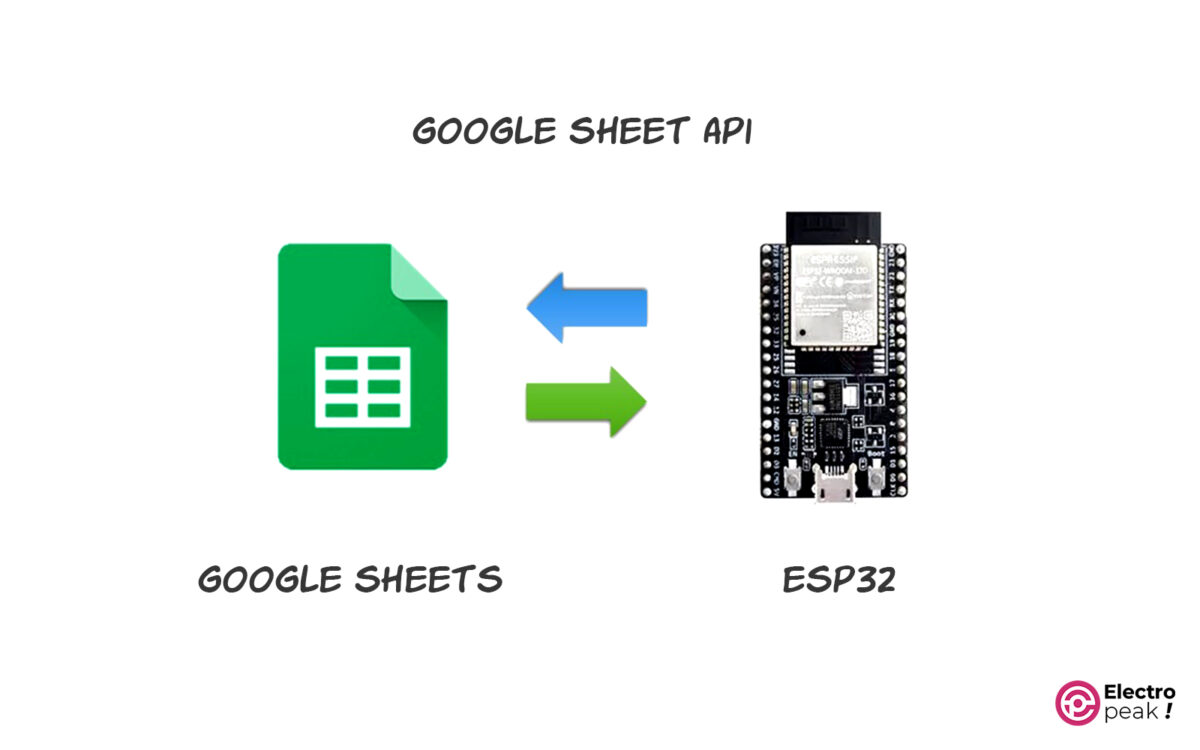
2- Send ESP32 Data Using Google Sheets API
With the Google Sheets API, there is no need to write additional code outside the Arduino IDE. You can simply send data from ESP32 to Google Sheets by configuring some simple settings in your Google account.
Here, since Google Sheets API is used directly, you have access to all its features, including practical functions. In addition, it’s very simple to send and receive data.
This method is also more reliable compared to external services because the data is sent directly.
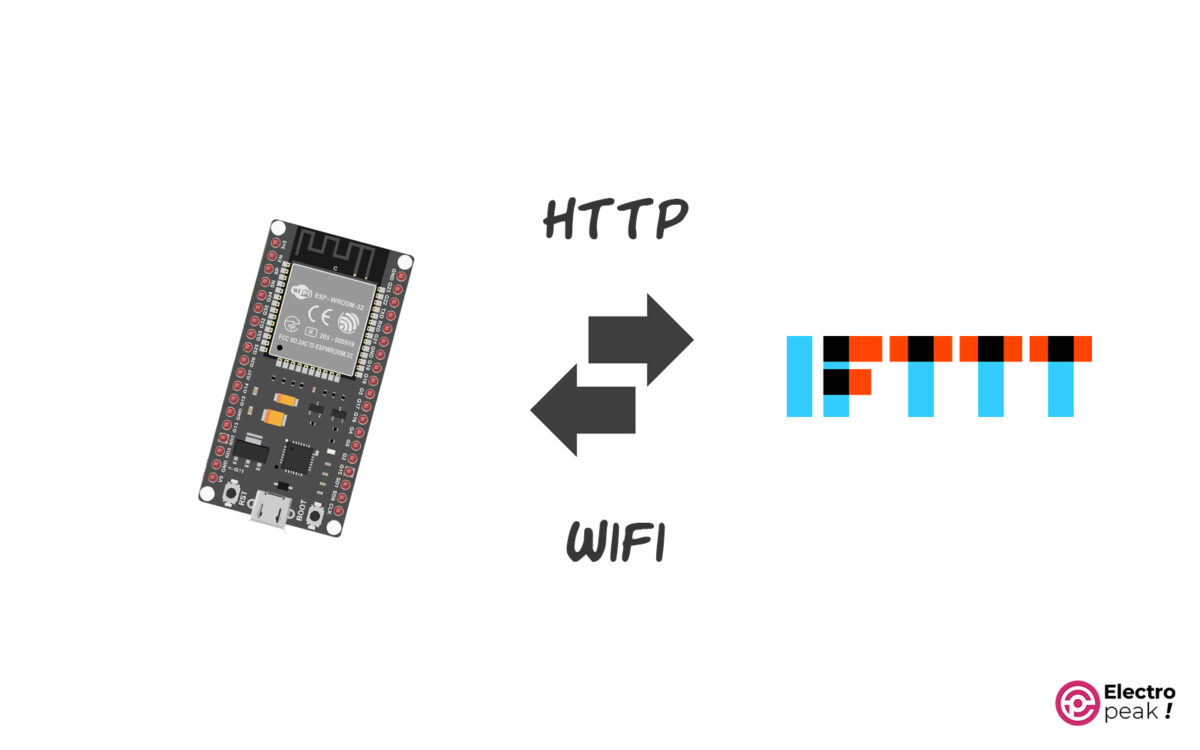
3- Send ESP32 Data Using IFTTT
In the third method, ESP32 connects to a secondary web service to communicate with Google Sheets. In this service, the data sent by the microcontroller is stored in the desired Sheet.
IFTTT is one of these secondary services. The advantage of this method, compared to the other two, is that you can communicate with several web-based software at the same time.
Required Materials
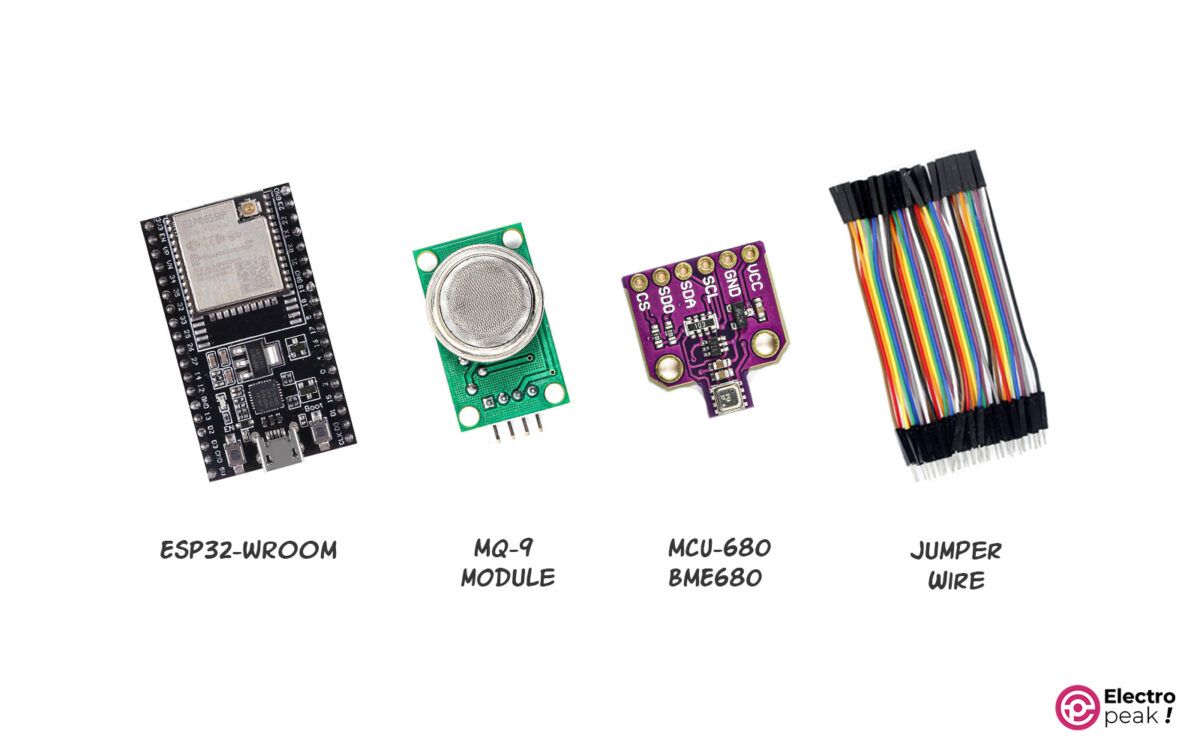
Hardware Components
**: As mentioned, you can use all kinds of ESP32 or ESP8266 boards.
***: In this tutorial, we have logged sensor data from MQ9 and BME680 to Google Sheets. You can use any other sensor according to your project.
Software
Method 1: Logging Data from ESP32 to Google Sheets using Google Sheets API
Step 1: Preparing Google Sheets
Create a “Service Account Private Key” for yourself and enable both the “Google Sheets API” and “Google Drive API.”
First, sign in to your Google Account.
It is recommended to regularly use IP-changing software if you plan on using it for a long time. If not possible, you can try the second method: “Google Apps Scrip.”
Enabling “Google Sheets API” and “Google Drive API”
Creating a Service Account Private Key
Open the Google Cloud Console page and then follow the steps below:
1- Create a new project to have a Service Account.
2- Click on “Service Account” (see the image below).
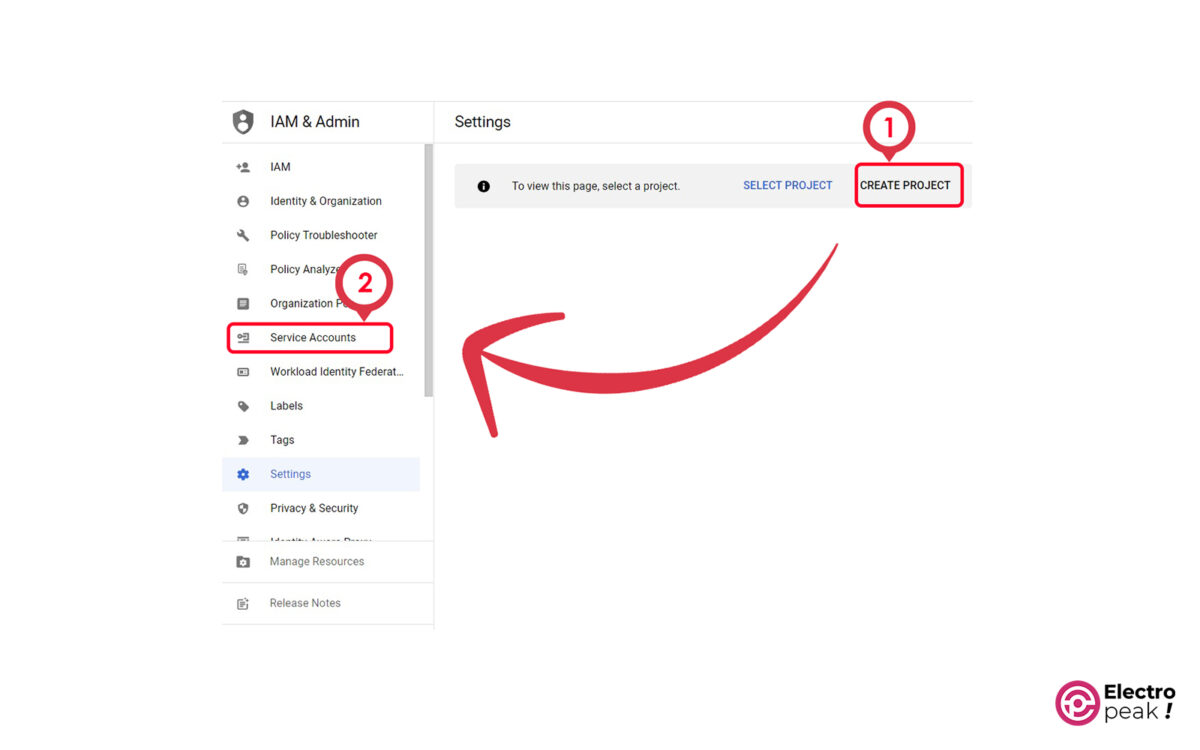
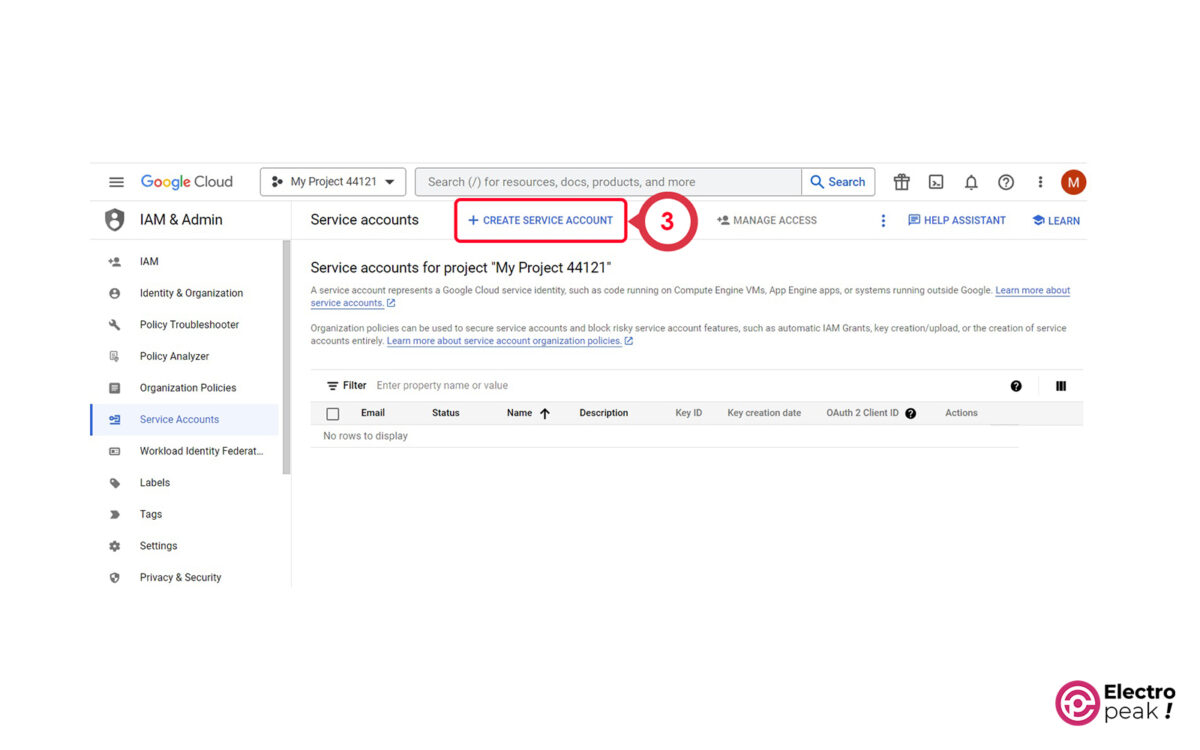
3- Click on “+CREATE SERVICE ACCOUNT.”
4- Type in the name of the Service Account.
5- After choosing the name for Service Account, if the Service Account ID is not automatically completed or if you want to choose another name, modify it with your desired name.
6- Click on “Create and Continue.”
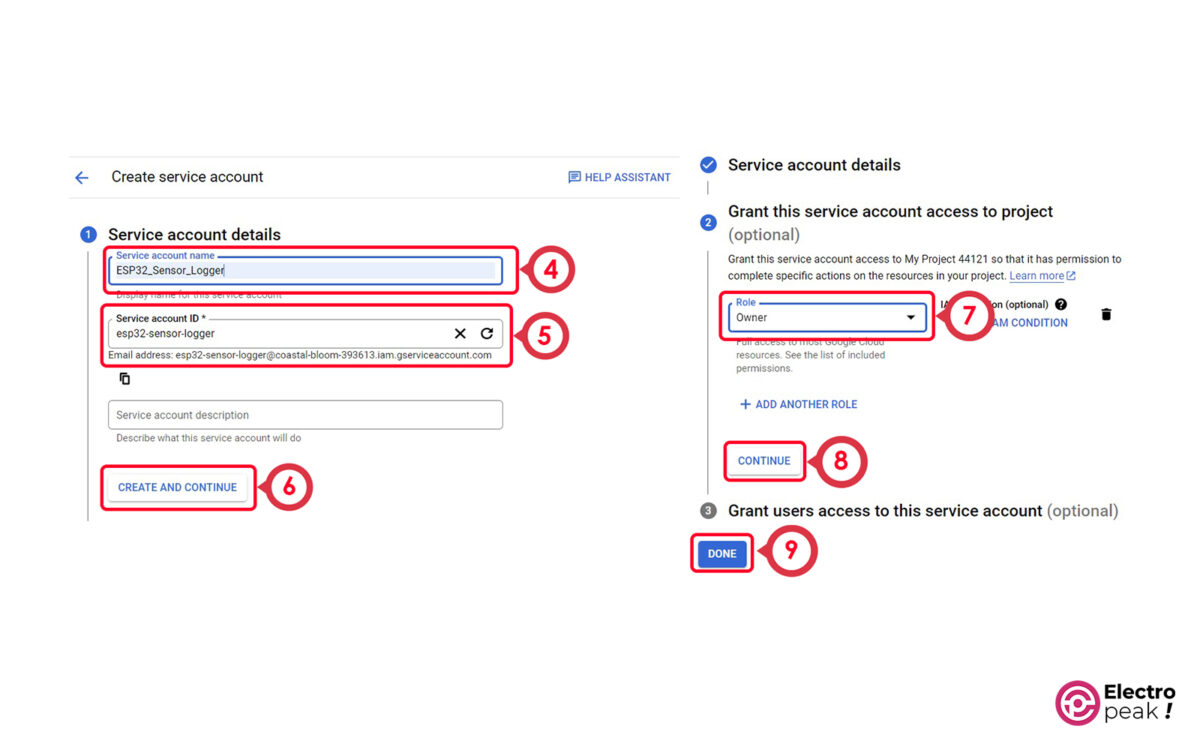
7- Select the “Role” type (here: Owner).
8- Click “Continue.”
9- Finally, click “Done.”
10- Select the created Service Account.

11- Click on the “KEYS” button.
12- Click “ADD KEY.”
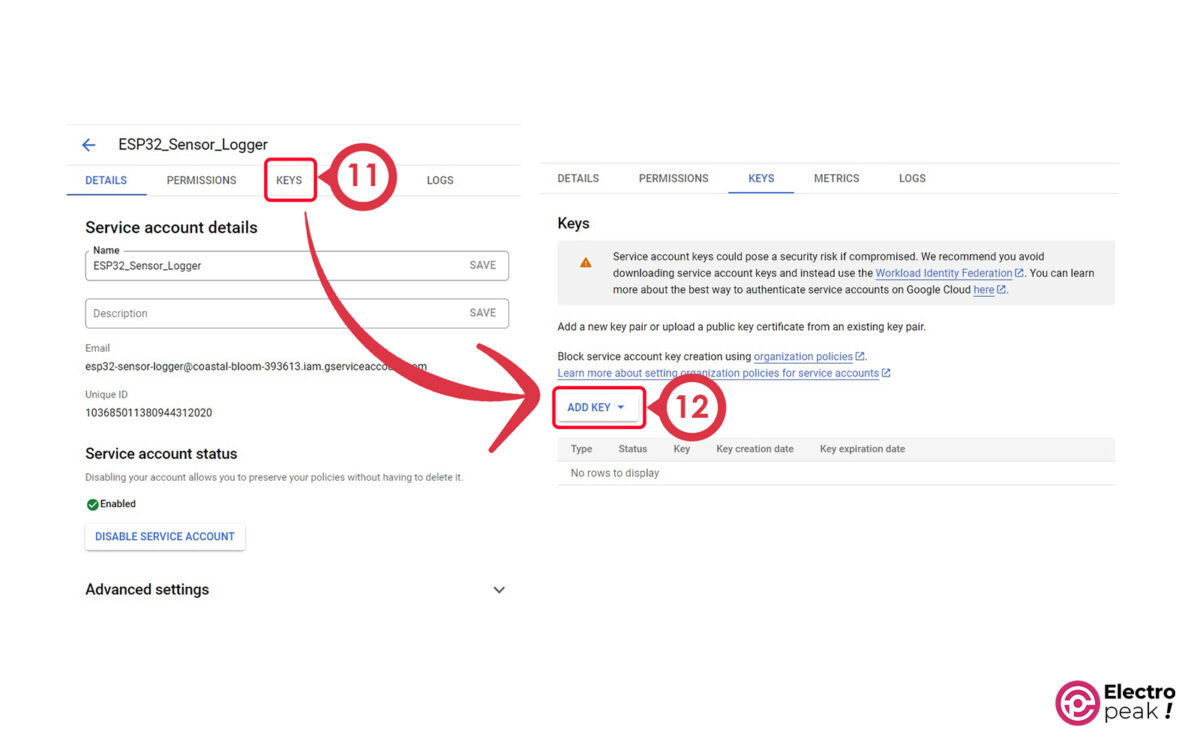
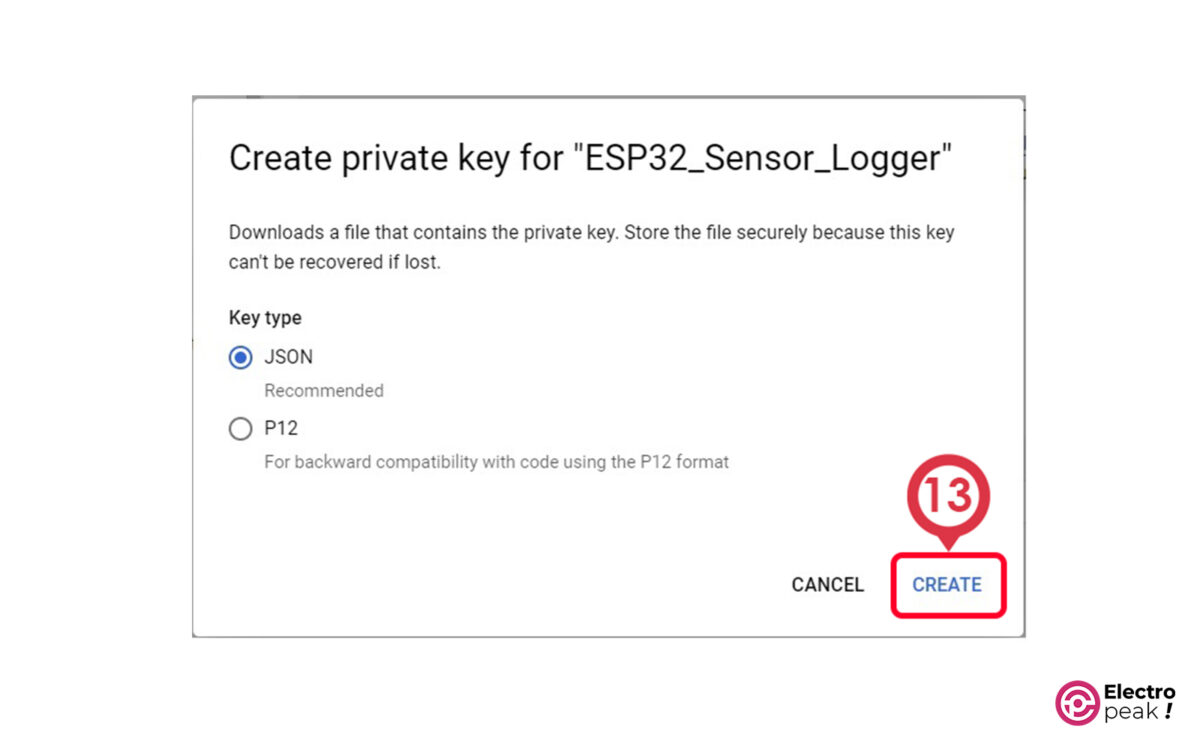
13- Select “JSON” (for the Key Type) and click “Create.”
14- (You have now successfully created your private key and it will be downloaded automatically). Click “Close.”
15. Open the downloaded JSON file with text editing software. It will open a text similar to the following:
{
  "type": "service_account",
  "project_id": "...",
  "private_key_id": "...",
  "private_key": "-----BEGIN PRIVATE KEY-----\n...\n-----END PRIVATE KEY-----\n",
  "client_email": "...",
  "client_id": "...",
  "auth_uri": "https://accounts.google.com/o/oauth2/auth",
  "token_uri": "https://oauth2.googleapis.com/token",
  "auth_provider_x509_cert_url": "https://www.googleapis.com/oauth2/v1/certs",
  "client_x509_cert_url": "..."
}
Save “project_id,” “client_email,” “private_key_id,” and “private_key” mentioned in the code. You will need them for Arduino coding.
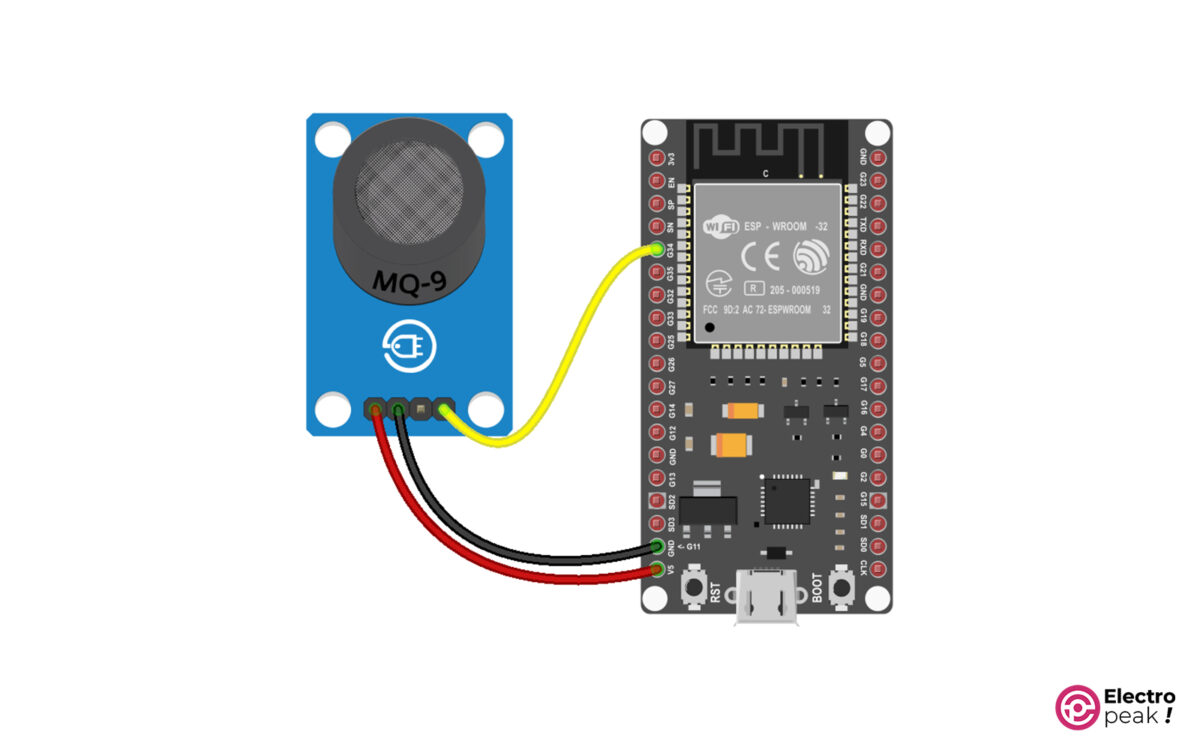
Step 2: Wiring
Connect the sensor’s VCC and GND pins to the corresponding pins on the ESP32 board (VIN and GND or 5V and GND) and the AO pin of the sensor to pin #34 of the ESP32 board. The type of ESP32 board does not change the wiring.
Step 3: Installing Library
To start coding, you must first install the required library.
In Arduino IDE, go to Sketch->Include Library->Manage Libraries.
In the Library Manager window, search for “Sheet” and install “ESP Spreadsheet Client” from the options.
If you need more help installing the library, refer to this link.
Step 4: Arduino Code (for Logging Data from ESP32 to Google Sheets)
After installing the library, create a new Arduino sketch and copy the following code into it.
/**
 Created by M.Merati

 Email: [email protected]
*/

// This example shows how to create the spreadsheet, update and read the values.

#include <Arduino.h>
#if defined(ESP32) || defined(ARDUINO_RASPBERRY_PI_PICO_W)
#include <WiFi.h>
#elif defined(ESP8266)
#include <ESP8266WiFi.h>
#endif
#include <ESP_Google_Sheet_Client.h>
#include <stdlib.h>
#include "time.h"
const char* ntpServer = "pool.ntp.org";
const long gmtOffset_sec = 19800;
const int daylightOffset_sec = 0;
int SensValue = 0;

// For SD/SD_MMC mounting helper
#include <GS_SDHelper.h>

#define WIFI_SSID "Galaxy S20 FEDF80"
#define WIFI_PASSWORD "kdbi8870"

#define PROJECT_ID "logical-utility-388206"

// Service Account's client email
#define CLIENT_EMAIL "[email protected]"

// Your email to share access to spreadsheet
#define USER_EMAIL "[email protected]"

char numberArray[20];

// Service Account's private key
const char PRIVATE_KEY[] PROGMEM = "-----BEGIN PRIVATE KEY-----\nMIIEvQIBADANBgkqhkiG9w0BAQEFAASCBKcwggSjAgEAAoIBAQCbBLtWIEx2OmTI\nzyNk53HtxjebDfGp0AcbAcC/ztN6CTPYKKO7k1jGcKkSUMe7oWGr4lB/QeS0XBFG\nkzjS3LpIuTMlBtf4erf7fcFqCF5VlYYWwuprOmZe3hyYvlc8oBUIcgQvOA6xQcxW\n0tJTAQXfT9g1IF3lRupZ6mCN1ILinxMQOA7zNLa7CLe2wq1hFX4kn8+YztHAiunp\nR7EMhzZAL9rwR2VpWoFZj24TZpQzEYS1S7n3iD8d0Ip3mVmoNcYDe39I5+ZE8xe1\nuqbc4Z5SzUe6RyytAMLL4tMAqDqvDTXtnD9Hw1f3DTymEWEFYjfjO3B6Pt90VLMG\n48r7veZvAgMBAAECggEAO5XzCGT73woNCV8NhNCt6y6g2xneBV7wDEJ9O30drq/w\n3KqqXQSDQCu34VFppMagi3g/ZtsGNQmanl0in3K2rBN8BESAKYPKSoIJIV+8GvuR\nghhEERlulhKcPV4UnDoQO6HP1/KdOydGiy0YKU2gWzkOq0UYsnOyywMbQAkqkj7n\n5ELfR//Leewx92zTiGrI4xns0sDm15rEYQvF8WQZeMFUblmJ+5FfuSK5hP0SaX4F\nvv9cx34TteUm1sro+v65HYTjY8Ozcur+ZjiuSNuAx4vs7CmpUM3kAjIN2451H9ka\ny3PY7I3bvFhy9tIHmQflFiokAFk3eH//HavpmBnroQKBgQDKJYElbW1b9L+5RHK4\nD8vRRbIgNVw1lcsBulwc4/VyAUORd3V9JQwfGvGBKykTVvJ75USR9T49BIDBZeR+\nfeO2RZtCaEXm5OtQgVM8p9GFUxhRk283CPf/uZbMkNkXXCLefcVWCBr+6+2extUV\nz+MMgghwFx4vjbJqe2RqFtA+vwKBgQDEURJ6zhKu7pJy1wNlPkfsnDwb2sbj/UmG\nmzA+9KEP9PQExxShRYBwyrsgGRB644kLtWv6tOTezib54SnWXAcVHXkkP1hWrw79\nfWY9tgPldwvlT9KMXTiG6NBHDZD/lwVtiMqulmKpXVr+AVSOp+t/vzquvOO8MKl2\nP5g5BvT0UQKBgQCX1S24uAWBIUd0V7Y3DB5R9KCDUrEMypMtnBWd2Zc85zgiJfEI\na3A8WNd25r02eoMtjho/602xNRWkrey/Gb2U5Zller6uW9lnoYusrnxQQQauFyhc\n1Q65dGORCWcWBa1nIl67bOEiAoF7VestM/VdKro9vw98NlkBY+cbTEFkLwKBgHno\nglpCR7XbrpOj05b2UwGqj2UYuXNwoUz2Z8JgdPgMu8+PtM7k8vqX2hX3mpVFYKAl\nu/UGii2VxPxdB3b21OsWz1hkAb5qnRtq2KevtMG06G0w4WWKqgSU5GmLEiS1qog3\nbu11s7TKpSugtdqUihhdLtq9r4n4ifNFUIjxOgHRAoGAbMlZi6KtyuIqfpnOvYej\nIO2SmKA85EBelrZCl2xKlIgGpLRITzfiQ5k+HH3ts22iw3ld+tBxpg82EX4Zuavj\niM57EIf6hzLsh8eLpic85ziD6PV14PBQUECS1Bb14fMJ4k3rcGcNFo2o9tgjlu9R\nKDx2yXeNgh/pToM7GLvlIOg=\n-----END PRIVATE KEY-----\n";

bool taskComplete = false;

#if defined(ARDUINO_RASPBERRY_PI_PICO_W)
WiFiMulti multi;
#endif

void tokenStatusCallback(TokenInfo info);

void setup()
{

 Serial.begin(115200);
 Serial.println();
 Serial.println();

#if defined(ESP32) || defined(ESP8266)
 WiFi.setAutoReconnect(true);
#endif

#if defined(ARDUINO_RASPBERRY_PI_PICO_W)
 multi.addAP(WIFI_SSID, WIFI_PASSWORD);
 multi.run();
#else
 WiFi.begin(WIFI_SSID, WIFI_PASSWORD);
#endif

 Serial.print("Connecting to Wi-Fi");
 unsigned long ms = millis();
 while (WiFi.status() != WL_CONNECTED)
 {
 Serial.print(".");
 delay(300);
#if defined(ARDUINO_RASPBERRY_PI_PICO_W)
 if (millis() - ms > 10000)
 break;
#endif
 }
 Serial.println();
 Serial.print("Connected with IP: ");
 Serial.println(WiFi.localIP());
 Serial.println();

 // Set the callback for Google API access token generation status (for debug only)
 GSheet.setTokenCallback(tokenStatusCallback);

 // The WiFi credentials are required for Pico W
 // due to it does not have reconnect feature.
#if defined(ARDUINO_RASPBERRY_PI_PICO_W)
 GSheet.clearAP();
 GSheet.addAP(WIFI_SSID, WIFI_PASSWORD);
#endif

 // Set the seconds to refresh the auth token before expire (60 to 3540, default is 300 seconds)
 GSheet.setPrerefreshSeconds(10 * 60);

 // Begin the access token generation for Google API authentication
 GSheet.begin(CLIENT_EMAIL, PROJECT_ID, PRIVATE_KEY);

 configTime(gmtOffset_sec, daylightOffset_sec, ntpServer);
}

void loop()
{
 // Call ready() repeatedly in loop for authentication checking and processing
 bool ready = GSheet.ready();

 if (ready && !taskComplete)
 {
 FirebaseJson response;

 Serial.println("\nCreate spreadsheet...");
 Serial.println("------------------------");

 FirebaseJson spreadsheet;
 spreadsheet.set("properties/title", "Gas Sensor Data Log");
 spreadsheet.set("sheets/properties/gridProperties/rowCount", 100 );
 spreadsheet.set("sheets/properties/gridProperties/columnCount", 2);

 String spreadsheetId, spreadsheetURL;
 bool success = false;

 // For Google Sheet API ref doc, go to https://developers.google.com/sheets/api/reference/rest/v4/spreadsheets/create

 success = GSheet.create(&response /* returned response */, &spreadsheet /* spreadsheet object */, USER_EMAIL /* your email that this spreadsheet shared to */);
 response.toString(Serial, true);
 Serial.println();


 if (success)
 {
 // Get the spreadsheet id from already created file.
 FirebaseJsonData result;
 response.get(result, FPSTR("spreadsheetId")); // parse or deserialize the JSON response
 if (result.success)
 spreadsheetId = result.to<const char *>();

 // Get the spreadsheet URL.
 result.clear();
 response.get(result, FPSTR("spreadsheetUrl")); // parse or deserialize the JSON response
 if (result.success)
 {
 spreadsheetURL = result.to<const char *>();
 Serial.println("\nThe spreadsheet URL");
 Serial.println(spreadsheetURL);
 }

 struct tm timeinfo;
 char timeStringBuff[50];
 String asString;
 char buffer[40];


 FirebaseJson valueRange;
 for (int counter = 0; counter < 10; counter++)
 {
 Serial.println("\nUpdate spreadsheet values...");
 Serial.println("------------------------------");
 if (!getLocalTime(&timeinfo)) {
 Serial.println("Failed to obtain time");
 return;
 }
 strftime(timeStringBuff, sizeof(timeStringBuff), "%A, %B %d %Y %H:%M:%S", &timeinfo);
 asString = timeStringBuff;
 asString.replace(" ", "-");
 SensValue = analogRead(34);
 itoa(SensValue, numberArray, 10);

 sprintf(buffer, "values/[%d]/[1]", counter);
 valueRange.set(buffer, numberArray);
 sprintf(buffer, "values/[%d]/[0]", counter);
 valueRange.set(buffer, asString);
 sprintf(buffer, "Sheet1!A%d:B%d", 1 + counter, 10 + counter);

 success = GSheet.values.update(&response /* returned response */, spreadsheetId /* spreadsheet Id to update */, "Sheet1!A1:B1000" /* range to update */, &valueRange /* data to update */);
 response.toString(Serial, true);
 Serial.println();
 //valueRange.clear();
 delay(5000);
 }

 // For Google Sheet API ref doc, go to https://developers.google.com/sheets/api/reference/rest/v4/spreadsheets.values/update

 if (success)
 {

 Serial.println("\nGet spreadsheet values...");
 Serial.println("------------------------------");

 success = GSheet.values.get(&response /* returned response */, spreadsheetId /* spreadsheet Id to read */, "Sheet1!A1:B10" /* range to read */);
 response.toString(Serial, true);
 Serial.println();


#if defined(ESP32) || defined(ESP8266)
 Serial.println(ESP.getFreeHeap());
#elif defined(PICO_RP2040)
 Serial.println(rp2040.getFreeHeap());
#endif
 }
 }

 taskComplete = true;
 }
}

void tokenStatusCallback(TokenInfo info)
{
 if (info.status == esp_signer_token_status_error)
 {
 Serial.printf("Token info: type = %s, status = %s\n", GSheet.getTokenType(info).c_str(), GSheet.getTokenStatus(info).c_str());
 Serial.printf("Token error: %s\n", GSheet.getTokenError(info).c_str());
 }
 else
 {
 Serial.printf("Token info: type = %s, status = %s\n", GSheet.getTokenType(info).c_str(), GSheet.getTokenStatus(info).c_str());
 }
}
Code Cracking
First, we load the required libraries.
#include <Arduino.h>
#if defined(ESP32) || defined(ARDUINO_RASPBERRY_PI_PICO_W)
#include <WiFi.h>
#elif defined(ESP8266)
#include <ESP8266WiFi.h>
#endif
#include <ESP_Google_Sheet_Client.h>
#include <stdlib.h>
#include "time.h"
The “WiFi.h” library is for a WiFi connection, and the “ESP_Google_Sheet_Client.h” library is used to communicate with Google Sheets API.
Next, we introduce the WiFi specifications for the ESP32 microcontroller.
#define WIFI_SSID "**********"
#define WIFI_PASSWORD "**********"
Below, you should enter the data obtained from steps 15 and 16 of the previous stage.
#define PROJECT_ID "**************"

// Service Account's client email
#define CLIENT_EMAIL "*******************"

// Your email to share access to spreadsheet
#define USER_EMAIL "************"

char numberArray[20];

// Service Account's private key
const char PRIVATE_KEY[] PROGMEM = **********************"";
Setup() Function:
Here, we first establish a serial communication to monitor the code’s performance at different stages, and then, connect to the WiFi network specified in the code. If there are no errors, we will send the ESP32 IP address in the network through the serial port.
Finally, we connect ESP32 to the Google Sheets API service using the CLIENT_EMAIL, PROJECT_ID, and PRIVATE_KEY mentioned earlier in the code.
void setup()
{

 Serial.begin(115200);
 Serial.println();
 Serial.println();

#if defined(ESP32) || defined(ESP8266)
 WiFi.setAutoReconnect(true);
#endif

#if defined(ARDUINO_RASPBERRY_PI_PICO_W)
 multi.addAP(WIFI_SSID, WIFI_PASSWORD);
 multi.run();
#else
 WiFi.begin(WIFI_SSID, WIFI_PASSWORD);
#endif

 Serial.print("Connecting to Wi-Fi");
 unsigned long ms = millis();
 while (WiFi.status() != WL_CONNECTED)
 {
 Serial.print(".");
 delay(300);
#if defined(ARDUINO_RASPBERRY_PI_PICO_W)
 if (millis() - ms > 10000)
 break;
#endif
 }
 Serial.println();
 Serial.print("Connected with IP: ");
 Serial.println(WiFi.localIP());
 Serial.println();

 // Set the callback for Google API access token generation status (for debug only)
 GSheet.setTokenCallback(tokenStatusCallback);

 // The WiFi credentials are required for Pico W
 // due to it does not have reconnect feature.
#if defined(ARDUINO_RASPBERRY_PI_PICO_W)
 GSheet.clearAP();
 GSheet.addAP(WIFI_SSID, WIFI_PASSWORD);
#endif

 // Set the seconds to refresh the auth token before expire (60 to 3540, default is 300 seconds)
 GSheet.setPrerefreshSeconds(10 * 60);

 // Begin the access token generation for Google API authentication
 GSheet.begin(CLIENT_EMAIL, PROJECT_ID, PRIVATE_KEY);

 configTime(gmtOffset_sec, daylightOffset_sec, ntpServer);
}
Loop() Function:
At the beginning of this function, we first check if ESP32 and Google Sheets are ready to communicate with each other.
bool ready = GSheet.ready();
Next, create an “instance” for the “response” received from Google Sheets. And if the connection is ready, print the following text in the serial port.
Serial.println("\nCreate spreadsheet...");
Serial.println("------------------------");
To perform various tasks in the Sheet, define an “Instance” as below:
FirebaseJson spreadsheet;
In line 116, you can change the title of the created “Sheet” file using the above instance. Also, in lines 117 and 118, you can define the desired number of rows and columns.
spreadsheet.set("properties/title", "Gas Sensor Data Log");
spreadsheet.set("sheets/properties/gridProperties/rowCount", 100 );
spreadsheet.set("sheets/properties/gridProperties/columnCount", 2);
To change other specifications such as Sheet name, ID, type (here: GRID), and the number of rows and columns, add the following code in line 120.
       spreadsheet.set("properties/title", "ENTER YOUR FILE NAME HERE");

        spreadsheet.set("sheets/properties/title", "ENTER YOUR SHEET TITLE HERE");
        spreadsheet.set("sheets/properties/sheetId", TYPE SHEET ID HERE (Ex. 1));
        spreadsheet.set("sheets/properties/sheetType", “ENTER SHEET TYPE HERE (Ex. "GRID")”);
        spreadsheet.set("sheets/properties/gridProperties/rowCount", ENTER SHEET ROW COUNT HERE (EX. 20) );
        spreadsheet.set("sheets/properties/gridProperties/columnCount", ENTER SHEET COLUMN COUNT HERE (EX. 10));
After choosing the file name, we create the file with the defined specifications by the code in line 126 and then print the response received from Google Sheets in the serial port.
    success = GSheet.create(&response /* returned response */, &spreadsheet /* spreadsheet object */, USER_EMAIL /* your email that this spreadsheet shared to */);
    response.toString(Serial, true);
    Serial.println();
If the file is successfully created, we receive the “spreadsheetId” and “spreadsheetUrl” from Google Sheets and print them in the serial port.
response.get(result, FPSTR("spreadsheetId"));
 if (result.success)
 spreadsheetId = result.to<const char *>();

 // Get the spreadsheet URL.
 result.clear();
 response.get(result, FPSTR("spreadsheetUrl"));
 if (result.success)
 {
 spreadsheetURL = result.to<const char *>();
 Serial.println("\nThe spreadsheet URL");
 Serial.println(spreadsheetURL);
 }
Logging Data from ESP32 to Google Sheets:
Now you can insert the desired data in the created file. Specifically, we enter the analog output of the gas sensor into the code using ADC.
Alternatively, you can use any type of sensor output or other data (numbers or text) in the code to enter Google Sheets.
In the “For” loop below, we first read the current system date and time, and then store the gas sensor output in the SensValue variable using ADC. We send these two data points in one row and two columns to Google Sheets, and finally, print the result of the data transmission in the serial port.
We repeat this process 10 times with a time interval of five seconds.
You can also change the sampling rate.
FirebaseJson valueRange;

 for (int counter = 0; counter < 10; counter++)
 {
 Serial.println("\nUpdate spreadsheet values...");
 Serial.println("------------------------------");
 if (!getLocalTime(&timeinfo)) {
 Serial.println("Failed to obtain time");
 return;
 }
 strftime(timeStringBuff, sizeof(timeStringBuff), "%A, %B %d %Y %H:%M:%S", &timeinfo);
 asString = timeStringBuff;
 asString.replace(" ", "-");
 SensValue = analogRead(34);
 itoa(SensValue, numberArray, 10);

 sprintf(buffer, "values/[%d]/[1]", counter);
 valueRange.set(buffer, numberArray);
 sprintf(buffer, "values/[%d]/[0]", counter);
 valueRange.set(buffer, asString);
 sprintf(buffer, "Sheet1!A%d:B%d", 1+counter,10+counter);

 success = GSheet.values.update(&response /* returned response */, spreadsheetId /* spreadsheet Id to update */, "Sheet1!A1:B1000" /* range to update */, &valueRange /* data to update */);
 response.toString(Serial, true);
 Serial.println();
 //valueRange.clear();
 delay(5000);
 }
If the data is successfully sent, we proceed to the stage of receiving data from Google Sheets.
Receiving Data from Google Sheets with ESP32:
        success = GSheet.values.get(&response /* returned response */, spreadsheetId /* spreadsheet Id to read */, "Sheet1!A1:B10" /* range to read */);
        response.toString(Serial, true);
        Serial.println();
In the above code, we retrieve data from cells A1 to B10 in Google Sheets. If successful, we display this data in the serial port.
If an error occurs in any step, we send an error message and its cause to the serial port.
Step 5: Uploading Code to ESP32
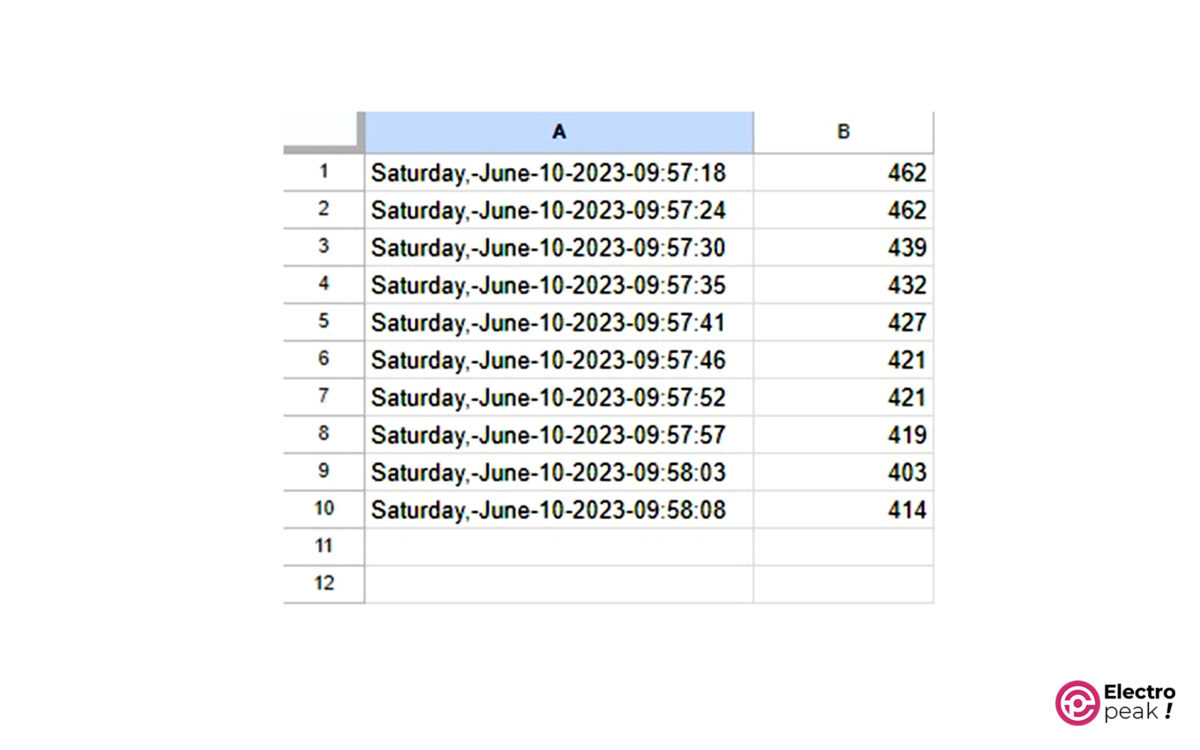
Now, program the ESP32 board. By running the code on ESP32, a sheet file will be created (as shown in the image below.)
As you can see, the current system date and time are inserted in column A, while the gas sensor data is inserted in column B.
After running the code, the values read by ESP32 from Google Sheets are displayed in the serial port as shown below.
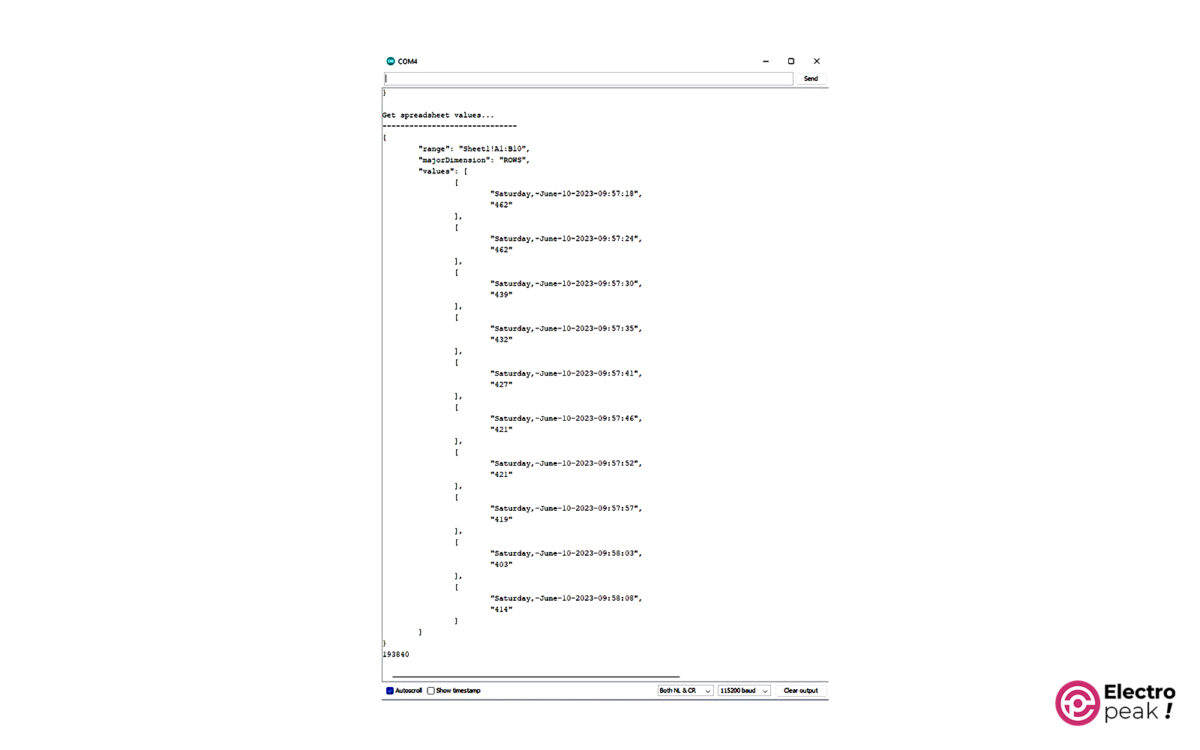
The key parts of the output printed in the serial port are as follows:
Connecting to Wi-Fi...
Connected with IP: 192.168.***.***

Token info: type = OAuth2.0 access token, status = on initializing
Token info: type = OAuth2.0 access token, status = on signing
Token info: type = OAuth2.0 access token, status = on exchange request
Token info: type = OAuth2.0 access token, status = ready

Create spreadsheet...
------------------------
{
 "spreadsheetId": "**********",
 "properties": {
 "title": "Gas Sensor Data Log",

 "spreadsheetUrl": "https://docs.google.com/spreadsheets/d/1vIeFO58uNubRK0As6nr-iJrRRYMdxR2-NhkrHE0rihE/edit"
}

The spreadsheet URL
https://docs.google.com/spreadsheets/d/1vIeFO58uNubRK0As6nr-iJrRRYMdxR2-NhkrHE0rihE/edit

Update spreadsheet values...
------------------------------
{
 "spreadsheetId": "1vIeFO58uNubRK0As6nr-iJrRRYMdxR2-NhkrHE0rihE",
 "updatedRange": "Sheet1!A1:B1",
 "updatedRows": 1,
 "updatedColumns": 2,
 "updatedCells": 2
}

Update spreadsheet values...
------------------------------
{
 "spreadsheetId": "1vIeFO58uNubRK0As6nr-iJrRRYMdxR2-NhkrHE0rihE",
 "updatedRange": "Sheet1!A1:B2",
 "updatedRows": 2,
 "updatedColumns": 2,
 "updatedCells": 4
}

Update spreadsheet values...
------------------------------
{
 "spreadsheetId": "1vIeFO58uNubRK0As6nr-iJrRRYMdxR2-NhkrHE0rihE",
 "updatedRange": "Sheet1!A1:B3",
 "updatedRows": 3,
 "updatedColumns": 2,
 "updatedCells": 6
}

Update spreadsheet values...
------------------------------
{
 "spreadsheetId": "1vIeFO58uNubRK0As6nr-iJrRRYMdxR2-NhkrHE0rihE",
 "updatedRange": "Sheet1!A1:B4",
 "updatedRows": 4,
 "updatedColumns": 2,
 "updatedCells": 8
}

Update spreadsheet values...
------------------------------
{
 "spreadsheetId": "1vIeFO58uNubRK0As6nr-iJrRRYMdxR2-NhkrHE0rihE",
 "updatedRange": "Sheet1!A1:B5",
 "updatedRows": 5,
 "updatedColumns": 2,
 "updatedCells": 10
}

Update spreadsheet values...
------------------------------
{
 "spreadsheetId": "1vIeFO58uNubRK0As6nr-iJrRRYMdxR2-NhkrHE0rihE",
 "updatedRange": "Sheet1!A1:B6",
 "updatedRows": 6,
 "updatedColumns": 2,
 "updatedCells": 12
}

Update spreadsheet values...
------------------------------
{
 "spreadsheetId": "1vIeFO58uNubRK0As6nr-iJrRRYMdxR2-NhkrHE0rihE",
 "updatedRange": "Sheet1!A1:B7",
 "updatedRows": 7,
 "updatedColumns": 2,
 "updatedCells": 14
}

Update spreadsheet values...
------------------------------
{
 "spreadsheetId": "1vIeFO58uNubRK0As6nr-iJrRRYMdxR2-NhkrHE0rihE",
 "updatedRange": "Sheet1!A1:B8",
 "updatedRows": 8,
 "updatedColumns": 2,
 "updatedCells": 16
}

Update spreadsheet values...
------------------------------
{
 "spreadsheetId": "1vIeFO58uNubRK0As6nr-iJrRRYMdxR2-NhkrHE0rihE",
 "updatedRange": "Sheet1!A1:B9",
 "updatedRows": 9,
 "updatedColumns": 2,
 "updatedCells": 18
}

Update spreadsheet values...
------------------------------
{
 "spreadsheetId": "1vIeFO58uNubRK0As6nr-iJrRRYMdxR2-NhkrHE0rihE",
 "updatedRange": "Sheet1!A1:B10",
 "updatedRows": 10,
 "updatedColumns": 2,
 "updatedCells": 20
}

Get spreadsheet values...
------------------------------
{
 "range": "Sheet1!A1:B10",
 "majorDimension": "ROWS",
 "values": [
 [
 "Saturday,-June-10-2023-09:57:18",
 "462"
 ],
 [
 "Saturday,-June-10-2023-09:57:24",
 "462"
 ],
 [
 "Saturday,-June-10-2023-09:57:30",
 "439"
 ],
 [
 "Saturday,-June-10-2023-09:57:35",
 "432"
 ],
 [
 "Saturday,-June-10-2023-09:57:41",
 "427"
 ],
 [
 "Saturday,-June-10-2023-09:57:46",
 "421"
 ],
 [
 "Saturday,-June-10-2023-09:57:52",
 "421"
 ],
 [
 "Saturday,-June-10-2023-09:57:57",
 "419"
 ],
 [
 "Saturday,-June-10-2023-09:58:03",
 "403"
 ],
 [
 "Saturday,-June-10-2023-09:58:08",
 "414"
 ]
 ]
}
193840
To verify the values, compare the numbers entered in Google Sheets with those displayed in the serial monitor.
The files created by the codes in this tutorial are automatically shared with your account.
Step 6: Google Sheets Functions
For example, the code below adds up the numbers in cells A1 to A5 and inserts the result in the cell located in the first row and second column.
valueRange.set("values/[0]/[1]", "=SUM(A1:A5)");
Or to calculate the average of the same numbers, you can use the following code. The calculated number will be inserted in the cell located in the third row and second column.
valueRange.set("values/[2]/[1]", "=AVERAGE(A1:A5)");
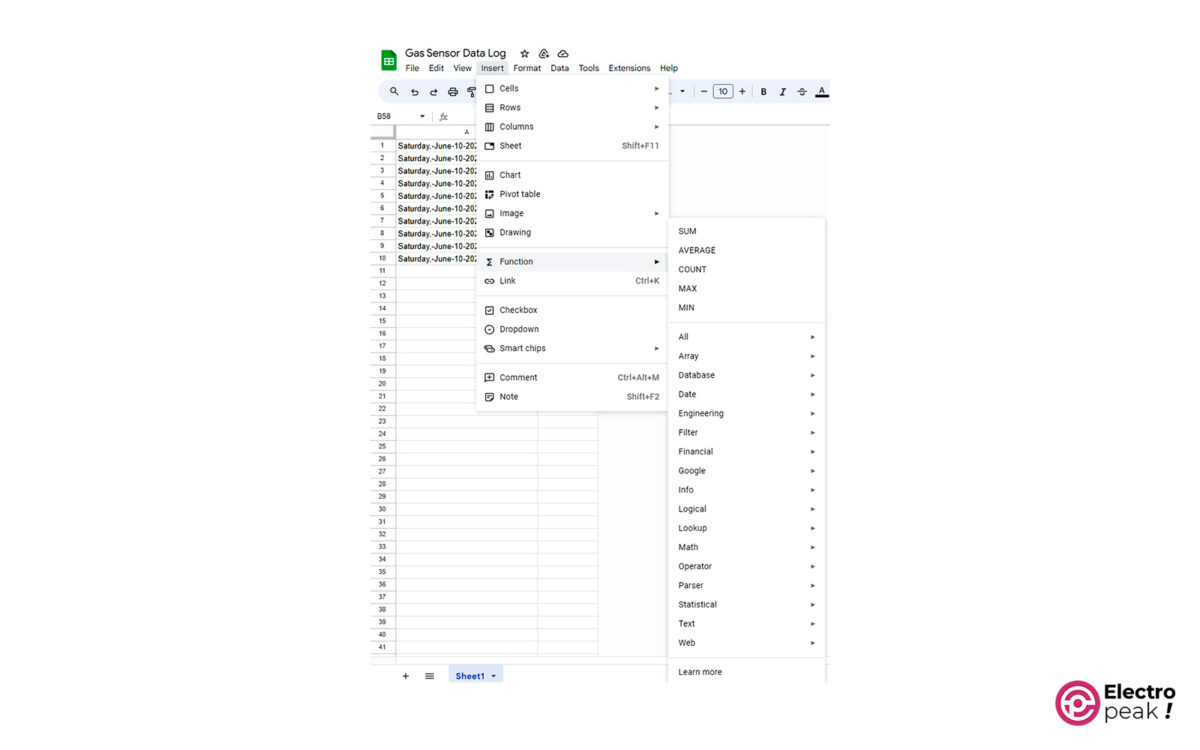
To explore all the available functions in Google Sheets, open the file in your browser and navigate to the Insert -> Function section (see the image below).
You can access all available Google Sheets files from this link.
Method 2: Logging Data from ESP32 to Google Sheets with Google Apps Script
In the second method, we use the BME680 temperature and humidity sensor instead of the MQ9 sensor.
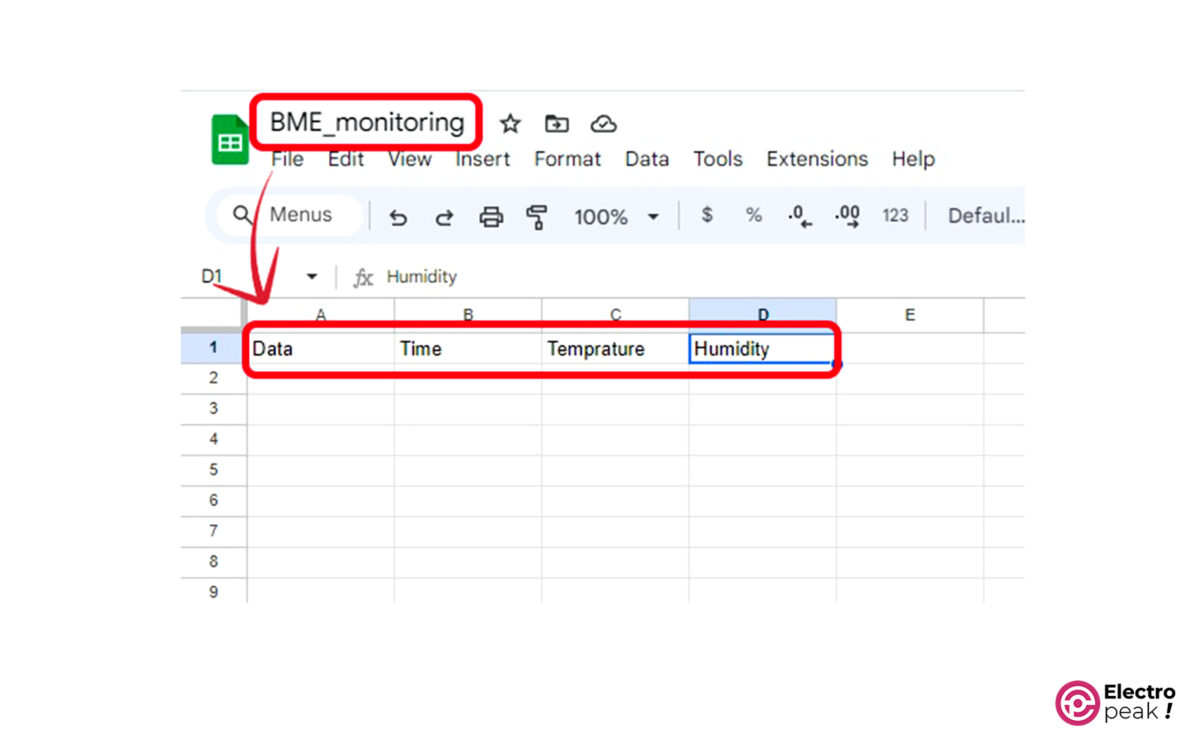
Step 1: Creating a Sheet
First, we need to create a sheet: open Google Sheets, create a new sheet, and specify the file name and column titles.
Step 2: Creating a Script
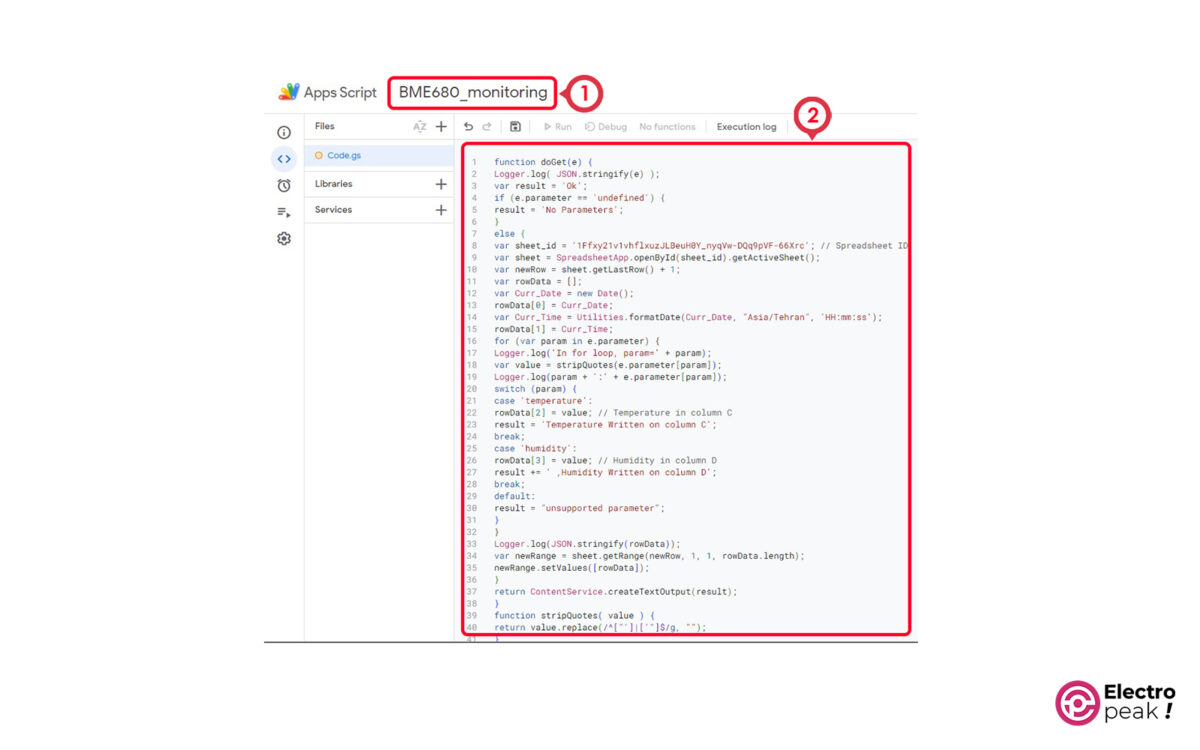
1- Go to the menu bar and select “Extensions,” and then click on “Apps Script” to open a new script.

2- Copy the following code into the opened page:
function doGet(e) {
Logger.log( JSON.stringify(e) );
var result = 'Ok';
if (e.parameter == 'undefined') {
result = 'No Parameters';
}
else {
var sheet_id = '1Ffxy21v1vhflxuzJLBeuH0Y_nyqVw-DQq9pVF-66Xrc'; // Spreadsheet ID
var sheet = SpreadsheetApp.openById(sheet_id).getActiveSheet();
var newRow = sheet.getLastRow() + 1;
var rowData = [];
var Curr_Date = new Date();
rowData[0] = Curr_Date;
var Curr_Time = Utilities.formatDate(Curr_Date, "Asia/Tehran", 'HH:mm:ss');
rowData[1] = Curr_Time;
for (var param in e.parameter) {
Logger.log('In for loop, param=' + param);
var value = stripQuotes(e.parameter[param]);
Logger.log(param + ':' + e.parameter[param]);
switch (param) {
case 'temperature':
rowData[2] = value; // Temperature in column C
result = 'Temperature Written on column C';
break;
case 'humidity':
rowData[3] = value; // Humidity in column D
result += ' ,Humidity Written on column D';
break;
default:
result = "unsupported parameter";
}
}
Logger.log(JSON.stringify(rowData));
var newRange = sheet.getRange(newRow, 1, 1, rowData.length);
newRange.setValues([rowData]);
}
return ContentService.createTextOutput(result);
}
function stripQuotes( value ) {
return value.replace(/^["']|['"]$/g, "");
}
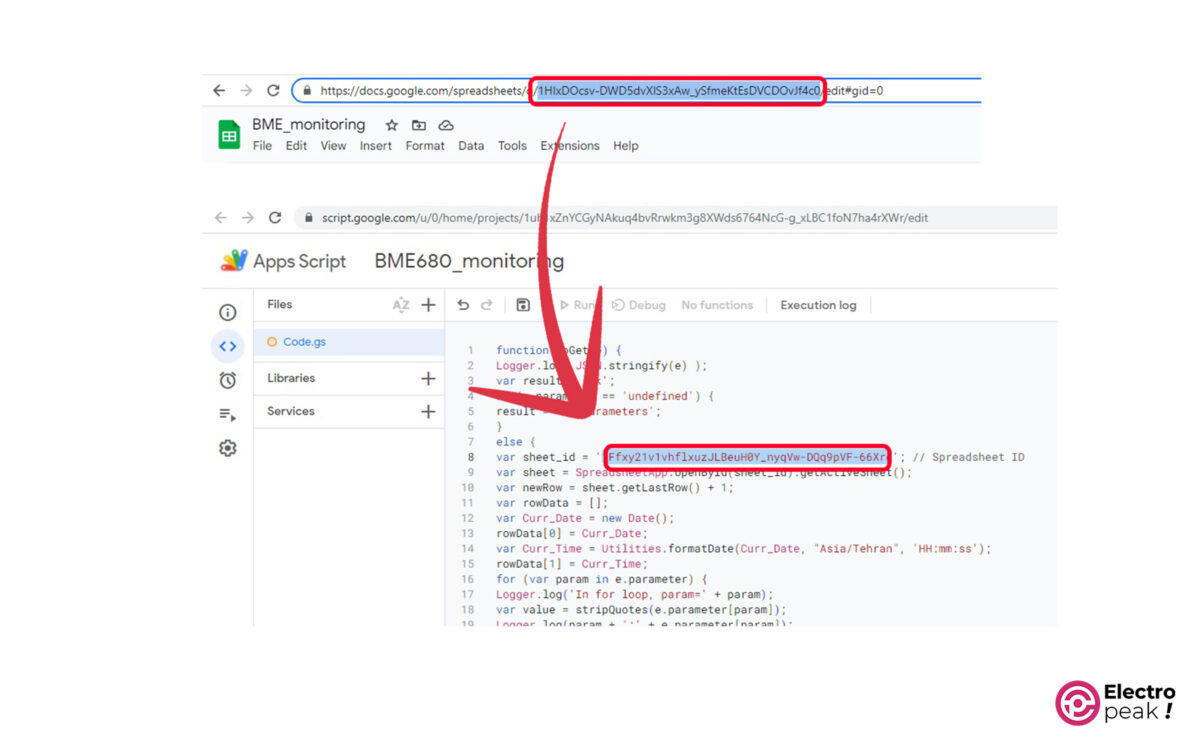
3- Copy the sheet ID and paste it into the Script code (as shown in the image below).
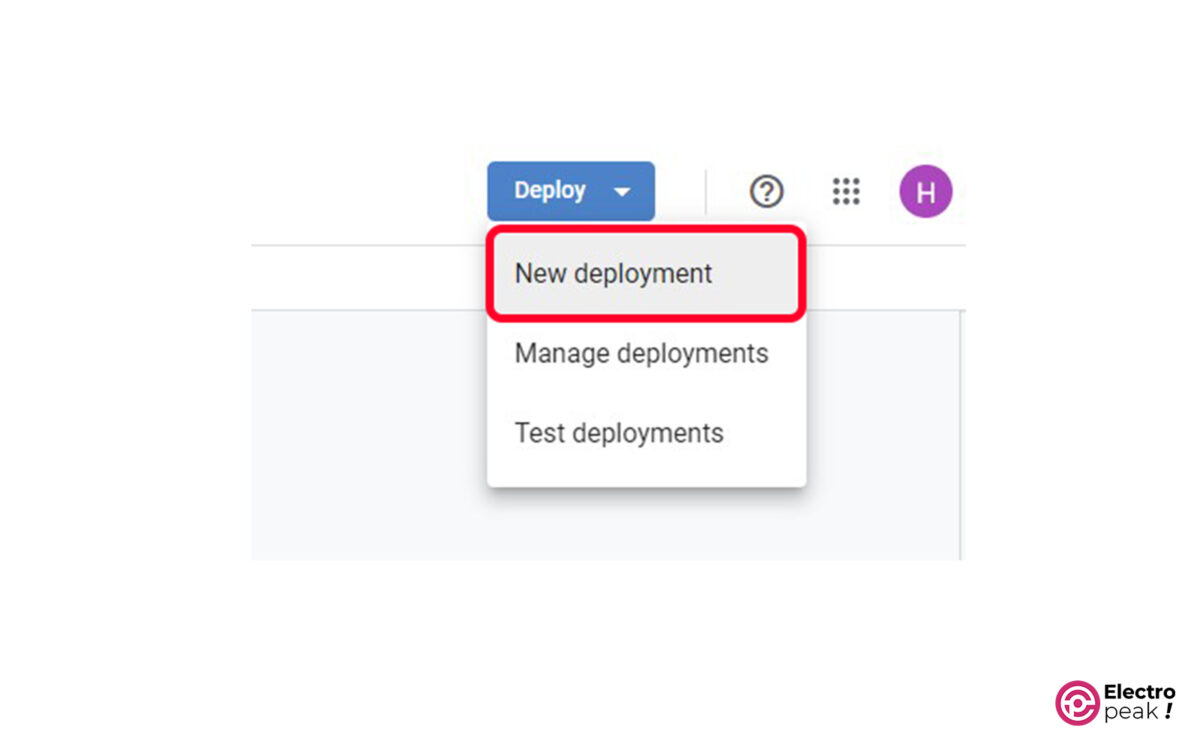
4- Go to Save -> Deploy -> New deployment.
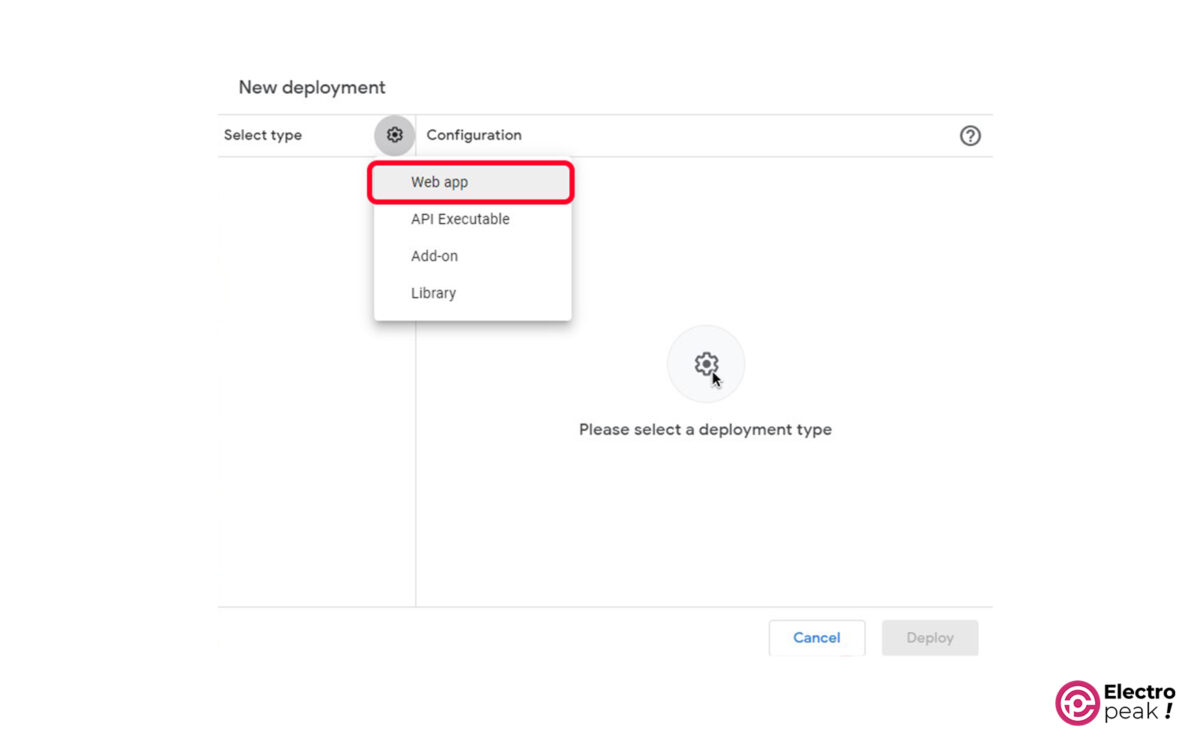
5- In the “Select type” section, click on “Web app.”
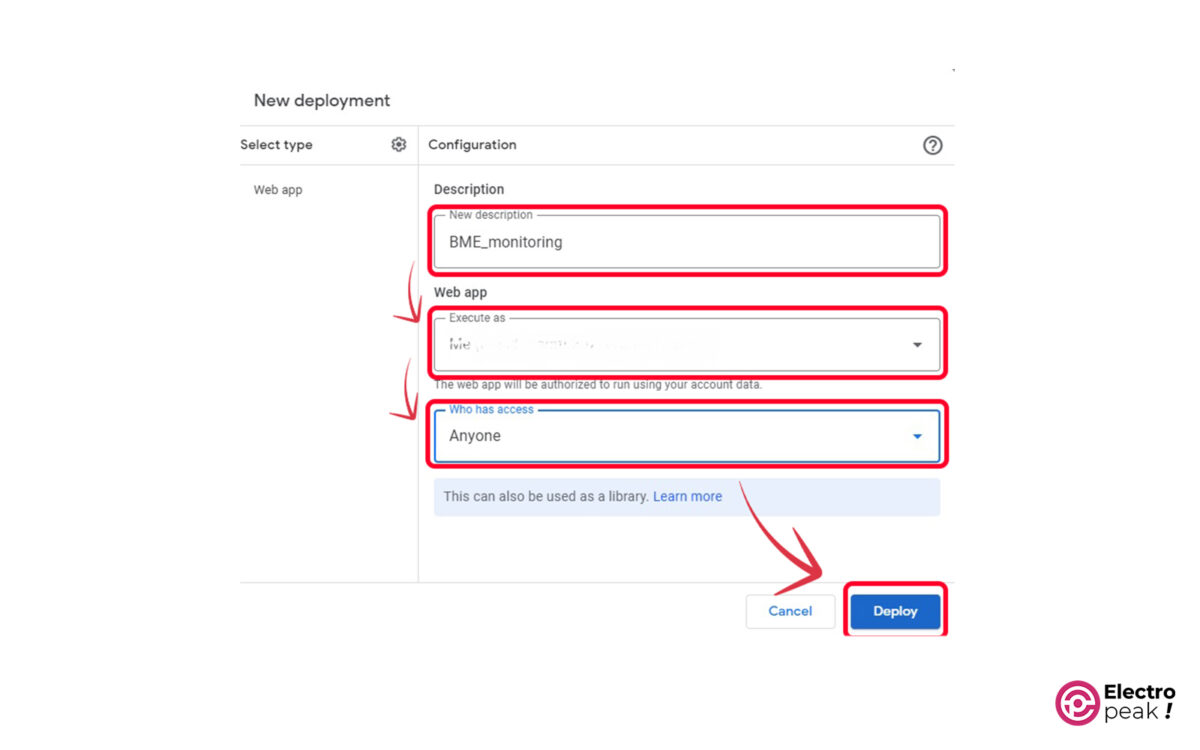
6- Configure “Description” and “Who has access” as shown in the image below, then click on “Deploy” (the “Description” is optional).
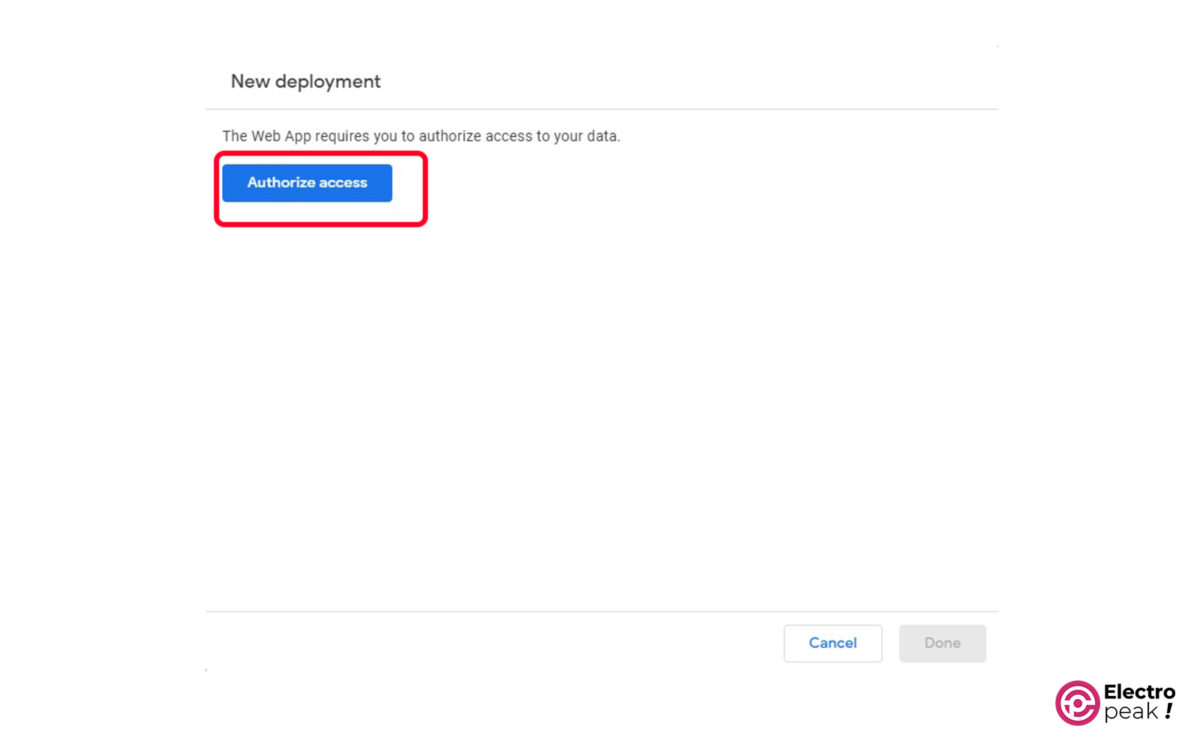
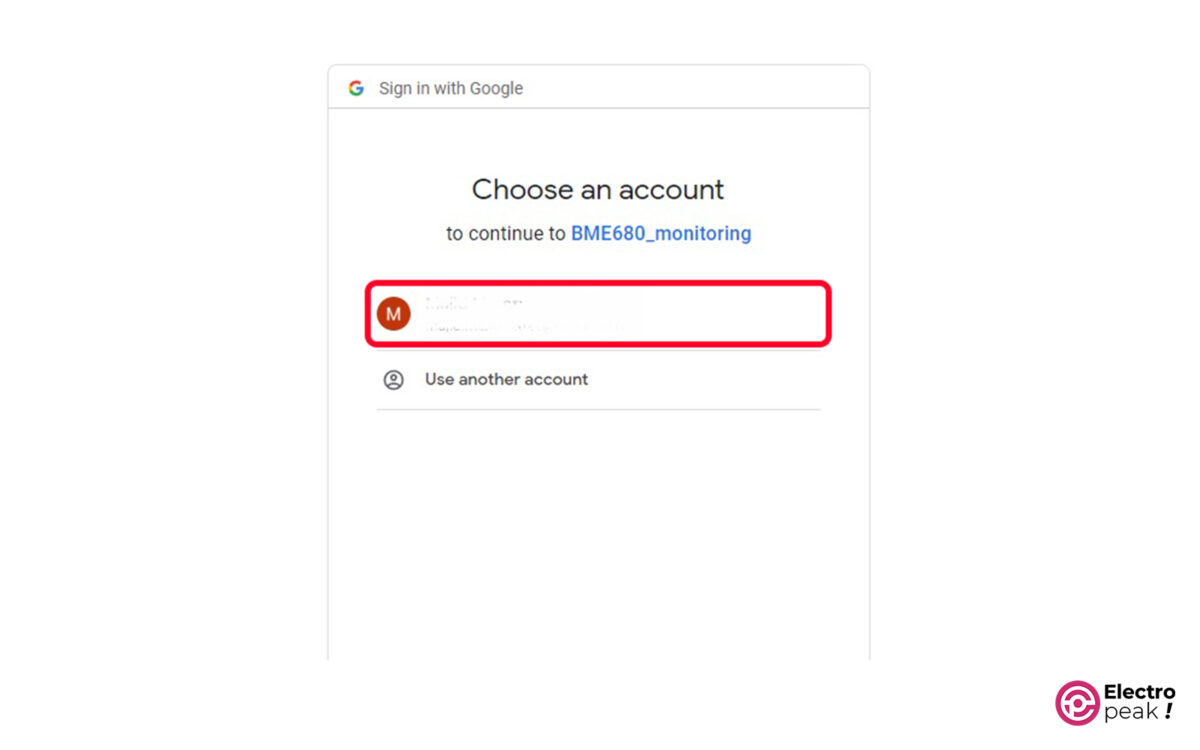
7- Click on “Authorize access” to select your Google account.
8- If you face the “Google Hasn’t Verified This App” error, click on “Advanced,” select the “unsafe” option, and click on “Allow.”
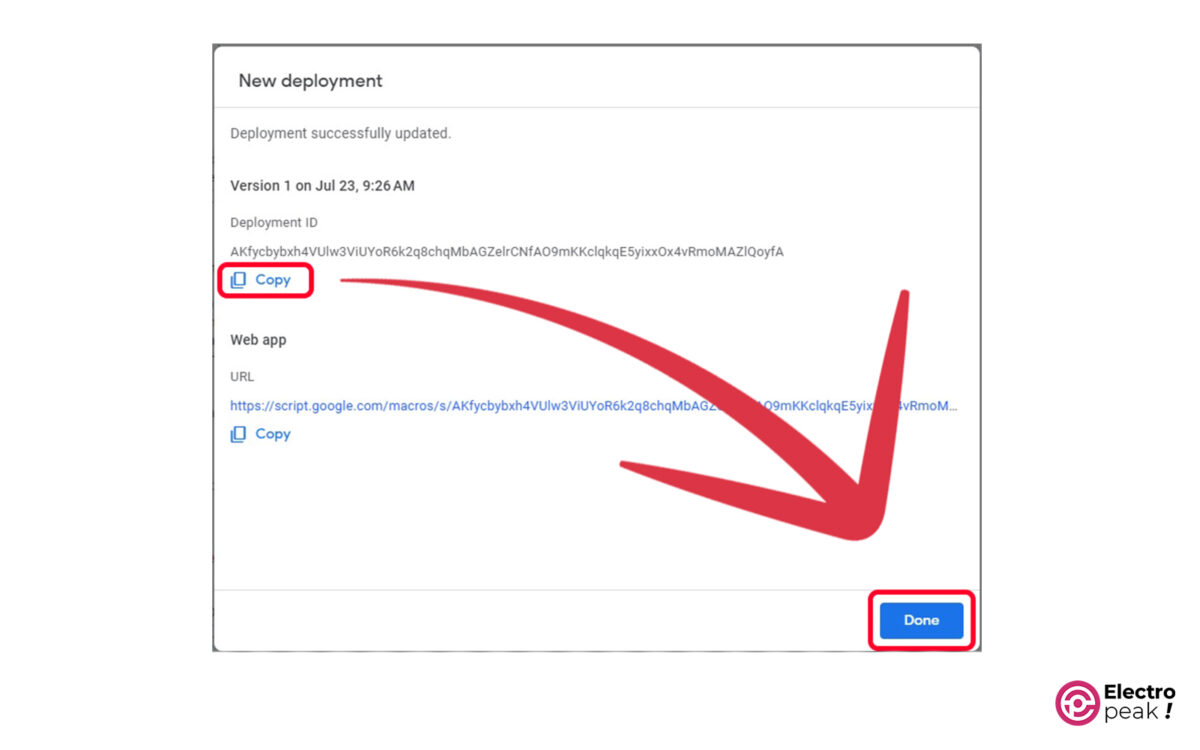
9- You will see a “Deployment ID” and a “Web app URL.” Copy and save the “Deployment ID” in a safe place.
Code Cracking
We first copy and paste the desired Sheet ID. And in the next line, we allow the script page to access our Sheet using this ID.
var sheet_id = '1Ffxy21v1vhflxuzJLBeuH0Y_nyqVw-DQq9pVF-66Xrc'; // Spreadsheet ID
var sheet = SpreadsheetApp.openById(sheet_id).getActiveSheet();
Next, we take the current date and store it in a variable, which is then inserted into column A of the desired Sheet. After that, we retrieve the desired region’s time zone and save it in column B.
var Curr_Date = new Date();
rowData[0] = Curr_Date;
var Curr_Time = Utilities.formatDate(Curr_Date, "Asia/China", 'HH:mm:ss');
rowData[1] = Curr_Time;
Finally, we obtain the temperature and humidity variables from ESP32 and print them in columns C and D of the sheet.
case 'temperature':
rowData[2] = value;
result = 'Temperature Written on column C';
break;
case 'humidity':
rowData[3] = value;
result += ' ,Humidity Written on column D';
break;
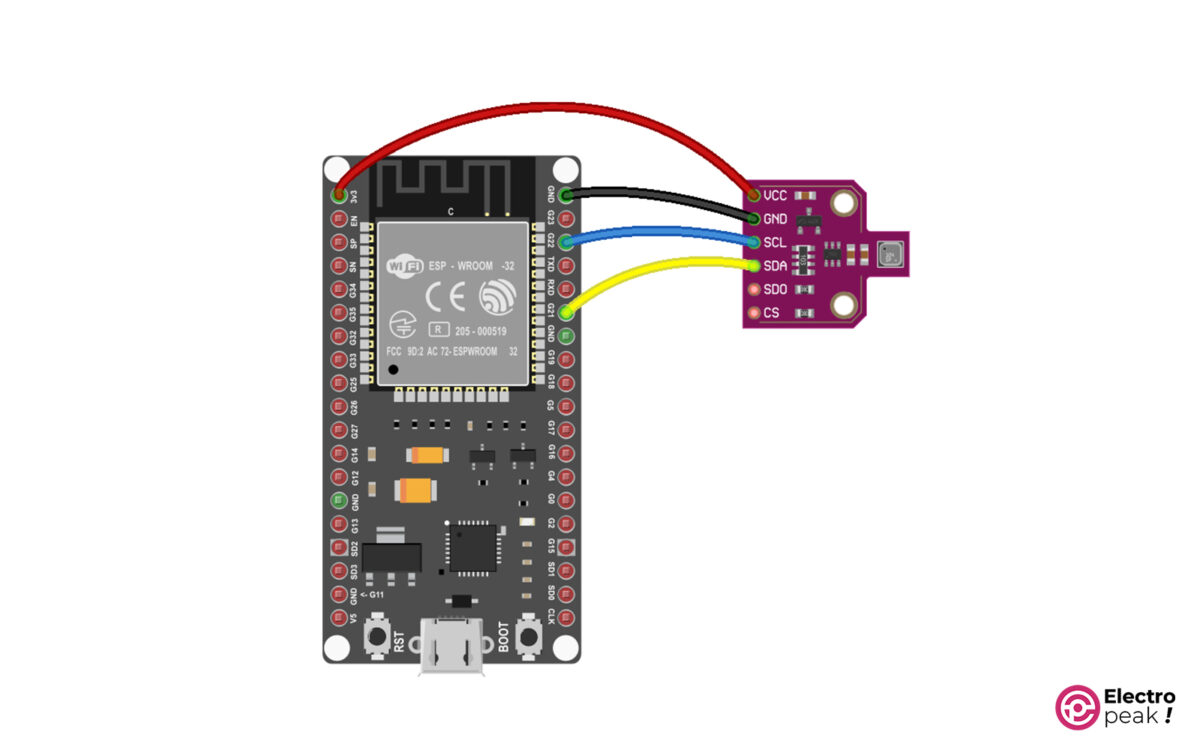
Step 3: Wiring
Connect the wires as shown below.
Step 4: Uploading Code on ESP32
Open the Arduino IDE software. After selecting the appropriate port and board, clear the entire page and replace it with the following code.
#if defined(ESP32) || defined(ARDUINO_RASPBERRY_PI_PICO_W)
#include <WiFi.h>
#elif defined(ESP8266)
#include <ESP8266WiFi.h>
#endif
#include <WiFiClientSecure.h>
#include <Wire.h>
#include <Adafruit_Sensor.h>
#include "Adafruit_BME680.h"
#define SEALEVELPRESSURE_HPA (1013.25)
Adafruit_BME680 bme; // I2C
#define ON_Board_LED 2 //--> Defining an On Board LED, used for indicators when the process of connecting to a wifi router
const char* ssid = "Caferobot"; //--> Your wifi name or SSID.
const char* password = "**********"; //--> Your wifi password.

//----------------------------------------Host & httpsPort
const char* host = "script.google.com";
const int httpsPort = 443;
//----------------------------------------

WiFiClientSecure client; //--> Create a WiFiClientSecure object.

String GAS_ID = "AKfycbxGBAOSGsonYMhC44spCtQUwFCW3C-0P2NdZiAmrRFXMzpSB2DKD9cF8hL7F4QCRg7C"; //--> spreadsheet script ID

void setup() {
 // put your setup code here, to run once:
 Serial.begin(115200);
 delay(500);
 WiFi.begin(ssid, password); //--> Connect to your WiFi router
 Serial.println("");
 pinMode(ON_Board_LED,OUTPUT); //--> On Board LED port Direction output
 digitalWrite(ON_Board_LED, HIGH); //--> Turn off Led On Board
 //----------------------------------------Wait for connection
 Serial.print("Connecting");
 while (WiFi.status() != WL_CONNECTED) {
 Serial.print(".");
 //----------------------------------------Make the On Board Flashing LED on the process of connecting to the wifi router.
 digitalWrite(ON_Board_LED, LOW);
 delay(250);
 digitalWrite(ON_Board_LED, HIGH);
 delay(250);
 //----------------------------------------
 }
 //----------------------------------------
 digitalWrite(ON_Board_LED, HIGH); //--> Turn off the On Board LED when it is connected to the wifi router.
 Serial.println("");
 Serial.print("Successfully connected to : ");
 Serial.println(ssid);
 Serial.print("IP address: ");
 Serial.println(WiFi.localIP());
 Serial.println();
 //----------------------------------------

 while (!Serial);
 Serial.println(F("BME680 test"));
 if (!bme.begin()) {
 Serial.println("Could not find a valid BME680 sensor, check wiring!");
 while (1);
 }
 // Set up oversampling and filter initialization
 bme.setTemperatureOversampling(BME680_OS_8X);
 bme.setHumidityOversampling(BME680_OS_2X);
 bme.setPressureOversampling(BME680_OS_4X);
 bme.setIIRFilterSize(BME680_FILTER_SIZE_3);
 bme.setGasHeater(320, 150); // 320*C for 150 ms
 client.setInsecure();
}

void loop() {
 // Reading temperature or humidity takes about 250 milliseconds!
 // Sensor readings may also be up to 2 seconds 'old' (its a very slow sensor)
 if (! bme.performReading()) {
 Serial.println("Failed to perform reading :(");
 return;
 }
 Serial.print("Temperature = ");
 Serial.print(bme.temperature);
 Serial.println(" *C");
 Serial.print("Pressure = ");
 Serial.print(bme.pressure / 100.0);
 Serial.println(" hPa");
 Serial.print("Humidity = ");
 Serial.print(bme.humidity);
 Serial.println(" %");
 Serial.print("Gas = ");
 Serial.print(bme.gas_resistance / 1000.0);
 Serial.println(" KOhms");

 Serial.print("Approx. Altitude = ");
 Serial.print(bme.readAltitude(SEALEVELPRESSURE_HPA));
 Serial.println(" m");
 Serial.println();
int h = bme.humidity;
 float t = bme.temperature;
 sendData(t, h); //--> Calls the sendData Subroutine
}

// Subroutine for sending data to Google Sheets
void sendData(float tem, int hum) {
 Serial.println("==========");
 Serial.print("connecting to ");
 Serial.println(host);
 //----------------------------------------Connect to Google host
 if (!client.connect(host, httpsPort)) {
 Serial.println("connection failed");
 return;
 }
 //----------------------------------------

 //----------------------------------------Processing data and sending data
 String string_temperature = String(tem);
 // String string_temperature = String(tem, DEC);
 String string_humidity = String(hum, DEC);
 String url = "/macros/s/" + GAS_ID + "/exec?temperature=" + string_temperature + "&humidity=" + string_humidity;
 Serial.print("requesting URL: ");
 Serial.println(url);

 client.print(String("GET ") + url + " HTTP/1.1\r\n" +
 "Host: " + host + "\r\n" +
 "User-Agent: BuildFailureDetectorESP32 \r\n" +
 "Connection: close\r\n\r\n");

 Serial.println("request sent");
 //----------------------------------------

 //----------------------------------------Checking whether the data was sent successfully or not
 while (client.connected()) {
 String line = client.readStringUntil('\n');
 if (line == "\r") {
 Serial.println("headers received");
 break;
 }
 }
 String line = client.readStringUntil('\n');
 if (line.startsWith("{\"state\":\"success\"")) {
 Serial.println("ESP32 /Arduino CI successfull!");
 } else {
 Serial.println("ESP32 /Arduino CI has failed");
 }
 Serial.print("reply was : ");
 Serial.println(line);
 Serial.println("closing connection");
 Serial.println("==========");
 Serial.println();
}
In the GAS_ID section, paste the Deployment ID that you previously saved. In addition, enter your information in the “SSID” and “password” sections and then upload the code.

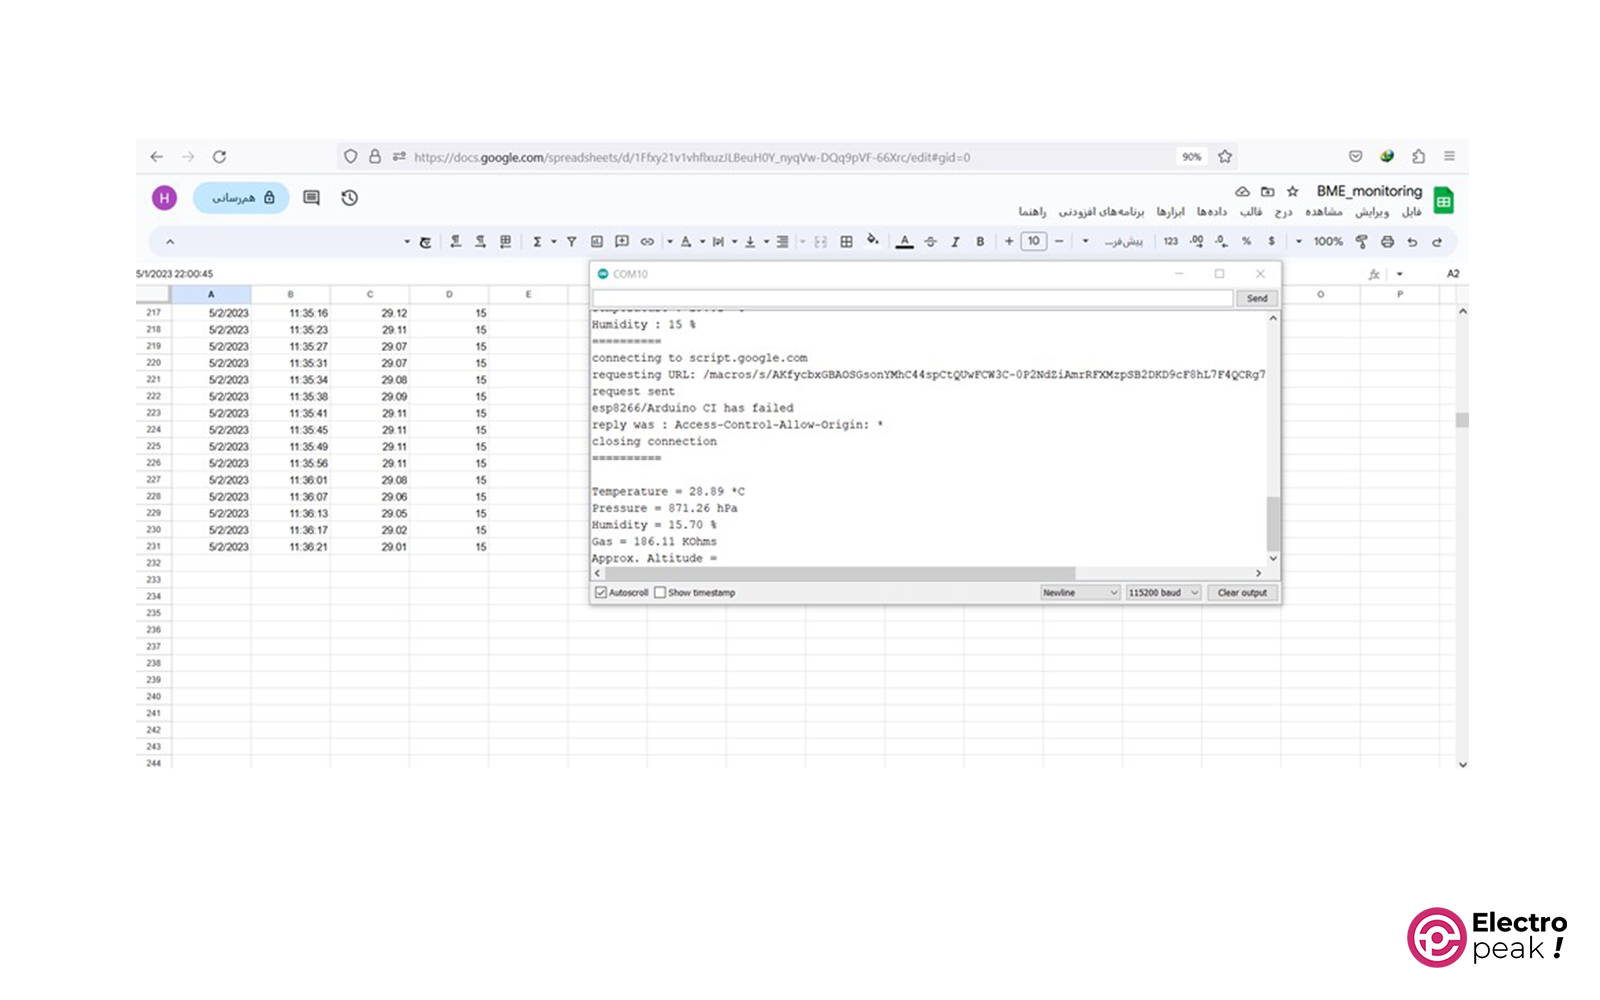
Finally, get back to the created sheet to view the desired results, including temperature, humidity, time, and date. You can also monitor this data through the serial monitor window, as well as on mobile phones and within Google Sheets.
Code Cracking
Now, let’s break down the Arduino code into different sections and briefly explain the purpose of each one.
First, we define the required libraries. Obviously, the libraries will change if you use other sensors.
#if defined(ESP32) || defined(ARDUINO_RASPBERRY_PI_PICO_W)
#include <WiFi.h>
#elif defined(ESP8266)
#include <ESP8266WiFi.h>
#endif
#include <WiFiClientSecure.h>
#include <Wire.h>
#include <Adafruit_Sensor.h>
#include "Adafruit_BME680.h"
In the lines below, you should enter the WiFi specifications so that ESP32 can connect to the WiFi network.
const char* ssid = "ElectroPeak"; //--> Your wifi name or SSID.
const char* password = "**********"; //--> Your wifi password.
Make sure to carefully replace the “Deployment ID” according to the procedure mentioned earlier.
String GAS_ID = "AKfycbxGBAOSGsonYMhC44spCtQUwFCW3C-0P2NdZiAmrRFXMzpSB2DKD9cF8hL7F4QCRg7C"; //--> spreadsheet script ID
ESP connects to the WiFi network we have specified.
WiFi.begin(ssid, password); //--> Connect to your WiFi router
If the WiFi connection is made correctly, you will see the network name and IP in the Serial Monitor window.
  Serial.println("");
  Serial.print("Successfully connected to : ");
  Serial.println(ssid);
  Serial.print("IP address: ");
  Serial.println(WiFi.localIP());
  Serial.println();
Now, we measure temperature, air pressure, humidity, pollutant gases, and height above mean sea level, and print them in the serial monitor.
  Serial.print("Temperature = ");
  Serial.print(bme.temperature);
  Serial.println(" *C");
  Serial.print("Pressure = ");
  Serial.print(bme.pressure / 100.0);
  Serial.println(" hPa");
  Serial.print("Humidity = ");
  Serial.print(bme.humidity);
  Serial.println(" %");
  Serial.print("Gas = ");
  Serial.print(bme.gas_resistance / 1000.0);
  Serial.println(" KOhms");

  Serial.print("Approx. Altitude = ");
  Serial.print(bme.readAltitude(SEALEVELPRESSURE_HPA));
  Serial.println(" m");
Temperature and humidity are measured, stored in variables “t” and “h,” and then sent to Google Sheets by the “sendData” function.
float t = bme.temperature;
int h = bme.humidity;
sendData(t, h); //--> Calls the sendData Subroutine
In the lines below—which are related to the definition of the sendDate function—first, the temperature and humidity variables are defined as strings. Next, the required URL is assigned to a variable. Finally, the desired data is sent to Google Sheets using the “client.print” command.
String string_temperature = String(tem);
 String string_humidity = String(hum, DEC);
 String url = "/macros/s/" + GAS_ID + "/exec?temperature=" + string_temperature + "&humidity=" + string_humidity;
 Serial.print("requesting URL: ");
 Serial.println(url);
 client.print(String("GET ") + url + " HTTP/1.1\r\n" +
 "Host: " + host + "\r\n" +
 "User-Agent: BuildFailureDetectorESP32 \r\n" +
 "Connection: close\r\n\r\n");
What’s next?
In this tutorial, we have made a data exchange system between ESP32 and Google Sheets using the “Google Sheets API” and “Google Apps Script” methods. We have also stored the date and sensor data in the created sheet.
The created sheet can also handle various complex tasks, such as:
• Sending any written data to Google Sheets—no matter what format. This data can come from sensor outputs or other modules.
• Creating a “Data Logger” and analyzing its data by simply sending the sensor data to the desired sheet.
• Developing an IoT network management system by analyzing the available data.
