
Overview
What You Will Learn
- What the RFID is and how it works.
- How to use RC522 RFID module

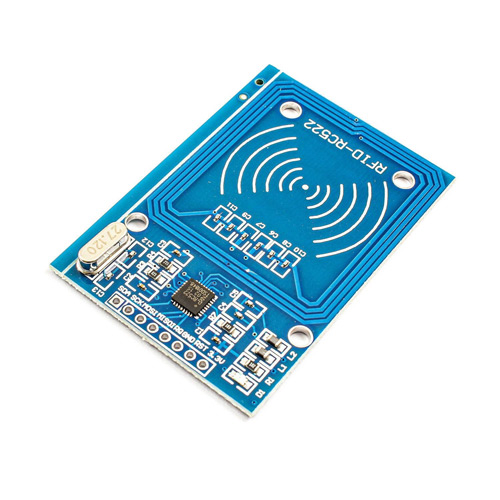
RC522 Module Features & Pinout
Radio Frequency Identification or RFID is a wireless data transfer system, to transfer data between a tag and a reader device. You have seen the applications of these systems in stores! In this case, a thin RFID tag which contains an electrical circuit is labeled to each object. When this tag is exposed to a magnetic field caused by a barcode reader device, it activates and transmits data using radio pulses. Then it is detected and removed from the system according to the emitted pulses. These modules work at different frequencies. Common frequencies for RFID technology are three frequencies: 125kHz, 13.56MHz or UHF.
RFID modules such as RC522 are used to read and write RFID cards or tags.
This module works in 13.56 MHz frequency, and it can write data on tags in addition to read them. Here are some of the features of these modules:
- Communicate with microcontrollers using serial, SPI, and I2C protocols
- up to 10 Mbit/sec data transfer rate
- 3V working voltage
- Small dimensions of 4*6 cm
You can download the datasheet of this module here.
RC522 MH RFID Module Pinout
This module has 8 pins:
- VCC: Module power supply – 3.3 V
- GND: Ground
- RST: Reset
- IRQ: Interrupt
- MISO/TX/SCL: Communication pins of SPI, serial and I2C protocols
- MOSI: SPI Communication Pin
- SCK: SPI Communication Pin
- SS/RX/SDA: Communication pins of SPI, serial and I2C protocols
You can see pinout of this module in the image below.

Required Materials
Hardware Components
Software Apps
Reading the RFID Cards
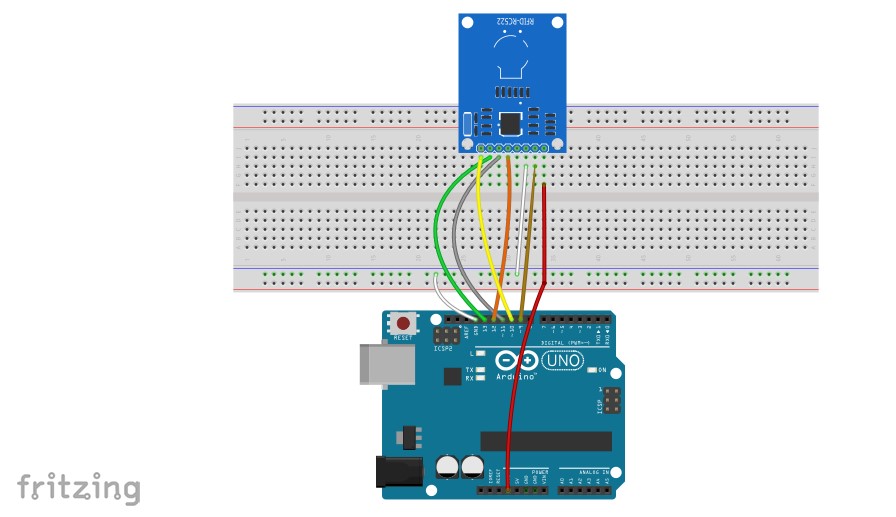
Code
/*
 *  RFID , read tags
 *  by Hanie kiani
 *  https://electropeak.com/learn/
 */

#include <SPI.h>
#include <MFRC522.h>

#define RST_PIN         9           // Configurable, see typical pin layout above
#define SS_PIN          10          // Configurable, see typical pin layout above

MFRC522 mfrc522(SS_PIN, RST_PIN);   // Create MFRC522 instance

//*****************************************************************************************//
void setup() {
  Serial.begin(9600);                                           // Initialize serial communications with the PC
  SPI.begin();                                                  // Init SPI bus
  mfrc522.PCD_Init();                                              // Init MFRC522 card
  Serial.println(F("Read personal data on a MIFARE PICC:"));    //shows in serial that it is ready to read
}

//*****************************************************************************************//
void loop() {

  // Prepare key - all keys are set to FFFFFFFFFFFFh at chip delivery from the factory.
  MFRC522::MIFARE_Key key;
  for (byte i = 0; i < 6; i++) key.keyByte[i] = 0xFF;

  //some variables we need
  byte block;
  byte len;
  MFRC522::StatusCode status;

  //-------------------------------------------

  // Reset the loop if no new card present on the sensor/reader. This saves the entire process when idle.
  if ( ! mfrc522.PICC_IsNewCardPresent()) {
    return;
  }

  // Select one of the cards
  if ( ! mfrc522.PICC_ReadCardSerial()) {
    return;
  }

  Serial.println(F("**Card Detected:**"));

  //-------------------------------------------

  mfrc522.PICC_DumpDetailsToSerial(&(mfrc522.uid)); //dump some details about the card

  //mfrc522.PICC_DumpToSerial(&(mfrc522.uid));      //uncomment this to see all blocks in hex

  //-------------------------------------------

  Serial.print(F("Name: "));

  byte buffer1[18];

  block = 4;
  len = 18;

  //------------------------------------------- GET FIRST NAME
  status = mfrc522.PCD_Authenticate(MFRC522::PICC_CMD_MF_AUTH_KEY_A, 4, &key, &(mfrc522.uid)); //line 834 of MFRC522.cpp file
  if (status != MFRC522::STATUS_OK) {
    Serial.print(F("Authentication failed: "));
    Serial.println(mfrc522.GetStatusCodeName(status));
    return;
  }

  status = mfrc522.MIFARE_Read(block, buffer1, &len);
  if (status != MFRC522::STATUS_OK) {
    Serial.print(F("Reading failed: "));
    Serial.println(mfrc522.GetStatusCodeName(status));
    return;
  }

  //PRINT FIRST NAME
  for (uint8_t i = 0; i < 16; i++)
  {
    if (buffer1[i] != 32)
    {
      Serial.write(buffer1[i]);
    }
  }
  Serial.print(" ");

  //---------------------------------------- GET LAST NAME

  byte buffer2[18];
  block = 1;

  status = mfrc522.PCD_Authenticate(MFRC522::PICC_CMD_MF_AUTH_KEY_A, 1, &key, &(mfrc522.uid)); //line 834
  if (status != MFRC522::STATUS_OK) {
    Serial.print(F("Authentication failed: "));
    Serial.println(mfrc522.GetStatusCodeName(status));
    return;
  }

  status = mfrc522.MIFARE_Read(block, buffer2, &len);
  if (status != MFRC522::STATUS_OK) {
    Serial.print(F("Reading failed: "));
    Serial.println(mfrc522.GetStatusCodeName(status));
    return;
  }

  //PRINT LAST NAME
  for (uint8_t i = 0; i < 16; i++) {
    Serial.write(buffer2[i] );
  }


  //----------------------------------------

  Serial.println(F("\n**End Reading**\n"));

  delay(1000); //change value if you want to read cards faster

  mfrc522.PICC_HaltA();
  mfrc522.PCD_StopCrypto1();
}
Detecting Tags
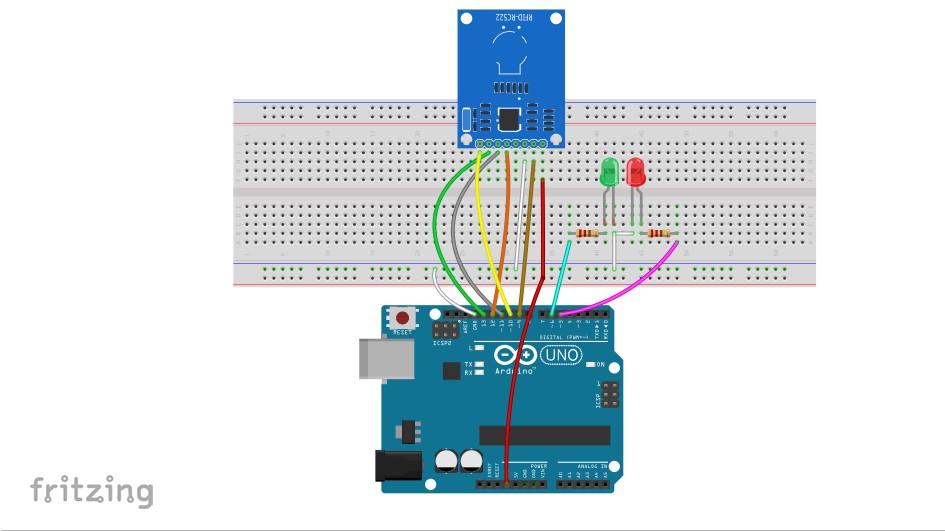
By adding the following code, you can define a specific barcode and introduces it as the standard data to Arduino. (replace it with identified tag in the first line.)
Connect a red LED and a green one to pins 8 and 7 then upload the code on your board. When tag with the specific barcode is exposed to the module, the green LED turns on indicating that the tag barcode is approved. And if the red LED turns on, it means the barcode is not known. By expanding this piece of code, you can use it in more complex projects such as door electronic lock.
if(data == (" ...identified tag... "){
  digitalWrite(8, HIGH);
  delay(3000);
  digitalWrite(8, LOW);
}
else{
  digitalWrite(7, HIGH);
  delay(3000);
  digitalWrite(7, LOW);
}
Writing Data on Tags
To write information on the card, you must first ensure that your card is Writable. UHF card is a kind of RFID card that works at high frequency and has the ability to store information so, you need these RFID cards to write the information you want on the card.
Use the same circuit as before and upload the following code on your board.
Download MFRC522 Library:
Code
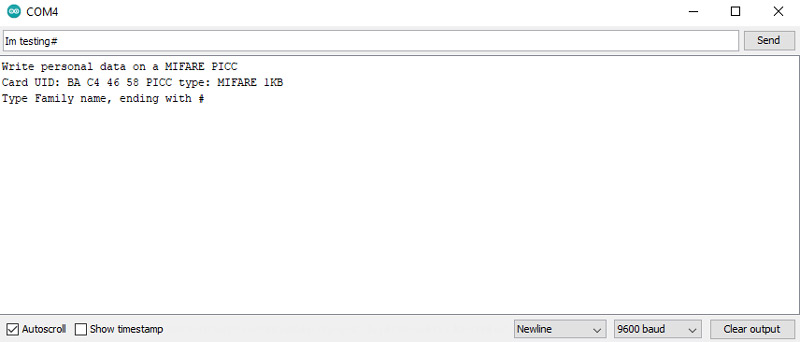
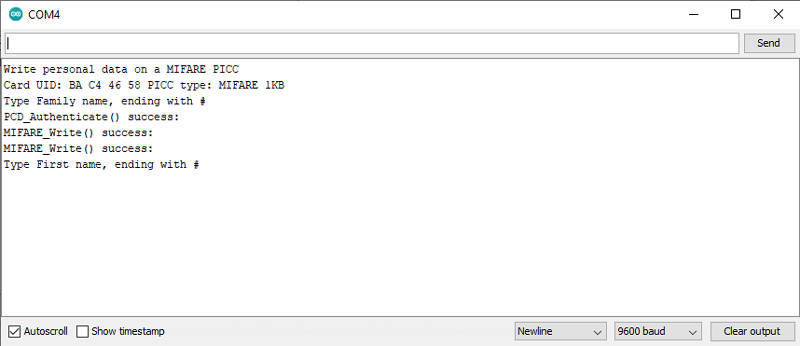
This code asks you for the information you want to save on the card after the card is detected and the card UDI is displayed. This information can consist of letters, numbers or other strings.
This information is then stored in block 1 of the card. You can write a different block each time by changing the block variable in the code.
First, upload the following code to the Arduino board.
/*
 *  RFID , read tags
 *  by Hanie kiani
 *  https://electropeak.com/learn/
 */

#include <SPI.h>
#include <MFRC522.h>

#define RST_PIN         9           // Configurable, see typical pin layout above
#define SS_PIN          10          // Configurable, see typical pin layout above

MFRC522 mfrc522(SS_PIN, RST_PIN);   // Create MFRC522 instance

void setup() {
  Serial.begin(9600);        // Initialize serial communications with the PC
  SPI.begin();               // Init SPI bus
  mfrc522.PCD_Init();        // Init MFRC522 card
  Serial.println(F("Write personal data on a MIFARE PICC "));
}

void loop() {

  // Prepare key - all keys are set to FFFFFFFFFFFFh at chip delivery from the factory.
  MFRC522::MIFARE_Key key;
  for (byte i = 0; i < 6; i++) key.keyByte[i] = 0xFF;

  // Reset the loop if no new card present on the sensor/reader. This saves the entire process when idle.
  if ( ! mfrc522.PICC_IsNewCardPresent()) {
    return;
  }

  // Select one of the cards
  if ( ! mfrc522.PICC_ReadCardSerial()) {
    return;
  }

  Serial.print(F("Card UID:"));    //Dump UID
  for (byte i = 0; i < mfrc522.uid.size; i++) {
    Serial.print(mfrc522.uid.uidByte[i] < 0x10 ? " 0" : " ");
    Serial.print(mfrc522.uid.uidByte[i], HEX);
  }
  Serial.print(F(" PICC type: "));   // Dump PICC type
  MFRC522::PICC_Type piccType = mfrc522.PICC_GetType(mfrc522.uid.sak);
  Serial.println(mfrc522.PICC_GetTypeName(piccType));

  byte buffer[34];
  byte block;
  MFRC522::StatusCode status;
  byte len;

  Serial.setTimeout(20000L) ;     // wait until 20 seconds for input from serial
  // Ask personal data: Family name
  Serial.println(F("Type Family name, ending with #"));
  len = Serial.readBytesUntil('#', (char *) buffer, 30) ; // read family name from serial
  for (byte i = len; i < 30; i++) buffer[i] = ' ';     // pad with spaces

  block = 1;
  //Serial.println(F("Authenticating using key A..."));
  status = mfrc522.PCD_Authenticate(MFRC522::PICC_CMD_MF_AUTH_KEY_A, block, &key, &(mfrc522.uid));
  if (status != MFRC522::STATUS_OK) {
    Serial.print(F("PCD_Authenticate() failed: "));
    Serial.println(mfrc522.GetStatusCodeName(status));
    return;
  }
  else Serial.println(F("PCD_Authenticate() success: "));

  // Write block
  status = mfrc522.MIFARE_Write(block, buffer, 16);
  if (status != MFRC522::STATUS_OK) {
    Serial.print(F("MIFARE_Write() failed: "));
    Serial.println(mfrc522.GetStatusCodeName(status));
    return;
  }
  else Serial.println(F("MIFARE_Write() success: "));

  block = 2;
  //Serial.println(F("Authenticating using key A..."));
  status = mfrc522.PCD_Authenticate(MFRC522::PICC_CMD_MF_AUTH_KEY_A, block, &key, &(mfrc522.uid));
  if (status != MFRC522::STATUS_OK) {
    Serial.print(F("PCD_Authenticate() failed: "));
    Serial.println(mfrc522.GetStatusCodeName(status));
    return;
  }

  // Write block
  status = mfrc522.MIFARE_Write(block, &buffer[16], 16);
  if (status != MFRC522::STATUS_OK) {
    Serial.print(F("MIFARE_Write() failed: "));
    Serial.println(mfrc522.GetStatusCodeName(status));
    return;
  }
  else Serial.println(F("MIFARE_Write() success: "));

  // Ask personal data: First name
  Serial.println(F("Type First name, ending with #"));
  len = Serial.readBytesUntil('#', (char *) buffer, 20) ; // read first name from serial
  for (byte i = len; i < 20; i++) buffer[i] = ' ';     // pad with spaces

  block = 4;
  //Serial.println(F("Authenticating using key A..."));
  status = mfrc522.MIFARE_Write(block, &buffer[16], 16);
  if (status != MFRC522::STATUS_OK) {
    Serial.print(F("PCD_Authenticate() failed: "));
    Serial.println(mfrc522.GetStatusCodeName(status));
    return;
  }

  // Write block
  status = mfrc522.MIFARE_Write(block, buffer, 16);
  if (status != MFRC522::STATUS_OK) {
    Serial.print(F("MIFARE_Write() failed: "));
    Serial.println(mfrc522.GetStatusCodeName(status));
    return;
  }
  else Serial.println(F("MIFARE_Write() success: "));

  block = 5;
  //Serial.println(F("Authenticating using key A..."));
  status = mfrc522.PCD_Authenticate(MFRC522::PICC_CMD_MF_AUTH_KEY_A, block, &key, &(mfrc522.uid));
  if (status != MFRC522::STATUS_OK) {
    Serial.print(F("PCD_Authenticate() failed: "));
    Serial.println(mfrc522.GetStatusCodeName(status));
    return;
  }

  // Write block
  status = mfrc522.MIFARE_Write(block, &buffer[16], 16);
  if (status != MFRC522::STATUS_OK) {
    Serial.print(F("MIFARE_Write() failed: "));
    Serial.println(mfrc522.GetStatusCodeName(status));
    return;
  }
  else Serial.println(F("MIFARE_Write() success: "));


  Serial.println(" ");
  mfrc522.PICC_HaltA(); // Halt PICC
  mfrc522.PCD_StopCrypto1();  // Stop encryption on PCD

}
What’s Next?
- Try to implement an electronic parking system.
By adding an ultrasound module (like SRF05), create a security system that alarms when an object is detected around, and the alarms only turn off when the right RFID tag is detected.

Comments (2)
Is it possible to interface two RFID moudle interfacing in Arduino Uno board
http://bigbelectronics.in/product.php?product=arduino-uno-r3-atmega328p
hi,
yes it’s possible. SPI interface can handle multiple slaves with one master.