

Introduction
Welcome to the world of innovation with Raspberry Pi Pico! This article explores voice recognition and wake word detection using machine learning techniques. Discover how to leverage Raspberry Pi Pico’s capabilities to create intelligent devices that respond to voice commands. Join us as we explore the exciting possibilities for smart home technology, robotics, and more.
Imagine you could use the machine learning capability on microcontrollers such as Raspberry Pi Pico. By integrating the power of machine learning and Raspberry Pi Pico using Edge Impulse, you can open up a whole new world of possibilities.
Raspberry Pi Pico is a low-cost yet powerful platform, and Edge Impulse provides a visual development environment for training and deploying machine learning models. Together, they can bring your ideas to life, in ways you never imagined.
What You Will Learn
- The concept of machine learning
- How to create models from files
- How to implement machine learning on Raspberry Pi Pico
How to Implement Machine Learning on Raspberry Pi Pico
Before we get into building the machine learning models, let’s start with the basics of machine learning. Machine learning is a subset of AI, focusing on algorithms and models that can learn from data and make predictions or decisions without explicit programming.
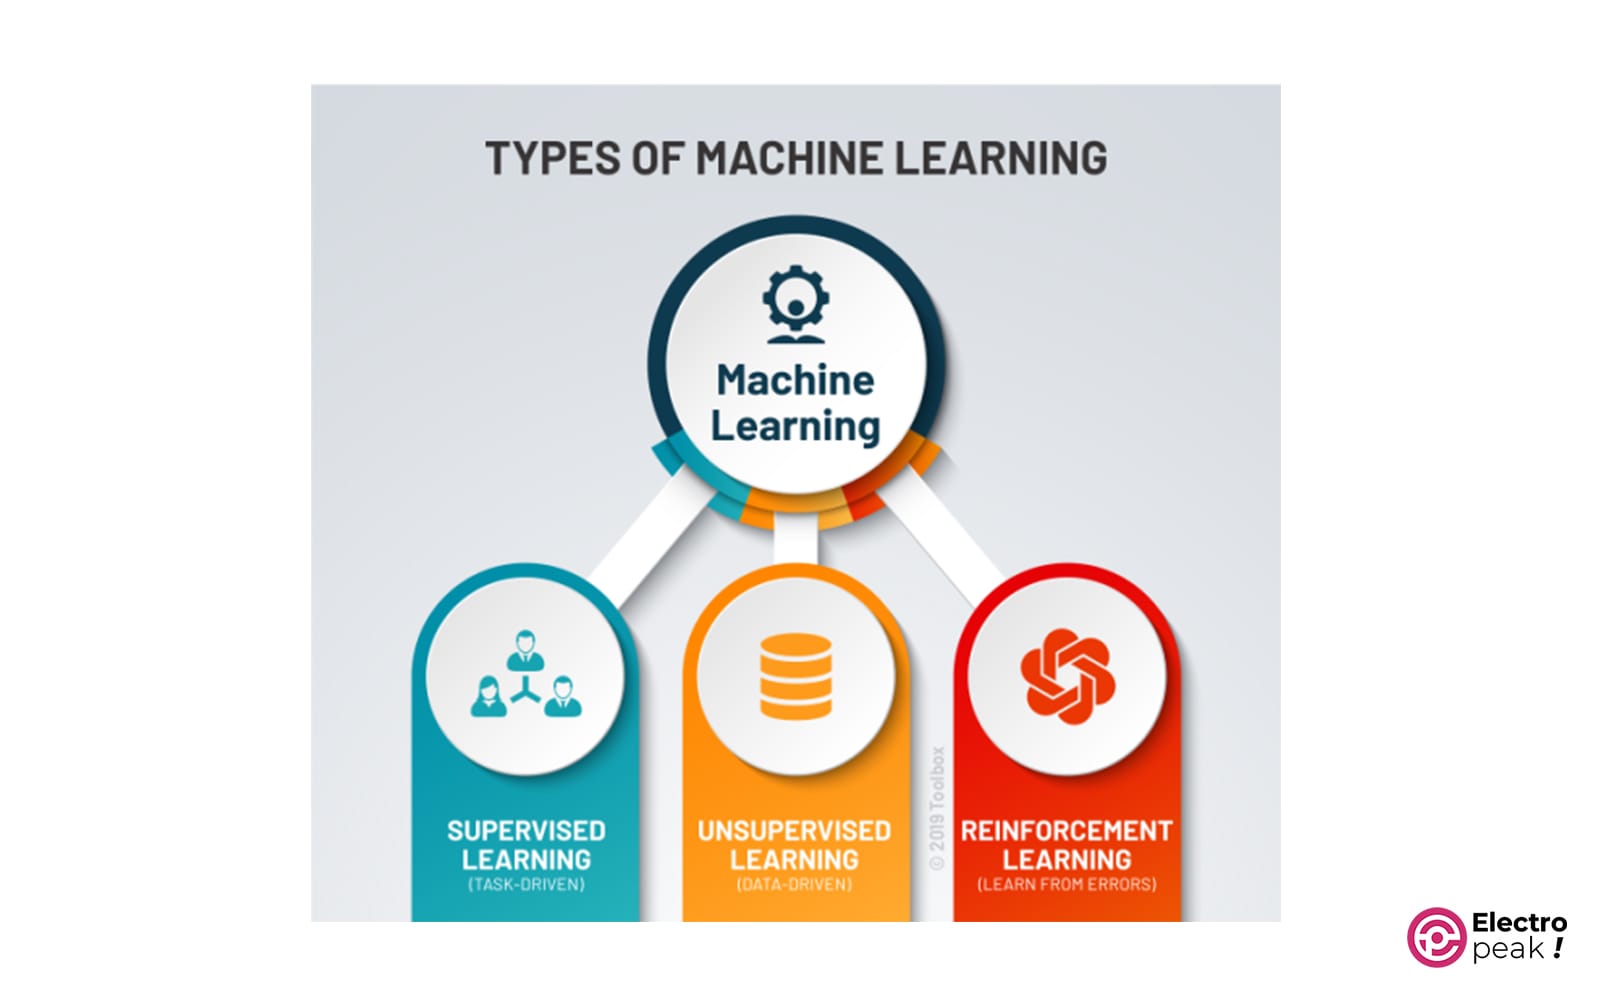
There are 3 types of machine learning: supervised, unsupervised, and reinforcement learning. Here is how they work:
Supervised Learning: The model learns from labeled data, where each data point is associated with a label or target output.
Unsupervised Learning: It deals with unlabeled data, aiming to find patterns or structures in the data.
Reinforcement Learning: It relies on a reward-based system where the model learns by trial and error to maximize rewards.
Machine Learning Algorithms for Raspberry Pi Pico and Arduino
To implement machine learning algorithms on Raspberry Pi Pico and Arduino, we need to keep in mind their limitations. These microcontrollers have limited memory and computational power, which means we should select algorithms that are lightweight and optimized for environments with limited resources.
Collecting and preparing Data for Machine learning
To build machine learning models effectively, you need to collect and prepare your data. Data collection includes collecting relevant datasets that contain the features or variables that you want your model to learn from. You can obtain these datasets from various sources such as online data, sensor data, or manual data collection.
How Edge Impulse Contributes to Machine Learning Integration
Edge Impulse is an advanced development platform that simplifies the process of integrating machine learning with embedded systems such as Raspberry Pi Pico. The platform provides a user-friendly interface to collect, preprocess, train, and deploy machine learning models directly on your device.
To get started with Edge Impulse, you won’t need in-depth knowledge of machine learning algorithms or coding expertise. The platform offers a wide range of tools and features that enable developers of all skill levels to utilize the power of machine learning. From data collection to model deployment, Edge Impulse simplifies the entire process and is accessible to anyone interested in building intelligent applications.
One of the key benefits of Edge Impulse is pre-processing and integrated data management. This platform supports a wide range of sensors and data types, allowing you to capture and process data from a variety of resources. Whether you’re dealing with accelerometer data, audio signals, or image inputs, Edge Impulse provides the tools you need to preprocess the data before training machine learning models. This eliminates the need for manual data processing and saves you time and effort during the development process. In addition, Edge Impulse has a visual interface for labeling and annotating data, simplifying the process of building high-quality datasets for training your models.
As mentioned, integrating machine learning with Raspberry Pi Pico using Edge Impulse has a lot of benefits: imagine you could build your desired smart home or a robot that could move around on its own. This way, you can develop applications that were once possible only by advanced hardware and complicated algorithms.
Machine Learning with Raspberry Pi Pico: Benefits
Machine learning with Raspberry Pi Pico has countless benefits for developers and enthusiasts. Let’s review some key factors:
1. Low-cost platform: Raspberry Pi Pico offers a cost-effective solution for building embedded systems. Costing only a few dollars, it’s an affordable option for enthusiasts, students, and professionals.
2. Versatile Development Environment: Raspberry Pi Pico—a Versatile development environment —is compatible with various programming languages, including MicroPython and C/C++. This flexibility allows developers to choose the language they are most comfortable with. Whether you are into Python or C/C++, Raspberry Pi Pico provides a familiar environment for developing practical AI applications.
3. Real-time processing: With this method, you can train and deploy machine learning models directly on the device itself, without the need for a cloud connection. This capability makes it possible to run programs that require an immediate response, such as robotics projects or real-time monitoring systems.
4. Privacy and Security: By processing data locally on the device, you can ensure that sensitive and private information remains secure. This is especially important when working with personal or confidential data.
Required Materials
Voice Recognition with Raspberry Pi Pico
Keyword spotting (KWS) is a technology used in a wide variety of applications. With this technology, you can interact with your device without using your hands. Recognizing the famous wake-up words, such as OK Google, Alexa, Hey Siri, or Cortana is a specific application of this technology, where the smart assistant continuously listens to the magical phrase before starting to interact with the device.
Now, let’s see how we can use KWS on Raspberry Pi Pico using Edge Impulse:
First, we will design a model based on Mel-frequency cepstral coefficients (MFCC), which is one of the most popular voice recognition features. Then, we will explain how to extract MFCCs from voice samples and train a machine learning (ML) model.
Our goal is to learn about the development of a KWS application using Edge Impulse and familiarize ourselves with acquiring voice data from an analog-to-digital converter (ADC).
To do that, we will implement the following instructions:
- Collect relevant audio data
- Extract MFCC features from voice samples
- Design and train an Artificial Neural Network (ANN) model
- Build a circuit with Raspberry Pi Pico
- Take voice samples using ADC and timer interrupts
Building a Model in the Edge Impulse Environment
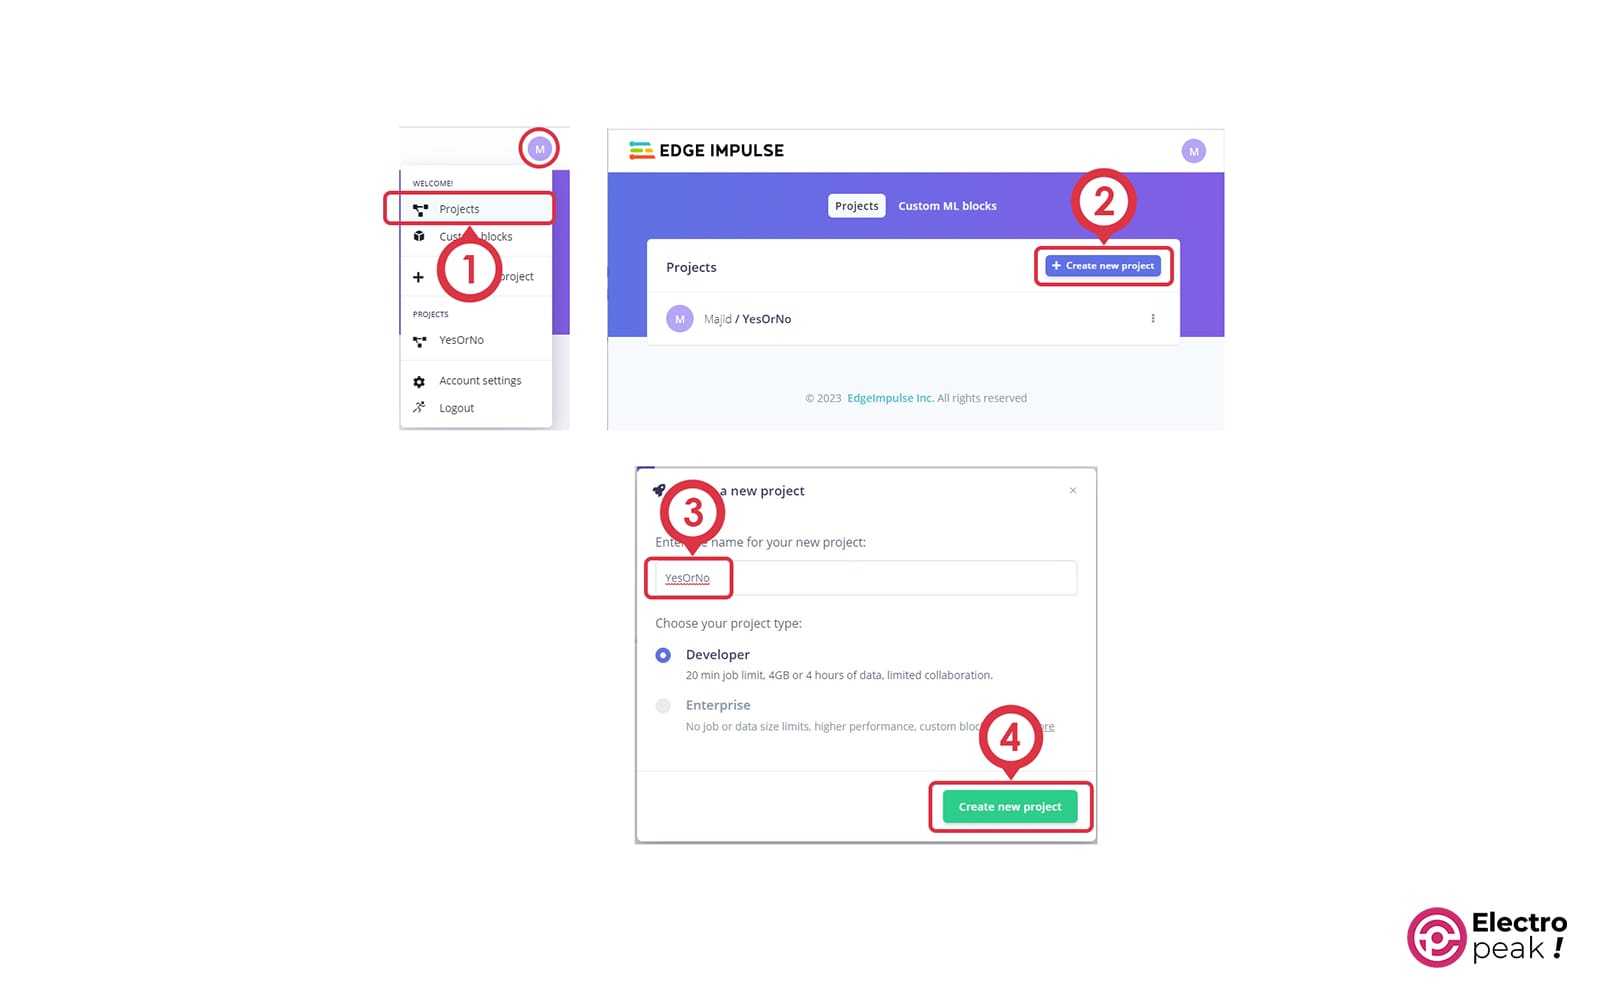
- Create an account on the Edge Impulse website by visiting this link.
- Go to the “Projects” section, click on the “+Create new project” button, choose a name, and click “Create new project” as shown in the image below.
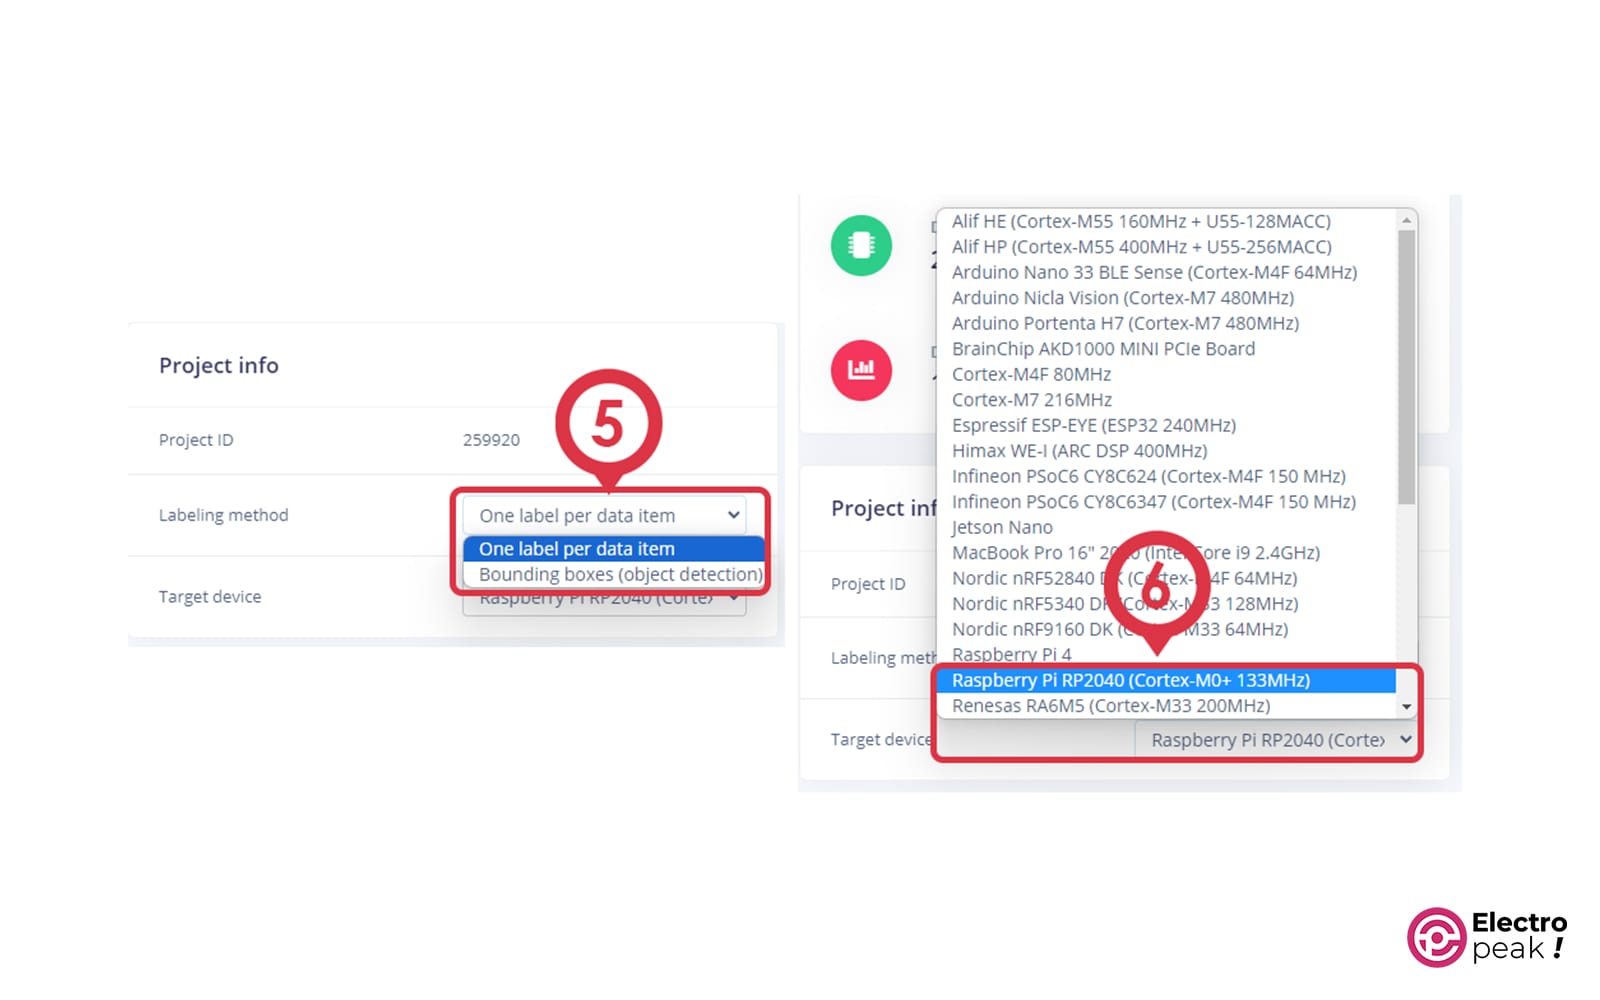
- Go to the Dashboard panel and adjust the settings in the “Project info” section.
- Download this compressed file and then extract it.
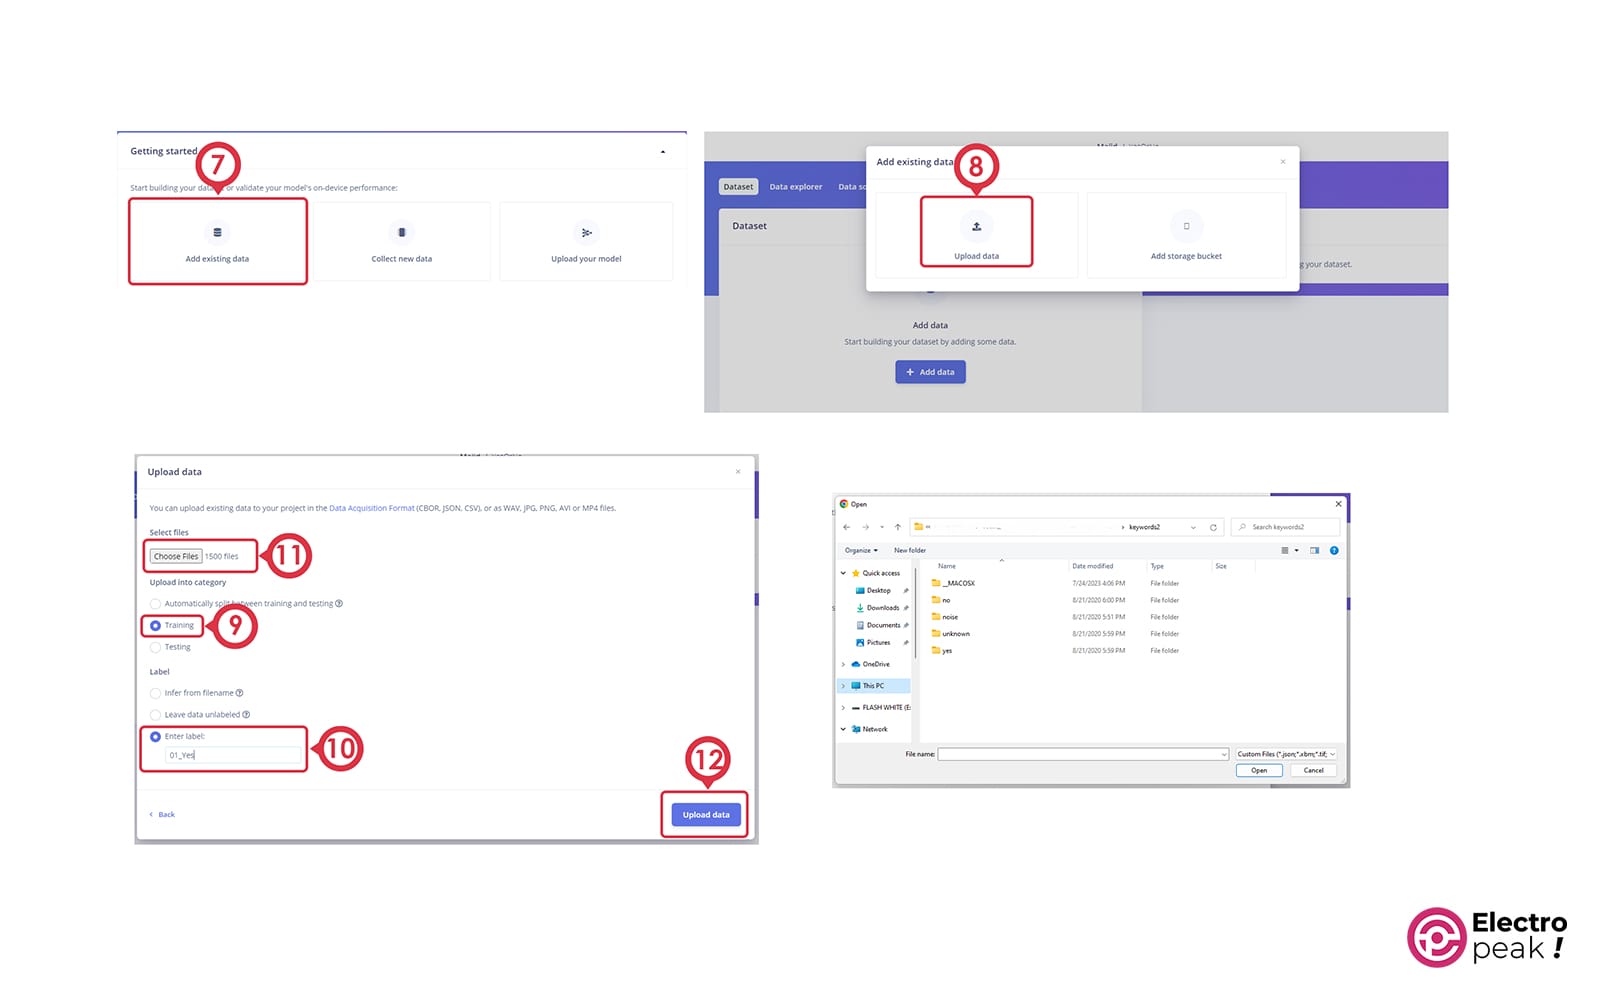
We have assigned the labels “01_Yes”, “02_No”, and “03_Unknown” for the files in the “yes”, “no”, and “unknown” folders, respectively.
Once you click the Upload button, the files will be uploaded.
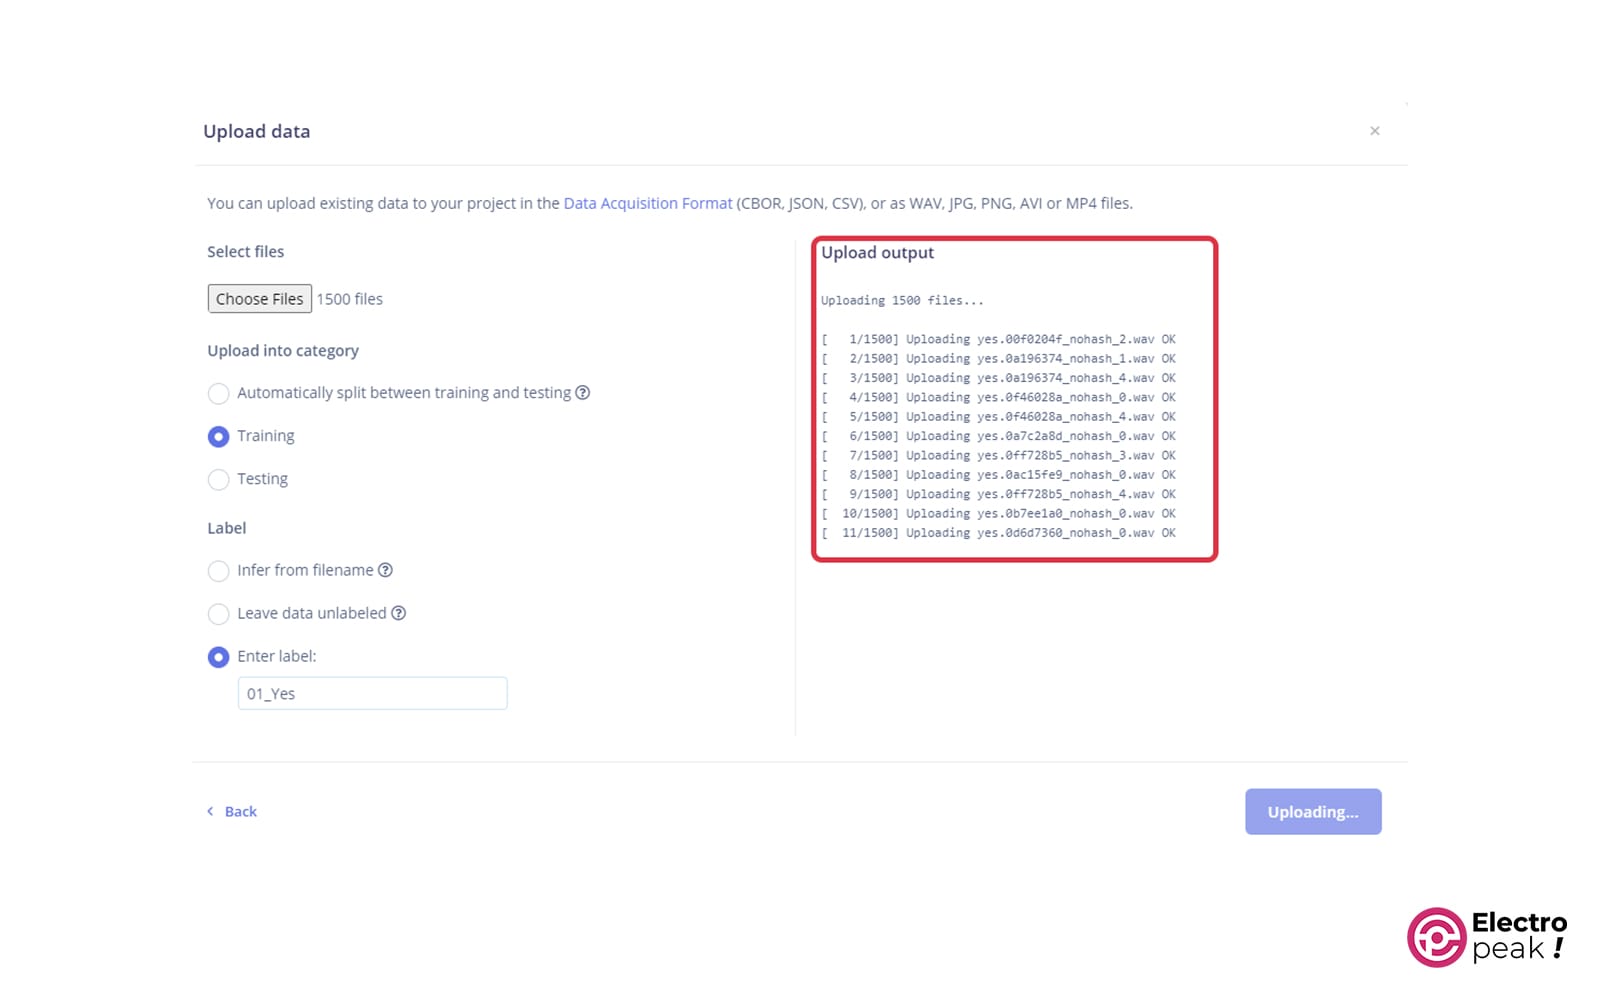
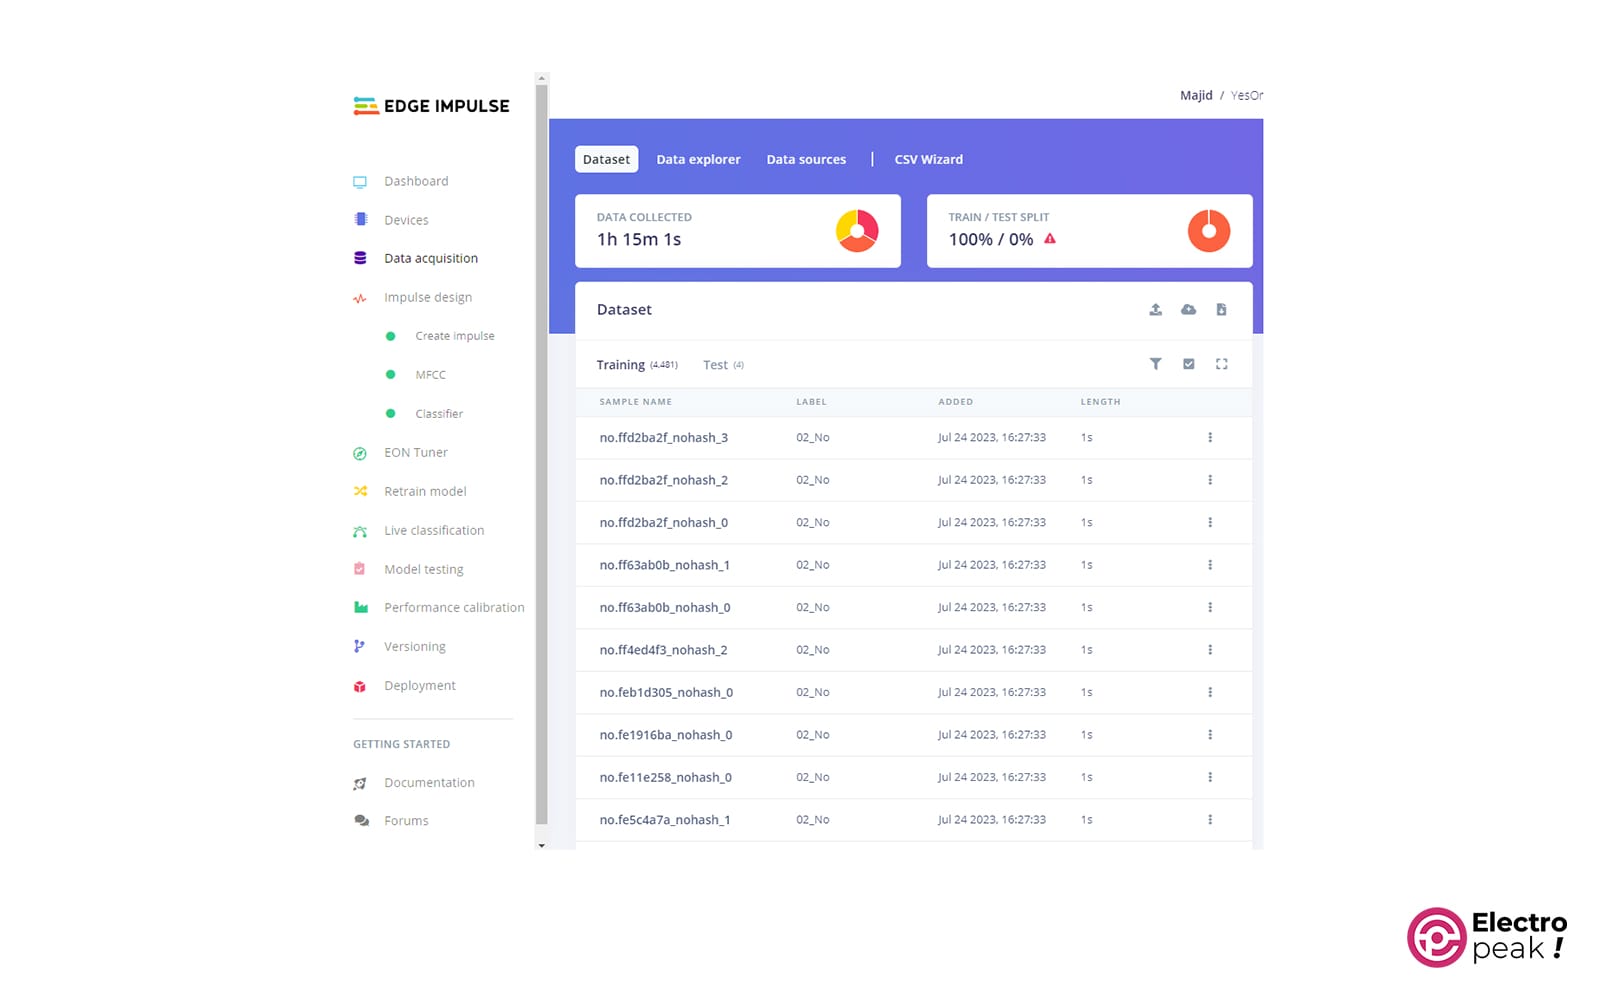
Once uploaded, the total duration of the loaded voice files will be displayed at the top of the “Data acquisition” page.
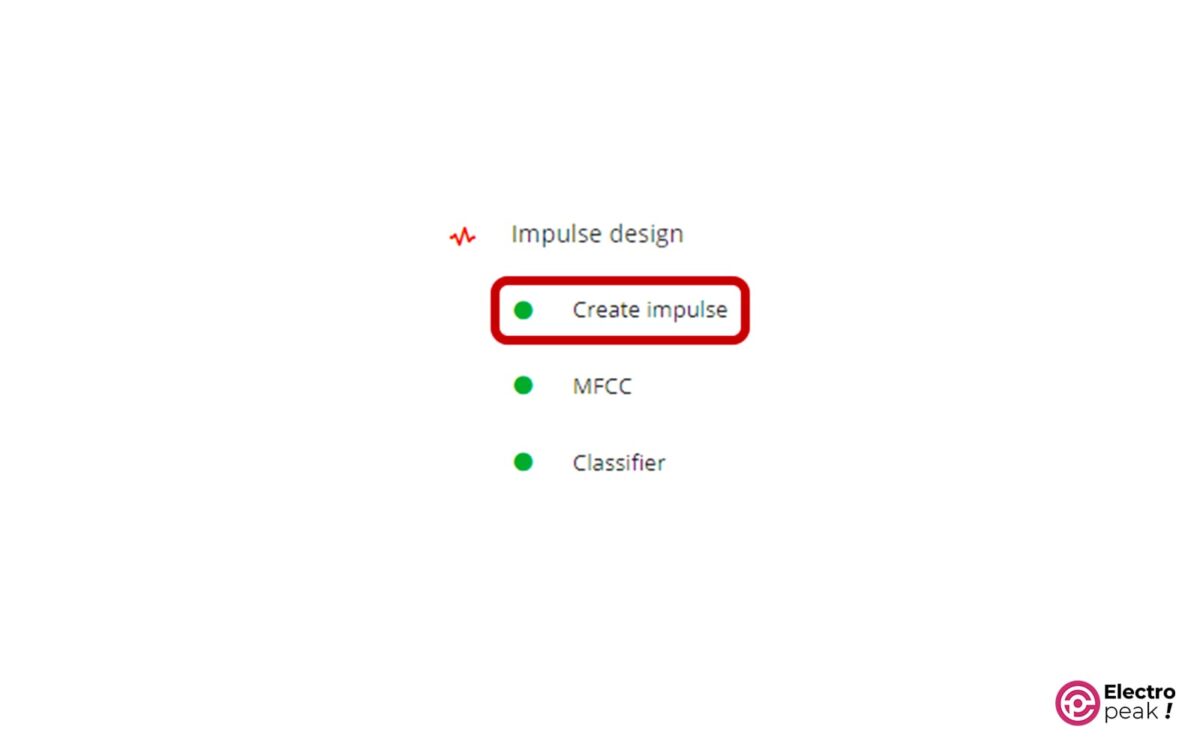
- In the “Impulse design” panel, start by determining the required features for training the neural network. To do this, we utilize Mel-frequency cepstral coefficients (MFCC) as features.
As shown in the image below, begin designing your first “Impulse” by clicking on the “Create impulse” option in the left menu:
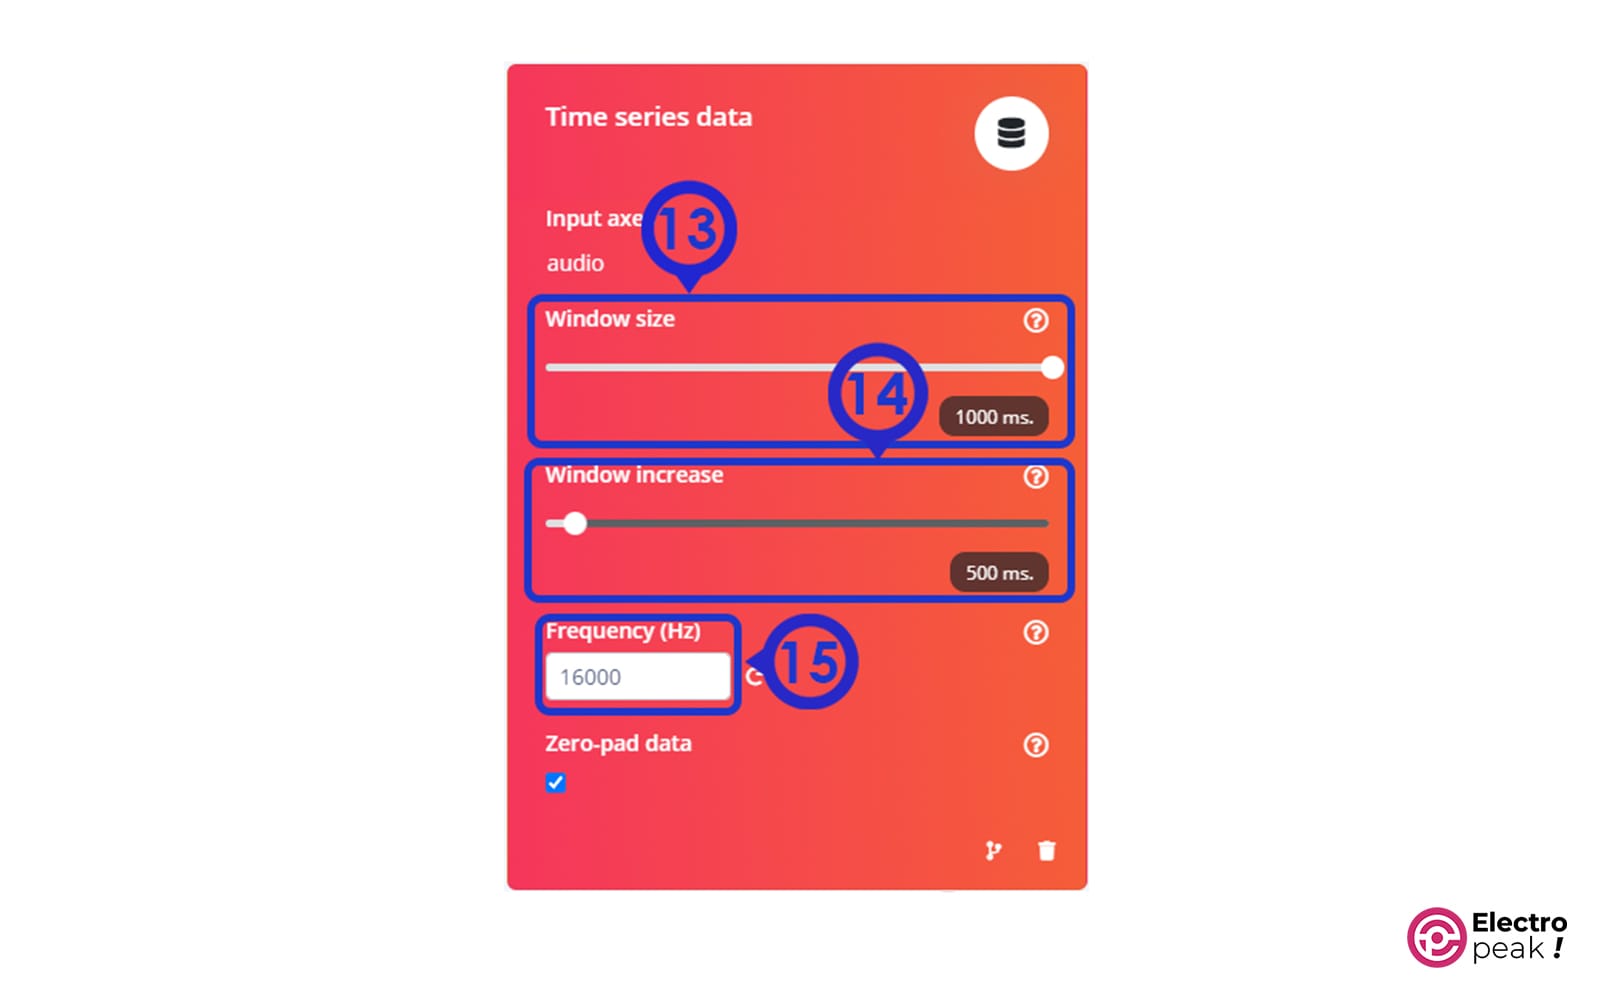
In the “Create impulse” section, ensure that the “Window size” field in the “Time series data” section is set to 1000 ms, and the “window increase” field to 500 ms.
The “Window increase” parameter is specifically designed for “Continuous KWS”, where there is a continuous voice stream, and the exact start time of speech is unknown. In this scenario, we need to divide the voice stream into windows or sections of equal length and perform machine learning inference on each of them. As shown in the figure below, “Window size” represents the length of each window, while “Window increase” indicates the time interval between two consecutive sections.
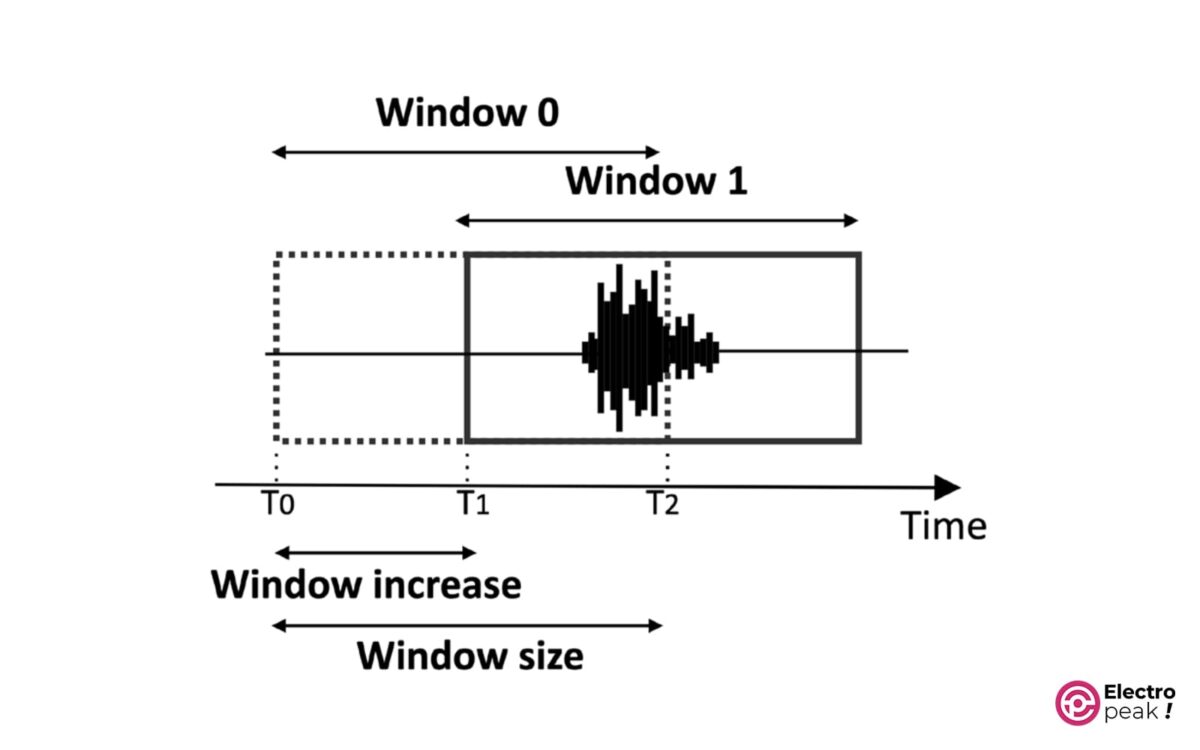
The “Window size” depends on the length of the training sample (1 second) and may affect the accuracy of the results. On the other hand, the “Window increase” does not affect the learning results but rather the likelihood of correctly detecting the start of speech. In fact, the lower the “Window increase”, the higher the chance of correctly detecting the start point of the speech. However, the proper value for “Window increase” depends on the model’s delay.
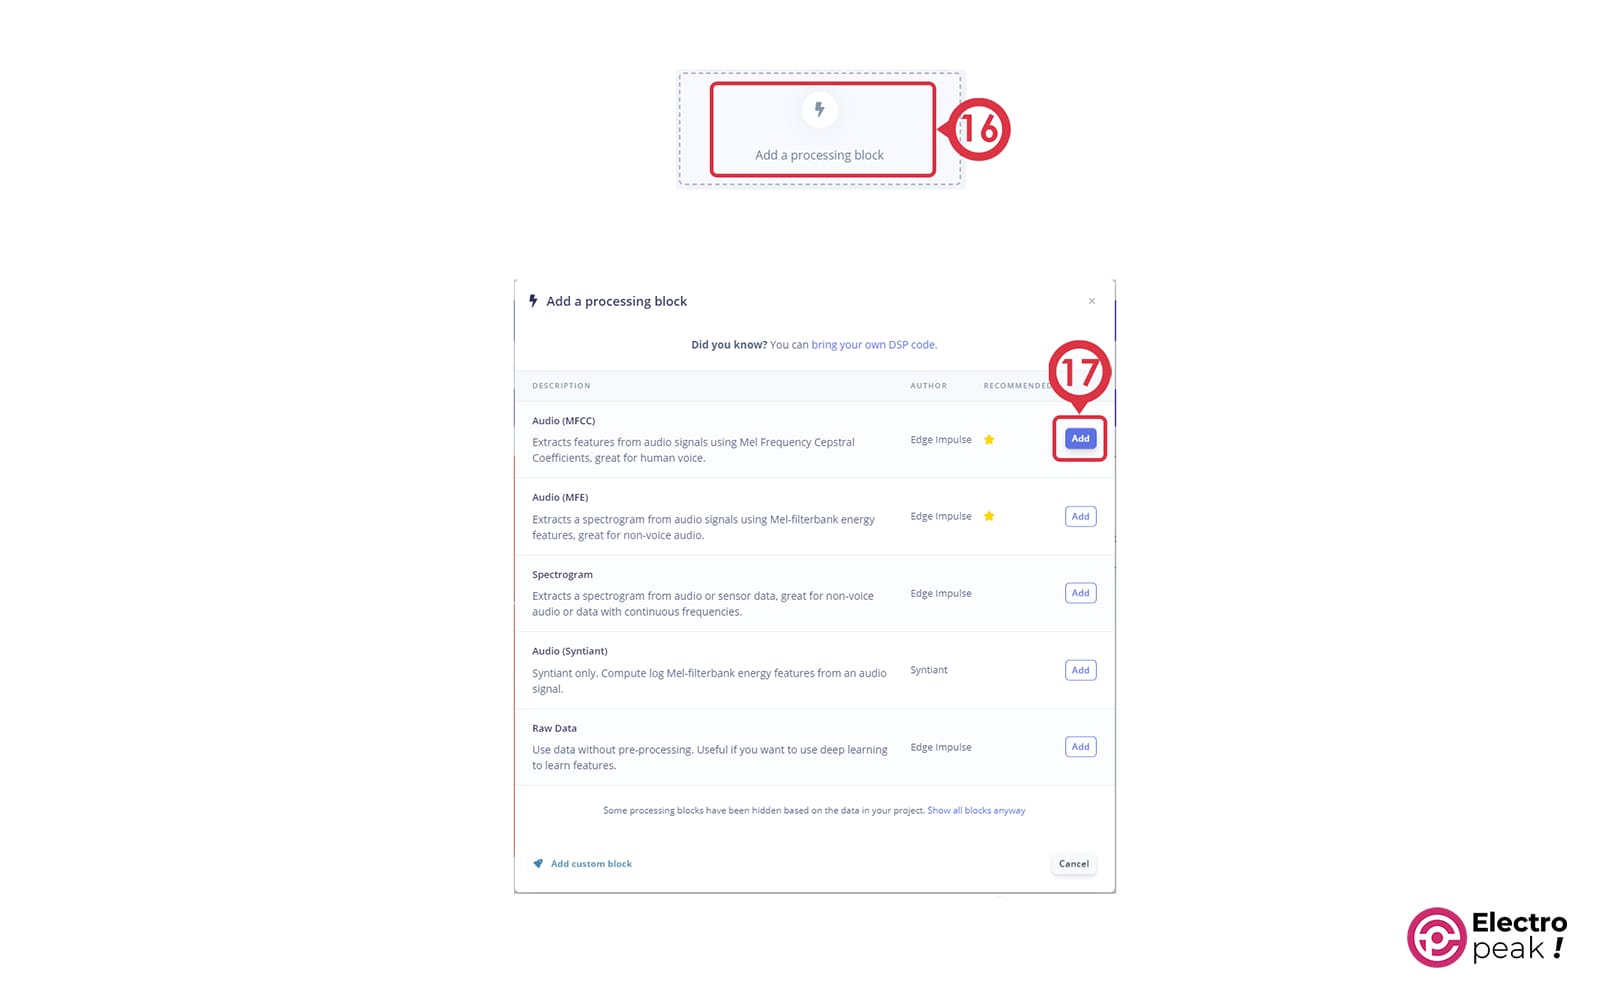
Now, let’s design a processing block for extracting MFCC features from recorded voice samples:
1. Click on “Add a processing block” and add Audio (MFCC).
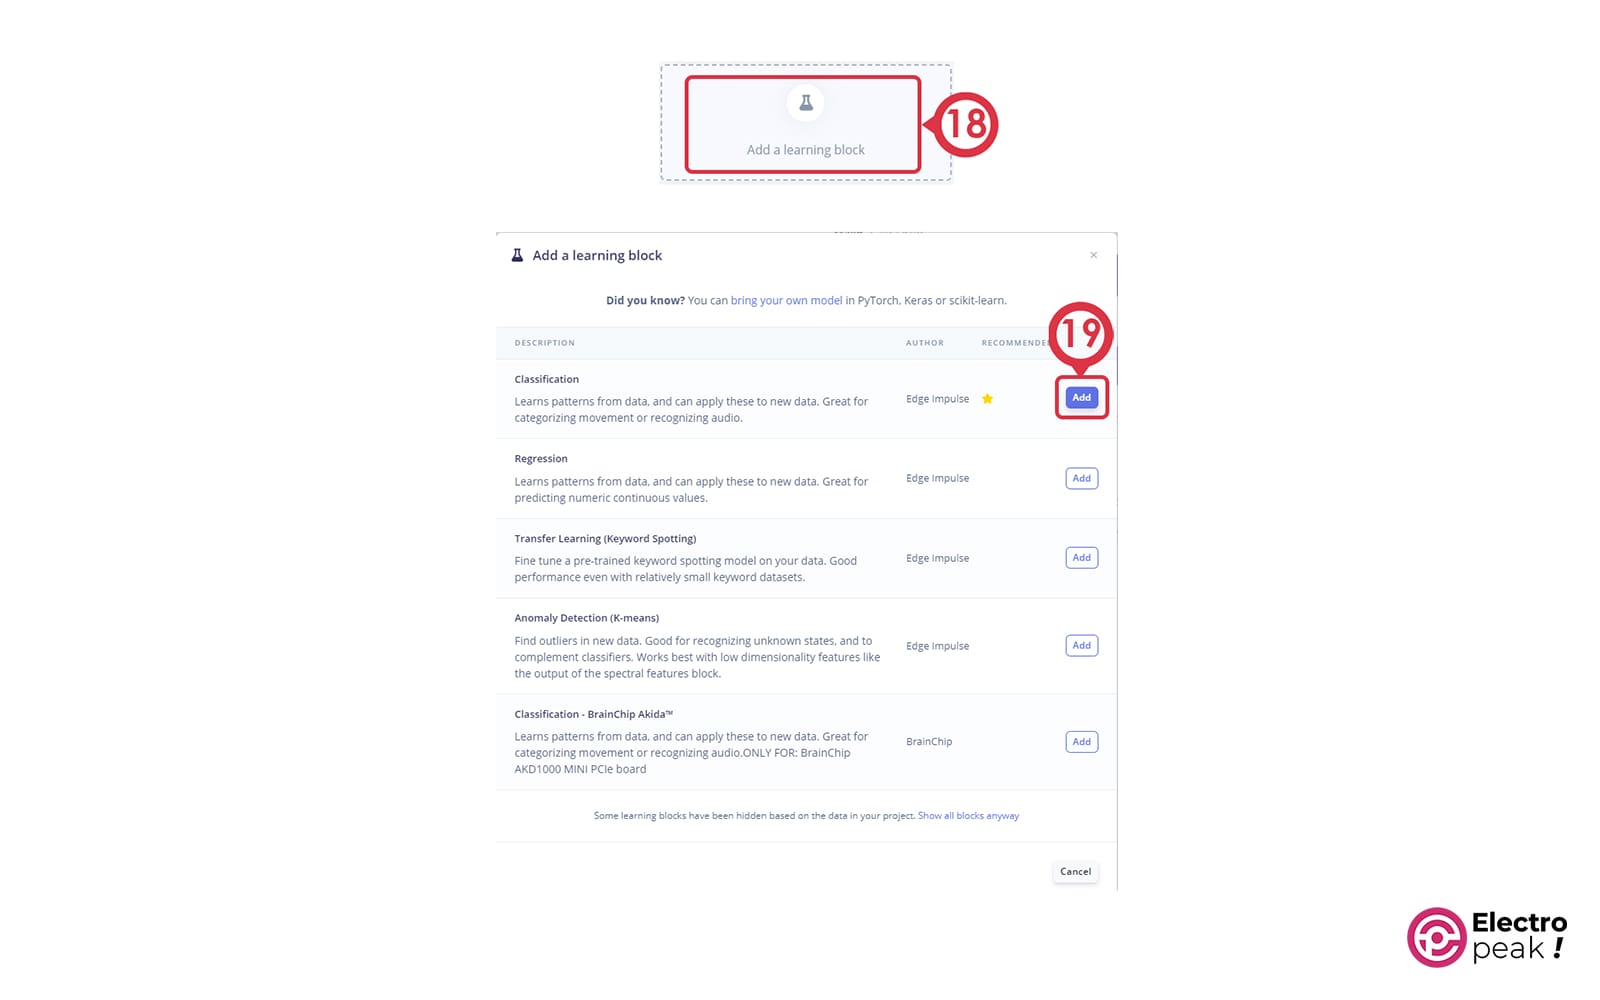
2. Click on “Add a learning block” and add Classification (Keras).
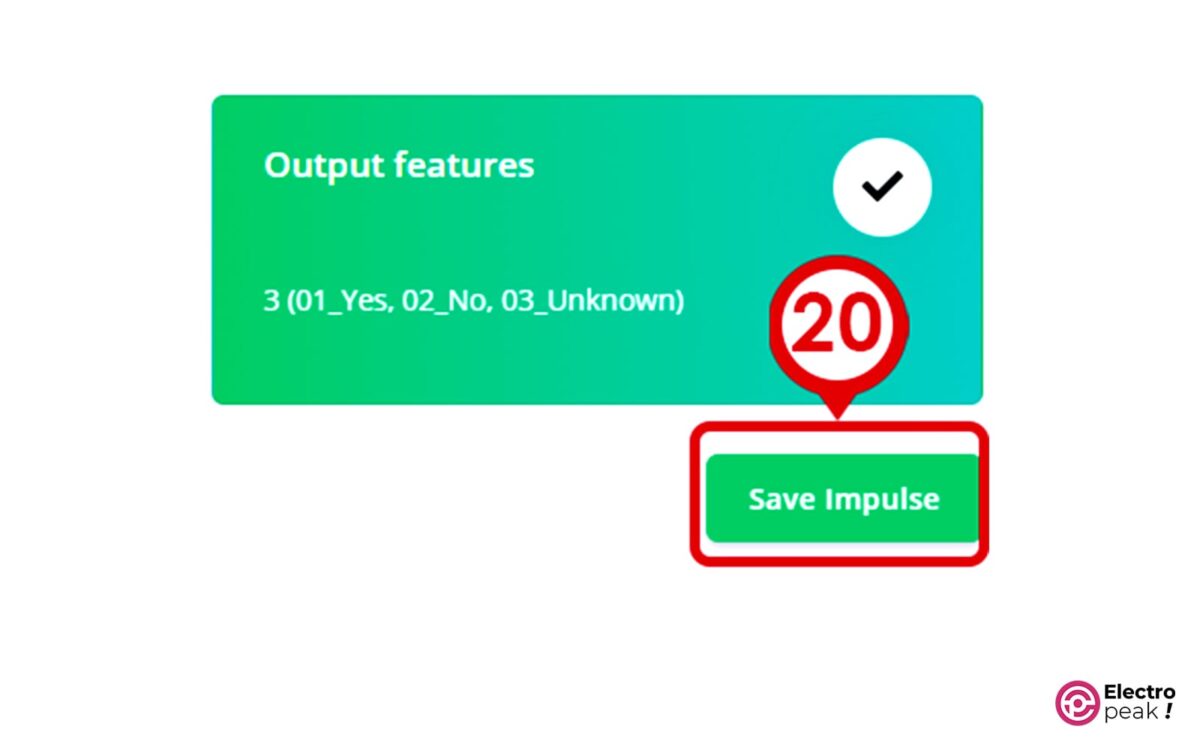
According to the image below, the “Output features” block should report three output classes for identification (01_Yes, 02_No, 03_Unknown).
3. Click on “Save Impulse.”
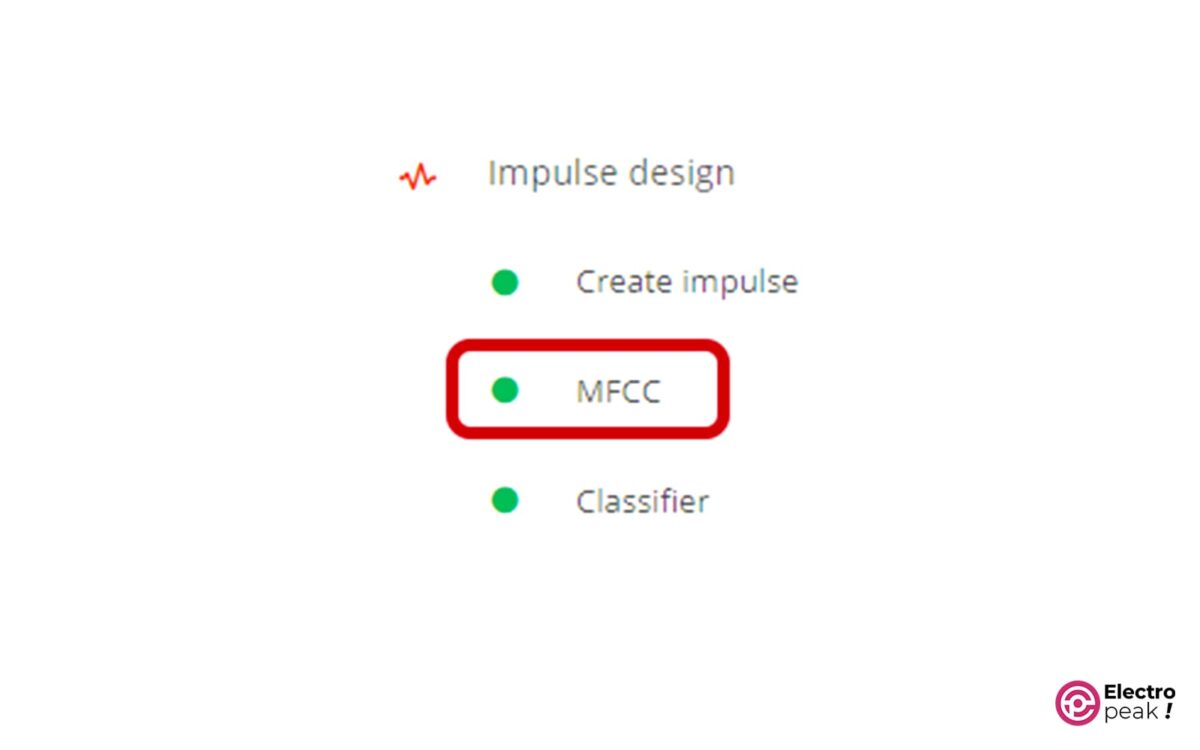
4. Click on “MFCC” in the “Impulse design” category.
5. Adjust the parameters that affect the MFCC feature extraction.
Here, you can adjust the parameters that affect the extraction of MFCC features such as the number of cepstral coefficients and the number of triangular filters applied for Mel scaling. In this tutorial, all MFCC parameters are kept at their default values.
There is also a parameter for the “pre-emphasis” stage at the bottom of the page. The “pre-emphasis” stage is performed before generating a spectrogram; we increase the energy at the highest frequencies in order to reduce the noise. If the “Coefficient value” is zero, there won’t be any emphasis on the input signal. Here, the “pre-emphasis” parameter is kept at its default value.
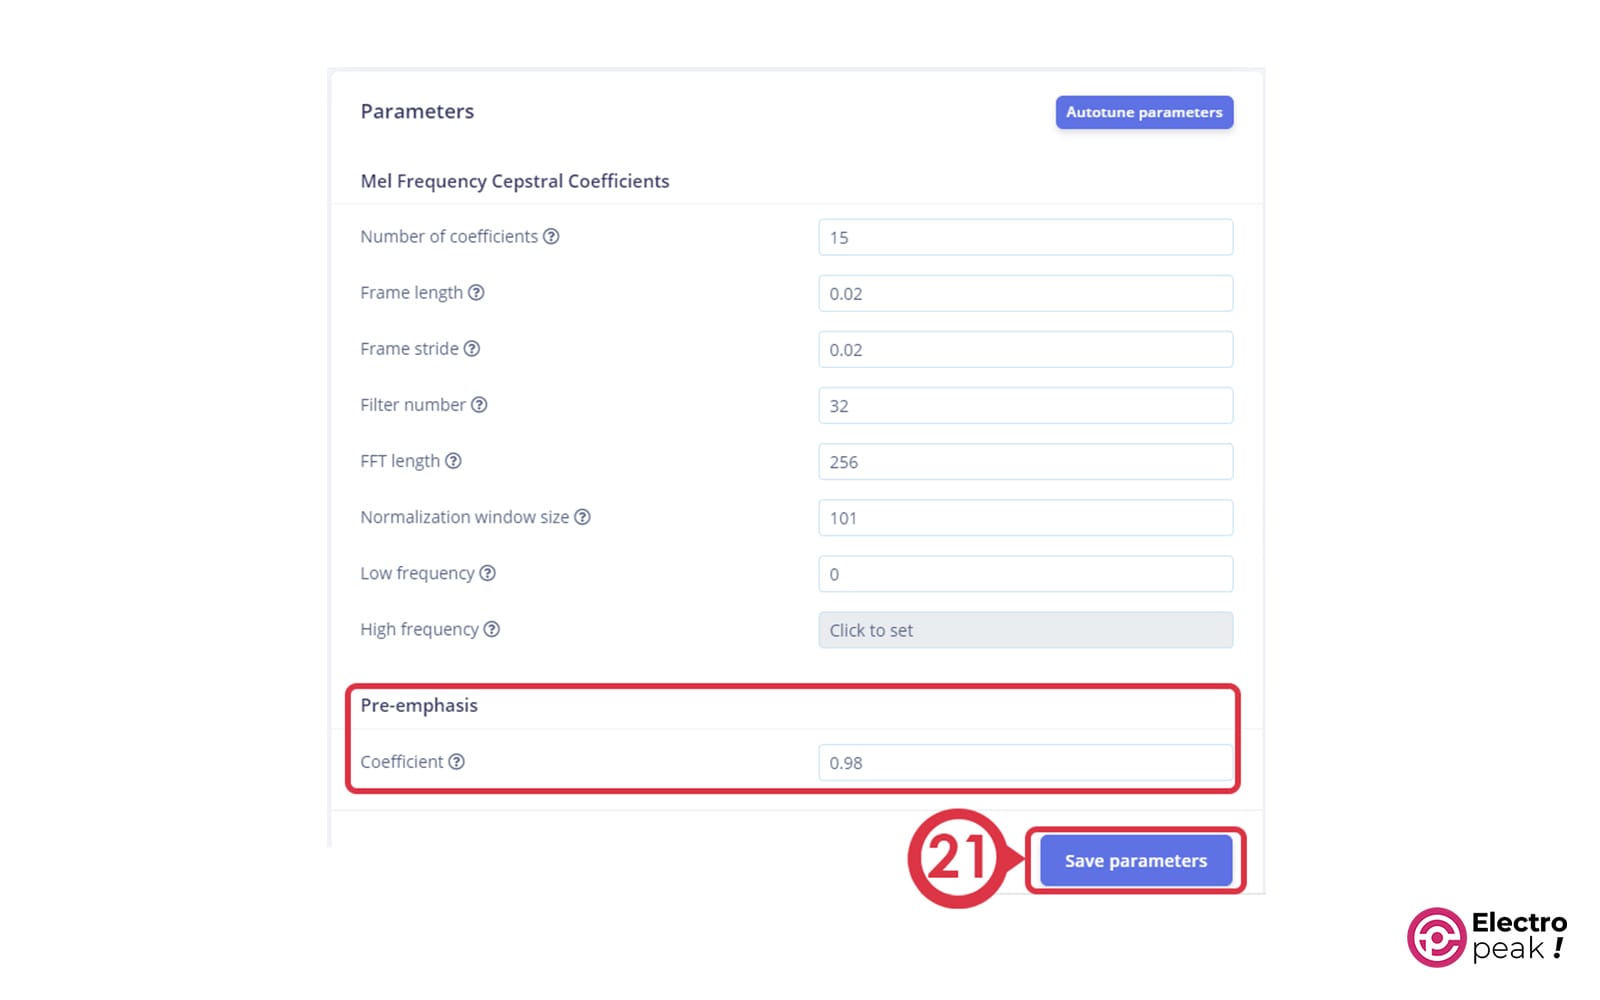
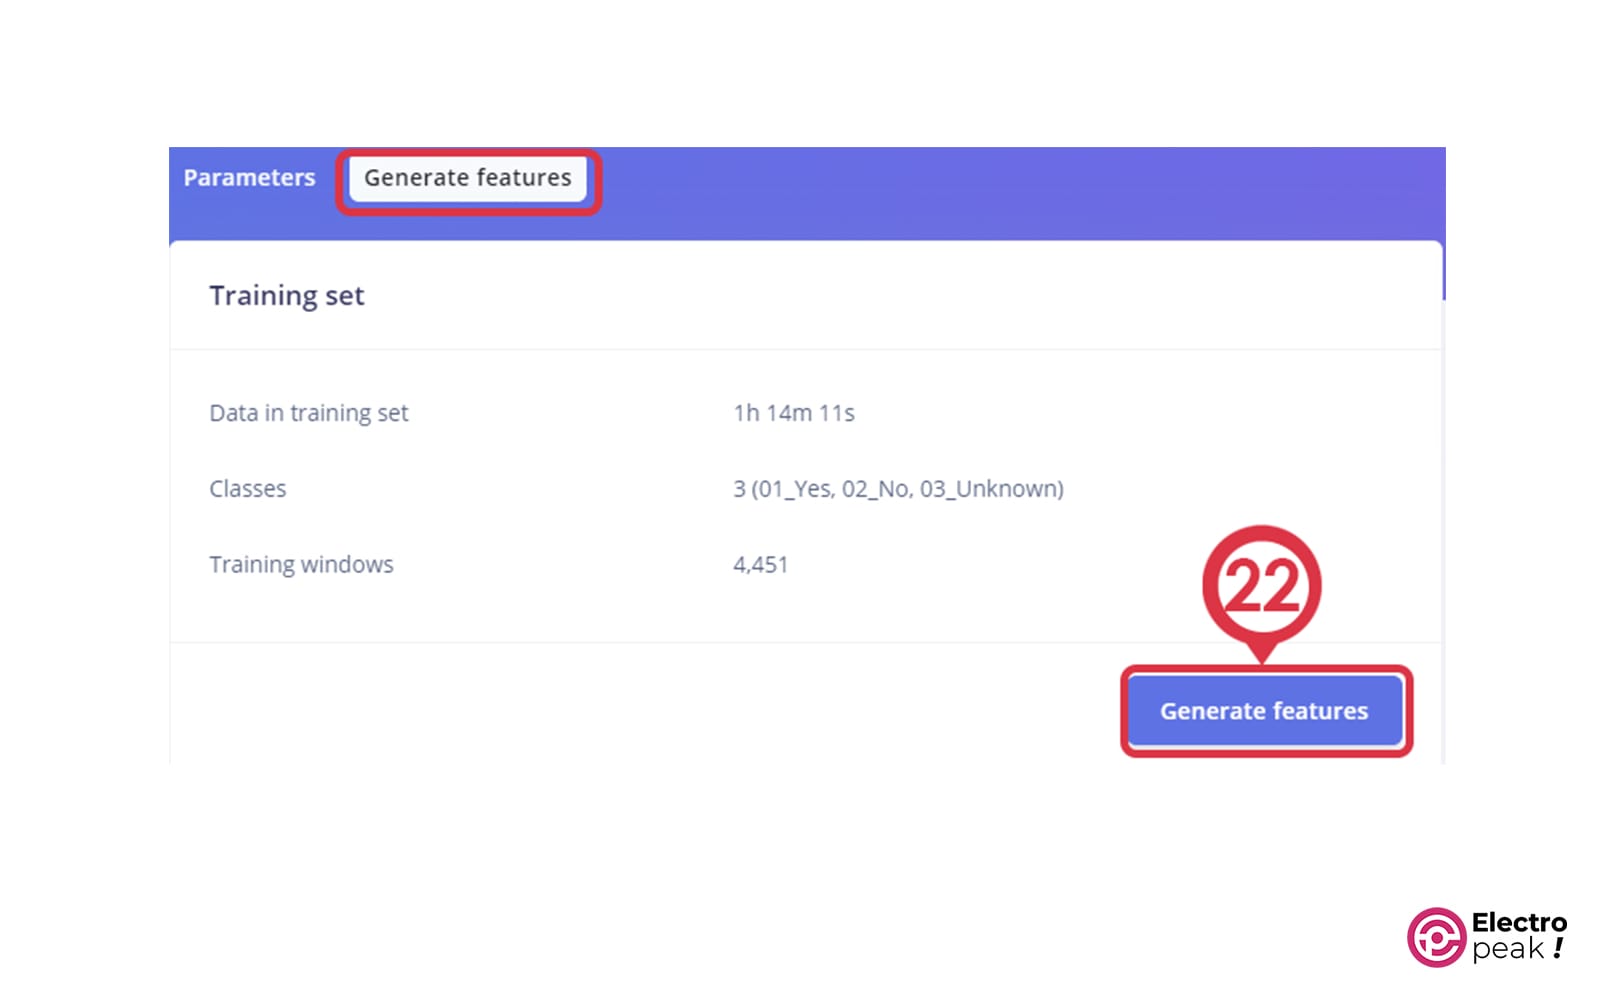
6. Click on “Generate features” to extract MFCC features from the training samples.
At the end, Edge Impulse returns the “Job completed” message in the console output.
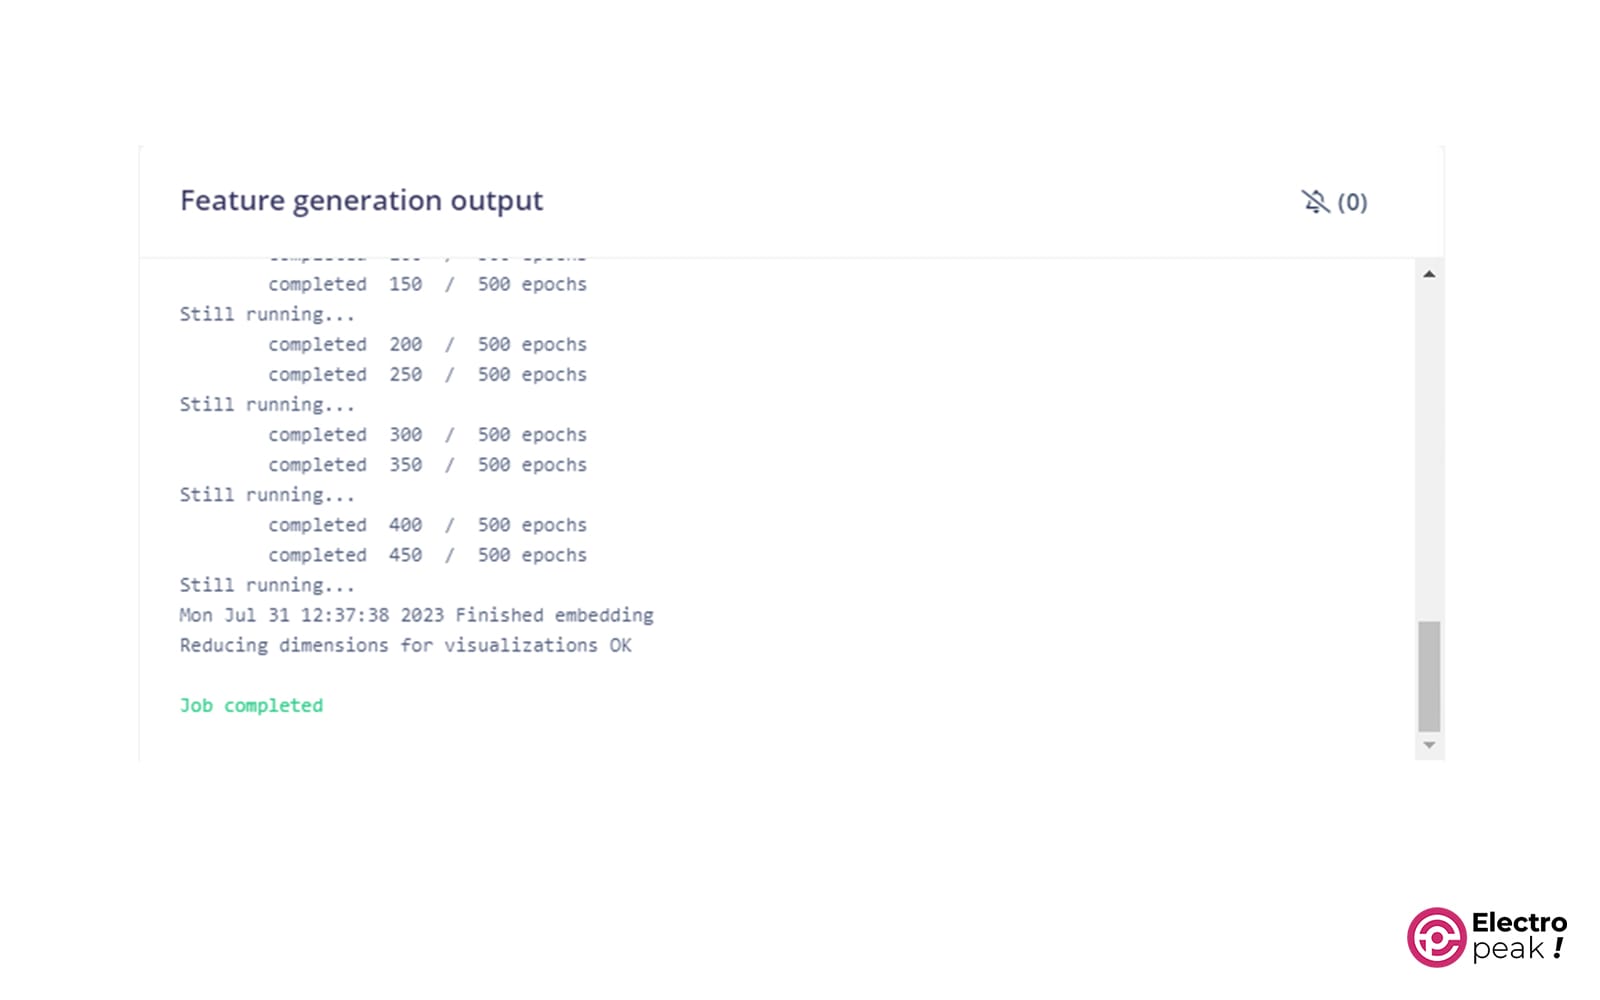
Now, you have successfully extracted MFCC features from all recorded voice samples.
Feature Extraction Results
After extracting MFCC features, we can use the “Feature explorer” tool and a 3D scatter plot to examine the generated training dataset, similar to the image below.
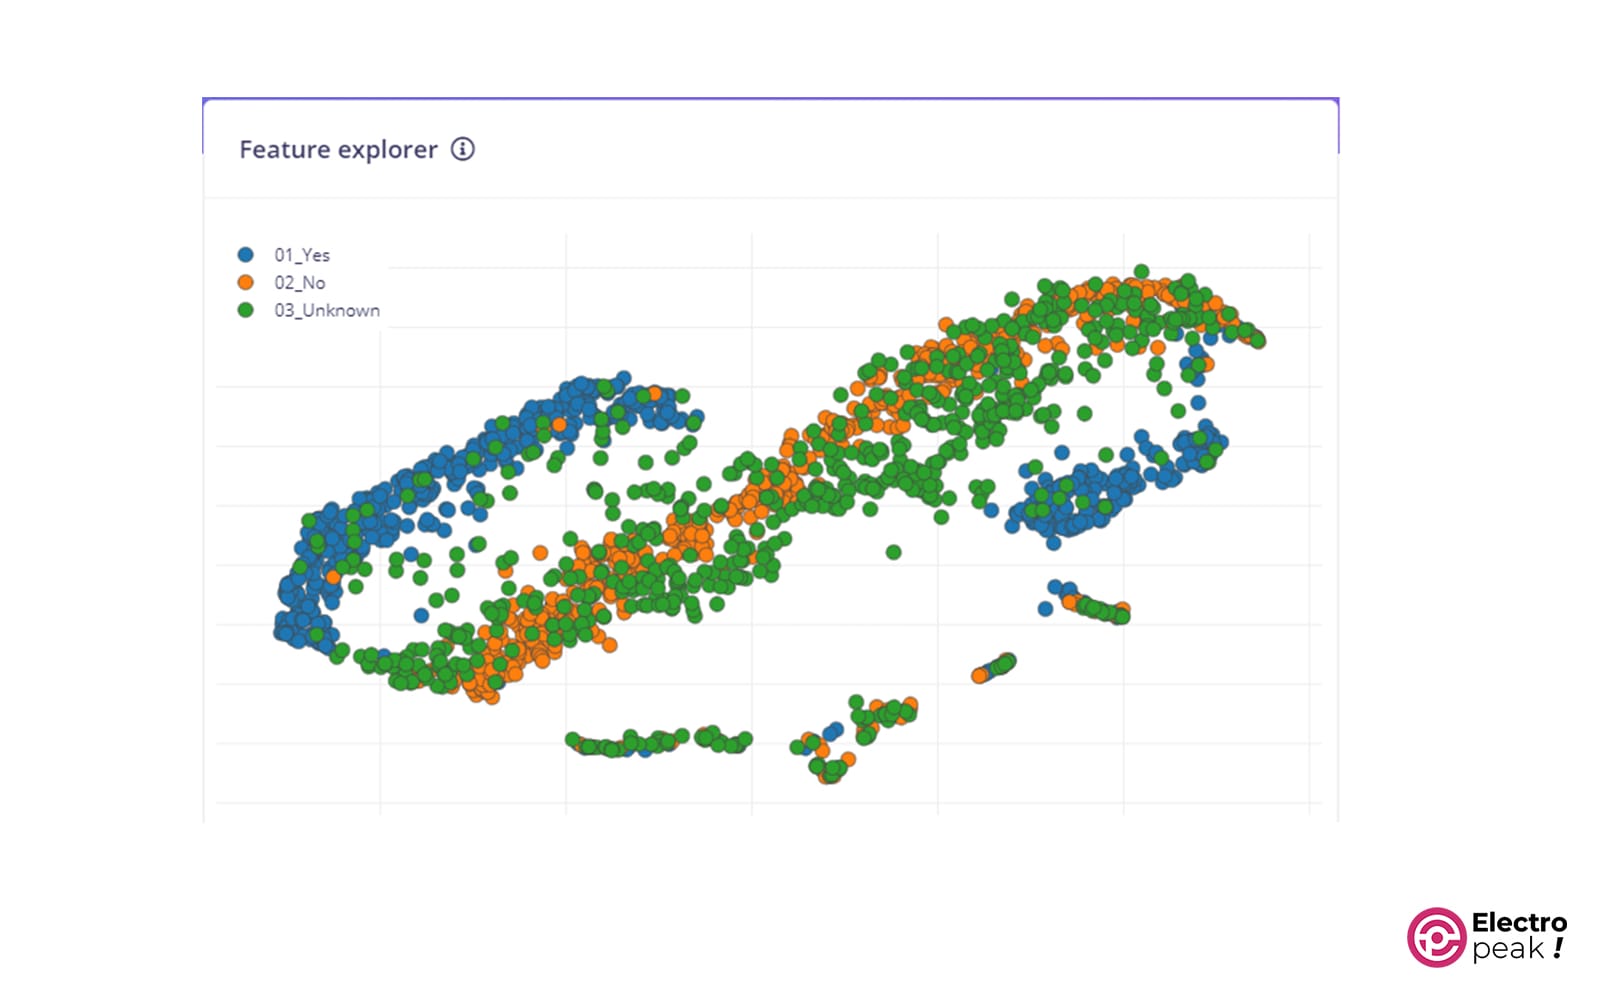
We should infer from the plot above whether the input features are suitable for our issue. If so, the output classes (except for the unknown output class) should be well separated.
You can view the temporary memory usage and data processing time in the “On-device performance” section related to MFCC.
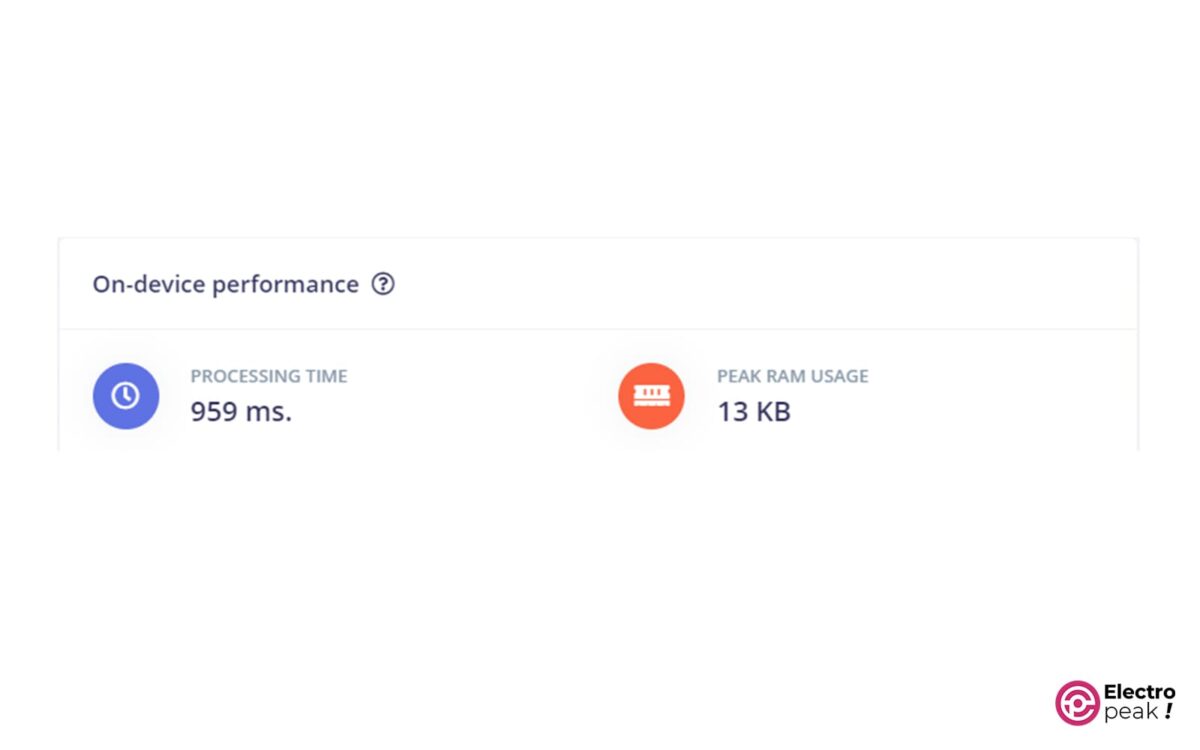
The processing time (delay) and maximum RAM usage (data memory) are estimated in the “Project info” section according to the device selected in the “Dashboard.”
NN Model: Design and Train
In this tutorial, we will use the following NN architecture for speech recognition:
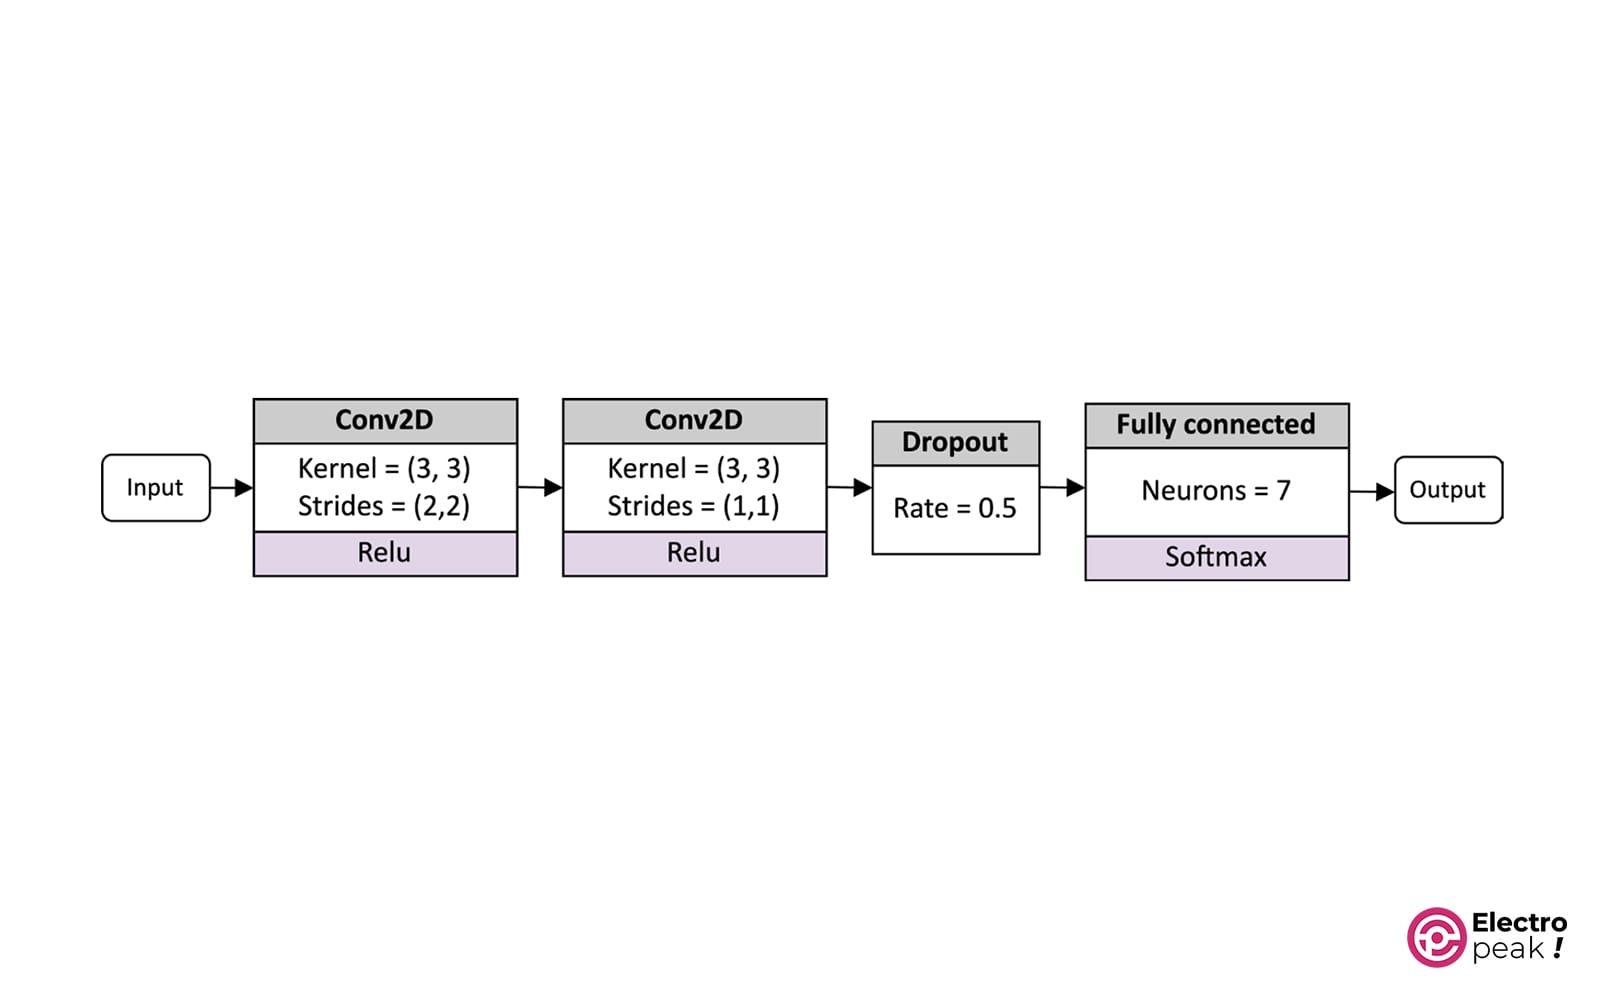
This model consists of two 2D convolution layers, one dropout layer, and a fully connected layer followed by a “softmax” activation.
MFCC features are the network input which are extracted from one-second voice samples.
Preparation
To do this, we only need to know how to design and train an NN model in Edge Impulse.
Depending on the selected learning block, Edge Impulse employs various ML frameworks for training. Here, Edge Impulse uses TensorFlow and Keras for the “classification” learning block.
You can design the model in two ways:
- Visual (simple way): It’s the quickest way and is done by the user interface. Edge Impulse provides some basic NN blocks and their architecture settings, which can be very helpful if you are new to deep learning (DL).
- Keras Code (advanced way): If you want to have more control over the network architecture, you can directly edit the Keras code in the web browser.
Steps to Follow
Click on the neural network (Keras) in “Impulse design” and follow the steps below to design and train the NN model as shown in the network structure diagram.
1. Select the “2D Convolution” architecture preset and delete the Dropout layer in the middle of the two convolution layers.
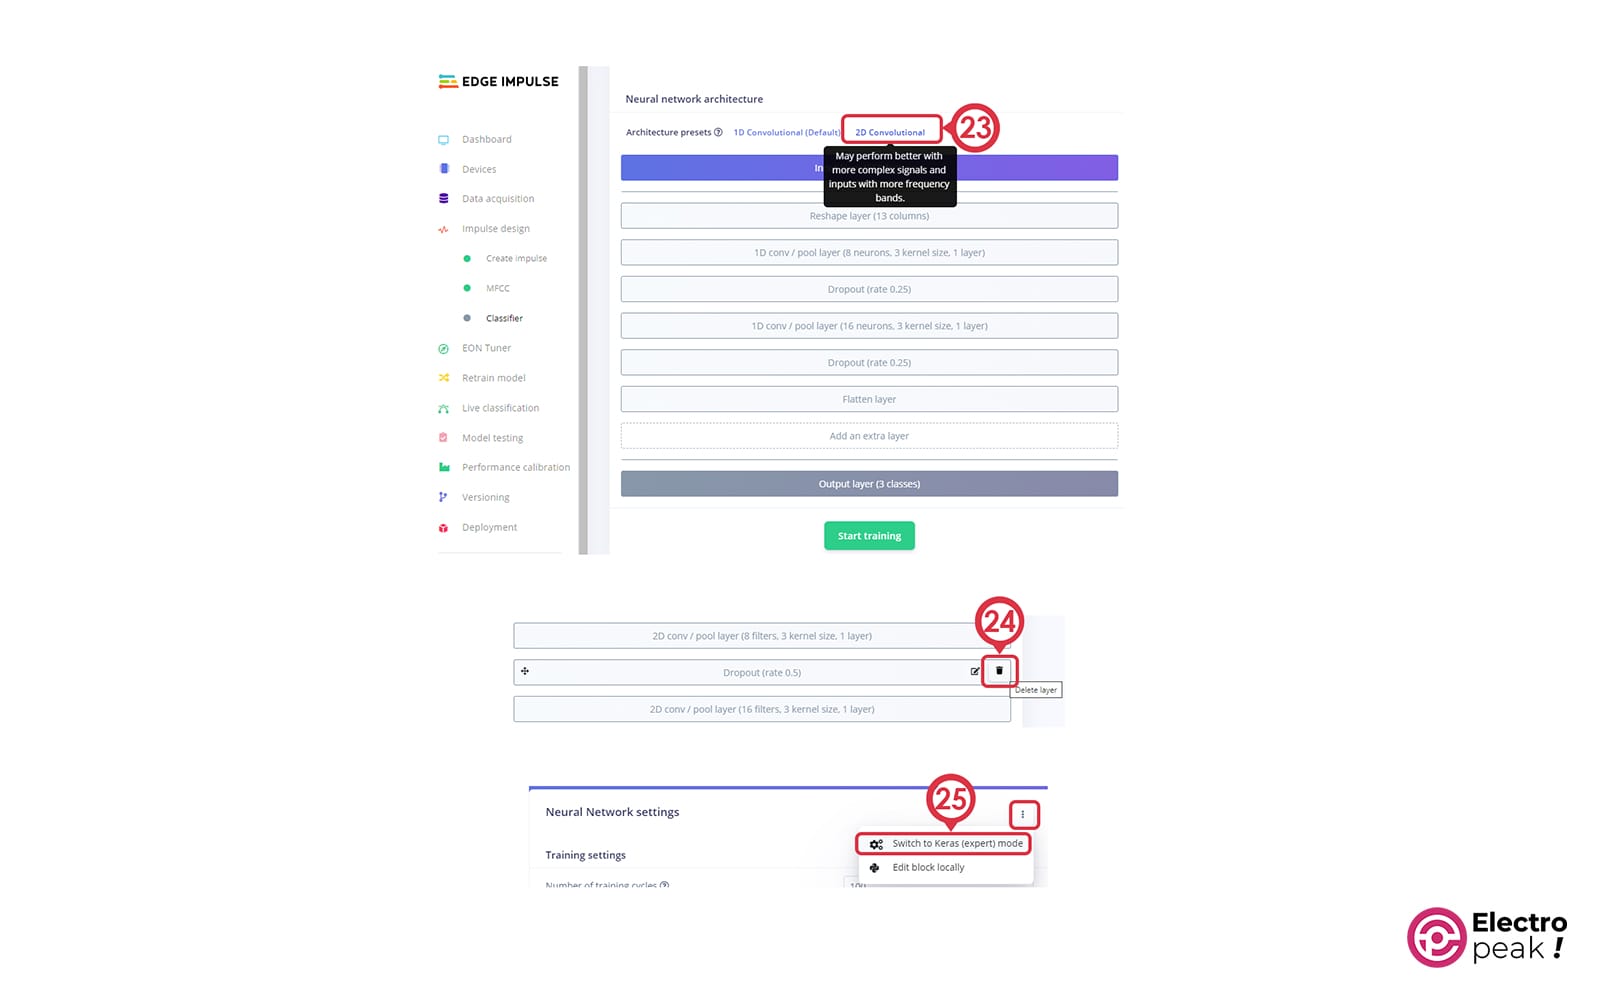
2. Click on the ⋮ icon to enter Keras mode (professional). In the code section, remove the MaxPooling2D layers.
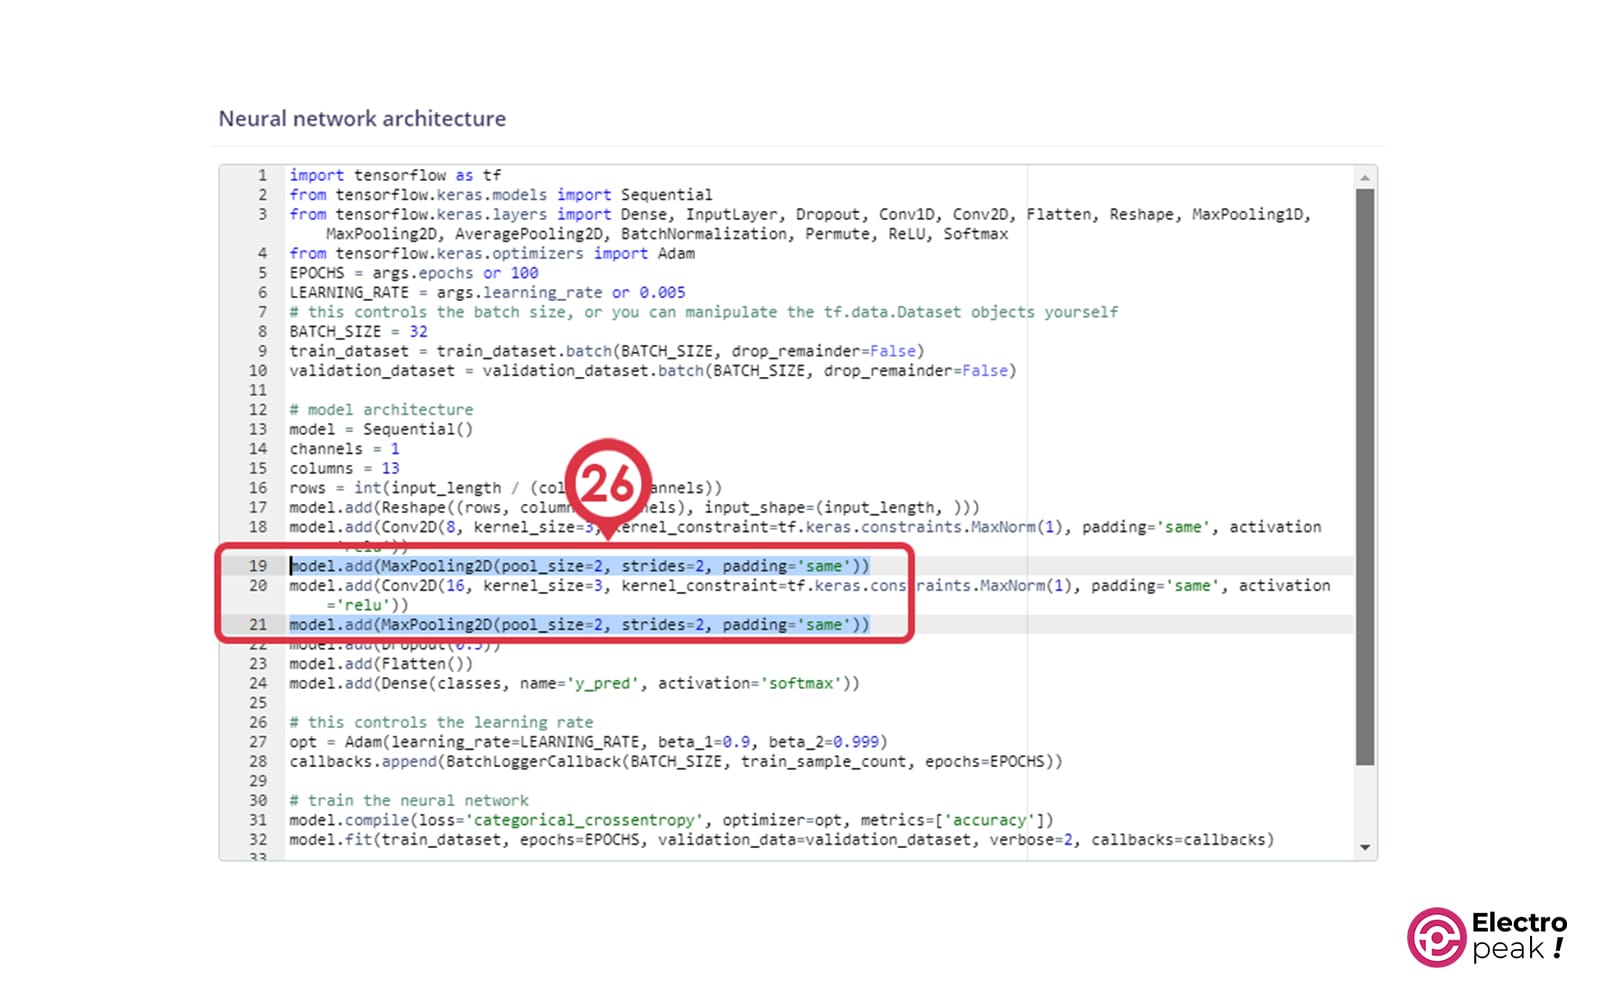
Set the first convolution layer’s strides to (2,2) as shown in the code below.
model.add(Conv2D(8, strides=(2,2), kernel_size=3, activation='relu', kernel_constraint=tf.keras. constraints.MaxNorm(1), padding='same'))
The pooling layer is a subsampling technique that helps decrease the amount of data sent through the network, which in turn reduces the chances of overfitting. However, it can lead to delays and higher RAM usage. In devices like microcontrollers with limited memory, RAM is a valuable resource, and we need to use it carefully. Therefore, we take non-unit steps in the convolution layers to reduce the size of spatial dimensions. This approach usually has better performance as we completely skip the computations of pooling layers and have fewer output elements to process, resulting in faster convolution layers.
3. Click on “Start training.”
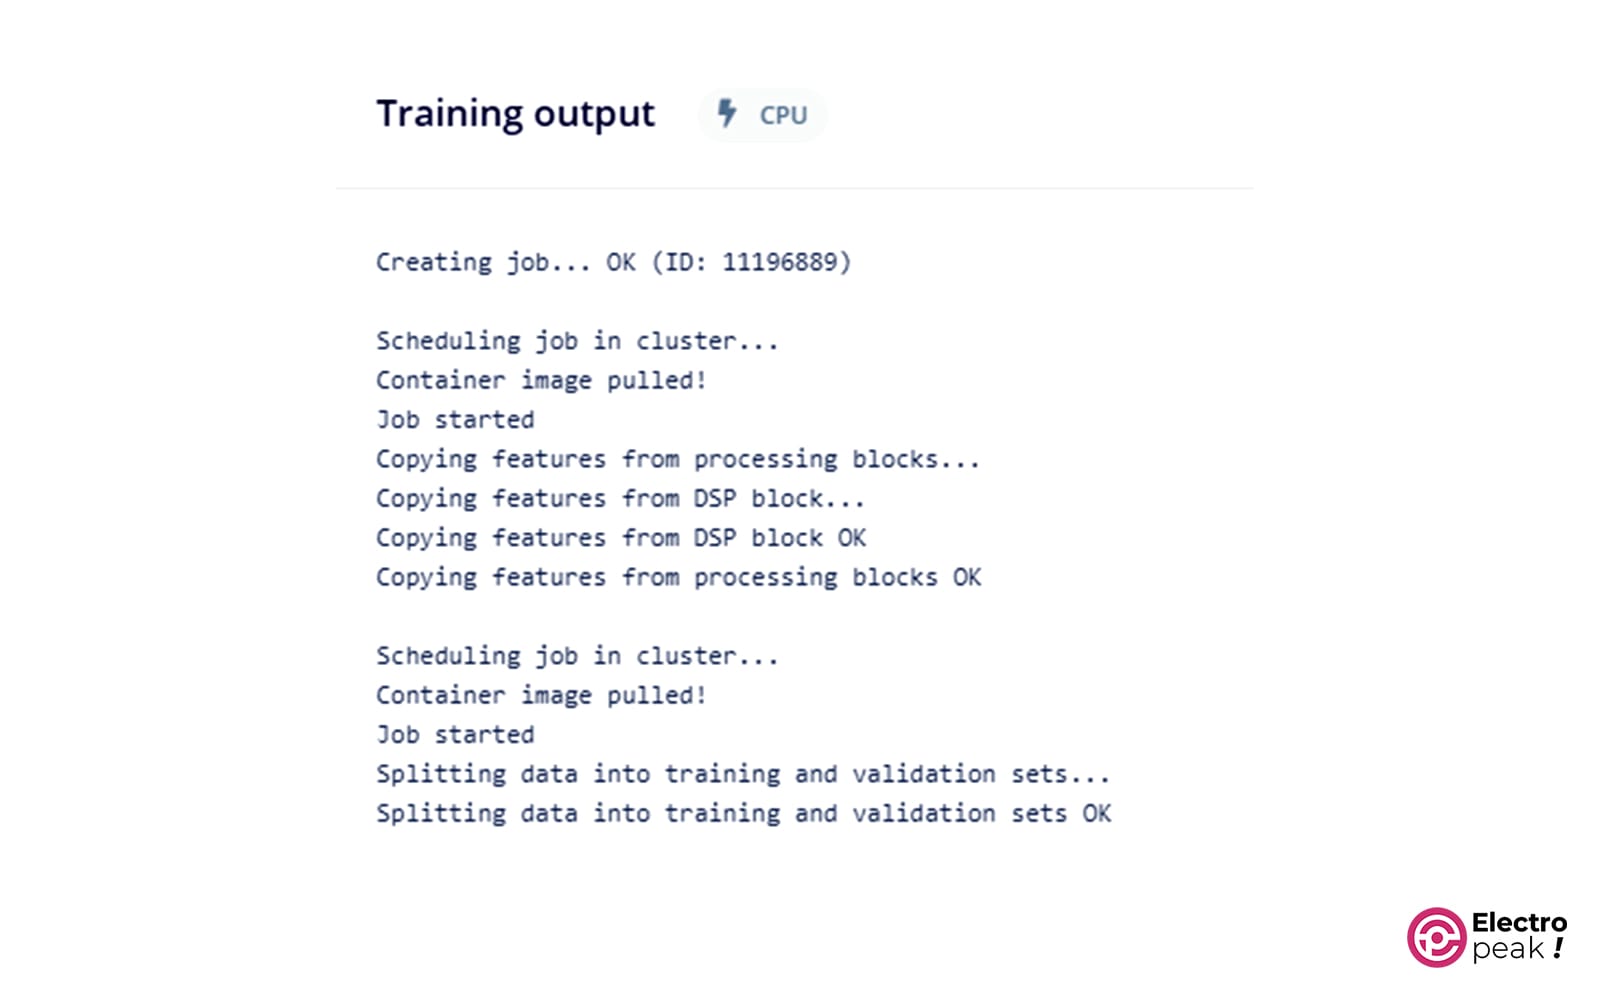
During the training process, the output console reports the accuracy and error of the training dataset and their validation after every stage.
At the end of training, we can evaluate the model’s performance (accuracy and error), the confusion matrix, and the estimated performance of the device on the same page.
If you are not satisfied with the accuracy, we recommend collecting more data and retraining the model.
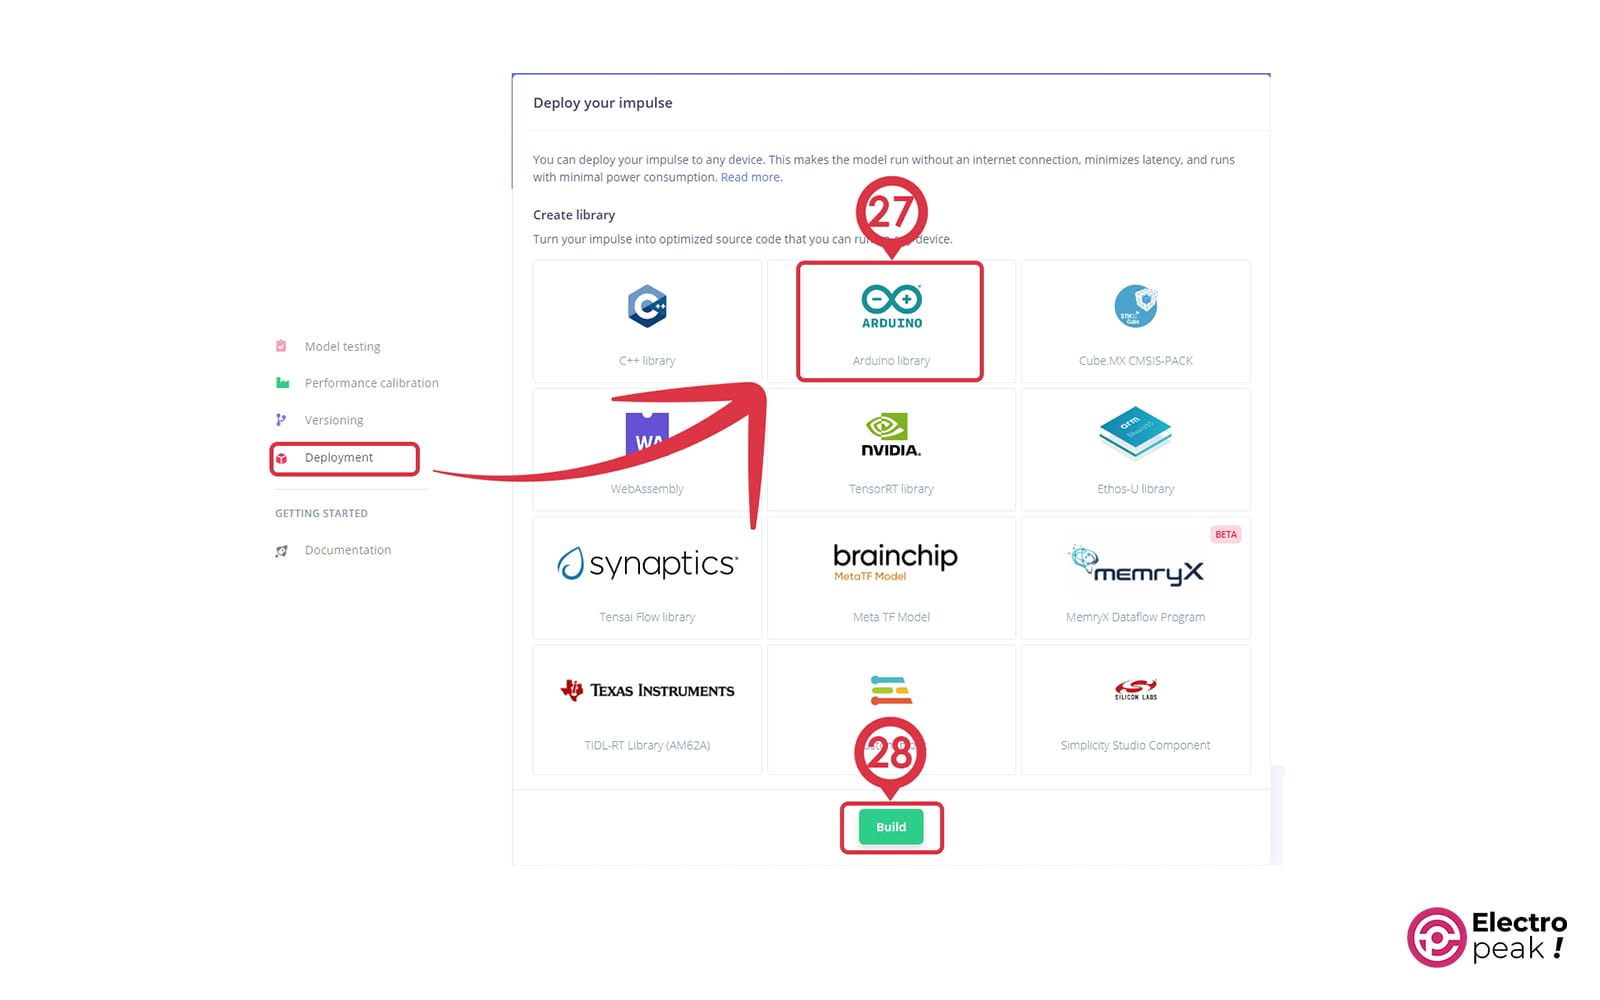
Now, you can download the created model as an Arduino library. To do that, click on Deployment -> Arduino library -> Build.
A Circuit w/ Raspberry Pi Pico: Voice-Controlled LED
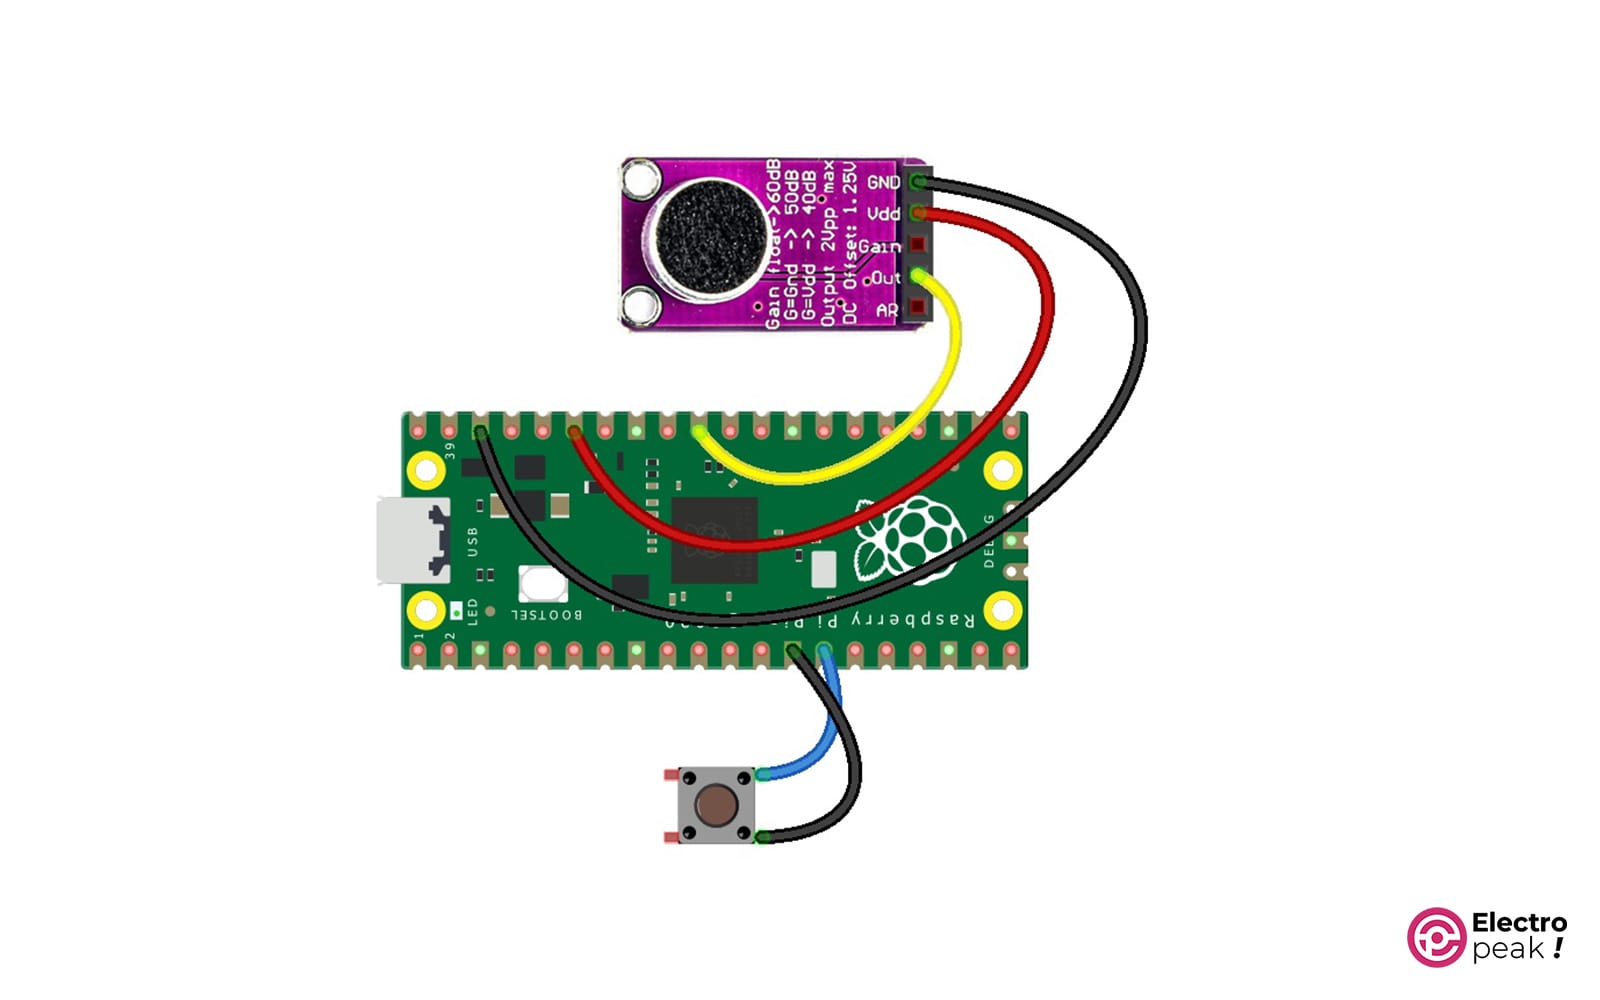
Raspberry Pi Pico only has a microcontroller on it. Therefore, you need to build a simple circuit to control voice on this platform.
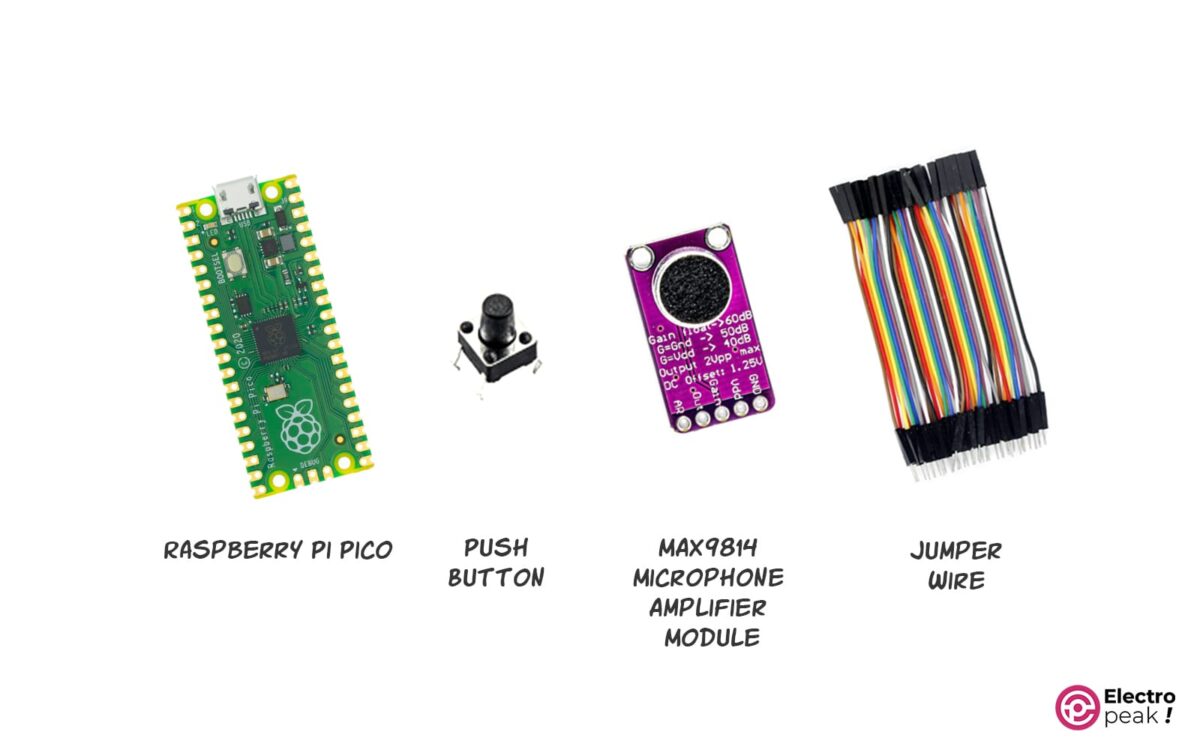
To start, we will need a few components: a Raspberry Pi Pico, an electret microphone with a MAX9814 amplifier, and a push button.
MAX9814 Microphone Amplifier in a Nutshell
The microphone used in this tutorial is the low-cost MAX9814 electret microphone amplifier.
The signal coming from the microphone is usually small and needs amplification for recording and analysis. For this reason, the microphone output is amplified with the MAX9814 chip, which is an automatic gain control (AGC) amplifier. AGC allows recording speech in environments where the background noise level varies unpredictably. Therefore, MAX9814 automatically adjusts the gain to always distinguish the desired sound.
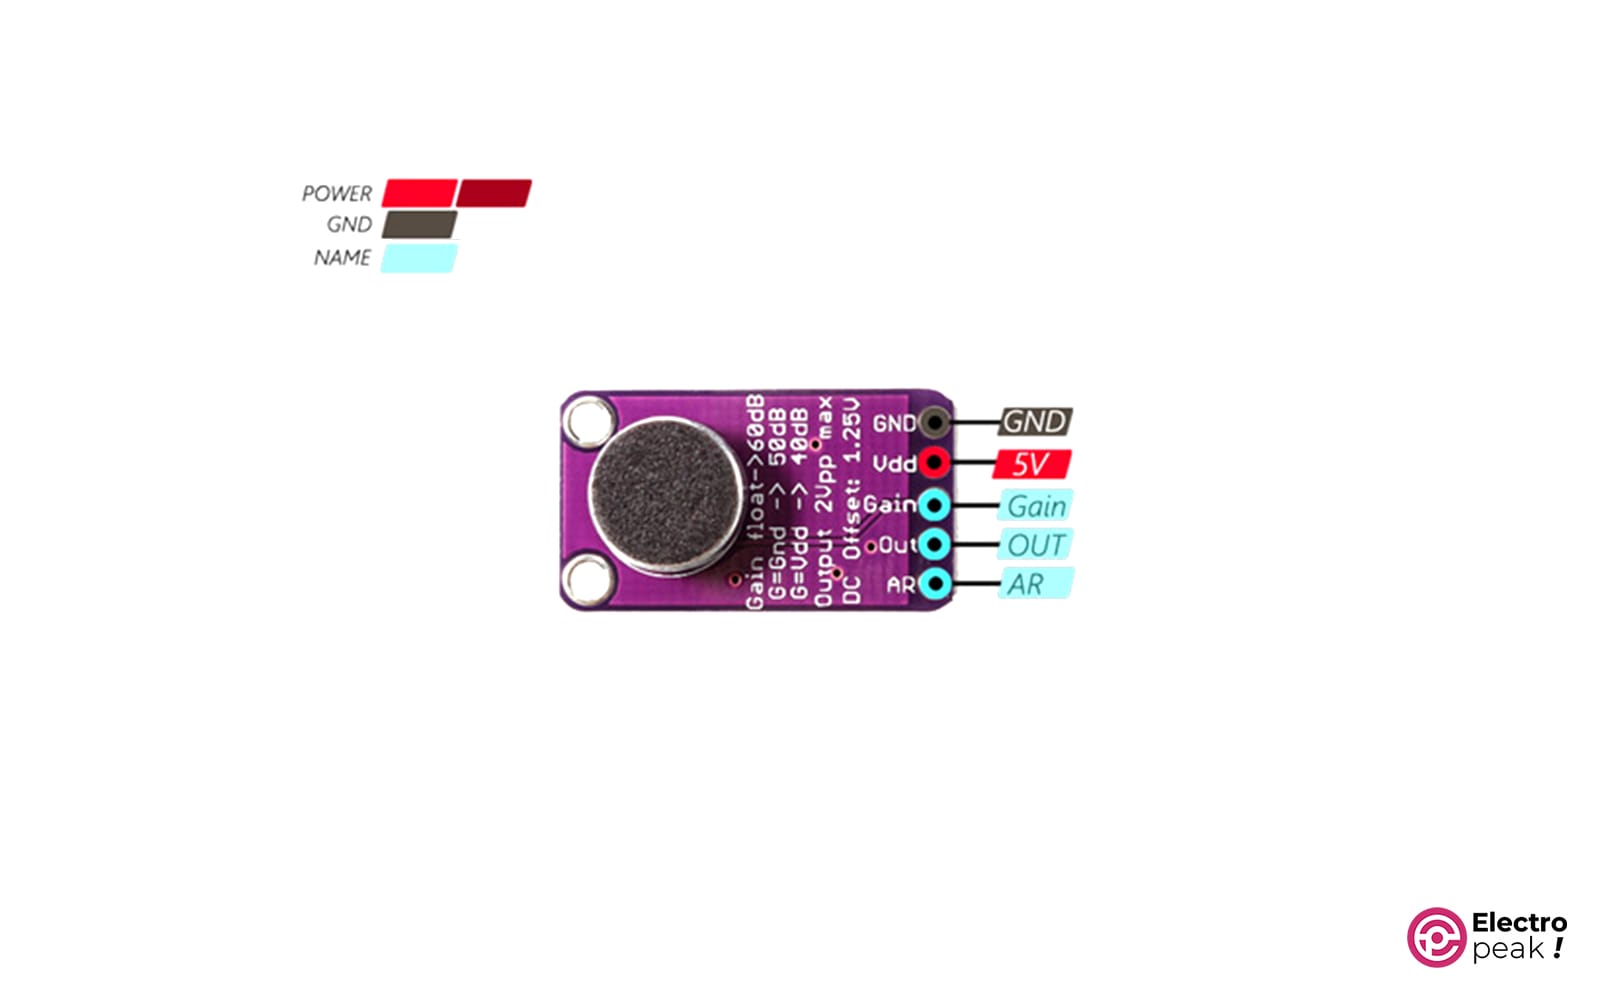
The amplifier requires a power supply between 2.7 and 5.5V and generates an output with a maximum peak-to-peak voltage of 2V at a DC bias of 1.25V. Therefore, you can easily connect the device to microcontrollers that operate at a voltage level of 3.3V.
The microphone module has five pins as shown in the image below.
Wiring
Wire up the components as shown below.
Voice Sampling on Raspberry Pi Pico w/ ADC and Timer Interrupts
Now, all the components are connected to Raspberry Pi Pico, and the only thing left is the code.
When we press the push button, the code records the voice for 1 second, extracts its features, and enters the data into an artificial neural network for classification. Finally, the result will be displayed as text on the serial monitor.
So, the first step is to read the voice signal. For this, you need to use an analog-to-digital converter (ADC). The RP2040 chip on Raspberry Pi Pico has four ADC pins with a resolution of 12 Bits and a maximum sampling frequency of 500 KHz.
The ADC is configured in “one-shot” mode, meaning it gives us a sample as soon as we request it.
The peripheral timer is set to generate an interrupt at a frequency similar to the ADC sampling rate. Therefore, the interrupt service routine (ISR) is responsible for sampling the received signal from the microphone and storing the data in an audio buffer.
Since the maximum ADC frequency is 500 KHz, the minimum time between two consecutive conversions will be 2µs. This won’t pose a problem for us because we take samples from the voice signal at 16 KHz.
Programming Raspberry Pi Pico with PlatformIO
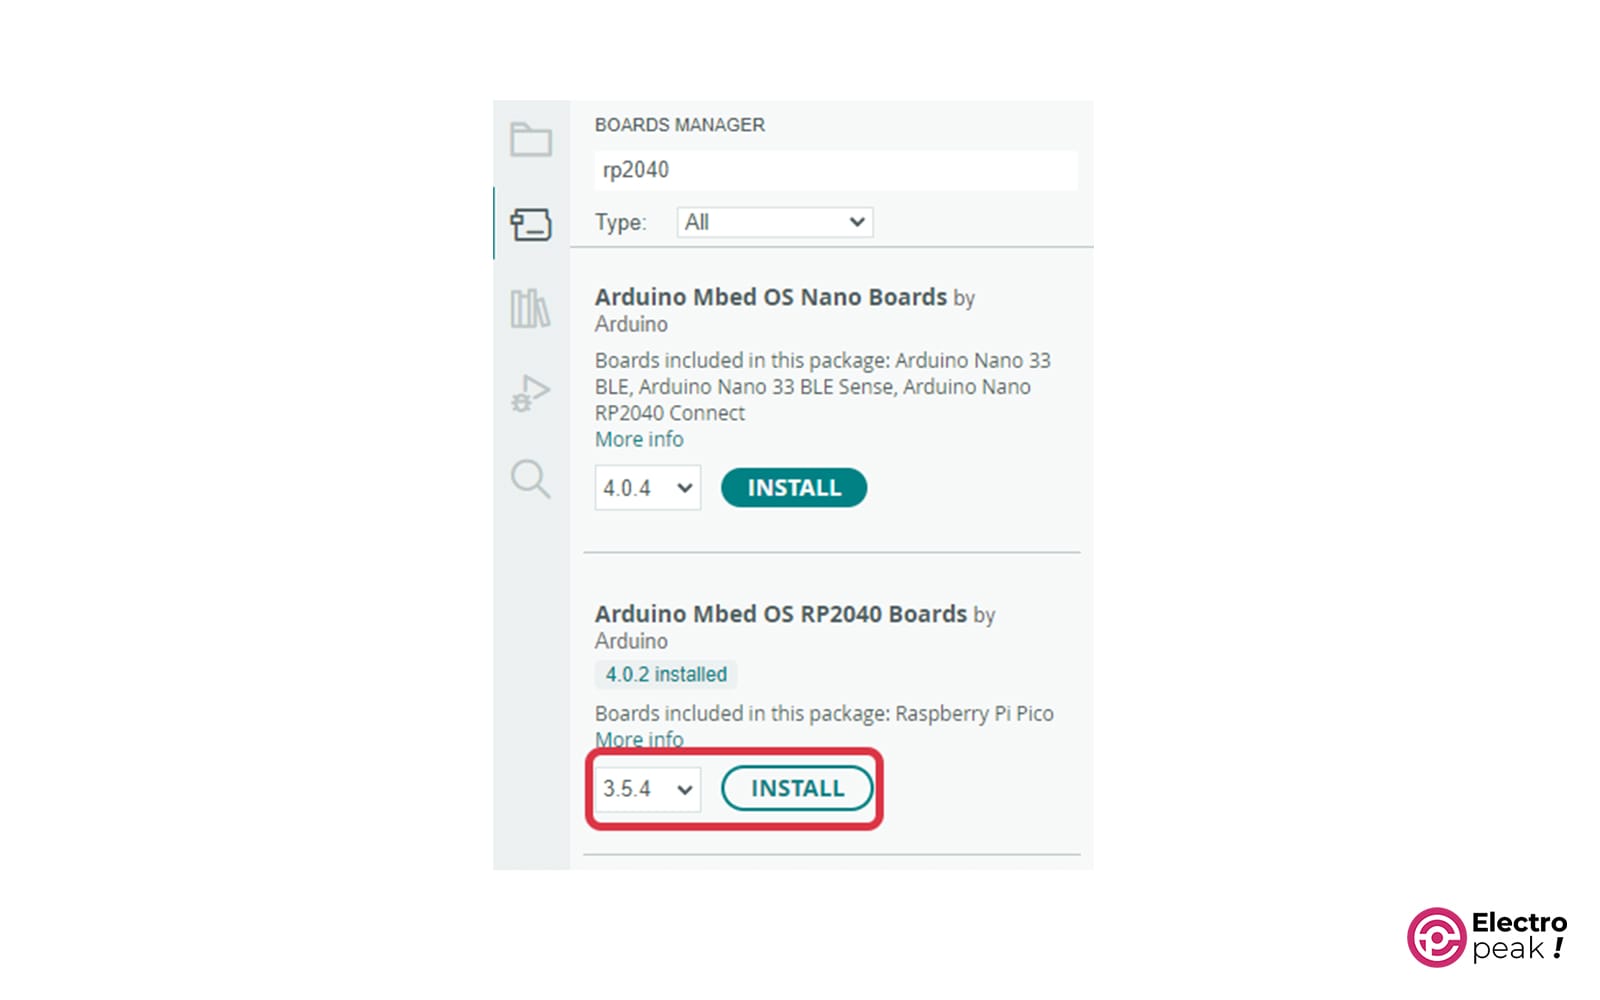
Before entering the PlatformIO software, open Arduino IDE and search for “rp2040 mbed” at Tools->Board->Boards manager. Then, select the desired version and click on “Install.” Wait for the installation process to finish. Finally, close Arduino IDE.
- Upload code with Arduino IDE in Linux environment
- Use PlatformIO software
PlatformIO software is one of the extensions of Visual Studio Code.
You can download and install Visual Studio Code from this link.
After installing and running the software, go to the “Extensions” section (Ctrl+Shift+X) and enter the term “PlatformIO” in the search field.
After installation, follow the steps below:
- Create a new project.
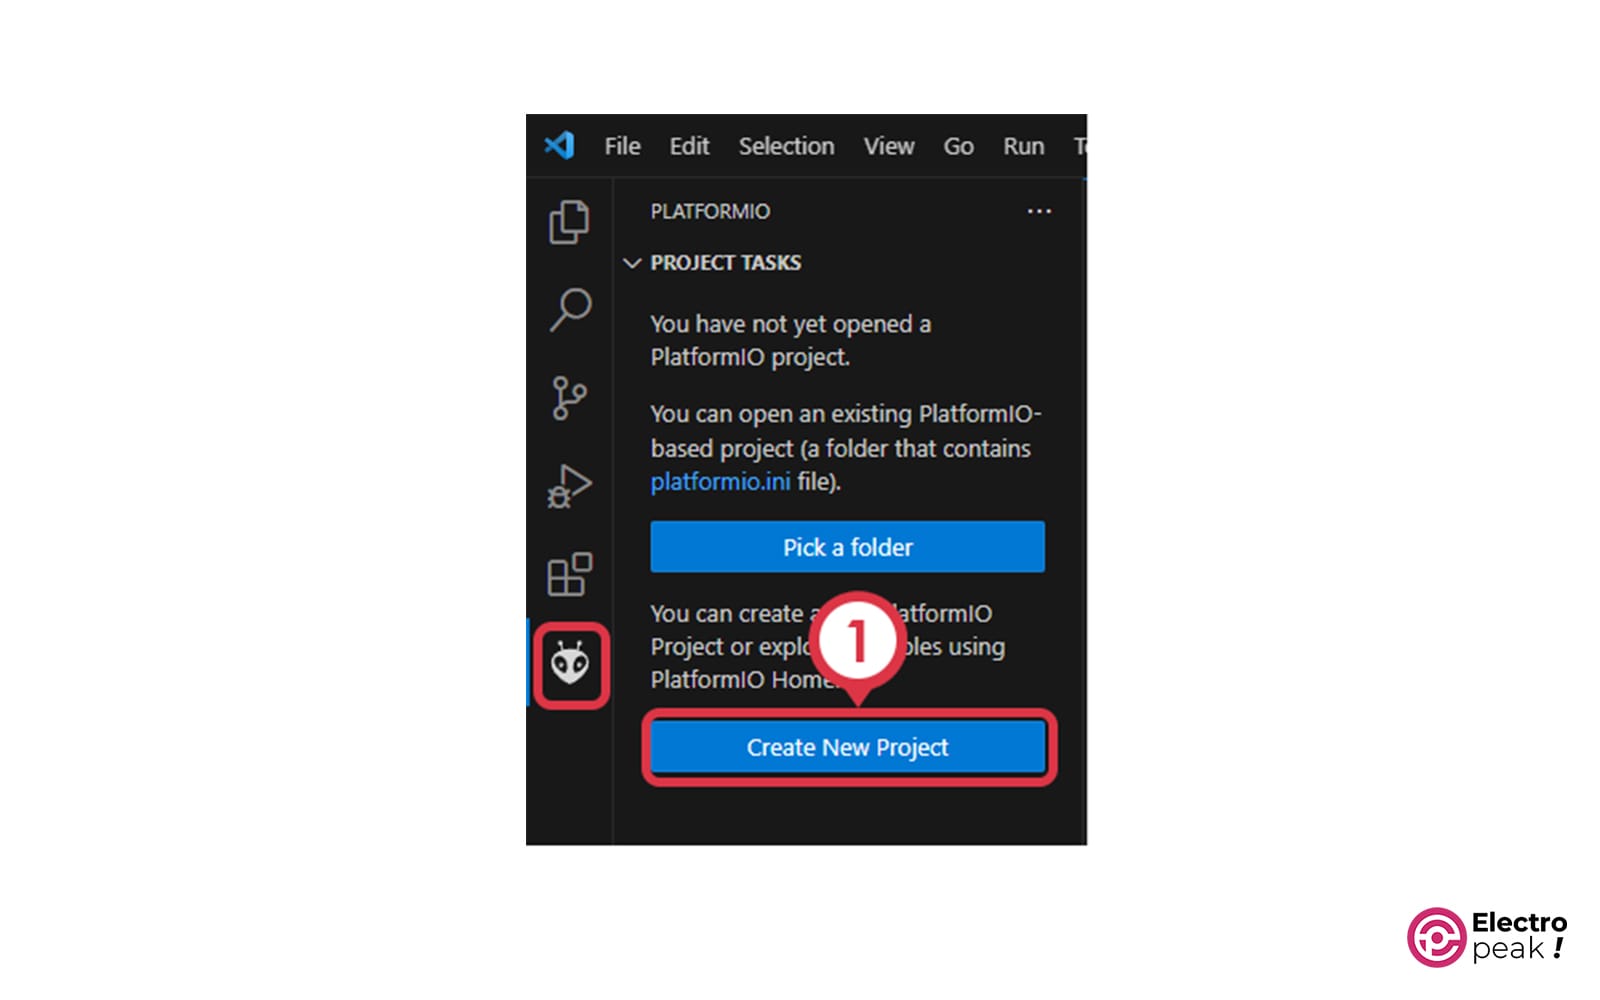
- Click on “New Project.”
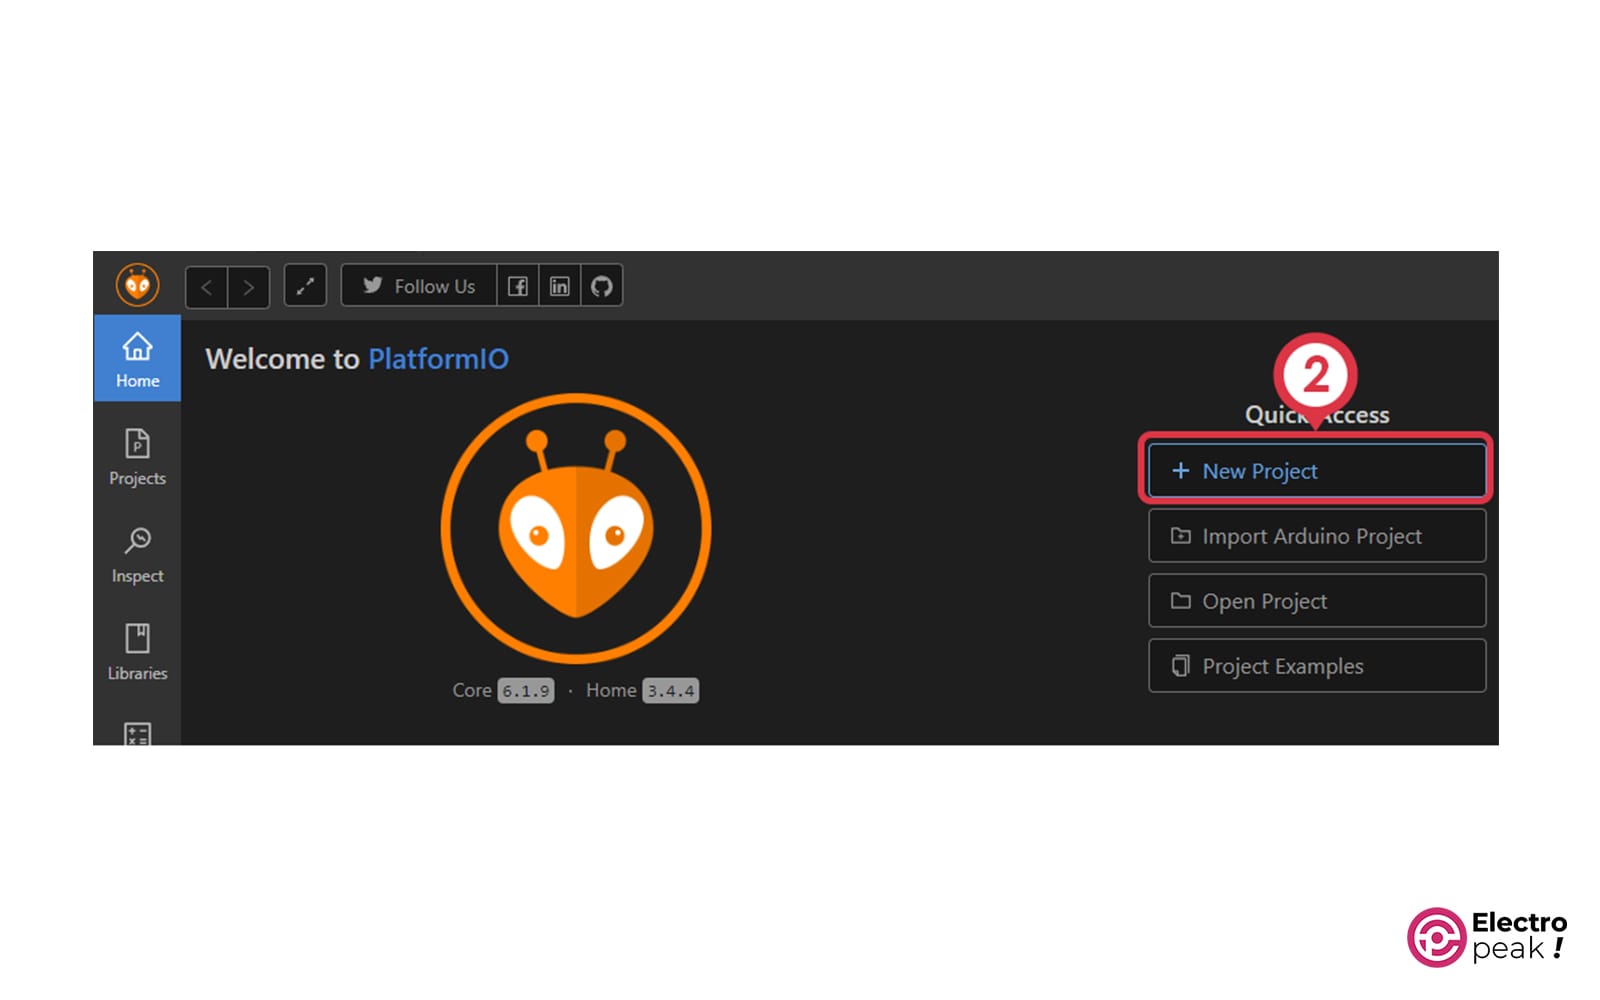
- Specify the project name, board type, and framework.
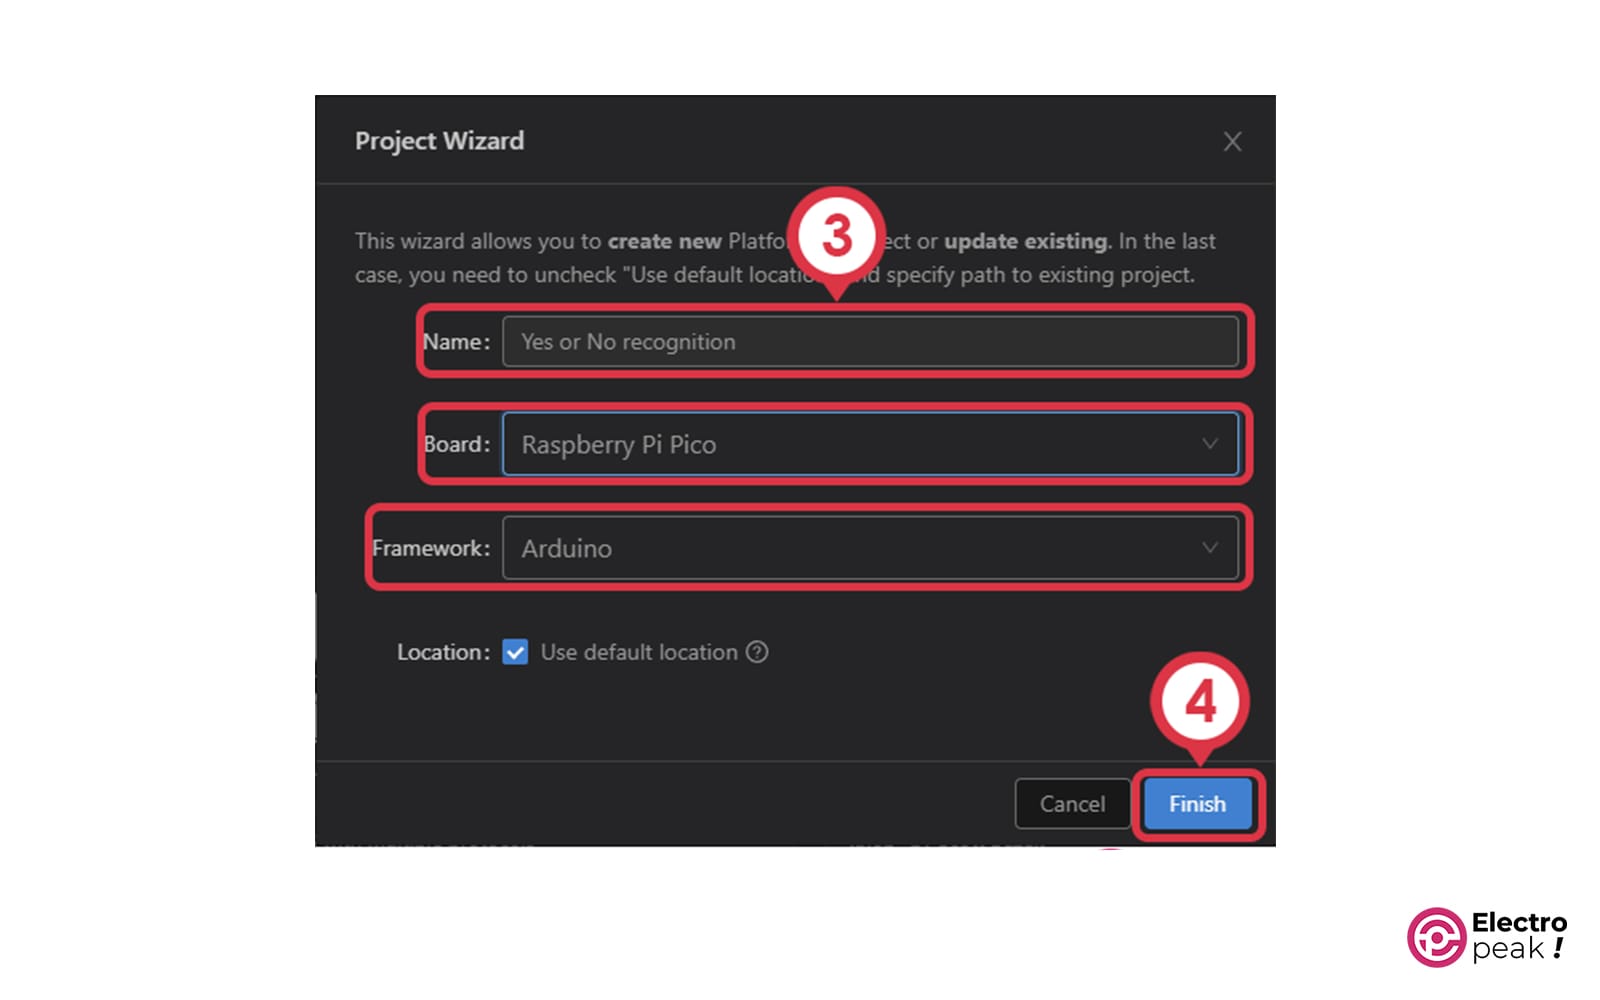
The files related to your project are placed in the Documents folder by default.
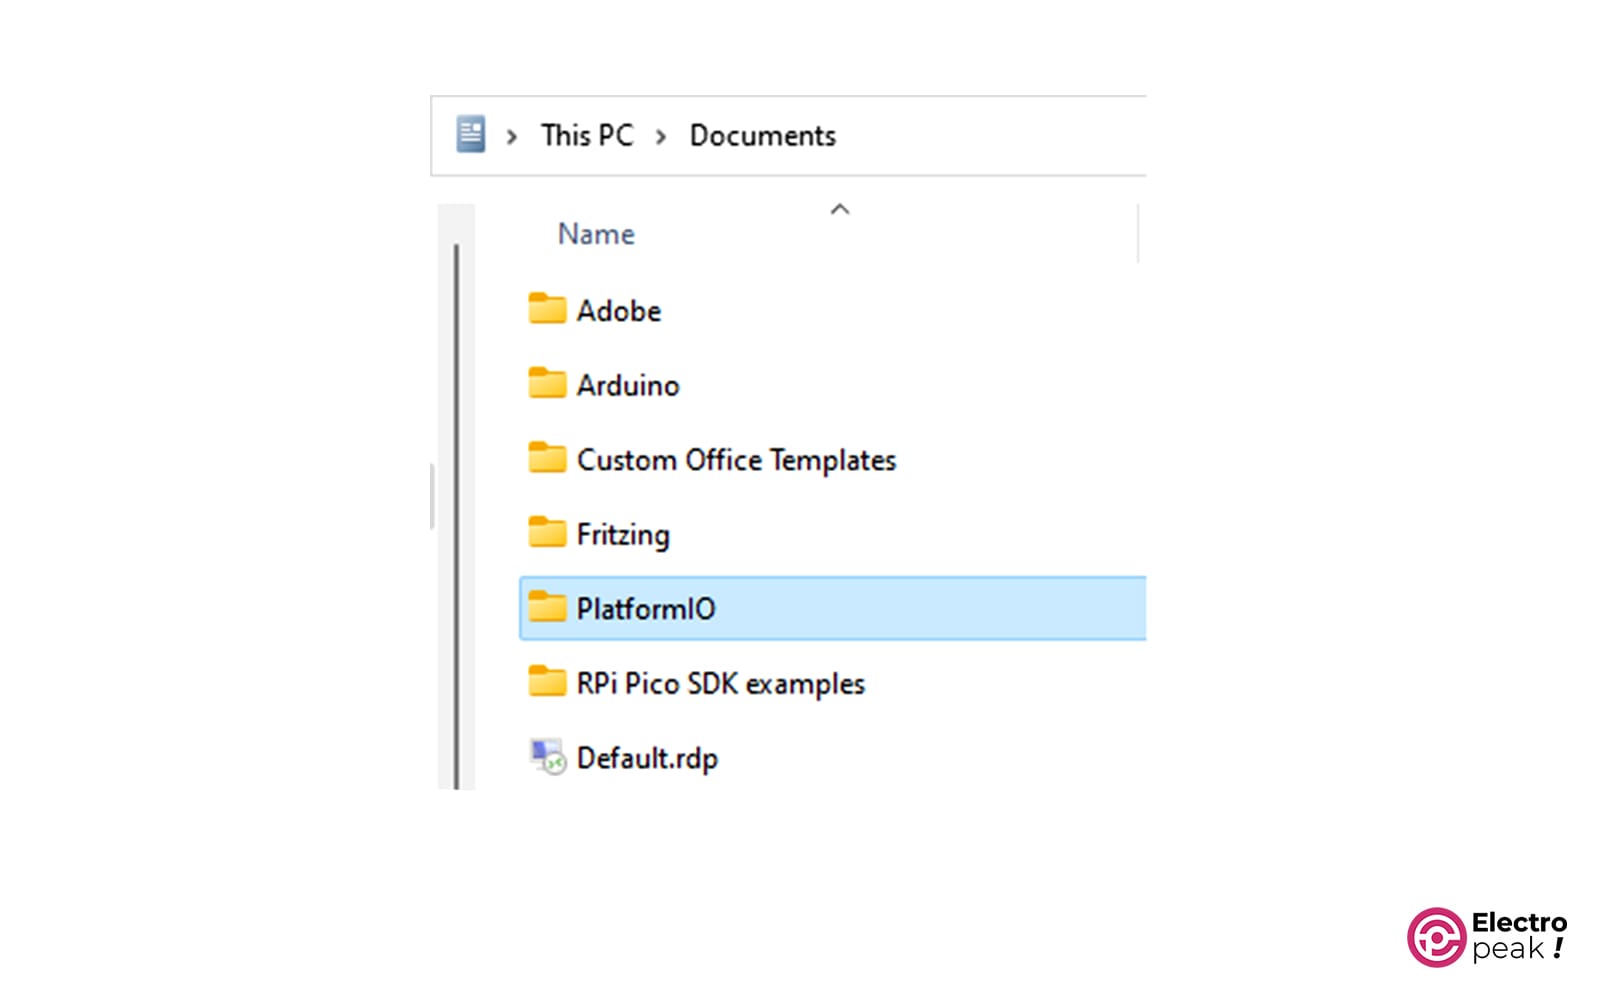
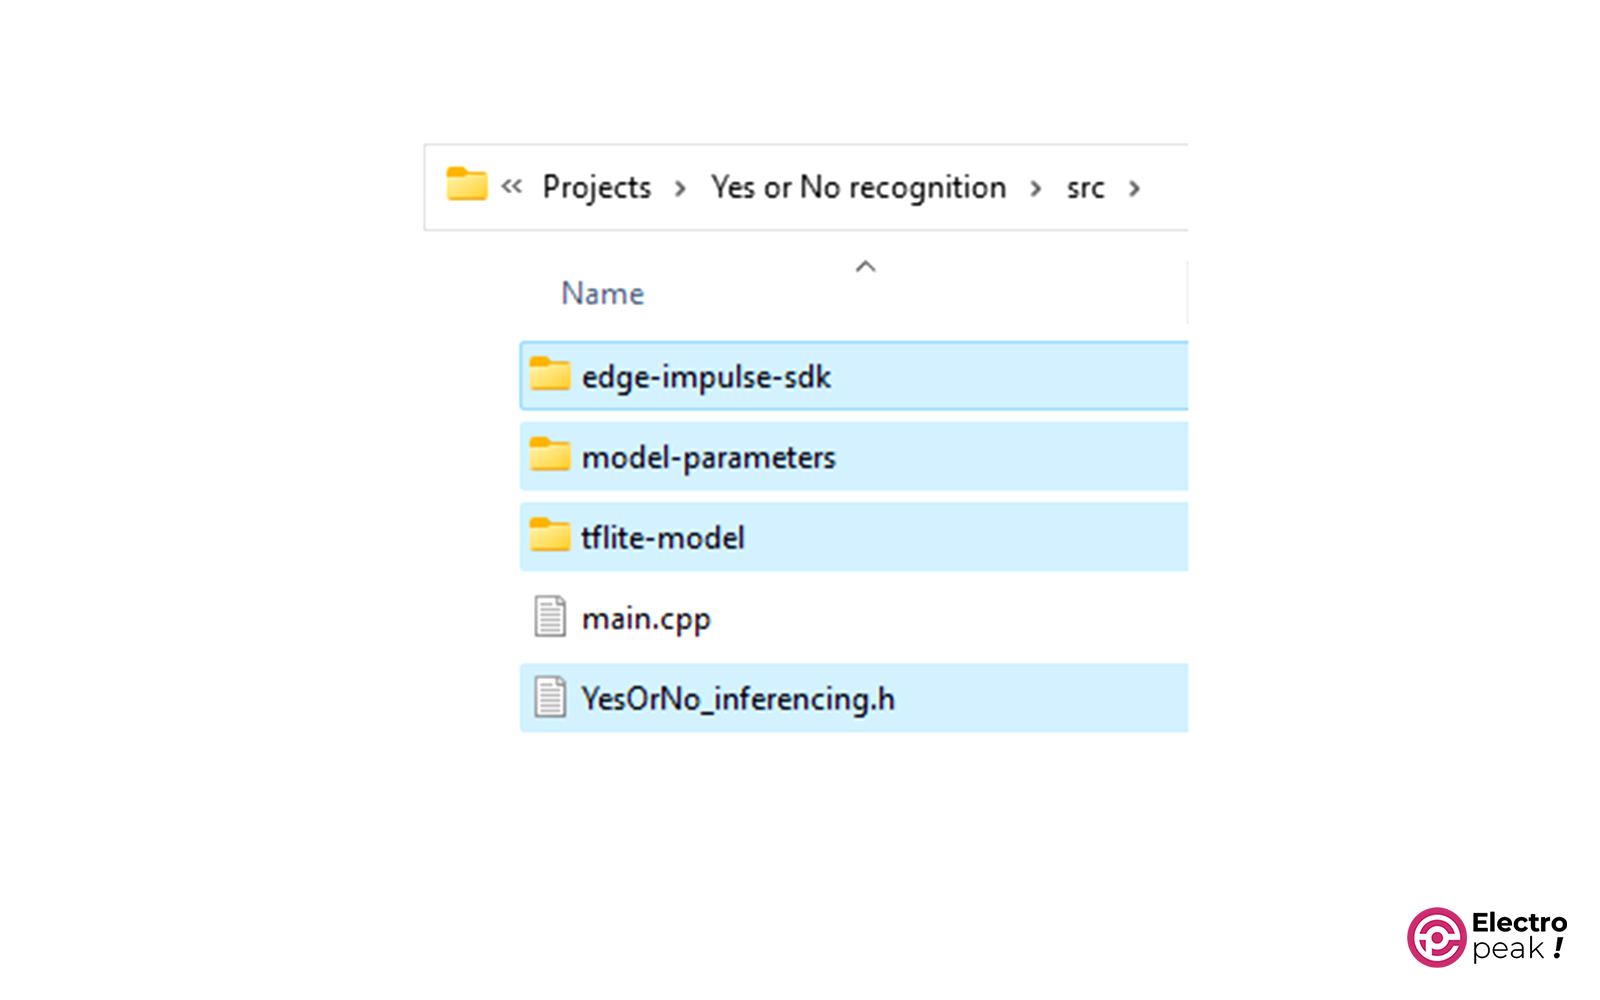
- Install the trained model library
Now unzip the model library file you downloaded and copy the contents of the “src” folder to the following path: Documents->PlatformIO->YOUR PROJECT NAME->src
- Enter the program code
Go back to PlatformIO and open the main.cpp file from the src folder.
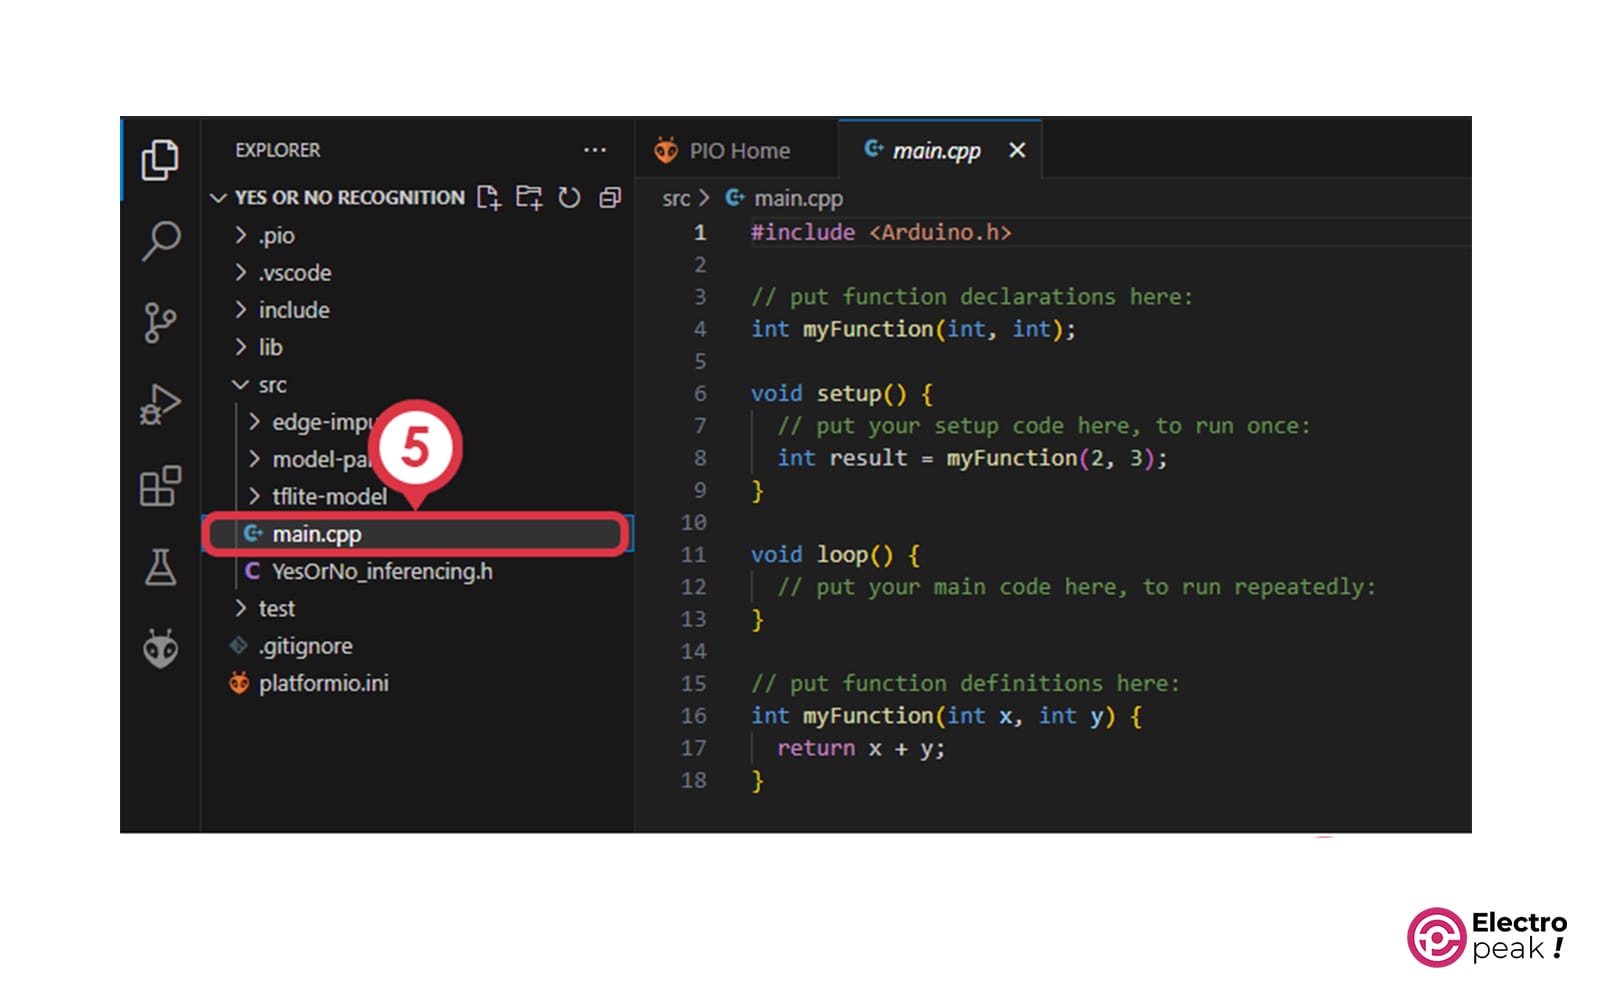
Now copy the following code into it.
/*
modified on Aug 2, 2023
Modified by Majid Merati from https://github.com/PacktPublishing/TinyML-Cookbook/blob/main/Chapter04/ArduinoSketches/09_kws_raspberrypi_pico.ino
Home
*/
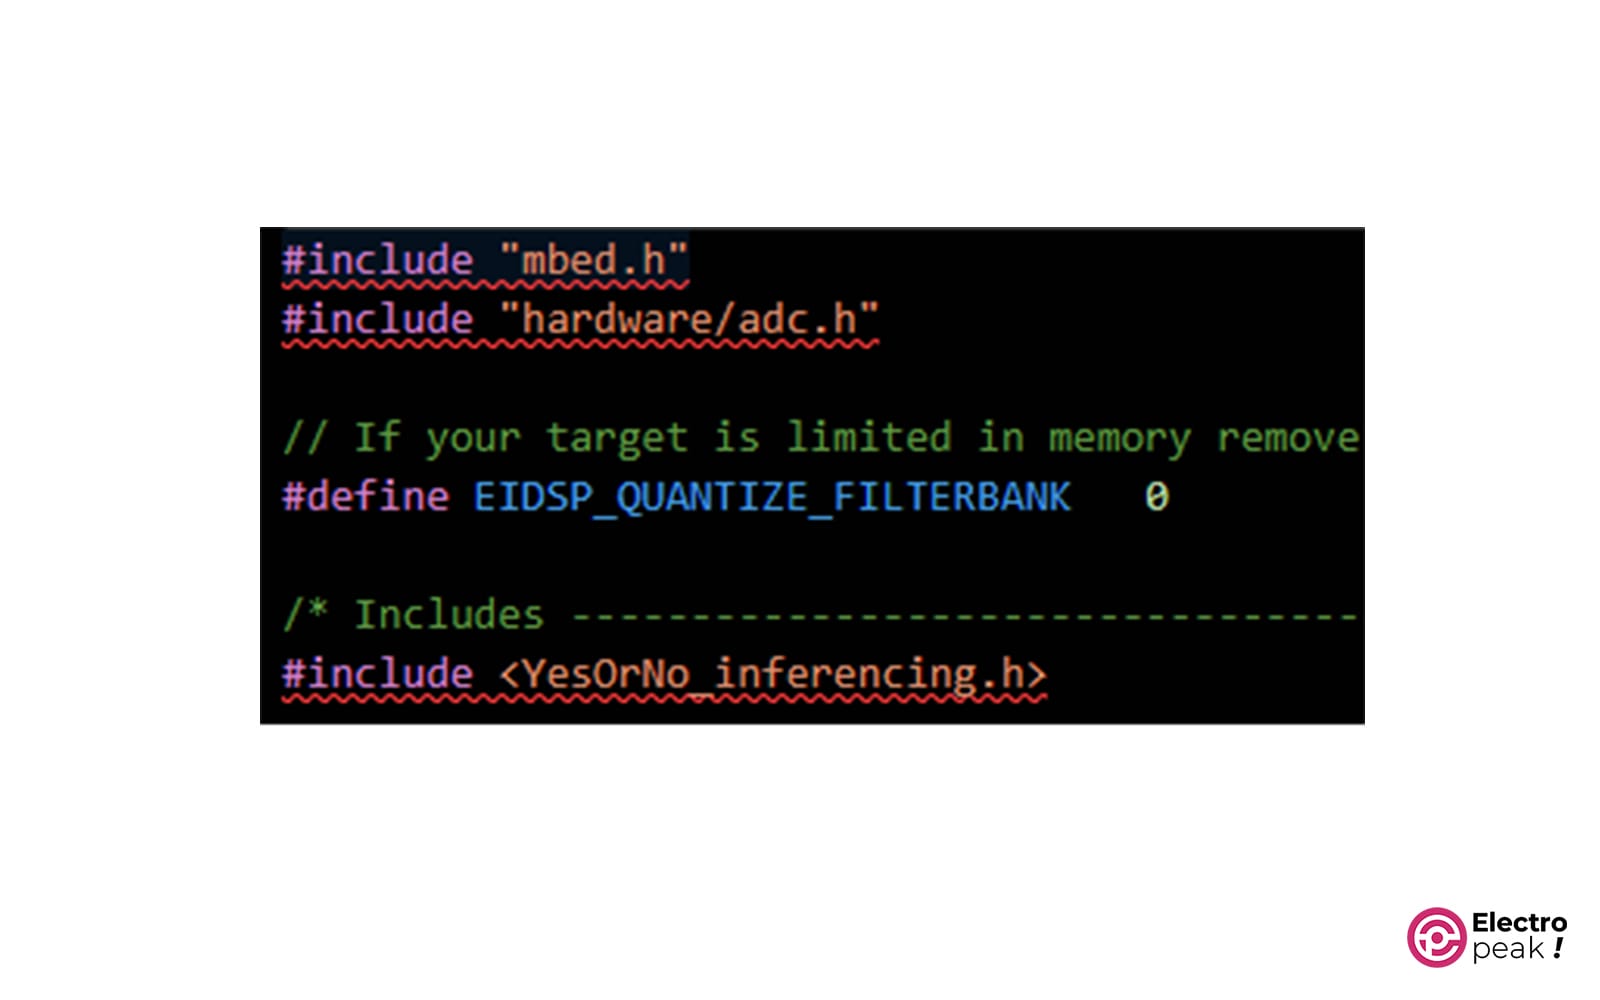
#include "mbed.h"
#include "hardware/adc.h"
// If your target is limited in memory remove this macro to save 10K RAM
#define EIDSP_QUANTIZE_FILTERBANK 0
/* Includes ---------------------------------------------------------------- */
#include <YesOrNo_inferencing.h>
#define ON 1
#define OFF 0
#define PRESSED 0
#define LEDR p9
#define LEDG p8
#define LEDB p7
#define LED_BUILTIN p25
#define BUTTON p10
#define BIAS_MIC 1552 // (1.25V * 4095) / 3.3
#define AUDIO_SAMPLING_RATE 16000.0
#define NUM_YesOrNo 3
#define PROBABILITY_THR 0.5
#define GAIN 1
static mbed::Ticker timer;
static mbed::DigitalOut led_builtin(LED_BUILTIN);
static mbed::DigitalIn button(BUTTON);
/** Audio buffers, pointers and selectors */
typedef struct {
int16_t *buffer;
int16_t *buffer_filtered;
uint8_t buf_ready;
uint32_t buf_count;
uint32_t n_samples;
} inference_t;
static volatile inference_t inference;
static bool debug_nn = false;
static bool debug_audio_raw = true;
static bool test_leds = false; // Set this to true to test the LEDs
static volatile int ix_buffer = 0;
static volatile bool is_buffer_ready = false;
static void adc_setup() {
adc_init();
adc_gpio_init(26);
adc_select_input(0);
}
static void print_raw_audio() {
for(int i = 0; i < EI_CLASSIFIER_RAW_SAMPLE_COUNT; ++i) {
ei_printf("%d\n", inference.buffer[i]);
}
}
void timer_ISR() {
if(ix_buffer < EI_CLASSIFIER_RAW_SAMPLE_COUNT) {
int16_t v = (int16_t)((adc_read() - BIAS_MIC)) * GAIN;
inference.buffer[ix_buffer++] = (int16_t)v;
}
else {
is_buffer_ready = true;
}
}
/**
* @brief Printf function uses vsnprintf and output using Arduino Serial
*
* @param[in] format Variable argument list
*/
void ei_printf(const char *format, ...) {
static char print_buf[1024] = { 0 };
va_list args;
va_start(args, format);
int r = vsnprintf(print_buf, sizeof(print_buf), format, args);
va_end(args);
if (r > 0) {
Serial.write(print_buf);
}
}
/**
* @brief Init inferencing struct and setup/start PDM
*
* @param[in] n_samples The n samples
*
* @return { description_of_the_return_value }
*/
static bool microphone_inference_start(uint32_t n_samples) {
inference.buffer = (int16_t *)malloc(n_samples * sizeof(int16_t));
if(inference.buffer == NULL) {
return false;
}
inference.buf_count = 0;
inference.n_samples = n_samples;
inference.buf_ready = 0;
return true;
}
/**
* @brief Wait on new data
*
* @return True when finished
*/
static bool microphone_inference_record(void) {
unsigned int sampling_period_us = 1000000 / 16000;
ix_buffer = 0;
is_buffer_ready = false;
led_builtin = ON;
timer.attach_us(&timer_ISR, sampling_period_us);
while(!is_buffer_ready);
timer.detach();
led_builtin = OFF;
if(debug_audio_raw) {
print_raw_audio();
}
return true;
}
/**
* Get raw audio signal data
*/
static int microphone_audio_signal_get_data(size_t offset, size_t length, float *out_ptr) {
numpy::int16_to_float(&inference.buffer[offset], out_ptr, length);
return 0;
}
static void microphone_inference_end(void) {
free(inference.buffer);
}
#if !defined(EI_CLASSIFIER_SENSOR) || EI_CLASSIFIER_SENSOR != EI_CLASSIFIER_SENSOR_MICROPHONE
#error "Invalid model for current sensor."
#endif
/**
* @brief Arduino setup function
*/
void setup()
{
Serial.begin(115200);
while(!Serial);
adc_setup();
led_builtin = 0;
button.mode(PullUp);
if (microphone_inference_start(EI_CLASSIFIER_RAW_SAMPLE_COUNT) == false) {
ei_printf("ERR: Failed to setup audio sampling\r\n");
return;
}
}
/**
* @brief Arduino main function. Runs the inferencing loop.
*/
void loop()
{
if(button == PRESSED) {
delay(700);
bool m = microphone_inference_record();
if (!m) {
ei_printf("ERR: Failed to record audio...\n");
return;
}
signal_t signal;
signal.total_length = EI_CLASSIFIER_RAW_SAMPLE_COUNT;
signal.get_data = µphone_audio_signal_get_data;
ei_impulse_result_t result = { 0 };
EI_IMPULSE_ERROR r = run_classifier(&signal, &result, debug_nn);
if (r != EI_IMPULSE_OK) {
ei_printf("ERR: Failed to run classifier (%d)\n", r);
return;
}
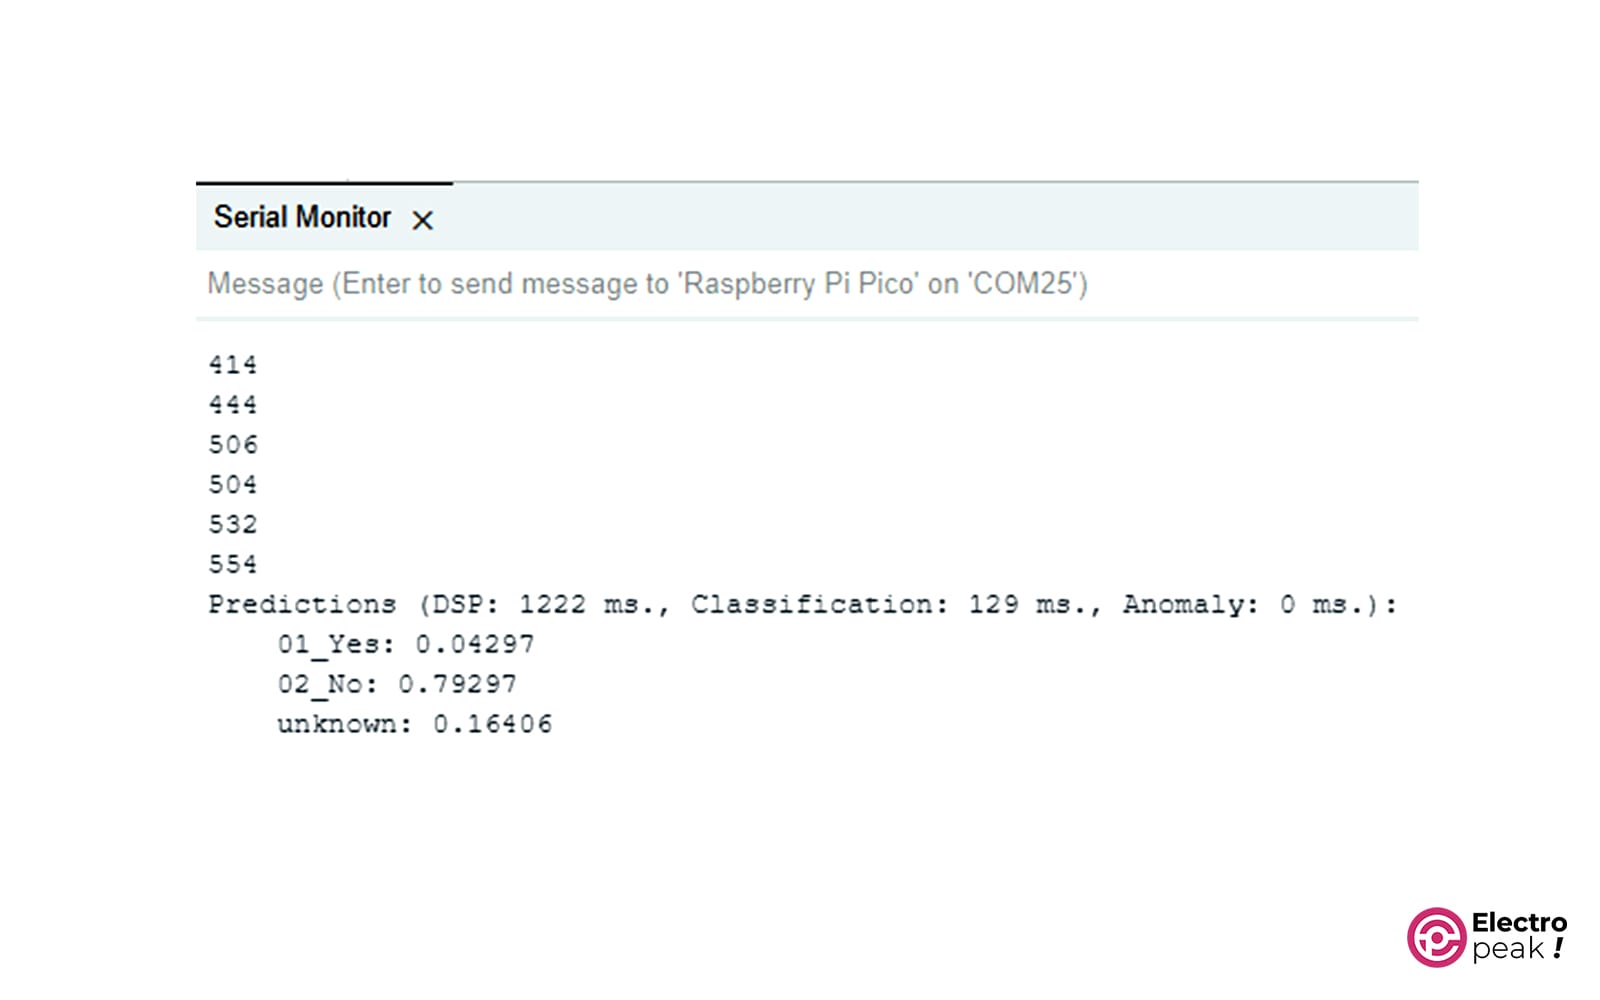
// print the predictions
ei_printf("Predictions ");
ei_printf("(DSP: %d ms., Classification: %d ms., Anomaly: %d ms.)",
result.timing.dsp, result.timing.classification, result.timing.anomaly);
ei_printf(": \n");
for (size_t ix = 0; ix < EI_CLASSIFIER_LABEL_COUNT; ix++) {
ei_printf(" %s: %.5f\n", result.classification[ix].label, result.classification[ix].value);
}
// Get the index with higher probability
size_t ix_max = 0;
float pb_max = 0;
for (size_t ix = 0; ix < EI_CLASSIFIER_LABEL_COUNT; ix++) {
if(result.classification[ix].value > pb_max) {
ix_max = ix;
pb_max = result.classification[ix].value;
}
}
if(pb_max > PROBABILITY_THR) {
switch (ix_max){
case 0:
//YOU CAN ADD YOUR FUNCTION HERE
break;
case 1:
//YOU CAN ADD YOUR FUNCTION HERE
break;
case 2:
//YOU CAN ADD YOUR FUNCTION HERE
break;
default:
ei_printf("Error! operator is not correct");
}
while(button == PRESSED);
delay(1000);
}
}
After you’ve copied the code, just give it a moment for the C++ compiler to do a quick check. You’ll see that there are some errors in the code. The code lines marked with a red line underneath them are the ones that the compiler says have errors.
To resolve these issues, follow these steps:
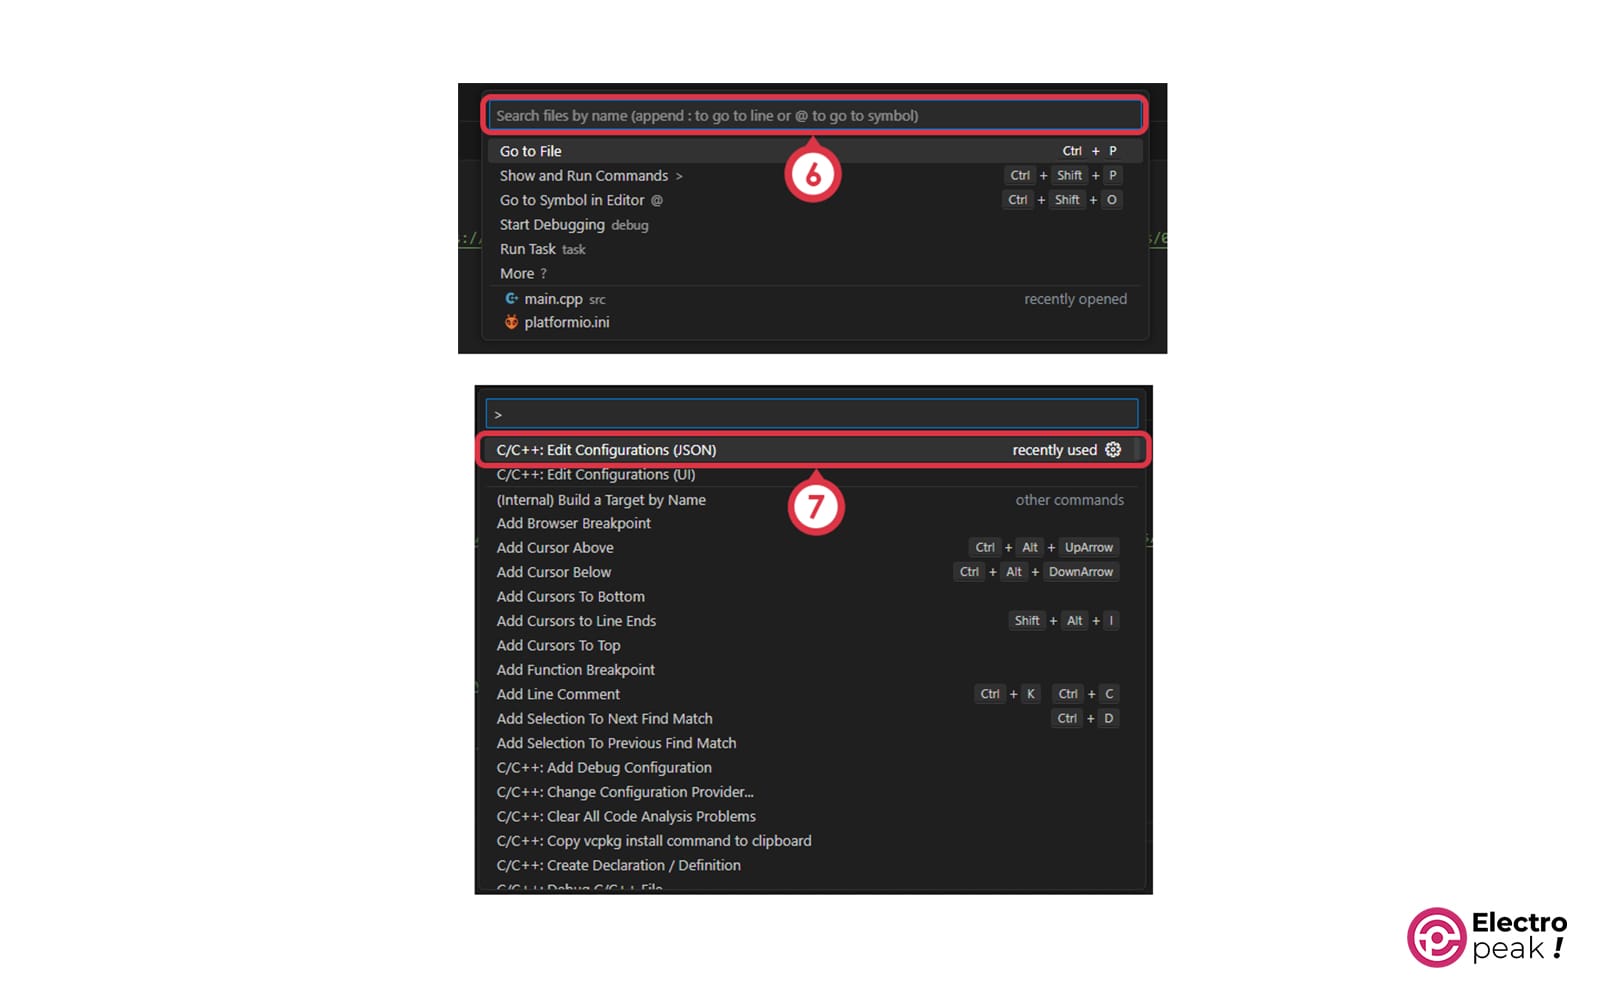
- Click on the search window, press the F1 key on your keyboard, and open the “C/C++: Edit Configurations (JSON)” file. Once the file is open, delete the written codes.
- Modify the library addresses: Copy the following code into this file.
//
// !!! WARNING !!! AUTO-GENERATED FILE!
// PLEASE DO NOT MODIFY IT AND USE "platformio.ini":
// https://docs.platformio.org/page/projectconf/section_env_build.html#build-flags
//
{
    "configurations": [
        {
            "name": "PlatformIO",
            "includePath": [
                "c:/Users/Caferobot9/Documents/PlatformIO/Projects/YesOrNo3/include",
                "c:/Users/Caferobot9/Documents/PlatformIO/Projects/YesOrNo3/src",
                "C:/Users/Caferobot9/.platformio/packages/framework-arduino-mbed/cores/arduino",
                "C:/Users/Caferobot9/.platformio/packages/framework-arduino-mbed/cores/arduino/api/deprecated",
                "C:/Users/Caferobot9/.platformio/packages/framework-arduino-mbed/cores/arduino/api/deprecated-avr-comp",
                "C:/Users/Caferobot9/.platformio/packages/framework-arduino-mbed/variants/RASPBERRY_PI_PICO",
                "C:/Users/Caferobot9/.platformio/packages/framework-arduino-mbed/libraries/Camera/src",
                "C:/Users/Caferobot9/.platformio/packages/framework-arduino-mbed/libraries/Ethernet/src",
                "C:/Users/Caferobot9/.platformio/packages/framework-arduino-mbed/libraries/GC2145",
                "C:/Users/Caferobot9/.platformio/packages/framework-arduino-mbed/libraries/GPS/src",
                "C:/Users/Caferobot9/.platformio/packages/framework-arduino-mbed/libraries/GSM/src",
                "C:/Users/Caferobot9/.platformio/packages/framework-arduino-mbed/libraries/Himax_HM01B0",
                "C:/Users/Caferobot9/.platformio/packages/framework-arduino-mbed/libraries/Himax_HM0360",
                "C:/Users/Caferobot9/.platformio/packages/framework-arduino-mbed/libraries/KernelDebug/src",
                "C:/Users/Caferobot9/.platformio/packages/framework-arduino-mbed/libraries/MCUboot/src",
                "C:/Users/Caferobot9/.platformio/packages/framework-arduino-mbed/libraries/MLC/src",
                "C:/Users/Caferobot9/.platformio/packages/framework-arduino-mbed/libraries/MRI/src",
                "C:/Users/Caferobot9/.platformio/packages/framework-arduino-mbed/libraries/NDP/src",
                "C:/Users/Caferobot9/.platformio/packages/framework-arduino-mbed/libraries/Nano33BLE_System/src",
                "C:/Users/Caferobot9/.platformio/packages/framework-arduino-mbed/libraries/Nicla_System/src",
                "C:/Users/Caferobot9/.platformio/packages/framework-arduino-mbed/libraries/OV7670",
                "C:/Users/Caferobot9/.platformio/packages/framework-arduino-mbed/libraries/PDM/src",
                "C:/Users/Caferobot9/.platformio/packages/framework-arduino-mbed/libraries/Portenta_Audio/src",
                "C:/Users/Caferobot9/.platformio/packages/framework-arduino-mbed/libraries/Portenta_SDCARD/src",
                "C:/Users/Caferobot9/.platformio/packages/framework-arduino-mbed/libraries/Portenta_SDRAM/src",
                "C:/Users/Caferobot9/.platformio/packages/framework-arduino-mbed/libraries/Portenta_Video/src",
                "C:/Users/Caferobot9/.platformio/packages/framework-arduino-mbed/libraries/Portenta_lvgl/src",
                "C:/Users/Caferobot9/.platformio/packages/framework-arduino-mbed/libraries/RPC/src",
                "C:/Users/Caferobot9/.platformio/packages/framework-arduino-mbed/libraries/SE05X/src",
                "C:/Users/Caferobot9/.platformio/packages/framework-arduino-mbed/libraries/SFU/src",
                "C:/Users/Caferobot9/.platformio/packages/framework-arduino-mbed/libraries/SPI",
                "C:/Users/Caferobot9/.platformio/packages/framework-arduino-mbed/libraries/STM32H747_System/src",
                "C:/Users/Caferobot9/.platformio/packages/framework-arduino-mbed/libraries/Scheduler/src",
                "C:/Users/Caferobot9/.platformio/packages/framework-arduino-mbed/libraries/SocketWrapper/src",
                "C:/Users/Caferobot9/.platformio/packages/framework-arduino-mbed/libraries/ThreadDebug/src",
                "C:/Users/Caferobot9/.platformio/packages/framework-arduino-mbed/libraries/USBAudio",
                "C:/Users/Caferobot9/.platformio/packages/framework-arduino-mbed/libraries/USBHID/src",
                "C:/Users/Caferobot9/.platformio/packages/framework-arduino-mbed/libraries/USBHOST/src",
                "C:/Users/Caferobot9/.platformio/packages/framework-arduino-mbed/libraries/USBMIDI",
                "C:/Users/Caferobot9/.platformio/packages/framework-arduino-mbed/libraries/USBMSD/src",
                "C:/Users/Caferobot9/.platformio/packages/framework-arduino-mbed/libraries/WiFi/src",
                "C:/Users/Caferobot9/.platformio/packages/framework-arduino-mbed/libraries/Wire",
                "C:/Users/Caferobot9/.platformio/packages/framework-arduino-mbed/libraries/doom/src",
                "C:/Users/Caferobot9/.platformio/packages/framework-arduino-mbed/libraries/ea_malloc",
                "C:/Users/Caferobot9/.platformio/packages/framework-arduino-mbed/libraries/mbed-memory-status",
                "C:/Users/Caferobot9/.platformio/packages/framework-arduino-mbed/libraries/openamp_arduino/src",
                "C:/Users/Caferobot9/.platformio/packages/framework-arduino-mbed/libraries/rpclib/src",
                "C:/Users/Caferobot9/.platformio/packages/framework-arduino-mbed/libraries/syntiant_ilib/src",
                ""
            ],
            "browse": {
                "limitSymbolsToIncludedHeaders": true,
                "path": [
                    "c:/Users/Caferobot9/Documents/PlatformIO/Projects/YesOrNo3/include",
                    "c:/Users/Caferobot9/Documents/PlatformIO/Projects/YesOrNo3/src",
                    "C:/Users/Caferobot9/.platformio/packages/framework-arduino-mbed/cores/arduino",
                    "C:/Users/Caferobot9/.platformio/packages/framework-arduino-mbed/cores/arduino/api/deprecated",
                    "C:/Users/Caferobot9/.platformio/packages/framework-arduino-mbed/cores/arduino/api/deprecated-avr-comp",
                    "C:/Users/Caferobot9/.platformio/packages/framework-arduino-mbed/variants/RASPBERRY_PI_PICO",
                    "C:/Users/Caferobot9/.platformio/packages/framework-arduino-mbed/libraries/Camera/src",
                    "C:/Users/Caferobot9/.platformio/packages/framework-arduino-mbed/libraries/Ethernet/src",
                    "C:/Users/Caferobot9/.platformio/packages/framework-arduino-mbed/libraries/GC2145",
                    "C:/Users/Caferobot9/.platformio/packages/framework-arduino-mbed/libraries/GPS/src",
                    "C:/Users/Caferobot9/.platformio/packages/framework-arduino-mbed/libraries/GSM/src",
                    "C:/Users/Caferobot9/.platformio/packages/framework-arduino-mbed/libraries/Himax_HM01B0",
                    "C:/Users/Caferobot9/.platformio/packages/framework-arduino-mbed/libraries/Himax_HM0360",
                    "C:/Users/Caferobot9/.platformio/packages/framework-arduino-mbed/libraries/KernelDebug/src",
                    "C:/Users/Caferobot9/.platformio/packages/framework-arduino-mbed/libraries/MCUboot/src",
                    "C:/Users/Caferobot9/.platformio/packages/framework-arduino-mbed/libraries/MLC/src",
                    "C:/Users/Caferobot9/.platformio/packages/framework-arduino-mbed/libraries/MRI/src",
                    "C:/Users/Caferobot9/.platformio/packages/framework-arduino-mbed/libraries/NDP/src",
                    "C:/Users/Caferobot9/.platformio/packages/framework-arduino-mbed/libraries/Nano33BLE_System/src",
                    "C:/Users/Caferobot9/.platformio/packages/framework-arduino-mbed/libraries/Nicla_System/src",
                    "C:/Users/Caferobot9/.platformio/packages/framework-arduino-mbed/libraries/OV7670",
                    "C:/Users/Caferobot9/.platformio/packages/framework-arduino-mbed/libraries/PDM/src",
                    "C:/Users/Caferobot9/.platformio/packages/framework-arduino-mbed/libraries/Portenta_Audio/src",
                    "C:/Users/Caferobot9/.platformio/packages/framework-arduino-mbed/libraries/Portenta_SDCARD/src",
                    "C:/Users/Caferobot9/.platformio/packages/framework-arduino-mbed/libraries/Portenta_SDRAM/src",
                    "C:/Users/Caferobot9/.platformio/packages/framework-arduino-mbed/libraries/Portenta_Video/src",
                    "C:/Users/Caferobot9/.platformio/packages/framework-arduino-mbed/libraries/Portenta_lvgl/src",
                    "C:/Users/Caferobot9/.platformio/packages/framework-arduino-mbed/libraries/RPC/src",
                    "C:/Users/Caferobot9/.platformio/packages/framework-arduino-mbed/libraries/SE05X/src",
                    "C:/Users/Caferobot9/.platformio/packages/framework-arduino-mbed/libraries/SFU/src",
                    "C:/Users/Caferobot9/.platformio/packages/framework-arduino-mbed/libraries/SPI",
                    "C:/Users/Caferobot9/.platformio/packages/framework-arduino-mbed/libraries/STM32H747_System/src",
                    "C:/Users/Caferobot9/.platformio/packages/framework-arduino-mbed/libraries/Scheduler/src",
                    "C:/Users/Caferobot9/.platformio/packages/framework-arduino-mbed/libraries/SocketWrapper/src",
                    "C:/Users/Caferobot9/.platformio/packages/framework-arduino-mbed/libraries/ThreadDebug/src",
                    "C:/Users/Caferobot9/.platformio/packages/framework-arduino-mbed/libraries/USBAudio",
                    "C:/Users/Caferobot9/.platformio/packages/framework-arduino-mbed/libraries/USBHID/src",
                    "C:/Users/Caferobot9/.platformio/packages/framework-arduino-mbed/libraries/USBHOST/src",
                    "C:/Users/Caferobot9/.platformio/packages/framework-arduino-mbed/libraries/USBMIDI",
                    "C:/Users/Caferobot9/.platformio/packages/framework-arduino-mbed/libraries/USBMSD/src",
                    "C:/Users/Caferobot9/.platformio/packages/framework-arduino-mbed/libraries/WiFi/src",
                    "C:/Users/Caferobot9/.platformio/packages/framework-arduino-mbed/libraries/Wire",
                    "C:/Users/Caferobot9/.platformio/packages/framework-arduino-mbed/libraries/doom/src",
                    "C:/Users/Caferobot9/.platformio/packages/framework-arduino-mbed/libraries/ea_malloc",
                    "C:/Users/Caferobot9/.platformio/packages/framework-arduino-mbed/libraries/mbed-memory-status",
                    "C:/Users/Caferobot9/.platformio/packages/framework-arduino-mbed/libraries/openamp_arduino/src",
                    "C:/Users/Caferobot9/.platformio/packages/framework-arduino-mbed/libraries/rpclib/src",
                    "C:/Users/Caferobot9/.platformio/packages/framework-arduino-mbed/libraries/syntiant_ilib/src",
                    ""
                ]
            },
            "defines": [
                "PLATFORMIO=60109",
                "ARDUINO_RASPBERRY_PI_PICO",
                "ARDUINO_ARCH_RP2040",
                "ARM_MATH_CM0PLUS",
                "COMPONENT_FLASHIAP=1",
                "DEVICE_ANALOGIN=1",
                "DEVICE_FLASH=1",
                "DEVICE_I2C=1",
                "DEVICE_I2CSLAVE=1",
                "DEVICE_INTERRUPTIN=1",
                "DEVICE_PORT_IN=1",
                "DEVICE_PORT_OUT=1",
                "DEVICE_PWMOUT=1",
                "DEVICE_RESET_REASON=1",
                "DEVICE_RTC=1",
                "DEVICE_SERIAL=1",
                "DEVICE_SERIAL_FC=1",
                "DEVICE_SPI=1",
                "DEVICE_USBDEVICE=1",
                "DEVICE_USTICKER=1",
                "DEVICE_WATCHDOG=1",
                "MBEDTLS_ENTROPY_NV_SEED",
                "MBED_BUILD_TIMESTAMP=1670863580.9430058",
                "MBED_MPU_CUSTOM",
                "PICO_NO_BINARY_INFO=1",
                "PICO_ON_DEVICE=1",
                "PICO_RP2040_USB_DEVICE_ENUMERATION_FIX=1",
                "PICO_TIME_DEFAULT_ALARM_POOL_DISABLED",
                "PICO_UART_ENABLE_CRLF_SUPPORT=0",
                "TARGET_CORTEX",
                "TARGET_CORTEX_M",
                "TARGET_LIKE_CORTEX_M0",
                "TARGET_LIKE_MBED",
                "TARGET_M0P",
                "TARGET_NAME=RASPBERRY_PI_PICO",
                "TARGET_RASPBERRYPI",
                "TARGET_RASPBERRY_PI_PICO",
                "TARGET_RELEASE",
                "TARGET_RP2040",
                "TARGET_memmap_default",
                "TOOLCHAIN_GCC",
                "TOOLCHAIN_GCC_ARM",
                "__CMSIS_RTOS",
                "__CORTEX_M0PLUS",
                "__MBED_CMSIS_RTOS_CM",
                "__MBED__=1",
                "MBED_NO_GLOBAL_USING_DIRECTIVE=1",
                "CORE_MAJOR=",
                "CORE_MINOR=",
                "CORE_PATCH=",
                "USE_ARDUINO_PINOUT",
                "ARDUINO=10810",
                "ARDUINO_ARCH_MBED",
                ""
            ],
            "cStandard": "gnu11",
            "cppStandard": "gnu++14",
            "compilerPath": "C:/Users/Caferobot9/.platformio/packages/toolchain-gccarmnoneeabi/bin/arm-none-eabi-gcc.exe",
            "compilerArgs": [
                "-mcpu=cortex-m0plus",
                "-mthumb",
                "-iprefixC:UsersCaferobot9.platformiopackagesframework-arduino-mbedcoresarduino",
                "@C:UsersCaferobot9.platformiopackagesframework-arduino-mbedvariantsRASPBERRY_PI_PICOincludes.txt",
                ""
            ]
        }
    ],
    "version": 4
}
- Select the word “Caferobot9” and press Ctrl+H on your keyboard. Then, type in your username in the section labeled “YOUR USER NAME HERE” and click on “Replace All.”
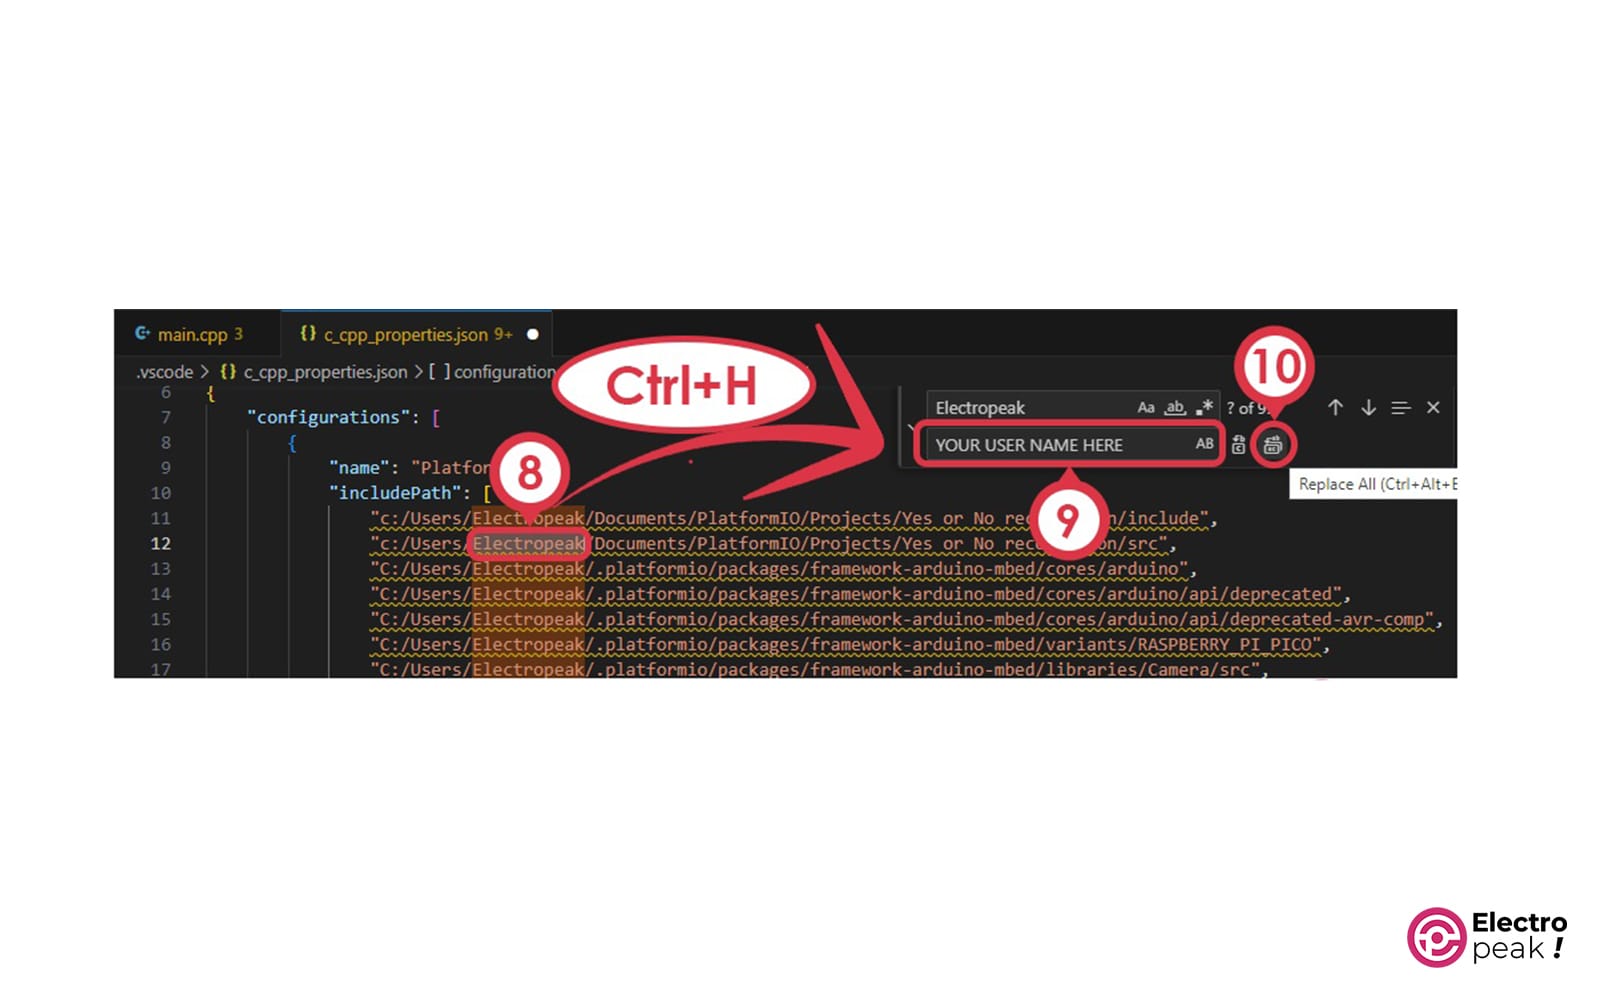
You can find your exact username in Windows from: “C:\Users”
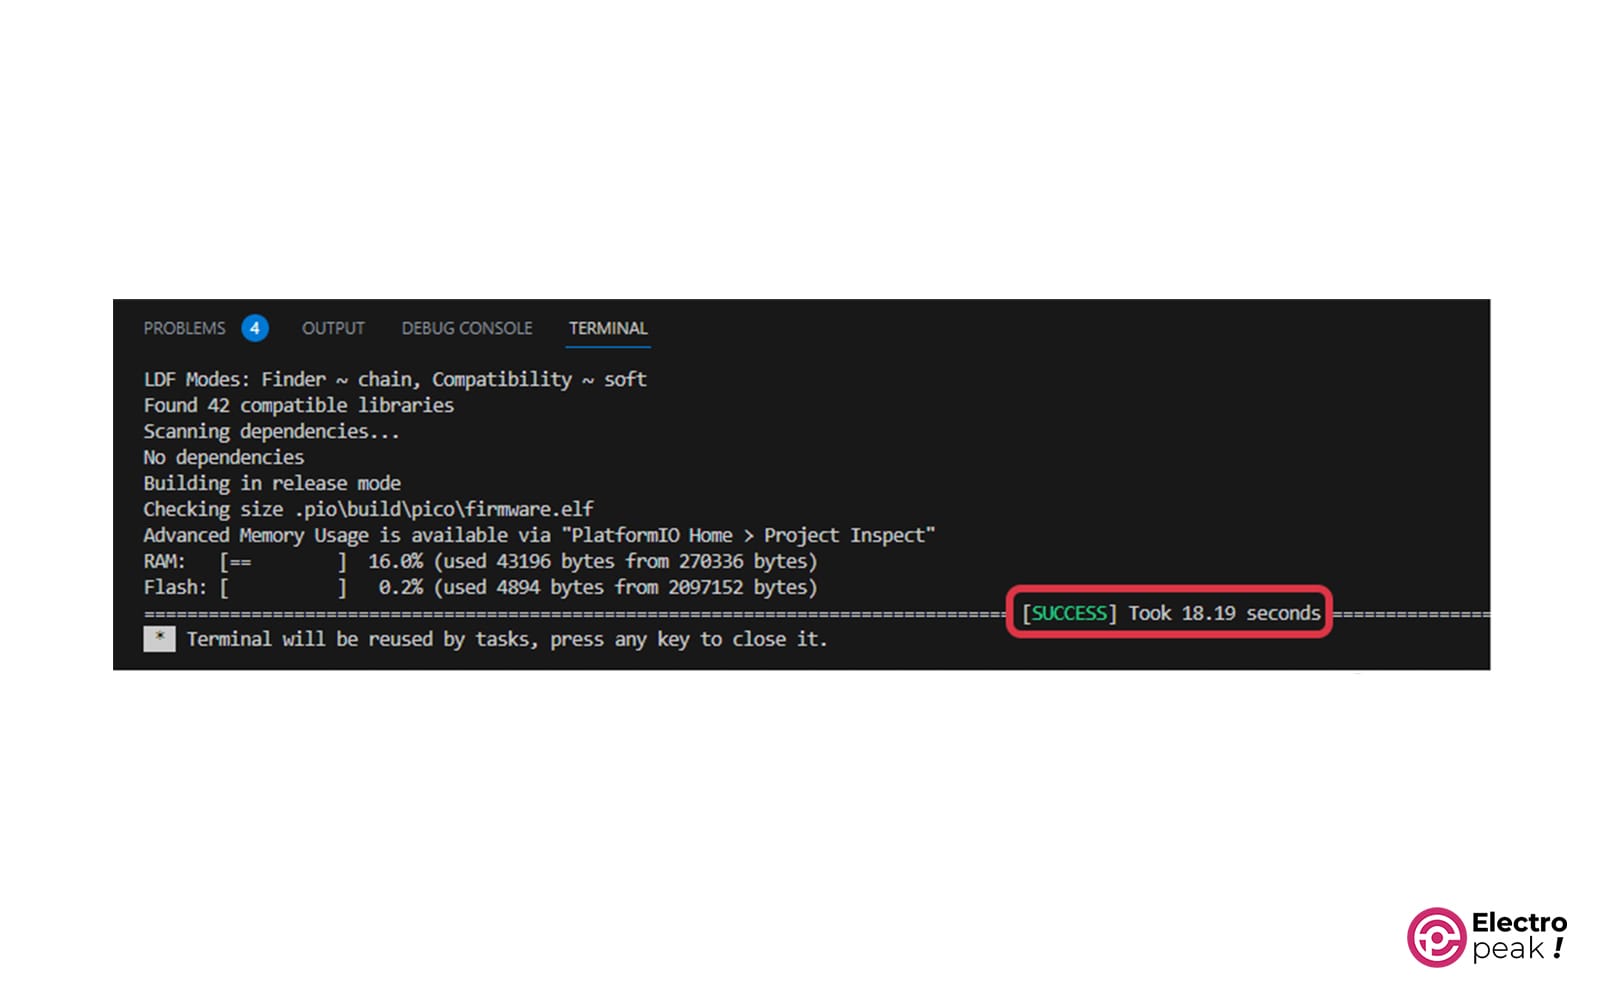
After doing this, give the compiler a few moments to perform the necessary operations. Then click on “Build” at the bottom of the page.
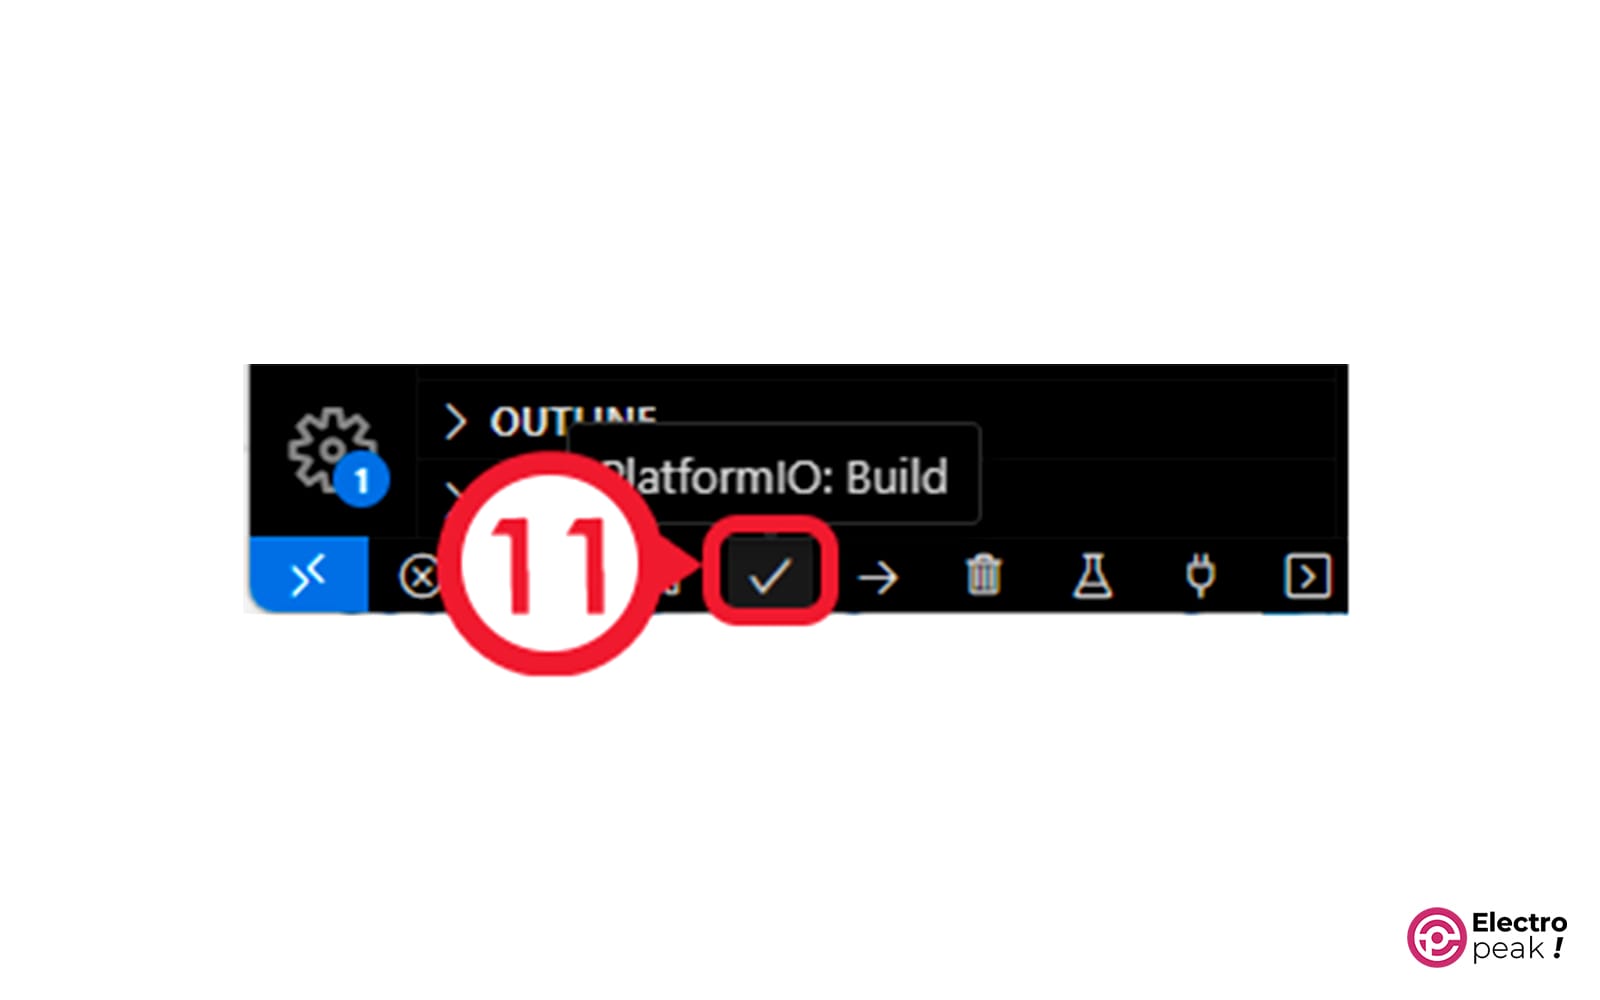
If you have followed the steps correctly, you will see the following phrases in the output.
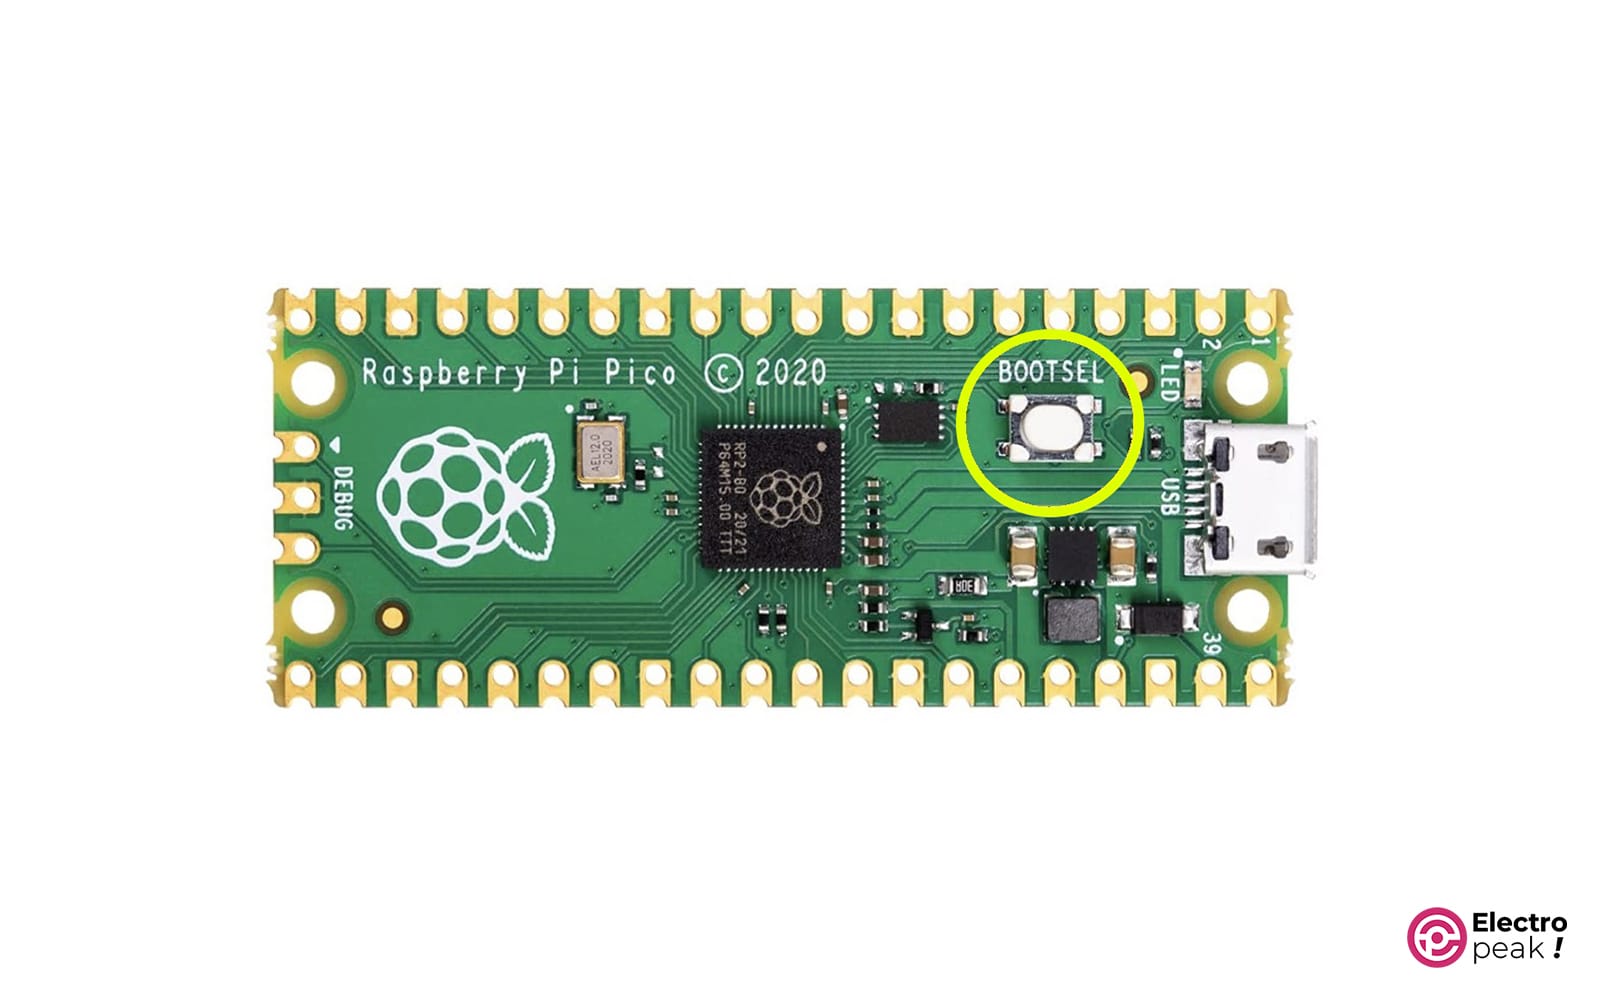
Next, connect your Raspberry Pi board to the computer while holding down the “BOOT” button.
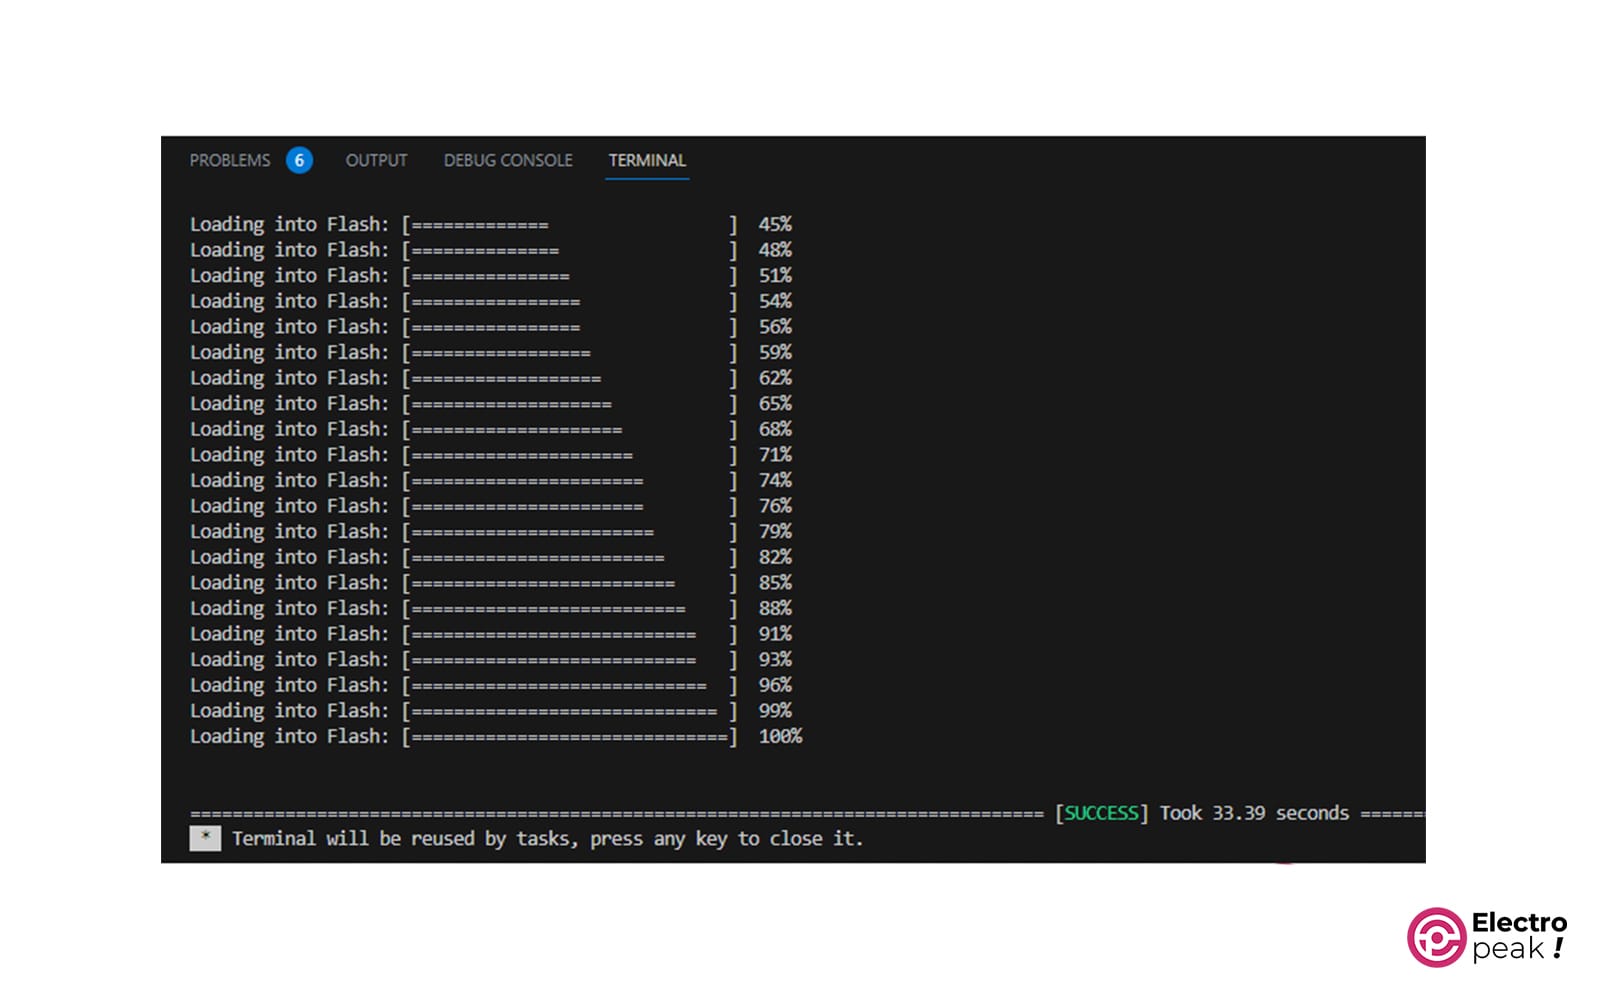
Finally, click on the “Upload” button to program your Raspberry Pi Pico board.
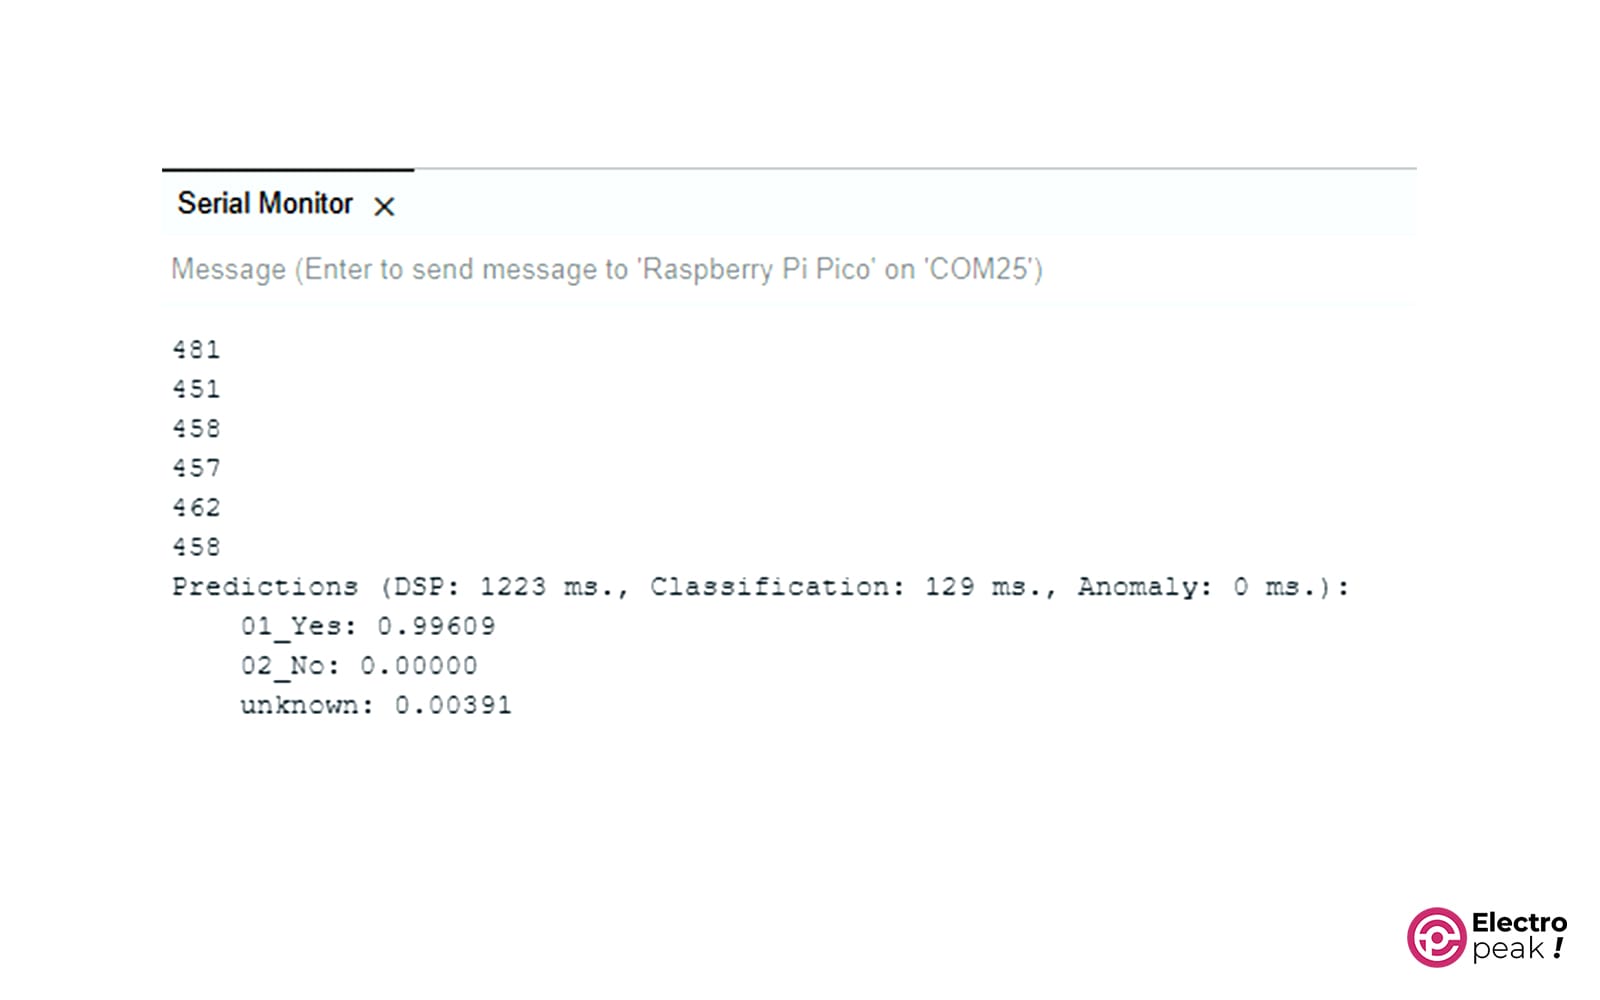
Now, open the Arduino IDE software and select the correct port. After that, open the Serial monitor.
Then press the button connected to the GP10 pin of Raspberry Pi Pico. Here, you’ll notice that the LED on the Raspberry Pi board turns on, and after 1 second, it turns off. During this time, if you say the words “Yes” or “No,” you’ll see the following responses on the serial monitor, respectively.
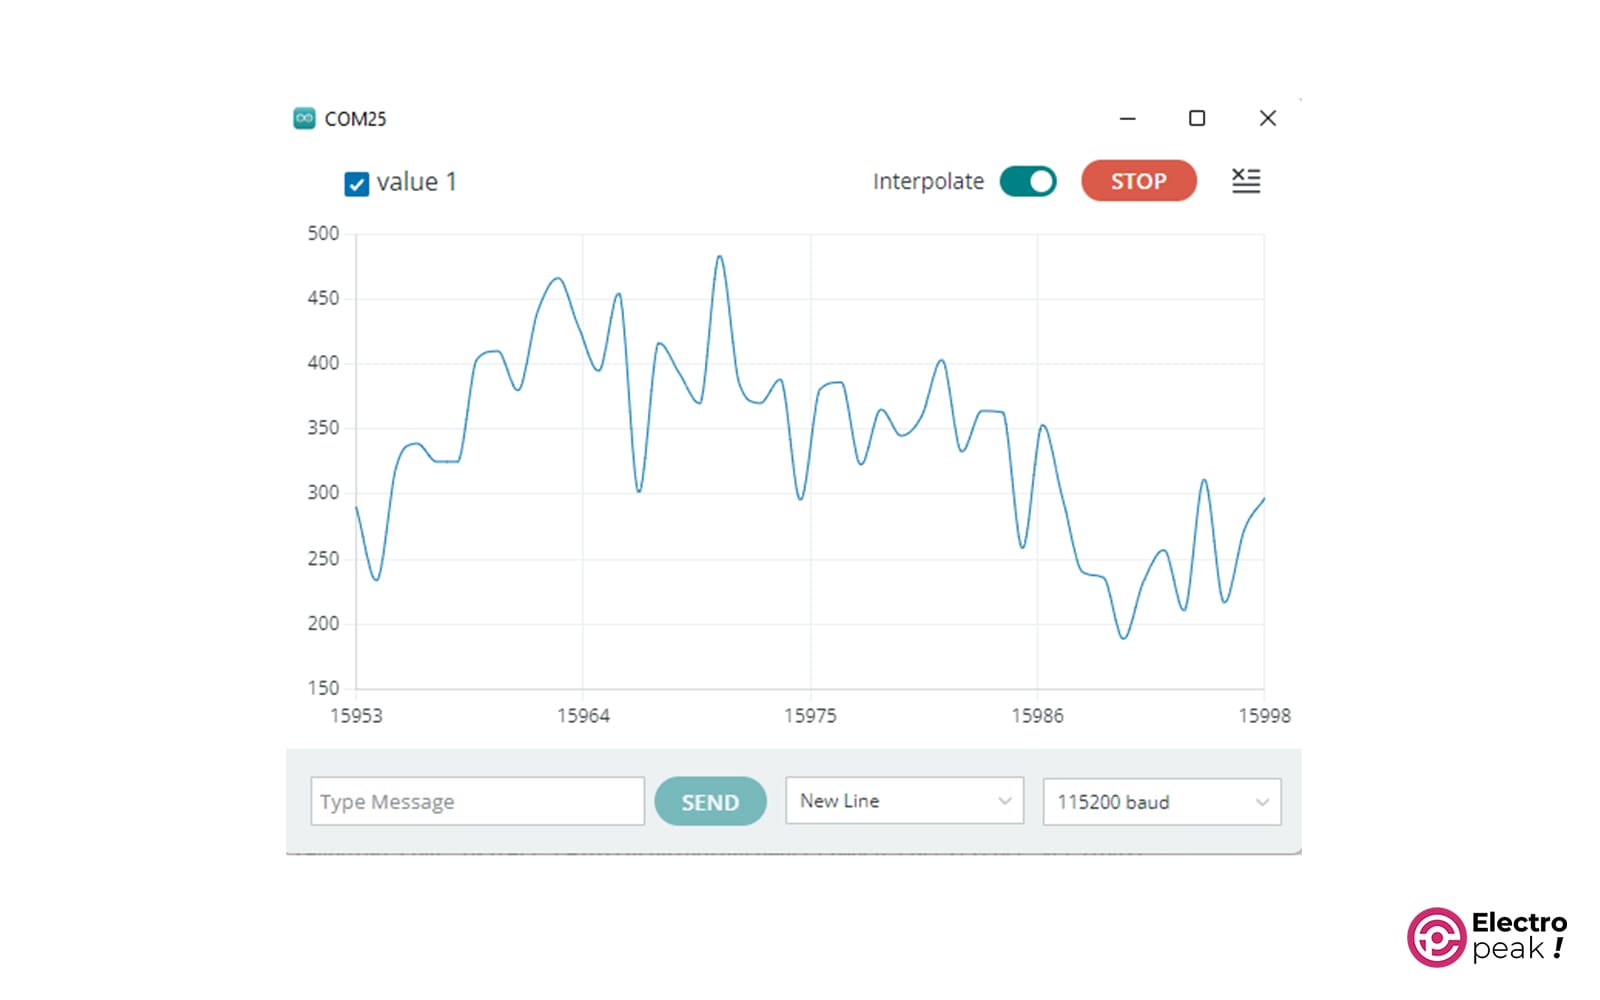
Also, if you open the Serial Plotter port and do this, the voice signal sensed by the microphone will be displayed.
What’s Next?
In this tutorial, you first became familiar with the concept of AI and machine learning. Next, using the attractive graphical interface of Edge Impulse, you created a model to detect keywords. Finally, you successfully ran the model on Raspberry Pi Pico.
Machine learning enables you to perform various tasks without the need for complex calculations. Some of them include:
1- Sensor fusion:
In some projects, we can use multiple sensors to measure various parameters to gather up-to-date information. For example, by using temperature, humidity, light, and pressure sensors, you can determine the present weather conditions. With more advanced technology, you can even predict the weather.
In the past, we’d use heavy computational codes to achieve this goal, requiring powerful hardware. But nowadays, you can do this task much more easily by using machine learning to combine data.
2- Object detection in images:
Without the use of our eyes and the ability to perceive images, many everyday activities would be impossible for humans. Images contain a vast amount of information based on which, the human brain sends commands to the body. Therefore, image processing has a wide range of applications.
By extracting key points from images containing the desired objects and creating a model based on them, you can have an object detection system according to your needs. This technology has various applications: license plate recognition, population counting, traffic control, image-to-text conversion, etc.
3- Recognizing gestures and motion patterns:
In the field of medicine, especially physiotherapy, robots have been invented to help humans in improving their physical abilities. You can accurately monitor the movements of various body parts by using motion sensors like the gyroscope, accelerometer, and magnetometer, along with neural sensors. If you create a model for each movement such as sitting, standing up, walking, running, etc., you can implement this model using an inexpensive microcontroller.
