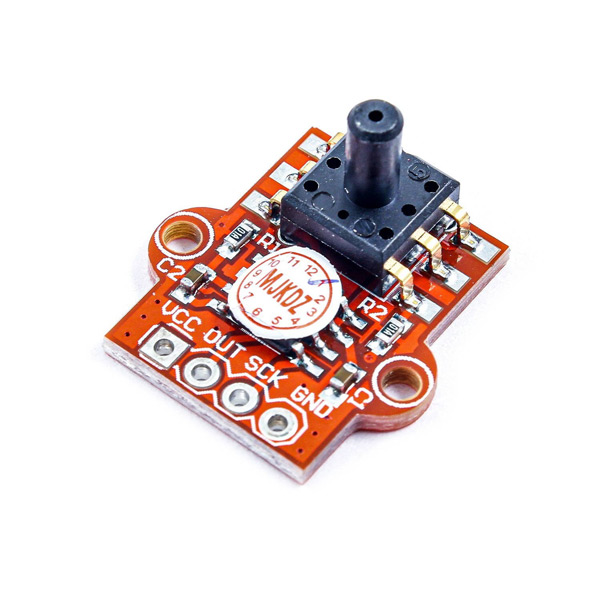
You can download the datasheet of this module here.
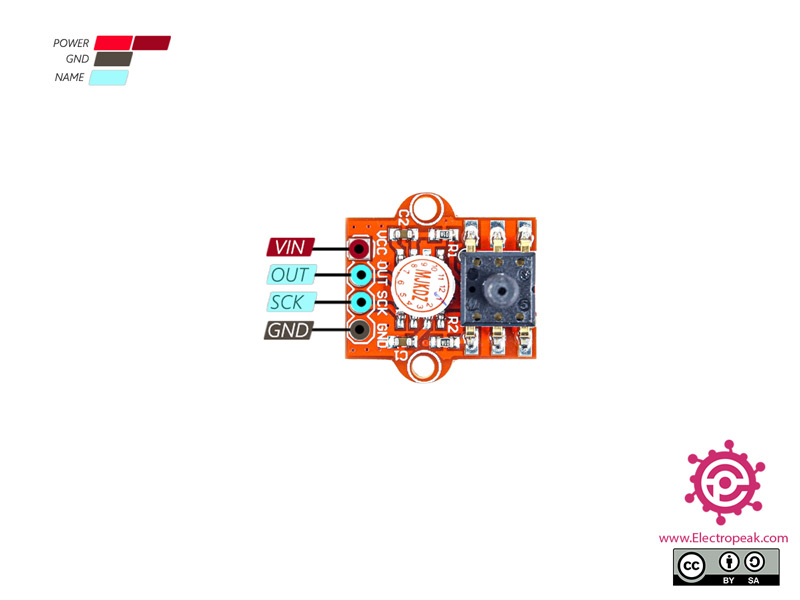

You can download the datasheet of this module here.

Comments (25)
Hi thks for your input…but which units are obtained with this code..KPa?
Hi Domingo, you’re welcome. Actually the output of HX711 is an integer. So the output of the code the average of 10 integers. It is not Pascal. For calculating the pressure accurately, the module needs to be calibrated in the region that it’s going to be used. And for calibration you can follow these steps: First go to a place where you already know the pressure, then use this module with the given code and write the output of it. Then you can easily calculate the pressure of different places by using proportionality.
hi,Thanks for the tutorial
My question is the sensor output in kilopascals?
Hi. Your question is actually answered in the previous comment as well. Here it is: “the output of HX711 is an integer. So the output of the code the average of 10 integers. It is not Pascal. For calculating the pressure accurately, the module needs to be calibrated in the region that it’s going to be used. And for calibration, you can follow these steps: First go to a place where you already know the pressure, then use this module with the given code and write the output of it. Then you can easily calculate the pressure of different places by using proportionality.”
What you actually need to do is to calculate the output of the sensor in a place where you already know the atmospheric pressure of. And use that as a reference in converting the sensor output to KPa.
thanks for your help.
I tested the sensor with a manometer, but the sensor does not read more than 70 mm Hg , but in the data sheet that the sensor works up to 40 kPa, ie 300 mm Hg. What do you think is the problem?
In fact, my project is digital therapy barometer.
You’re welcome. I’m afraid it’s not easy to exactly figure out what’s going on, but there can always be a difference between what the datasheet says and how the sensor works in the real world. And also, the datasheet is talking about the sensor itself. When the sensor is used in a PCB and accompanied by some other components, its specifications may change.
Hola Amir espero estés bien, amir una consulta como te acabo de ir con el sensor ? estoy trabajando con el y efectivamente mide hasta 70 mmhg y me gustaria saber que hicistes para mejorar este rango o si estas trabajando con otro sensor
Hi Mehran,
Thank you for your code and tutorial. I have the same question as asked by Damigo and Amir. Let me put it in another way. What type of signals we get it output.. ? is it millivolts signals? if yes then what value does represent which pressure say for example 0.2 mV represents 50 kPa? Further, in this case, thus the integer value gave me the voltage value or pressure value? If its output is in mV then how to convert it into corresponding Pressure value or if the output is converted directly into pressure then does that value represent kPa, Atm, or bar or what is the SI unit for the output..
Waiting for your kind help..
Hi,
You’re so welcome, but it’s actually Mohammad’s tutorial, not mine, as you can see at the beginning of the tutorial right under the title. And about your question, the answer is somehow the same as the answer to Damigo, but I’ll put it in another way trying to make it a little clearer.
First, the output of the module is a voltage between 0 and 5 volts BUT what is displayed on the Serial Plotter and Serial Monitor of Arduino IDE is an integer between 0 and 1024 which you can convert to volts using this formula: Suppose the integer displayed on Arduino Serial is X then: The sensor output voltage equals “5 * (X / 1024)”. So now you know all you need about the sensor output and what is displayed on the Arduino Serial.
Second, you want to know the relationship between the sensor output and the actual pressure. Here’s the answer: There is a linear relationship between the pressure and the sensor output. But the formula needs to be found by the one using the sensor, since it’s not factory-calibrated. It means that you should save the sensor output in volts in a place where you already know the pressure of. That will be your reference sensor output and pressure. Then you can use the module anywhere else and calculate the pressure using this formula: pressure = sensor output * (reference pressure / reference output sensor)
Good luck. Hope that helps!
can i contact you
If you have any questions regarding the tutorials or working with any kind of module or sensor, feel free to share them in the comments.
I have calibrated the sensor, but I extracted an equation for that..Now how can I add the equation to the code. Can you give me an example to explain it?
I have calibrated the sensor, but I extracted an equation for that..Now how can I add the equation to the code. Can you give me an example to explain it?
The equation you have extracted has “ave.mean()” as its parameter, right? To add that to the code, you should first define a float variable. Like this: “float x;”
Then, assign the equation to it in the next line. Like: “x = the equation”. After that, you can display it on the Serial Monitor using “Serial.println(x)” command.
Hello, your tutorial is very interesting, but I wonder if this pressure sensor and a scale can be used simultaneously with the HX711, if so, is it necessary to install the hx711 library or with Q2HX711 can both be controlled? Thank you
Hallo Mehran, vielen herzlichen
Dank für Ihren Code und Ihr Tutorial. Ich baue eine Wasserstandsmessung. Funktioniert mit “Arduino UNO”, aber nicht mit dem “ESP 8266 D1 mini”. Was muss ich da ändern?
Herzlichen Dank für eine Antwort
Hi dear
thank you for your attention
only thing that you want is to connect the module to esp8266 i2c (GPIO5 & GPIO4)
and also select your ESP8266 D1 mini board from the tools menu in Arduino IDE.
Hello.
Is the result of the measurement affected by the difference in atmospheric pressure day by day?
Would like to measure the water level in a container.
Regards
Peter Lörne
Hello.
Can you explain in more detail?
Does the atmospheric pressure change when you are at the same level?
hello i want to measure the pressure of my hho gas ..can u help me
Hi,
If you have gas, you can utilize this module without any additional configuration.
However, if your gas may contain liquid at times, it’s advisable to use a tube to create distance between the two components. This helps prevent any liquid from mixing with the module.
Hi Mohammad thank you for the wonderful tutorial,
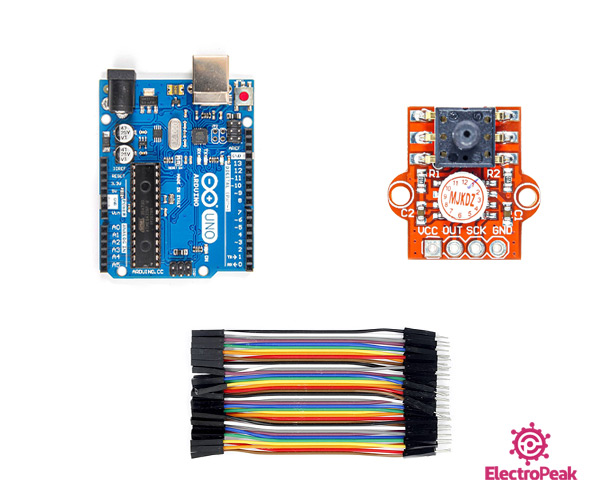
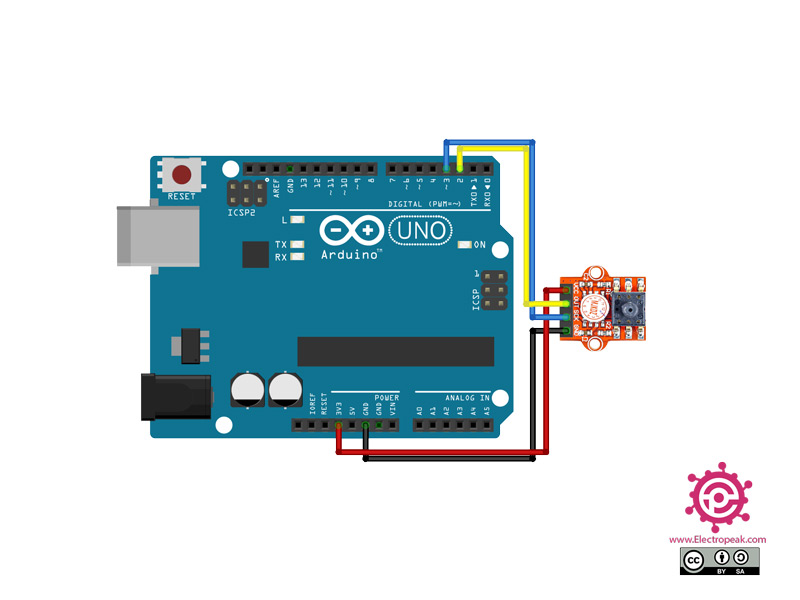
I am following your tutorial I am callibrating sensor which indicates(TM7711). I connected sensor out with pin 2 and sck with pin 3 of arduino uno R3.But I am receiving unexpected values on serial monitor. I need help . I am sharing code below please help me. please let me know also if i need specific library for TM7711.
#include <Q2HX711.h>
const byte MPS_OUT_pin = 2; // OUT data pin
const byte MPS_SCK_pin = 3; // clock data pin
int avg_size = 10; // #pts to average over
Q2HX711 MPS20N0040D(MPS_OUT_pin, MPS_SCK_pin); // start comm with the HX710B
// Reference pressure and sensor output voltage at the reference location
const float reference_pressure_hPa = 1008.0; // Reference pressure in hPa
const float reference_output_voltage = 2.5; // Reference sensor output voltage in volts
const float proportionality_factor = reference_pressure_hPa / reference_output_voltage;
void setup() {
Serial.begin(9600); // start the serial port
// Wait for serial connection to be established
while (!Serial) {
delay(100);
}
}
void loop() {
float avg_output_voltage = 0.0;
for (int ii = 0; ii < avg_size; ii++) {
avg_output_voltage += (5.0 * MPS20N0040D.read() / 1024.0); // add multiple ADC readings and convert to volts
delay(50); // delay between readings
}
avg_output_voltage /= avg_size;
// Calculate pressure in mbar
float pressure_mbar = avg_output_voltage * proportionality_factor * 10.0; // Convert from hPa to mbar (1 hPa = 10 mbar)
Serial.print("Pressure: ");
Serial.print(pressure_mbar);
Serial.println(" mbar");
delay(1000); // Adjust delay as needed
}
I need out put in mbar.
On Serial monitor i am receiving values like this.
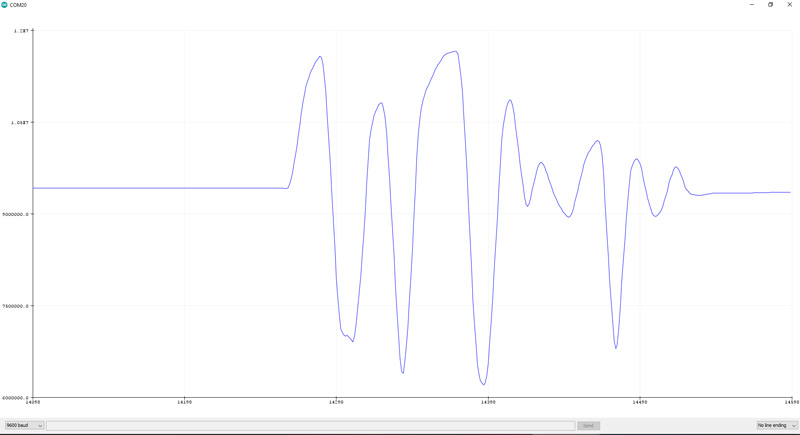
162737136.00mbar
162345679.00mbar…………….
and so on.
I didnt apply any pressure to sensor yet.
Hello,
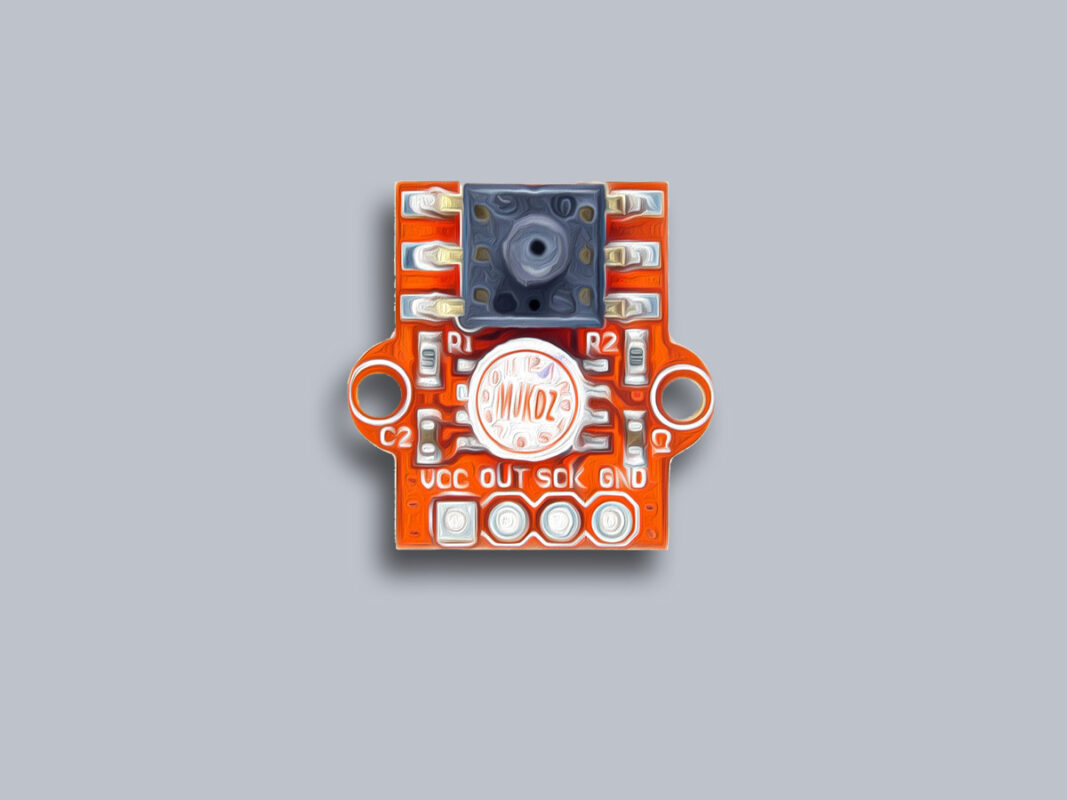
Firstly, your sensor of choice is the TM7711, which has its own dedicated article accessible at this link. It’s worth noting that both this sensor and the HX711 utilize the same library.
Secondly, the module in question serves as a high-resolution ADC capable of reading Wheatstone bridges. The sensor itself contains four resistors that form the Wheatstone bridge, and we utilize the ADC to retrieve data from it.
If you’re employing the MPS20N0040D with the TM7711, it’s crucial to double-check your wiring. Wheatstone bridge configurations require meticulous attention and precise setup to function accurately.
Avoid using jumper wires or similar connections between these two components. Instead, opt for the shortest distance possible and use high-quality wires to minimize errors. Additionally, consider using a multimeter to measure the resistance of each resistor within the Wheatstone bridge to ensure uniform values. Keep in mind that you’ll need to apply Ohm’s law to interpret these readings, as all resistors are interconnected within the sensor.
Hello again,
Thank you for your response.
I want to clarify things more .The sensor I am using same like this one you used here (red one) but my sensor is TM7711 instead of HX711. The sensor itself have 2 resistors not four. I excute the code you provided in this tutorial
/*
on Sep 21, 2020
by MohammedDamirchi
Home
*/
#include
#include
const byte MPS_OUT_pin = 2; // OUT data pin
const byte MPS_SCK_pin = 3; // clock data pin
int avg_size = 10; // #pts to average over
Q2HX711 MPS20N0040D(MPS_OUT_pin, MPS_SCK_pin); // start comm with the HX710B
Average ave(avg_size);
void setup() {
Serial.begin(9600); // start the serial port
}
void loop() {
ave.push(MPS20N0040D.read());
Serial.println(ave.mean());
}
I am receiving the following values on serial monitor.
8391885.00
8391885.00
8391066.00
8391885.00
8391885.00
8391885.00
8391885.00
8391066.00
8391885.00
8391885.00
8391885.00
8391897.00
8391897.00
8391897.00
8391897.00
8391078.00
8391897.00
8391897.00
8391897.00
8391897.00
8391078.00
8392704.00
8392704.00
8391885.00
8392704.00
8392704.00
8393523.00
and so on.
Now my question is I want to calculate the pressure which sensor detect or sense.The atmospheric pressure on location is 1008 hpa. How I calculate sensor pressure.
Which equation should I use in code to calculate pressure?
Thank you for clarifying the information. , with two of external resistor for stabilize the noise
  .
.
In the sensor datasheet, it’s evident that we have four resistors
The values you’re obtaining are normal, as evidenced by the readings we obtained in the Serial Plotter at the end of the article. The code retrieves raw values, and while I’m not an expert in converting these types of values, you could consult some datasheets for guidance on converting them.
this link my help you.