
Interfacing AS608 Optical Fingerprint Sensor Module with Arduino provides a comprehensive guide on integrating the AS608 optical fingerprint sensor with Arduino for secure fingerprint scanning and identification. This step-by-step guide will walk you through the process of enrolling and verifying fingerprints using the AS608 module. Discover how to connect the module to Arduino, install the required library, and follow the enrollment and verification procedures. Get started on your fingerprint sensor project today!
AS608 Optical Fingerprint Sensor Features
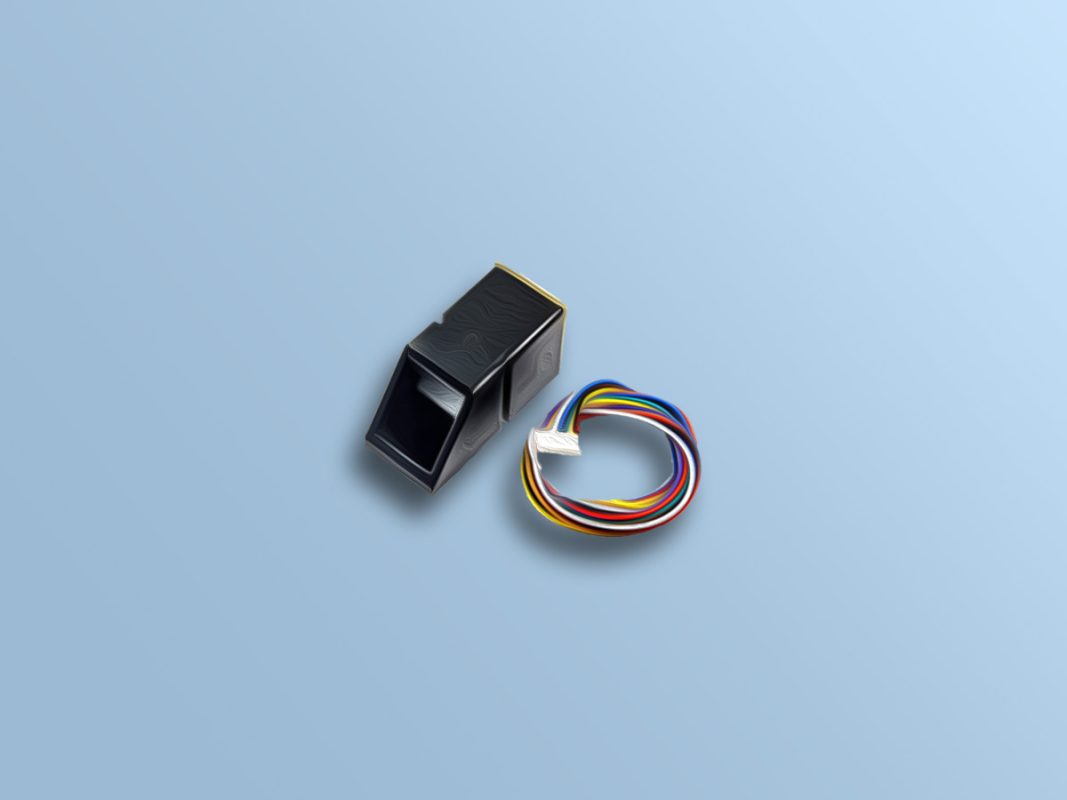
The AS608 optical fingerprint sensor can be used to scan fingerprint and it can send the processed data to a microcontroller via serial communication as well. All registered fingerprints are stored in this module. The AS608 is capable of storing up to 127 individual fingerprints
The most important features are:
- Supply voltage: 3.3V
- Maximum current supply: 60mA
- Resolution: 500dpi
- Max fingerprint imaging time: 1s

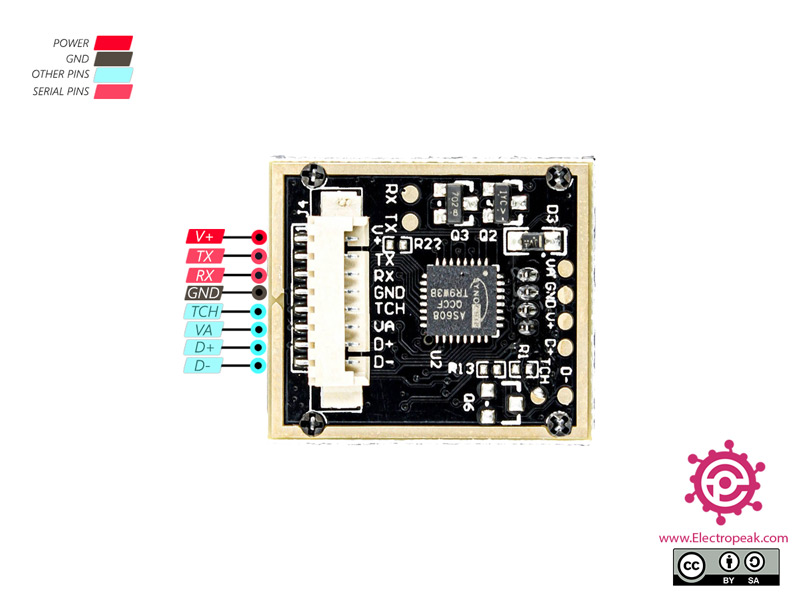
AS608 Optical Fingerprint Sensor Pinout
This Module has 4 useful pins:
- V+: Module power supply – 3.3V
- GND: Ground
- TX: Serial Transmitter
- RX: Serial Receiver
You can see the pinout of this module in the image below.
Required Material

Hardware component
Software Apps
Interfacing AS608 Optical Fingerprint Sensor with Arduino
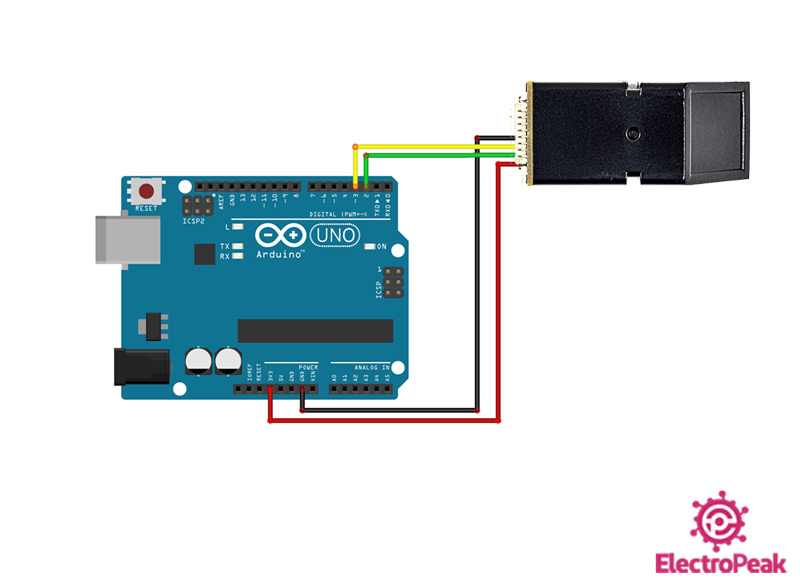
Step 1: Circuit
The following circuit show how you should connect Arduino to AS608 sensor. Connect wires accordingly.
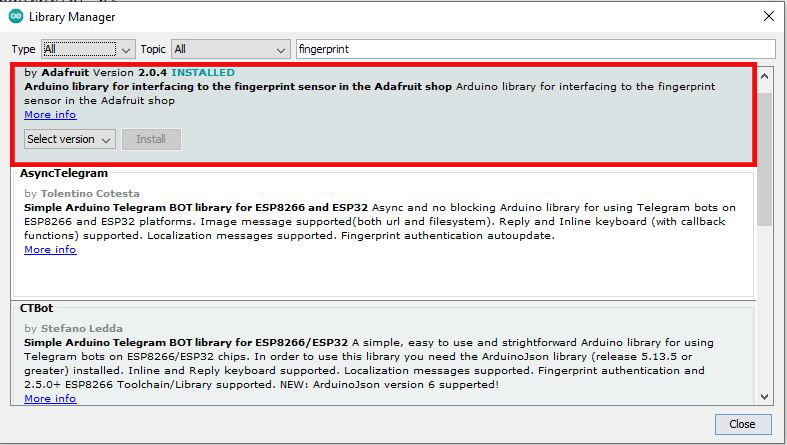
Step 2: Library
Go to Library manager and search for Fingerprint, install the following library.
Tip
If you need more help with installing a library on Arduino, read this tutorial: How to Install an Arduino Library
Step 3: Enrolling Fingerprint
First, upload the following code to Arduino.
  /*
  AS608-Optical-Fingerprint-Sensor-enroll
  Home
    based on Adafruit Library

*/
#include <Adafruit_Fingerprint.h>

SoftwareSerial mySerial(2, 3); // TX/RX

Adafruit_Fingerprint finger = Adafruit_Fingerprint(&mySerial);

uint8_t id;

void setup()
{
  Serial.begin(9600);
  while (!Serial);  // For Yun/Leo/Micro/Zero/...
  delay(100);
  Serial.println("\n\nAdafruit Fingerprint sensor enrollment");

  // set the data rate for the sensor serial port
  finger.begin(57600);

  if (finger.verifyPassword()) {
    Serial.println("Found fingerprint sensor!");
  } else {
    Serial.println("Did not find fingerprint sensor :(");
    while (1) { delay(1); }
  }
}

uint8_t readnumber(void) {
  uint8_t num = 0;

  while (num == 0) {
    while (! Serial.available());
    num = Serial.parseInt();
  }
  return num;
}

void loop()                     // run over and over again
{
  Serial.println("Ready to enroll a fingerprint!");
  Serial.println("Please type in the ID # (from 1 to 127) you want to save this finger as...");
  id = readnumber();
  if (id == 0) {// ID #0 not allowed, try again!
     return;
  }
  Serial.print("Enrolling ID #");
  Serial.println(id);

  while (!  getFingerprintEnroll() );
}

uint8_t getFingerprintEnroll() {

  int p = -1;
  Serial.print("Waiting for valid finger to enroll as #"); Serial.println(id);
  while (p != FINGERPRINT_OK) {
    p = finger.getImage();
    switch (p) {
    case FINGERPRINT_OK:
      Serial.println("Image taken");
      break;
    case FINGERPRINT_NOFINGER:
      break;
    case FINGERPRINT_PACKETRECIEVEERR:
      Serial.println("Communication error");
      break;
    case FINGERPRINT_IMAGEFAIL:
      Serial.println("Imaging error");
      break;
    default:
      Serial.println("Unknown error");
      break;
    }
  }

  // OK success!

  p = finger.image2Tz(1);
  switch (p) {
    case FINGERPRINT_OK:
      Serial.println("Image converted");
      break;
    case FINGERPRINT_IMAGEMESS:
      Serial.println("Image too messy");
      return p;
    case FINGERPRINT_PACKETRECIEVEERR:
      Serial.println("Communication error");
      return p;
    case FINGERPRINT_FEATUREFAIL:
      Serial.println("Could not find fingerprint features");
      return p;
    case FINGERPRINT_INVALIDIMAGE:
      Serial.println("Could not find fingerprint features");
      return p;
    default:
      Serial.println("Unknown error");
      return p;
  }

  Serial.println("Remove finger");
  delay(2000);
  p = 0;
  while (p != FINGERPRINT_NOFINGER) {
    p = finger.getImage();
  }
  Serial.print("ID "); Serial.println(id);
  p = -1;
  Serial.println("Place same finger again");
  while (p != FINGERPRINT_OK) {
    p = finger.getImage();
    switch (p) {
    case FINGERPRINT_OK:
      Serial.println("Image taken");
      break;
    case FINGERPRINT_NOFINGER:
      break;
    case FINGERPRINT_PACKETRECIEVEERR:
      Serial.println("Communication error");
      break;
    case FINGERPRINT_IMAGEFAIL:
      Serial.println("Imaging error");
      break;
    default:
      Serial.println("Unknown error");
      break;
    }
  }

  // OK success!

  p = finger.image2Tz(2);
  switch (p) {
    case FINGERPRINT_OK:
      Serial.println("Image converted");
      break;
    case FINGERPRINT_IMAGEMESS:
      Serial.println("Image too messy");
      return p;
    case FINGERPRINT_PACKETRECIEVEERR:
      Serial.println("Communication error");
      return p;
    case FINGERPRINT_FEATUREFAIL:
      Serial.println("Could not find fingerprint features");
      return p;
    case FINGERPRINT_INVALIDIMAGE:
      Serial.println("Could not find fingerprint features");
      return p;
    default:
      Serial.println("Unknown error");
      return p;
  }

  // OK converted!
  Serial.print("Creating model for #");  Serial.println(id);

  p = finger.createModel();
  if (p == FINGERPRINT_OK) {
    Serial.println("Prints matched!");
  } else if (p == FINGERPRINT_PACKETRECIEVEERR) {
    Serial.println("Communication error");
    return p;
  } else if (p == FINGERPRINT_ENROLLMISMATCH) {
    Serial.println("Fingerprints did not match");
    return p;
  } else {
    Serial.println("Unknown error");
    return p;
  }

  Serial.print("ID "); Serial.println(id);
  p = finger.storeModel(id);
  if (p == FINGERPRINT_OK) {
    Serial.println("Stored!");
  } else if (p == FINGERPRINT_PACKETRECIEVEERR) {
    Serial.println("Communication error");
    return p;
  } else if (p == FINGERPRINT_BADLOCATION) {
    Serial.println("Could not store in that location");
    return p;
  } else if (p == FINGERPRINT_FLASHERR) {
    Serial.println("Error writing to flash");
    return p;
  } else {
    Serial.println("Unknown error");
    return p;
  }
}
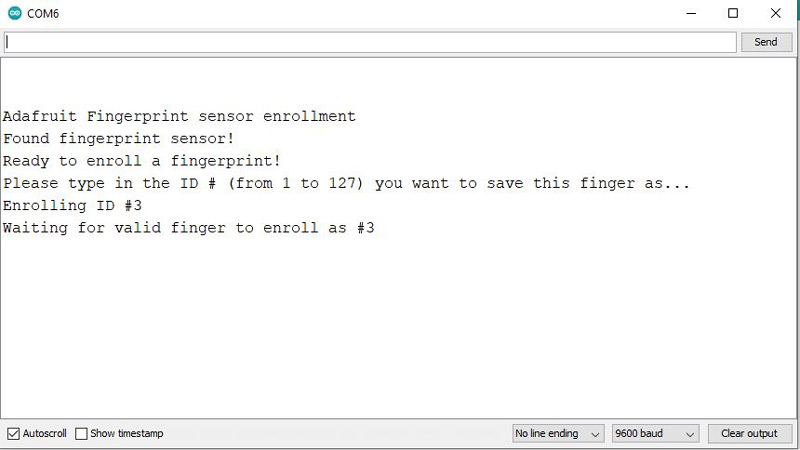
The above program is for enrolling fingerprints. With this program you can enroll 127 different fingerprints. Run the program and open the Serial Monitor. The general process for enrolling a fingerprint is as follows:
1- Enter Fingerprint ID
Before enrolling any fingerprint, you must first enter its ID. You are allowed to choose the number 1 to 127. For example, in the image below, we have selected number 3.
2- Place finger on sensor
Next you need to place your finger on sensor for the first image.

3- Place finger on the sensor again
Now you have to put your finger on the sensor again for the second image. When this step is completed correctly, the phrase Stored will appear.

Step 4: Test and Verify fingerprint
First, upload the following code to Arduino.
  /*
  AS608-Optical-Fingerprint-Sensor-enroll
    Modified on 06 Jan 2021
  by Amir Mohammad Shojaee @ Electropeak
  Home
    based on Adafruit Library

*/

#include <Adafruit_Fingerprint.h>

volatile int finger_status = -1;

SoftwareSerial mySerial(2, 3); // TX/RX on fingerprint sensor

Adafruit_Fingerprint finger = Adafruit_Fingerprint(&mySerial);

void setup()
{
  Serial.begin(9600);
  while (!Serial);  // For Yun/Leo/Micro/Zero/...
  delay(100);
  Serial.println("\n\nAdafruit finger detect test");

  // set the data rate for the sensor serial port
  finger.begin(57600);

  if (finger.verifyPassword()) {
    Serial.println("Found fingerprint sensor!");
  } else {
    Serial.println("Did not find fingerprint sensor :(");
    while (1) { delay(1); }
  }

  finger.getTemplateCount();
  Serial.print("Sensor contains "); Serial.print(finger.templateCount); Serial.println(" templates");
  Serial.println("Waiting for valid finger...");
}

void loop()                     // run over and over again
{
  finger_status = getFingerprintIDez();
  if (finger_status!=-1 and finger_status!=-2){
    Serial.print("Match");
  } else{
    if (finger_status==-2){
      for (int ii=0;ii<5;ii++){
        Serial.print("Not Match");
      }
    }
  }
  delay(50);            //don't ned to run this at full speed.
}

// returns -1 if failed, otherwise returns ID #
int getFingerprintIDez() {
  uint8_t p = finger.getImage();
  if (p!=2){
    Serial.println(p);
  }
  if (p != FINGERPRINT_OK)  return -1;

  p = finger.image2Tz();
  if (p!=2){
    Serial.println(p);
  }
  if (p != FINGERPRINT_OK)  return -1;

  p = finger.fingerFastSearch();
  if (p != FINGERPRINT_OK)  return -2;

  // found a match!
  Serial.print("Found ID #"); Serial.print(finger.fingerID);
  Serial.print(" with confidence of "); Serial.println(finger.confidence);
  return finger.fingerID;
}
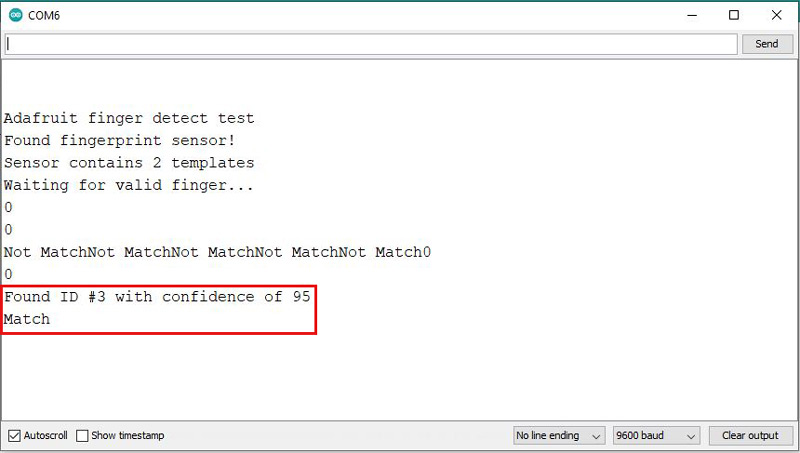
This code is for testing and matching fingerprints. First run the program and then open the Serial Monitor. At this point, the program waits for a finger to be placed on the sensor for identification. After placing the finger on the sensor, the phrase “Match” is displayed if the fingerprint is already stored, and phrase “Not Match” is displayed if fingerprint is not detected.
In addition, if fingerprint is identified, the corresponding ID will be specified.
Explore the potential of the AS608 Optical Fingerprint Sensor module in various applications that require secure and reliable fingerprint scanning and identification. Follow our step-by-step guide to unlock the full potential of this powerful module in your projects.
Don’t wait any longer! Start your fingerprint sensor project today and experience the convenience and security it offers.

Comments (9)
Hi,
I do for Arduino UNO and works fine, but if i want to try with arduino due it does not detect the sensor , i want to implement this on arduino due.
Best Regards!
Shukriya Bhai Apke Blog se Help Mili . .
Hi Waseem
I didn’t understand what you said but you are welcome
Hi, how can i increase max capacity of the IDs? i want store around 200 IDs. Is it possible?
Hie I want to store the fingerprint IDs in my Django Model. Im finding it hard to do so. I have since developed an API to send POST request to the Django server but it seems as if its only sending 0 as the the Fingerprint ID . Here is my code #include
#include
#include
#include
#define WIFI_SSID “:-)”
#define WIFI_PASSWORD “Kayl3n3#2023”
#define SERVER_URL “http://192.168.231.215:8000/biometric_examguard/capture-student/”
Adafruit_Fingerprint finger = Adafruit_Fingerprint(&Serial2);
int capturedFingerprintID = -1; // Global variable for storing the captured fingerprint ID
void setup() {
Serial.begin(57600);
delay(100);
finger.begin(57600);
connectToWiFi();
}
void loop() {
// Check if the fingerprint sensor is touched
if (finger.getImage() && finger.image2Tz() == FINGERPRINT_OK) {
// Fingerprint captured
capturedFingerprintID = finger.fingerID;
// Collect additional data (replace this with your actual data collection logic)
String studentID = “your_student_id”;
String studentName = “your_student_name”;
// Add other fields as needed
// Save and send the captured fingerprint data along with additional data
saveFingerprint(studentID, studentName);
}
}
void connectToWiFi() {
WiFi.begin(WIFI_SSID, WIFI_PASSWORD);
while (WiFi.status() != WL_CONNECTED) {
delay(1000);
Serial.println(“Connecting to WiFi…”);
}
Serial.println(“Connected to WiFi!”);
}
void saveFingerprint(String studentID, String studentName) {
if (capturedFingerprintID != -1) {
// Send the captured fingerprint data and additional data to the server
sendFingerprintData(capturedFingerprintID, studentID, studentName);
// Reset the captured fingerprint ID
capturedFingerprintID = -1;
}
}
void sendFingerprintData(int fingerprintID, String studentID, String studentName) {
WiFiClient client;
HTTPClient http;
// Create JSON payload with the fingerprint ID and additional data
String payload = “{\”student_id\”:” + String(fingerprintID) + “}”;
// Add other fields as needed
http.begin(client, SERVER_URL);
http.addHeader(“Content-Type”, “application/json”);
int httpResponseCode = http.POST(payload);
if (httpResponseCode == 200) {
// Print the response content
String response = http.getString();
Serial.println(“Response: “);
Serial.println(response);
Serial.println(fingerprintID);
} else {
Serial.print(“Error sending fingerprint data. HTTP response code: “);
Serial.println(httpResponseCode);
}
http.end();
}
Hi Anesu,
In the `sendFingerprintData` function, after setting the payload value, use the `Serial.println()` function to confirm that your value is correct.
If the value is 0 at this point, you should check the process up to this point.
If the value is correct, use the Postman app to test the data capture from the server.
Love you broskis
One issue that I have with AS608 module is while finger is put on the device, getImage function works first time, but it returns error in loop. If we remove finger from sensor and put it again it works. i.e. it does not work continuously on same finger. Can any one solve this issue?
Hello,
The sensor’s performance largely depends on how well the fingerprint was enrolled initially. If you enroll the fingerprint more accurately, the sensor will perform better in normal use. Additionally, this issue can be influenced by the quality of the fingerprint itself. I’ve tested with around 10 people, and some individuals with weaker fingerprints faced difficulties with these types of sensors.