

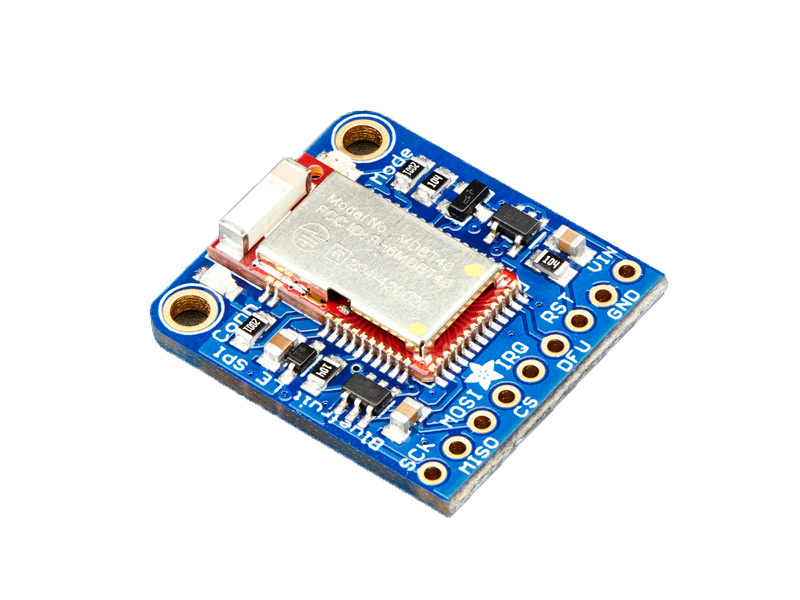
Adafruit Bluefruit LE SPI Friend Bluetooth Module Features
Bluetooth modules are a type of wireless communication modules that can be added to a project through the serial or SPI communication protocols.
The advantage of using Bluetooth modules is that they are easy to set up and use.
The Adafruit Bluefruit BL SPI Friend module supports SPI communication.
This module makes it easy to add Bluetooth to any board. Using SPI communication protocol, you no longer have to worry about speed (baud rate), current control or losing the UART port.
This module functions are way more than your imagination. Due to simplicity of learning AT Commands, you can have complete control over how the device works, including the ability to define and modify your GATT services and features. You can also use AT Commands to check for heat loss, battery voltage, RSSI connection or check the MAC address and so on.
You can get the primary version of your project using Bluefruit Connect app, which is available for both iOS and Android operating systems.
The Bluefruit bluetooth module can also function as a HID keyboard (for devices that support BLE HID)
Note
To update the Framework of this module, the module must be in DFU mode and the Bluefruit Connect software must be used.
In order to set the module in DFU mode, connect the DFU pin to GND.
Download the datasheet of Adafuit Bluefruit LE SPI Friend here.
For more details about Adafuit Bluefruit LE SPI Friend visit here.
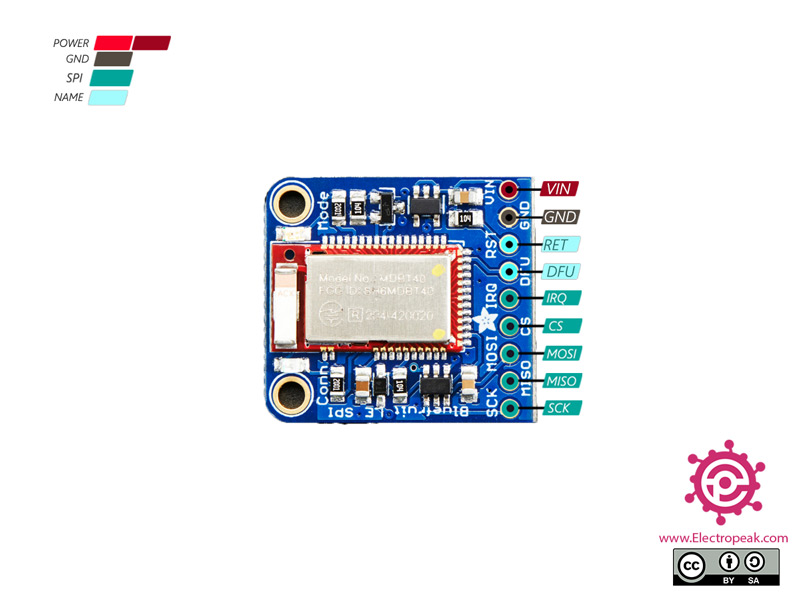
Adafruit Bluefruit LE SPI Friend Bluetooth Module Pinout
This module has 9 pins:
- VIN: Module power supply – 3.6-6 V
- GND: Ground
- IRQ: interrupt request from a device
- SCK: Serial Clock (output from master)
- MOSI: Master Out Slave In (data output from master)
- MISO: Master in Slave Out (data output from slave)
- CS: Slave Select (often active low, output from master)
- RET: Module Reset
- DFU: Set the module into DFU mode
You can see the pinout of this module here.
Required Material
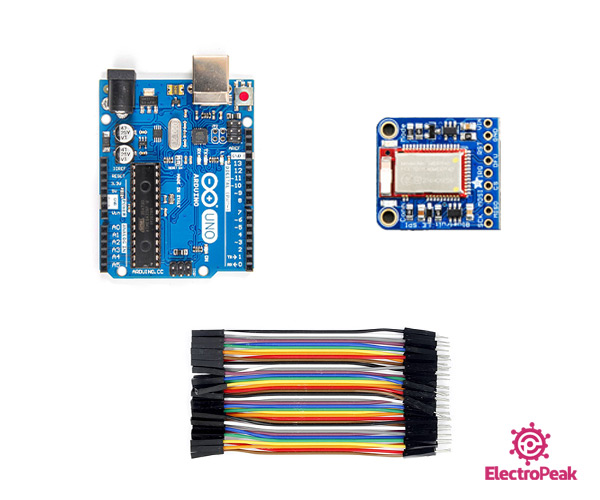
Hardware component
Software Apps
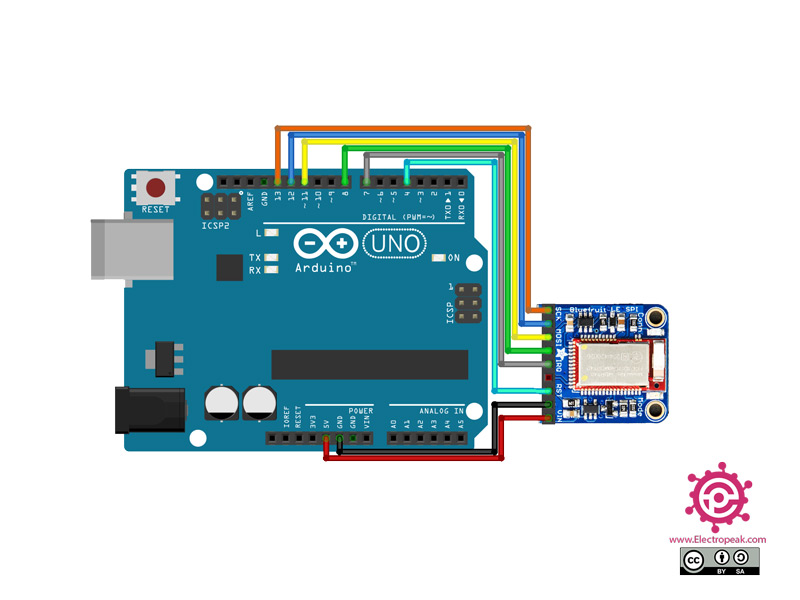
Interfacing Adafruit Bluefruit LE SPI Friend Bluetooth Module with Arduino
Step 1: Circuit
The following circuit shows how you should connect Arduino to this module. Connect wires accordingly.
Step 2: Library
Install the following library on your Arduino IDE.
https://learn.adafruit.com/introducing-the-adafruit-bluefruit-spi-breakout/software
Tip
If you need more help with installing a library on Arduino, read this tutorial: How to Install an Arduino Library
Step 3: Code
Upload the following code to the Arduino board.
    /*********************************************************************
 This is an example for our nRF51822 based Bluefruit LE modules

 Pick one up today in the adafruit shop!

 Adafruit invests time and resources providing this open source code,
 please support Adafruit and open-source hardware by purchasing
 products from Adafruit!

 MIT license, check LICENSE for more information
 All text above, and the splash screen below must be included in
 any redistribution
*********************************************************************/

#include <Arduino.h>
#include <SPI.h>
#include "Adafruit_BLE.h"
#include "Adafruit_BluefruitLE_SPI.h"
#include "Adafruit_BluefruitLE_UART.h"

#include "BluefruitConfig.h"

#if SOFTWARE_SERIAL_AVAILABLE
  #include <SoftwareSerial.h>
#endif

/*=========================================================================
    APPLICATION SETTINGS

    FACTORYRESET_ENABLE       Perform a factory reset when running this sketch

                              Enabling this will put your Bluefruit LE module
                              in a 'known good' state and clear any config
                              data set in previous sketches or projects, so
                              running this at least once is a good idea.

                              When deploying your project, however, you will
                              want to disable factory reset by setting this
                              value to 0.  If you are making changes to your
                              Bluefruit LE device via AT commands, and those
                              changes aren't persisting across resets, this
                              is the reason why.  Factory reset will erase
                              the non-volatile memory where config data is
                              stored, setting it back to factory default
                              values.

                              Some sketches that require you to bond to a
                              central device (HID mouse, keyboard, etc.)
                              won't work at all with this feature enabled
                              since the factory reset will clear all of the
                              bonding data stored on the chip, meaning the
                              central device won't be able to reconnect.
    MINIMUM_FIRMWARE_VERSION  Minimum firmware version to have some new features
    MODE_LED_BEHAVIOUR        LED activity, valid options are
                              "DISABLE" or "MODE" or "BLEUART" or
                              "HWUART"  or "SPI"  or "MANUAL"
    -----------------------------------------------------------------------*/
    #define FACTORYRESET_ENABLE         1
    #define MINIMUM_FIRMWARE_VERSION    "0.6.6"
    #define MODE_LED_BEHAVIOUR          "MODE"
/*=========================================================================*/

// Create the bluefruit object, either software serial...uncomment these lines
/*
SoftwareSerial bluefruitSS = SoftwareSerial(BLUEFRUIT_SWUART_TXD_PIN, BLUEFRUIT_SWUART_RXD_PIN);

Adafruit_BluefruitLE_UART ble(bluefruitSS, BLUEFRUIT_UART_MODE_PIN,
                      BLUEFRUIT_UART_CTS_PIN, BLUEFRUIT_UART_RTS_PIN);
*/

/* ...or hardware serial, which does not need the RTS/CTS pins. Uncomment this line */
// Adafruit_BluefruitLE_UART ble(Serial1, BLUEFRUIT_UART_MODE_PIN);

/* ...hardware SPI, using SCK/MOSI/MISO hardware SPI pins and then user selected CS/IRQ/RST */
Adafruit_BluefruitLE_SPI ble(BLUEFRUIT_SPI_CS, BLUEFRUIT_SPI_IRQ, BLUEFRUIT_SPI_RST);

/* ...software SPI, using SCK/MOSI/MISO user-defined SPI pins and then user selected CS/IRQ/RST */
//Adafruit_BluefruitLE_SPI ble(BLUEFRUIT_SPI_SCK, BLUEFRUIT_SPI_MISO,
//                             BLUEFRUIT_SPI_MOSI, BLUEFRUIT_SPI_CS,
//                             BLUEFRUIT_SPI_IRQ, BLUEFRUIT_SPI_RST);


// A small helper
void error(const __FlashStringHelper*err) {
  Serial.println(err);
  while (1);
}

/**************************************************************************/
/*!
    @brief  Sets up the HW an the BLE module (this function is called
            automatically on startup)
*/
/**************************************************************************/
void setup(void)
{
  while (!Serial);  // required for Flora & Micro
  delay(500);

  Serial.begin(115200);
  Serial.println(F("Adafruit Bluefruit Command Mode Example"));
  Serial.println(F("---------------------------------------"));

  /* Initialise the module */
  Serial.print(F("Initialising the Bluefruit LE module: "));

  if ( !ble.begin(VERBOSE_MODE) )
  {
    error(F("Couldn't find Bluefruit, make sure it's in CoMmanD mode & check wiring?"));
  }
  Serial.println( F("OK!") );

  if ( FACTORYRESET_ENABLE )
  {
    /* Perform a factory reset to make sure everything is in a known state */
    Serial.println(F("Performing a factory reset: "));
    if ( ! ble.factoryReset() ){
      error(F("Couldn't factory reset"));
    }
  }

  /* Disable command echo from Bluefruit */
  ble.echo(false);

  Serial.println("Requesting Bluefruit info:");
  /* Print Bluefruit information */
  ble.info();

  Serial.println(F("Please use Adafruit Bluefruit LE app to connect in UART mode"));
  Serial.println(F("Then Enter characters to send to Bluefruit"));
  Serial.println();

  ble.verbose(false);  // debug info is a little annoying after this point!

  /* Wait for connection */
  while (! ble.isConnected()) {
      delay(500);
  }

  // LED Activity command is only supported from 0.6.6
  if ( ble.isVersionAtLeast(MINIMUM_FIRMWARE_VERSION) )
  {
    // Change Mode LED Activity
    Serial.println(F("******************************"));
    Serial.println(F("Change LED activity to " MODE_LED_BEHAVIOUR));
    ble.sendCommandCheckOK("AT+HWModeLED=" MODE_LED_BEHAVIOUR);
    Serial.println(F("******************************"));
  }
}

/**************************************************************************/
/*!
    @brief  Constantly poll for new command or response data
*/
/**************************************************************************/
void loop(void)
{
  // Check for user input
  char inputs[BUFSIZE+1];

  if ( getUserInput(inputs, BUFSIZE) )
  {
    // Send characters to Bluefruit
    Serial.print("[Send] ");
    Serial.println(inputs);

    ble.print("AT+BLEUARTTX=");
    ble.println(inputs);

    // check response stastus
    if (! ble.waitForOK() ) {
      Serial.println(F("Failed to send?"));
    }
  }

  // Check for incoming characters from Bluefruit
  ble.println("AT+BLEUARTRX");
  ble.readline();
  if (strcmp(ble.buffer, "OK") == 0) {
    // no data
    return;
  }
  // Some data was found, its in the buffer
  Serial.print(F("[Recv] ")); Serial.println(ble.buffer);
  ble.waitForOK();
}

/**************************************************************************/
/*!
    @brief  Checks for user input (via the Serial Monitor)
*/
/**************************************************************************/
bool getUserInput(char buffer[], uint8_t maxSize)
{
  // timeout in 100 milliseconds
  TimeoutTimer timeout(100);

  memset(buffer, 0, maxSize);
  while( (!Serial.available()) && !timeout.expired() ) { delay(1); }

  if ( timeout.expired() ) return false;

  delay(2);
  uint8_t count=0;
  do
  {
    count += Serial.readBytes(buffer+count, maxSize);
    delay(2);
  } while( (count < maxSize) && (Serial.available()) );

  return true;
}
This code is to test the connection between the Arduino serial monitor and the device connected to the Bluetooth module.

Comments (2)
Hi – I´m wondering how to translate pinouts for an Arduino Mega – it doesn´t work straight away w/ the same pinouts??
Hi dear
you can use this link
it works with both Uno and Mega.