

An Introduction to WX-101W Module
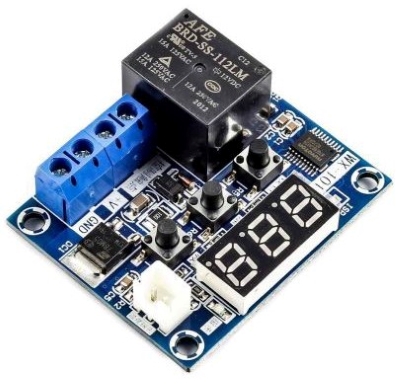
The WX-101W module is one of the oldest and most popular thermostats on the market. It’s a great option for temperature control in many projects due to its several features and simple design and use.
It also has a digital seven-segment display that shows the temperature value with a resolution of 0.1°C. In addition, there are three buttons for controlling and settings, as well as an output terminal for turning on/off an external actuator such as a heater.
To work with the WX-101W module, you must select either the cooling or heating modes and set a specific temperature. When the set temperature is reached, the module activates the relay and connects the input and output terminals. This allows you to build a smart temperature control system.
Some other features: an automatic protection system, an action-time delay, the ability to choose the cooling/heating mode, the operating temperature, and the hysteresis value.
Automatic Protection System of WX-101W Thermostat Module
As mentioned, the WX-101W module has an automatic protection system to prevent risks like temperature exceeding the desired range, sensor short-circuit, or sensor open-circuit
WX-101W Specifications
- Input voltage: 12V DC
- Maximum current consumption: 65 mA
- Maximum relay output current: 12 A
- Temperature sensor: NTC (10K 0.5%)
- Sampling rate: 2Hz (two measurements per second)
- Resolution: 0.1°C
- Range: -40 to 110°C
- Dimensions: 40 x 48.5 mm
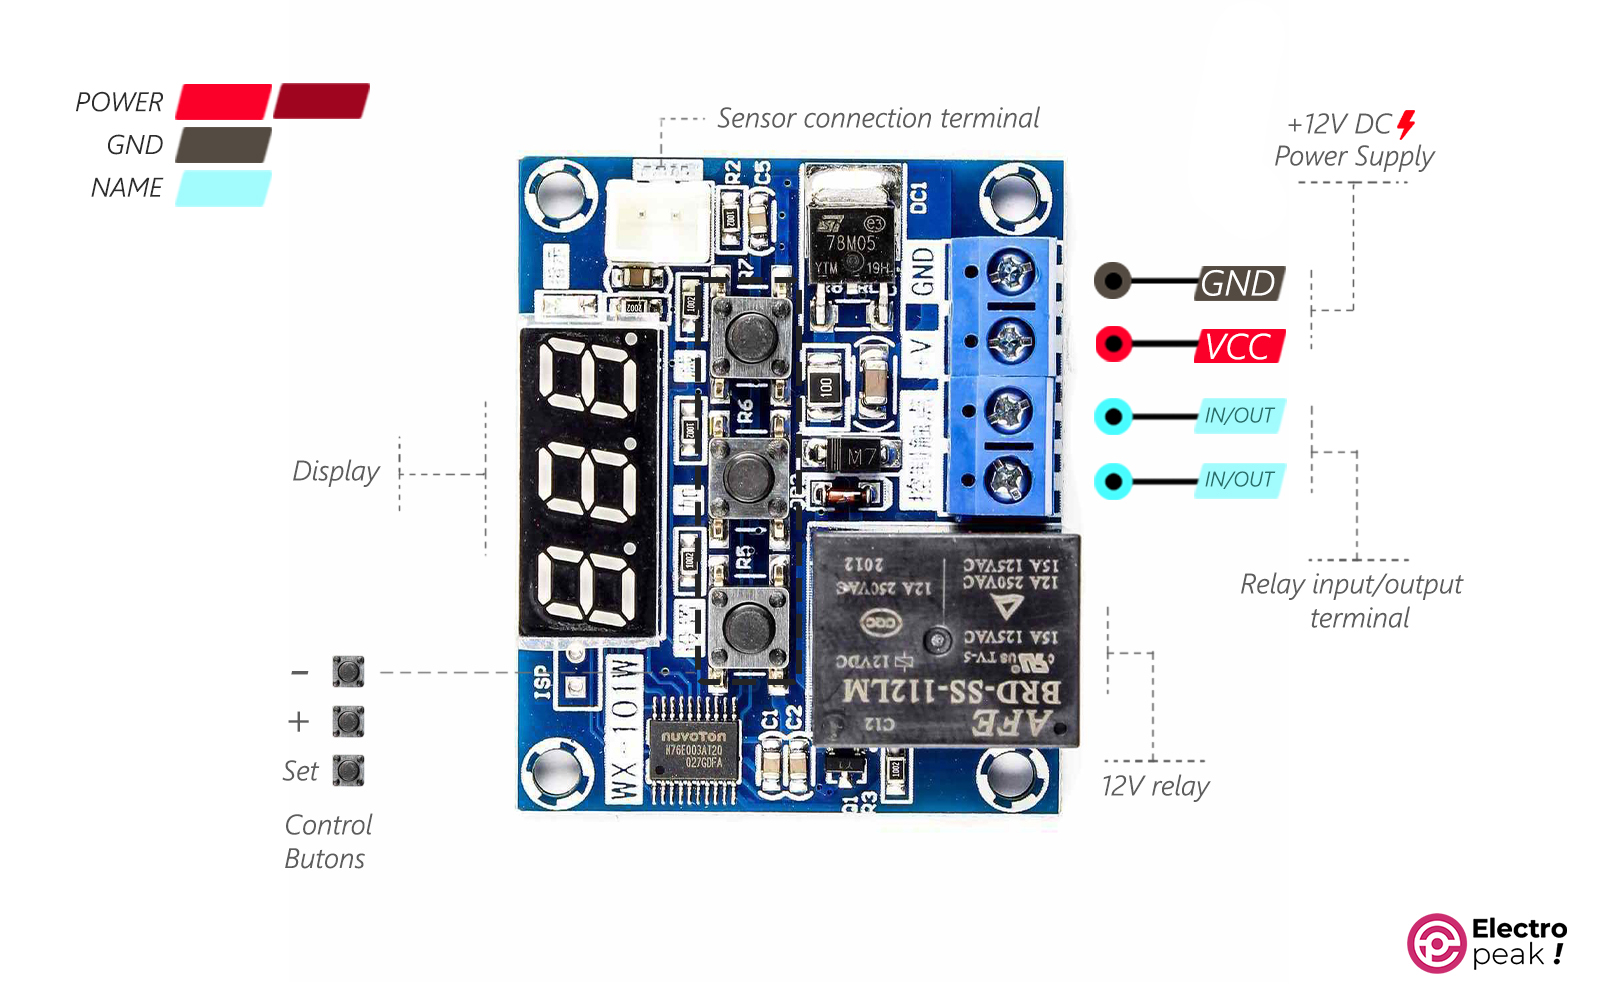
WX-101W Pinout
The WX-101W module has three pairs of terminals: (a) one pair to connect to the sensor (image below, on the top right corner), (b) another pair to feed the module, and (c) the last pair for the relay input/output.
- VCC: module power supply (12 V)
- GND: Ground
- OUT/IN: relay input/output pin
How to Use WX-101W Thermostat Module
The process is very simple. Just follow the steps below:
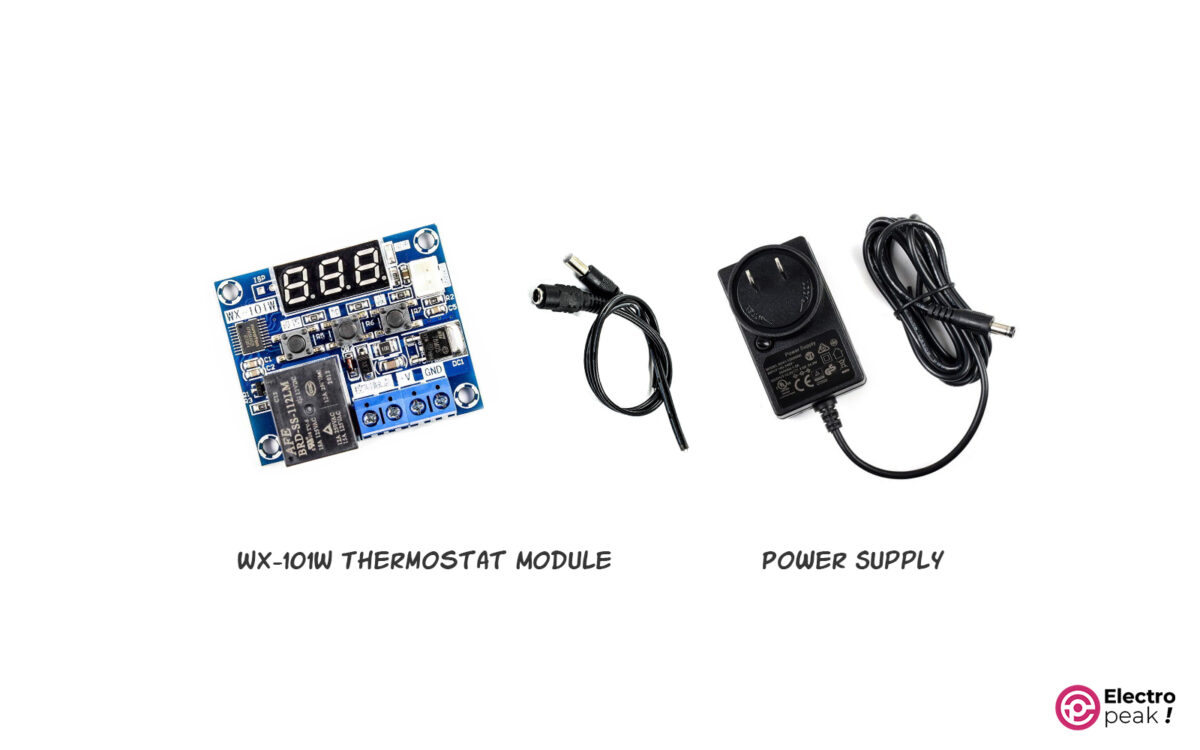
Required Materials
Wiring
Wiring the circuit correctly is crucial but can be a bit challenging. Check the figure below for the wiring diagram
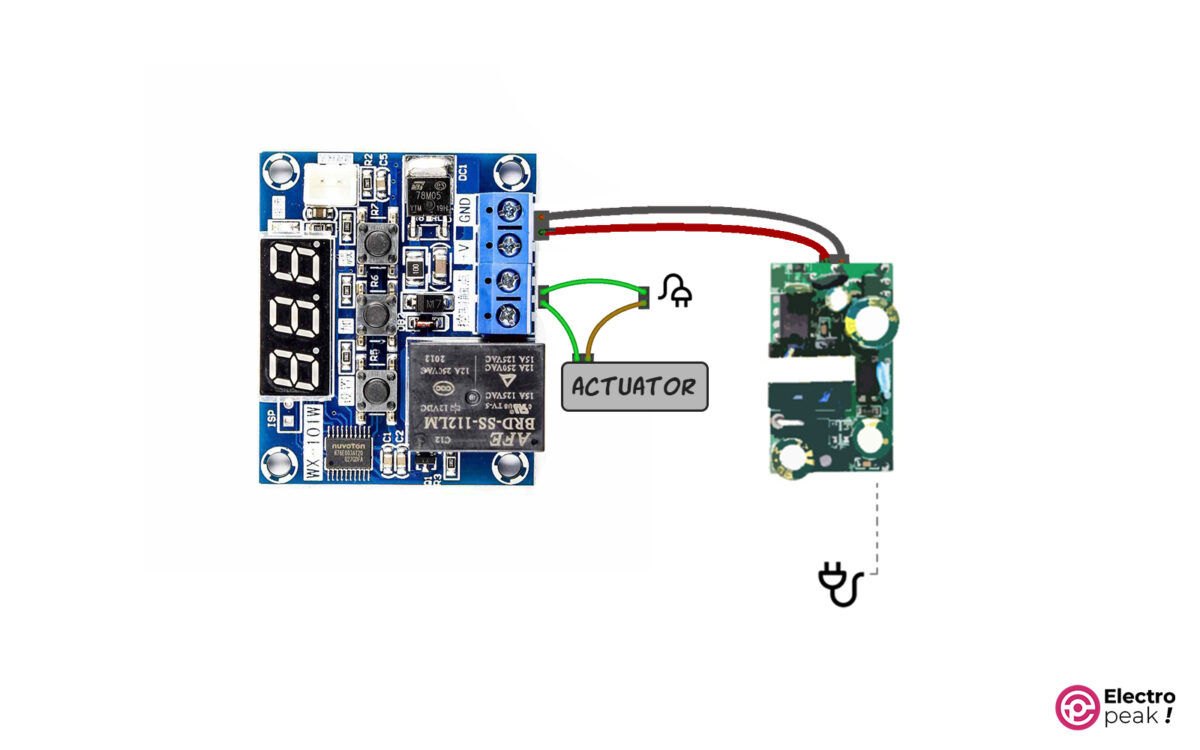
The GND and +V terminals should be connected to the 12V pins of the power supply.
Here, the actuator, which is often an electric cooling/heating tool, can have different voltage requirements (AC or DC) depending on the actuator. You can, for example, run a 220V heater or a 5V DC fan as long as you use the appropriate power supply.
Operating Temperature of WX-101W Thermostat Module
The operating temperature determines when the relay output of the module is activated or deactivated based on the cooling or heating mode.
After completing the connections and turning on the module, press one of the “+” or “–“ buttons to adjust the temperature. The number on the display will then start to flash.
Now, use the + and – buttons to reach the desired temperature, then press the set button. Here, the image will be fixed on the display, showing the measured temperature.
Now your thermostat is all set.
Control Parameters of WX-101W Thermostat
Apart from the operating temperature, you should adjust other control parameters to improve the module’s resolution and performance.
There are three buttons for thermostat adjustment: “+,” “–,“ and “set.”
The “set” button allows you to enter the menu of the module settings. You can also switch between setting with the “+” (up) and “–” (down) buttons. In addition, to change the parameter value, press the set button again. Also, while changing each parameter, adjust the value using the + and – buttons, and press the set button to save it.
F-1 Parameter: Cooling/Heating Mode
As mentioned, the WX-101W module has two modes: cooling and heating. To select a mode, adjust the “F-1” parameter to either “HH” (heating mode) or “CC” (cooling mode).
- “HH”: In heating mode, the relay output is activated when the ambient temperature drops below the set point, turning on an external actuator such as a heater.
- “CC”: the relay output is activated when the ambient temperature exceeds the set point, usually turning on a cooling element like a fan or cooler.
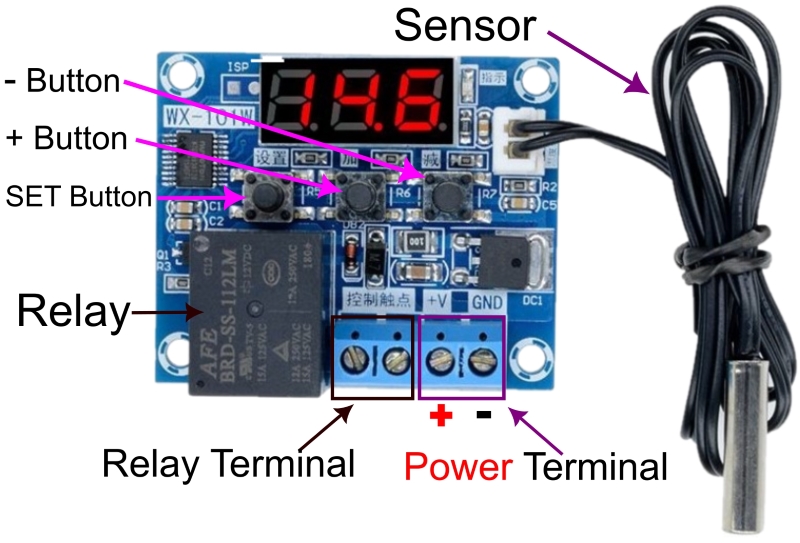
Follow the steps below to set the F-1 parameter on the WX-101W thermostat module.
- Connect the module to the 12 V power supply and the sensor to the module. Now the display should turn on and show the ambient temperature.
- Press the set button (left button) to display “F-1” on the screen.
- Press the set button again, and you’ll see “HH,” indicating the heating mode. (Note that by default, the module is in this mode.)
- Use the – and + buttons to choose between “HH” or “CC” modes. Finally, press the set button to complete the process. Next, you should see “F-1” again.
- The settings are now saved, and you should see the temperature value on the screen. To exit the settings, press and hold the set button for a few seconds.
F-2 Parameter: Hysteresis Setting
Let’s say the module is in the heating mode, and you’ve set the temperature to 25°C. In this case, when the temperature goes below 25°C, the output is activated, which will turn on a heater. However, the output becomes inactive and turns off the heater when the ambient temperature hits 25°C or more. This cycle may occur rapidly, turning on and off the module output repeatedly. To prevent this, many electrical components have a threshold value for the start/end point of operation.
And that’s where the F-2 parameter comes into play. It tells the module to activate or deactivate the output depending on how far away it is from the set point. For example, with a set point of 25°C and a hysteresis value of 0.5°C in heating mode, the output won’t be activated until the ambient temperature goes below 24.5°C.
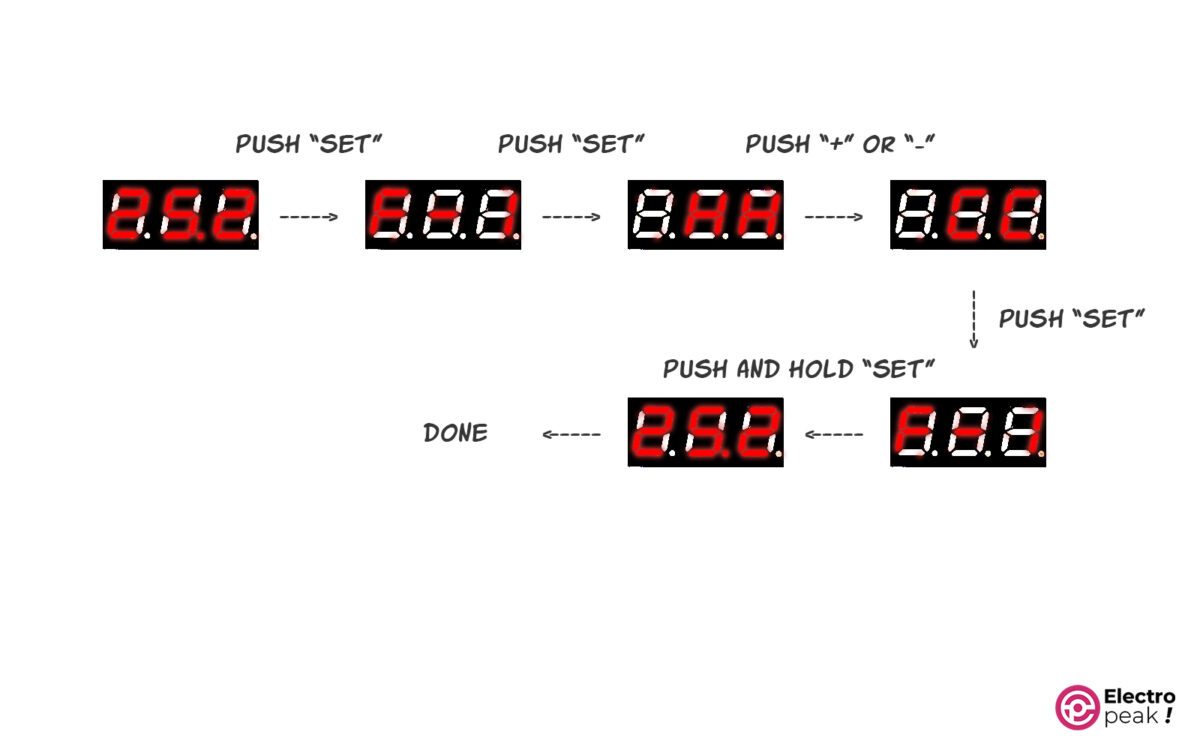
Here are the steps to adjust the F-2 parameter:
- Press the set button.
- Press the + button. When “F-2” appears on the display, press the set button again.
- By default, the number 02.00 will be displayed. Use the + and – buttons to adjust this number.
- After adjusting the number, press the set button again.
Remember that when you see “F-2,” if you press and hold the set button, the display will show the ambient temperature.
F-3 Parameter: Calibration
Suppose the temperature value has a permanent error. The F-3 parameter allows you to add or subtract a specific value from the measured temperature to eliminate the error.
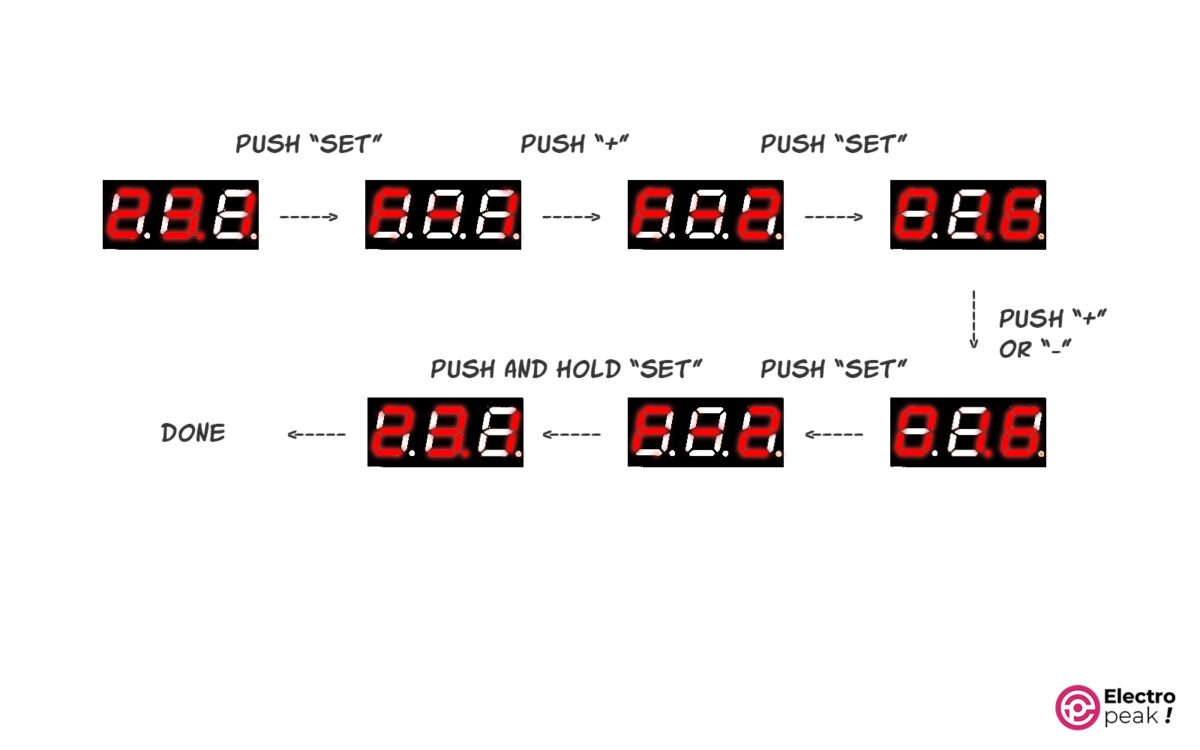
Similar to other parameters, you can adjust the F-3 parameter using the same steps:
- Press the set button.
- Press the + button twice to display F-3.
- Press the set button again to enter the settings, and then adjust the number with the + and – buttons.
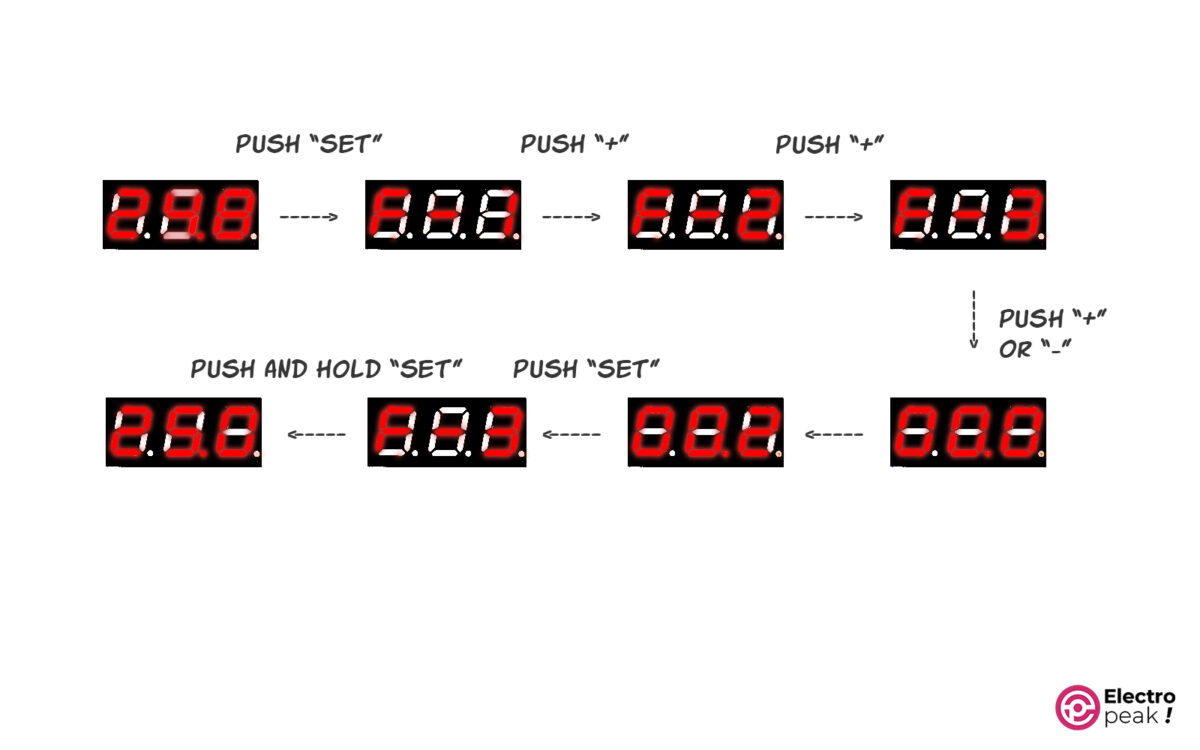
F-4 Parameter: Action-time Delay
You can adjust the action time with the F-4 parameter. It determines a time delay, so when the ambient temperature exceeds the range, the relay won’t be activated/deactivated until this specific amount of time has passed.
The settings process for this parameter is also the same.
Note that the number is given in “minutes.”
F-4, like the threshold, prevents the output from going on and off repeatedly. For example, imagine you are sitting in a room with this sensor, and a cold air flow enters through an open window, cooling the room temperature sharply. This temperature isn’t the desired stable temperature, so we don’t need to activate anything. That’s where the F-4 parameter comes in handy. When we set it to one minute, for example, we’re telling the module that the output should be activated only after he temperature has remained stable for one minute.
What’s next?
Now, let’s try to make an adjustable cooling system with the WX-101W module.
By using two WX-101W modules at the same time, each in a different mode, you can design a temperature control system for a greenhouse. This system will always keep the temperature within a specific range, for example, 23 to 26 degrees.
