
Introduction
Since most Arduino boards don’t support wireless communication, we have to connect them to a computer—using a cable—in order to program them. But, dealing with all those cables can be frustrating, right?
In this step-by-step tutorial, we’re going to show you how to wirelessly program your Arduino using Bluetooth. It gives you more flexibility when working on your projects. Whether you’re an Arduino pro or just starting out, this step-by-step guide will take you through the entire process—from configuring your Bluetooth module to writing and uploading your code. By the end of this tutorial, you’ll be able to program your Arduino projects using your computer’s Bluetooth connection.

What You Will Learn
- How to work with a Bluetooth Serial Module
- How to Program Arduino with Bluetooth
HC-05 Bluetooth Module
We use the HC-05 module to have Bluetooth communication. It acts as a slave and communicates with your Arduino through a serial port.
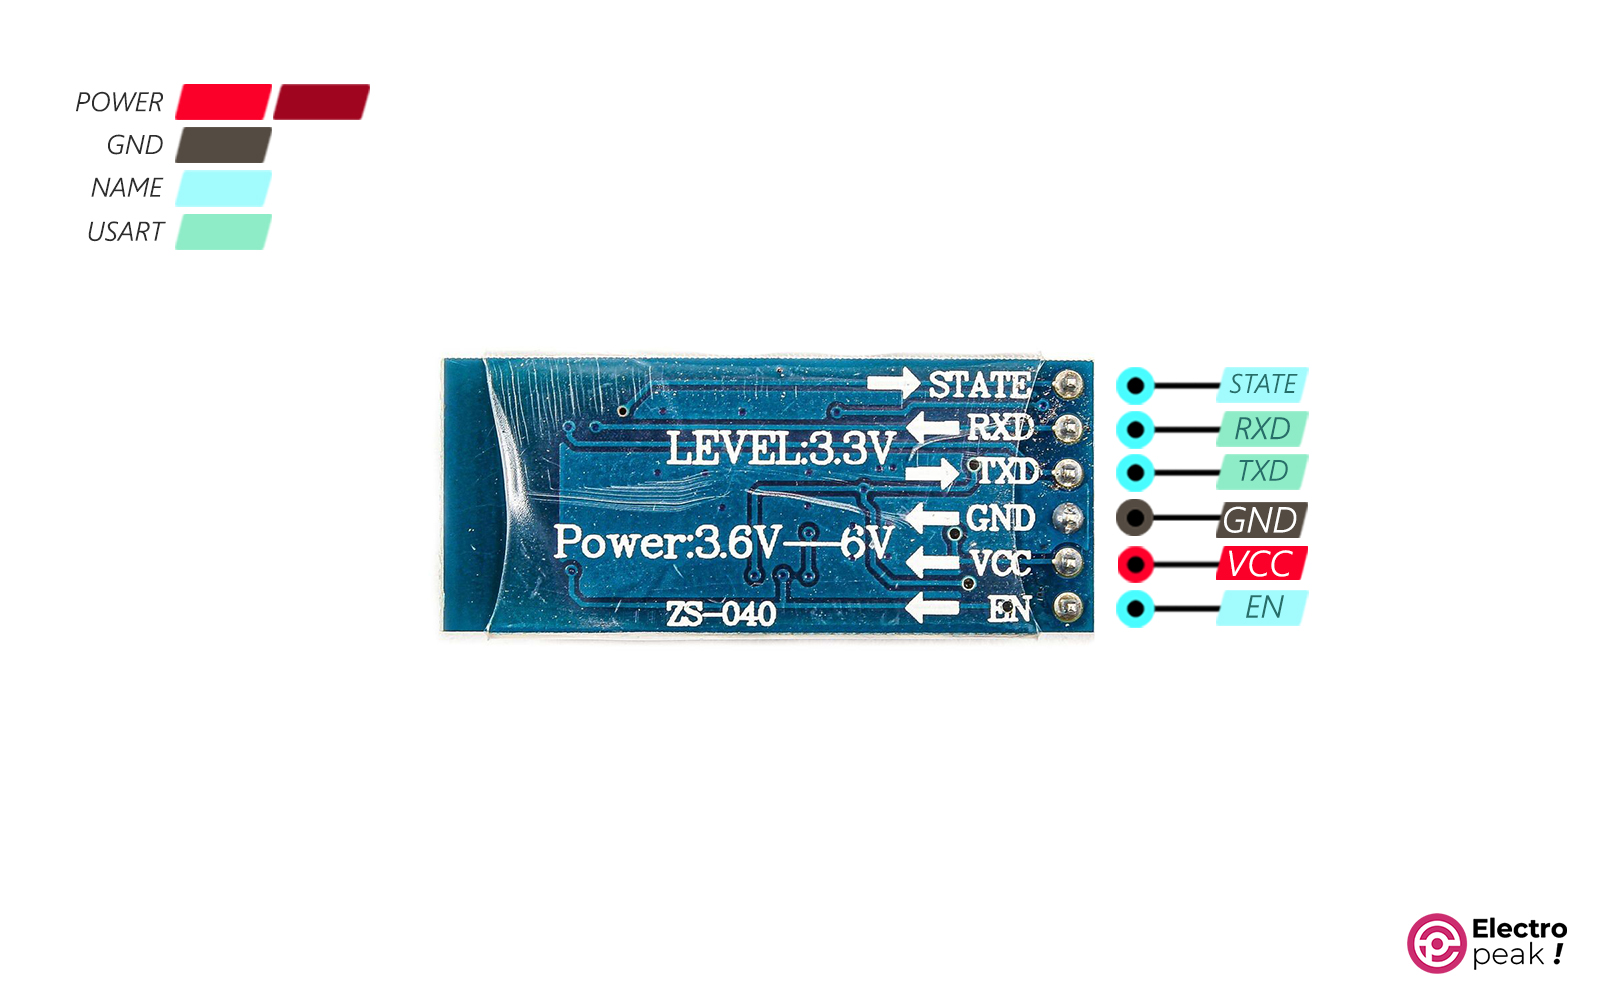
The HC-05 module has six pins:
VIN: Module power supply (3.6 to 6V)
GND: Ground
STATE: Connection status
EN: Enabling the AT Command Configuration
RX: Receiving data (serial protocol)
TX: Transmitting data (serial protocol)
HC-05 Pinout
Benefits of Programming Arduino with Bluetooth
1. Flexibility: You can wirelessly program your Arduino. It gives you the flexibility to test your projects without being tied to a computer.
2. Simplicity: It’s pretty easy to handle and set up Bluetooth modules. As soon as you pair your Arduino with a Bluetooth-enabled device, you can start programming the Arduino board.
3. Availability: Bluetooth technology is widely available. Most modern devices—smartphones, tablets, or computers—have built-in Bluetooth. So, you can program your Arduino using the devices you already have without needing any extra hardware.
Required Materials
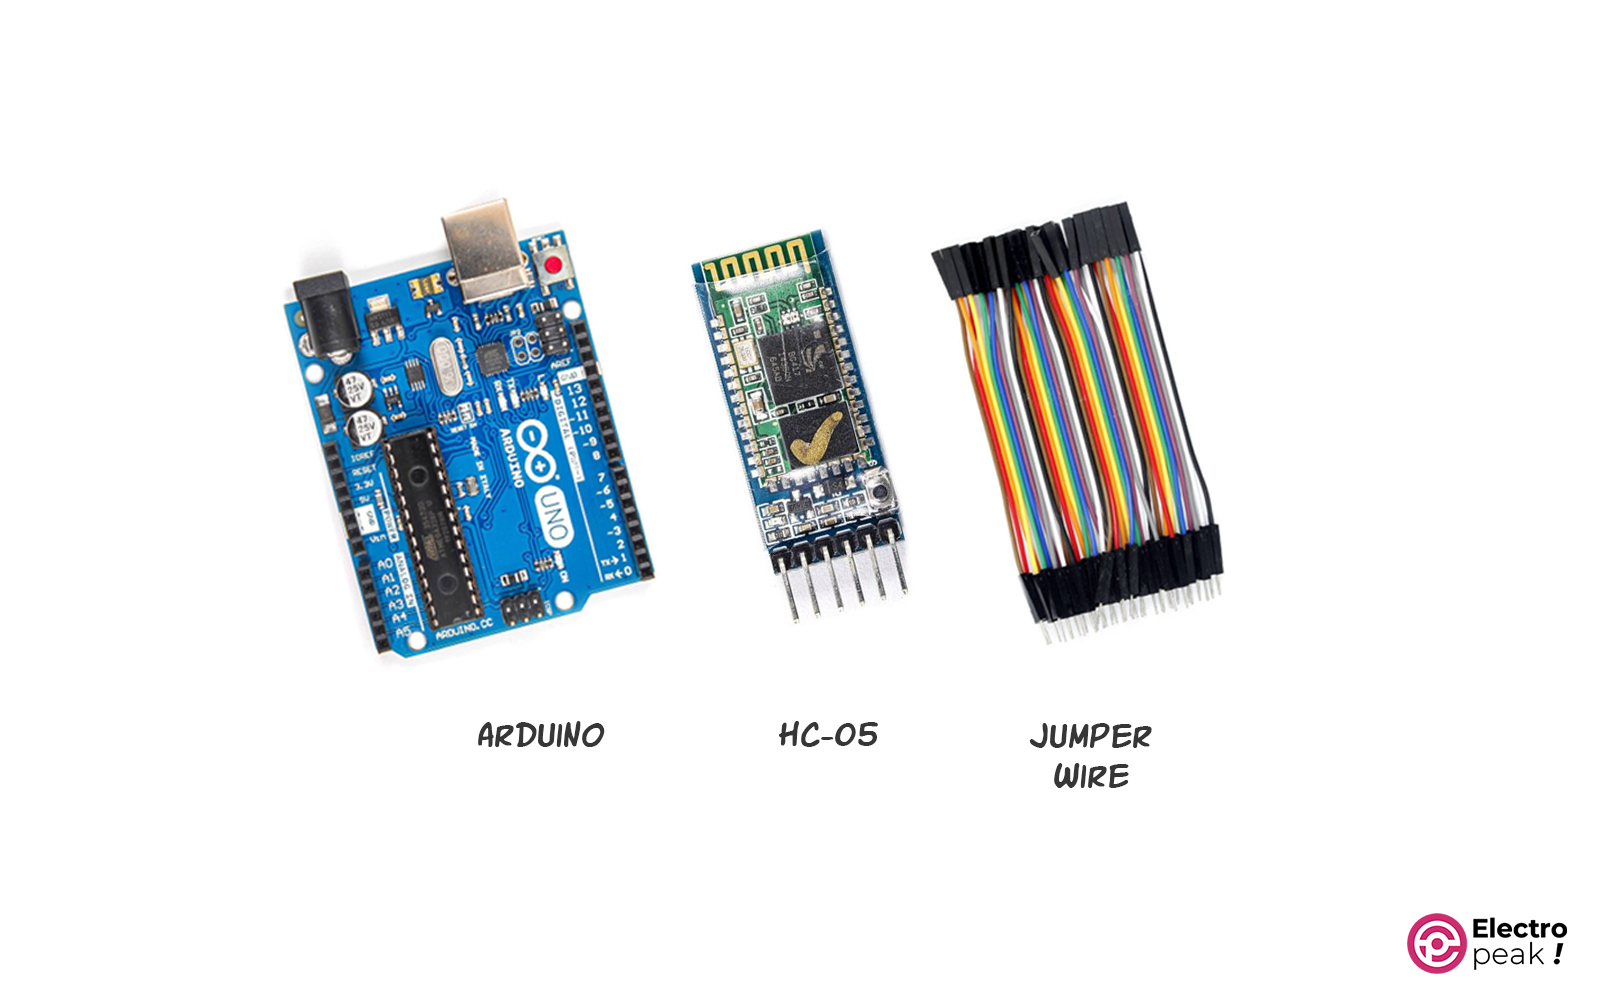
Hardware Components
*: This Bluetooth is compatible with any Arduino board that can be programmed through serial communication. Just make sure that it doesn’t have a CH340 TTL converter.
**: The HC-06 module can also get the job done, but make sure to remember the details mentioned in the text..
***: You can also use a capacitor up to 100 nF.
Software
Prepare the Bluetooth Module for Programming Arduino
Pay close attention to the steps below to get your HC-05 Bluetooth module ready for Arduino programming.
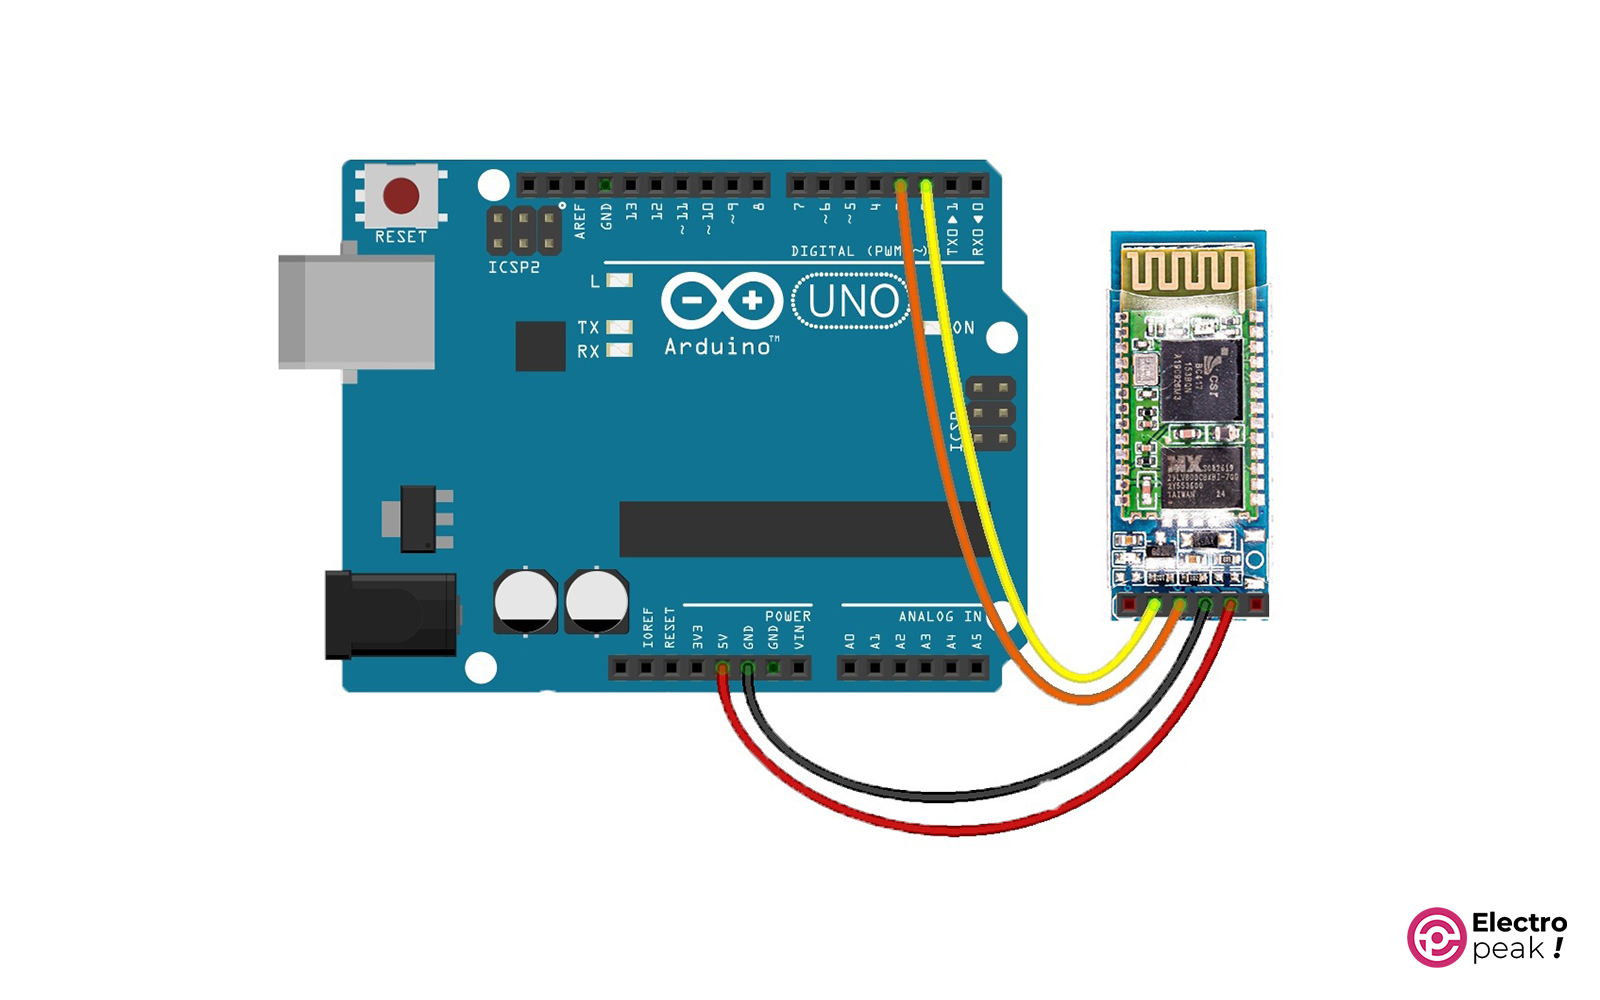
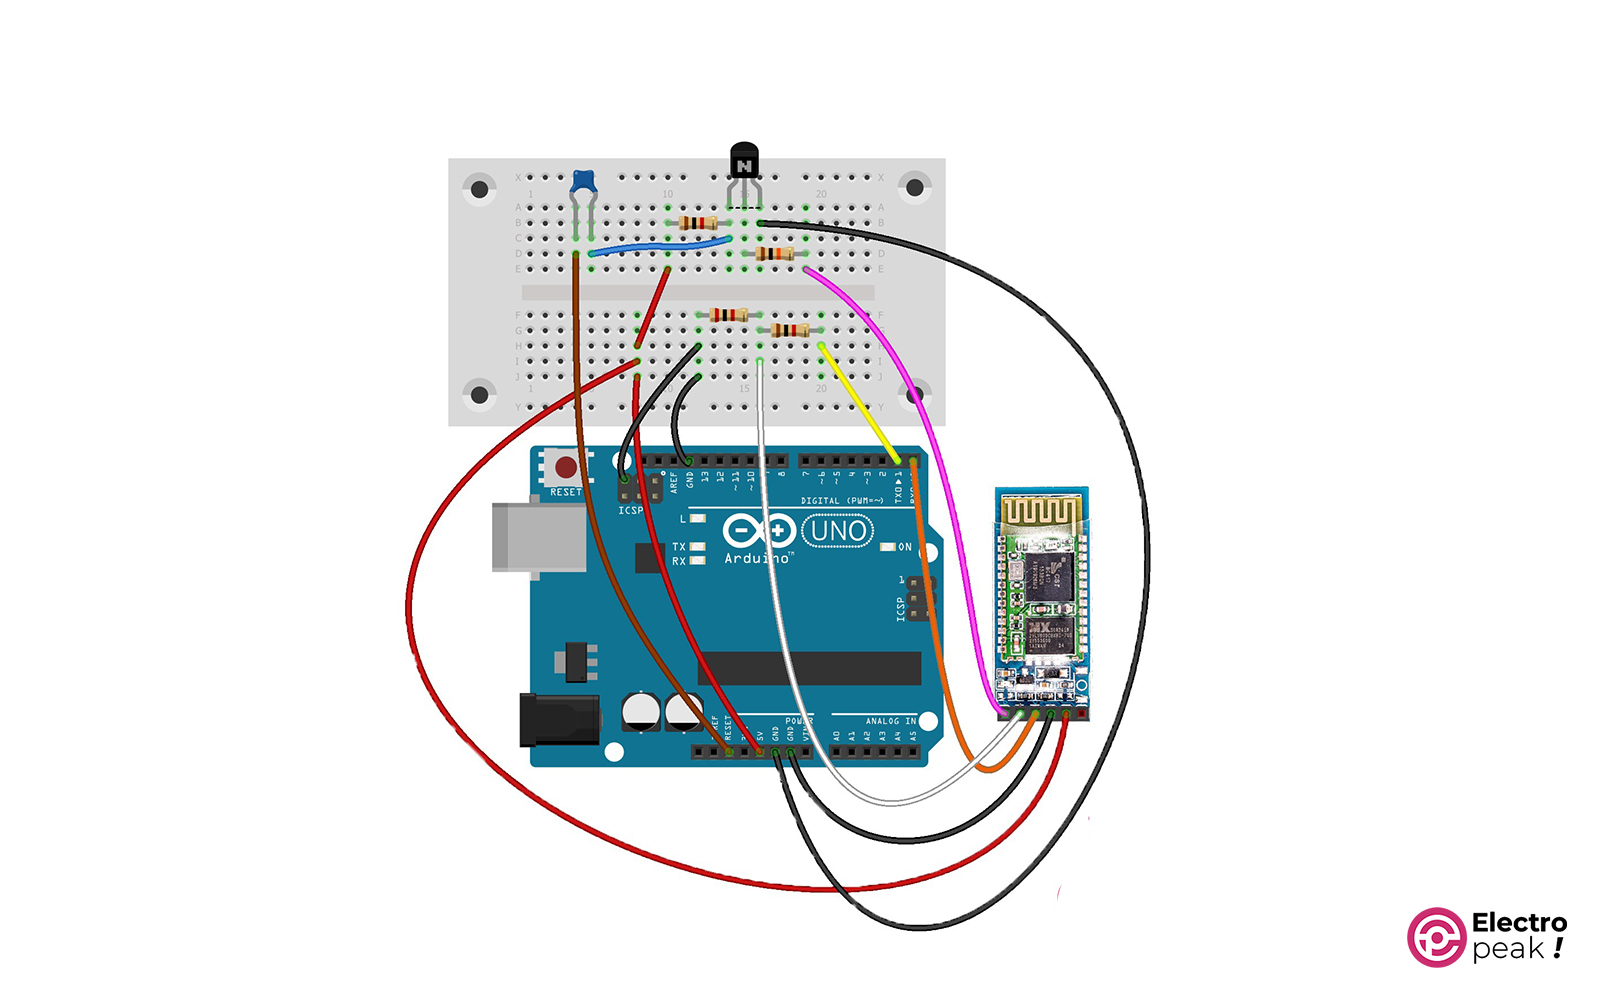
Wiring
First, wire up your module and Arduino board just like in the image below.
Code
Install this library in the Arduino IDE software and upload the following code to your Arduino.
#include <SoftwareSerial.h>
SoftwareSerial HC06(2,3);
void setup()
{
Serial.begin(9600);
while(!Serial);
Serial.println("Enter AT commands:");
HC05.begin(9600);
}
void loop()
{
 if (HC06.available())
 Serial.write(HC05.read());
 if (Serial.available())
 HC06.write(Serial.read());
}
This piece of code sets up two serial connections: one between Arduino and the computer and another with the Bluetooth module. Anything you type in the Serial Monitor window gets sent to the Bluetooth module via the serial connection, and the module’s response is sent back to Arduino and finally to the computer.
Entering the AT Command Mode
Before running the code, follow these steps:
1. Disconnect your Arduino from the computer and power supply.
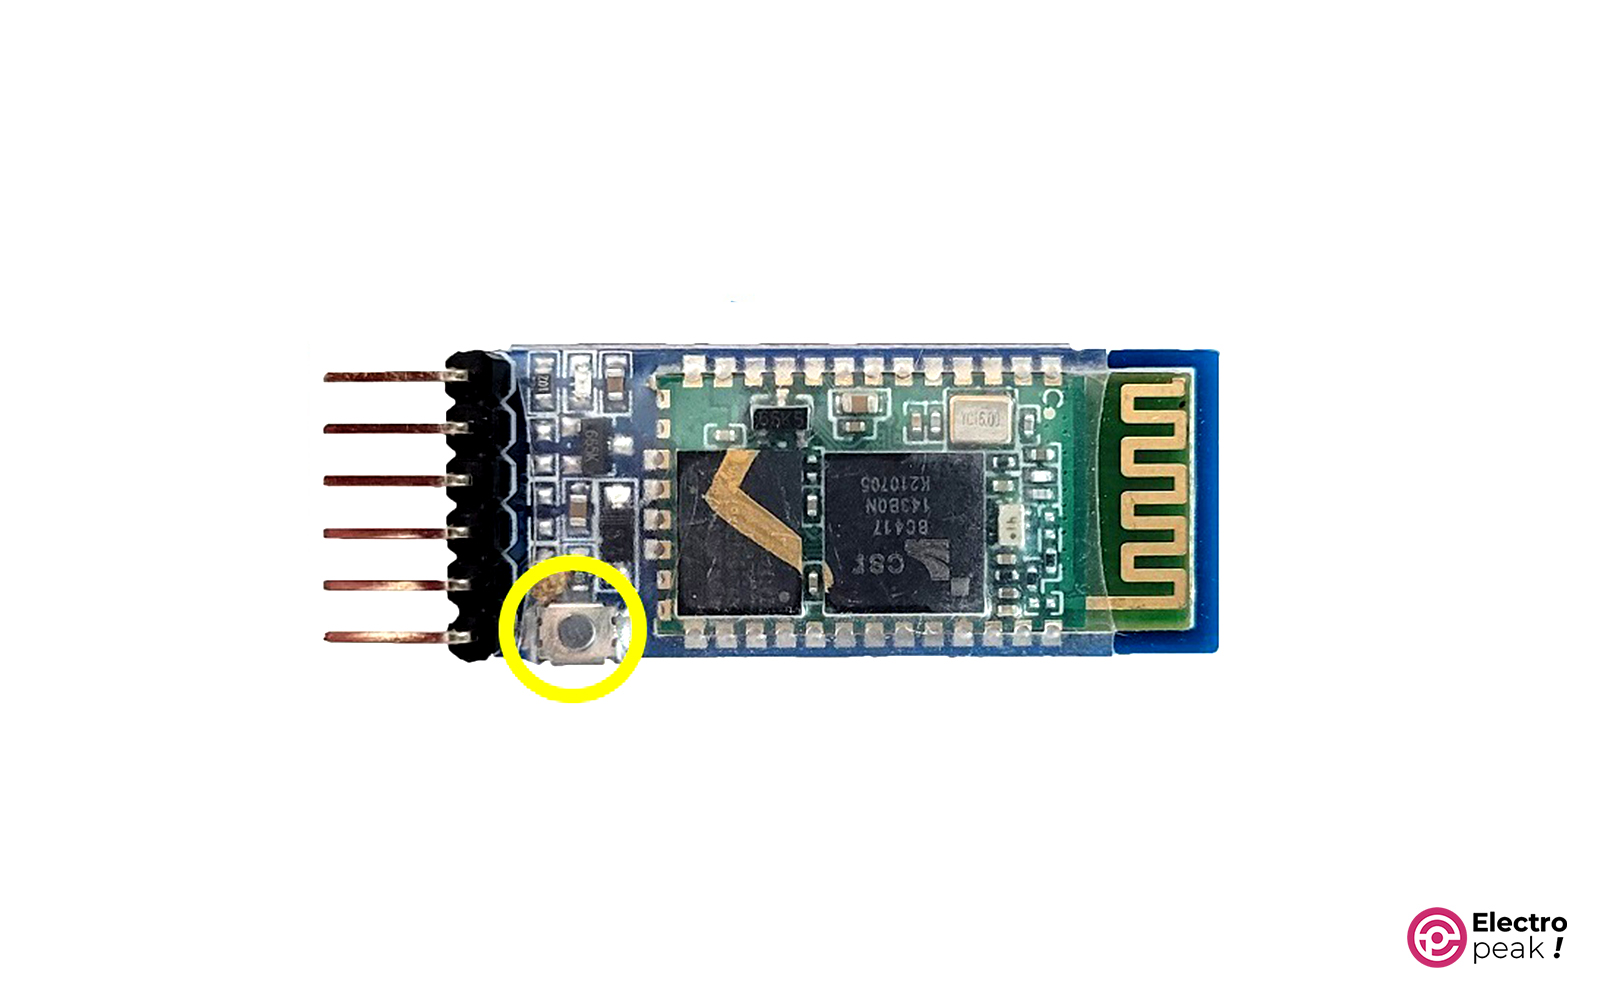
2. Hold down the KEY button on the Bluetooth module (the one marked with a yellow circle).
3. Connect it to your computer.
After following the steps above, the HC-05 Bluetooth module will enter AT Command mode and its LED will blink at a slower rate (about 0.5 Hz). If not, you haven’t entered AT Command mode yet.
Now, open the Serial Monitor window and set the communication type to “Both NL & CR” and the baud rate to 9600.
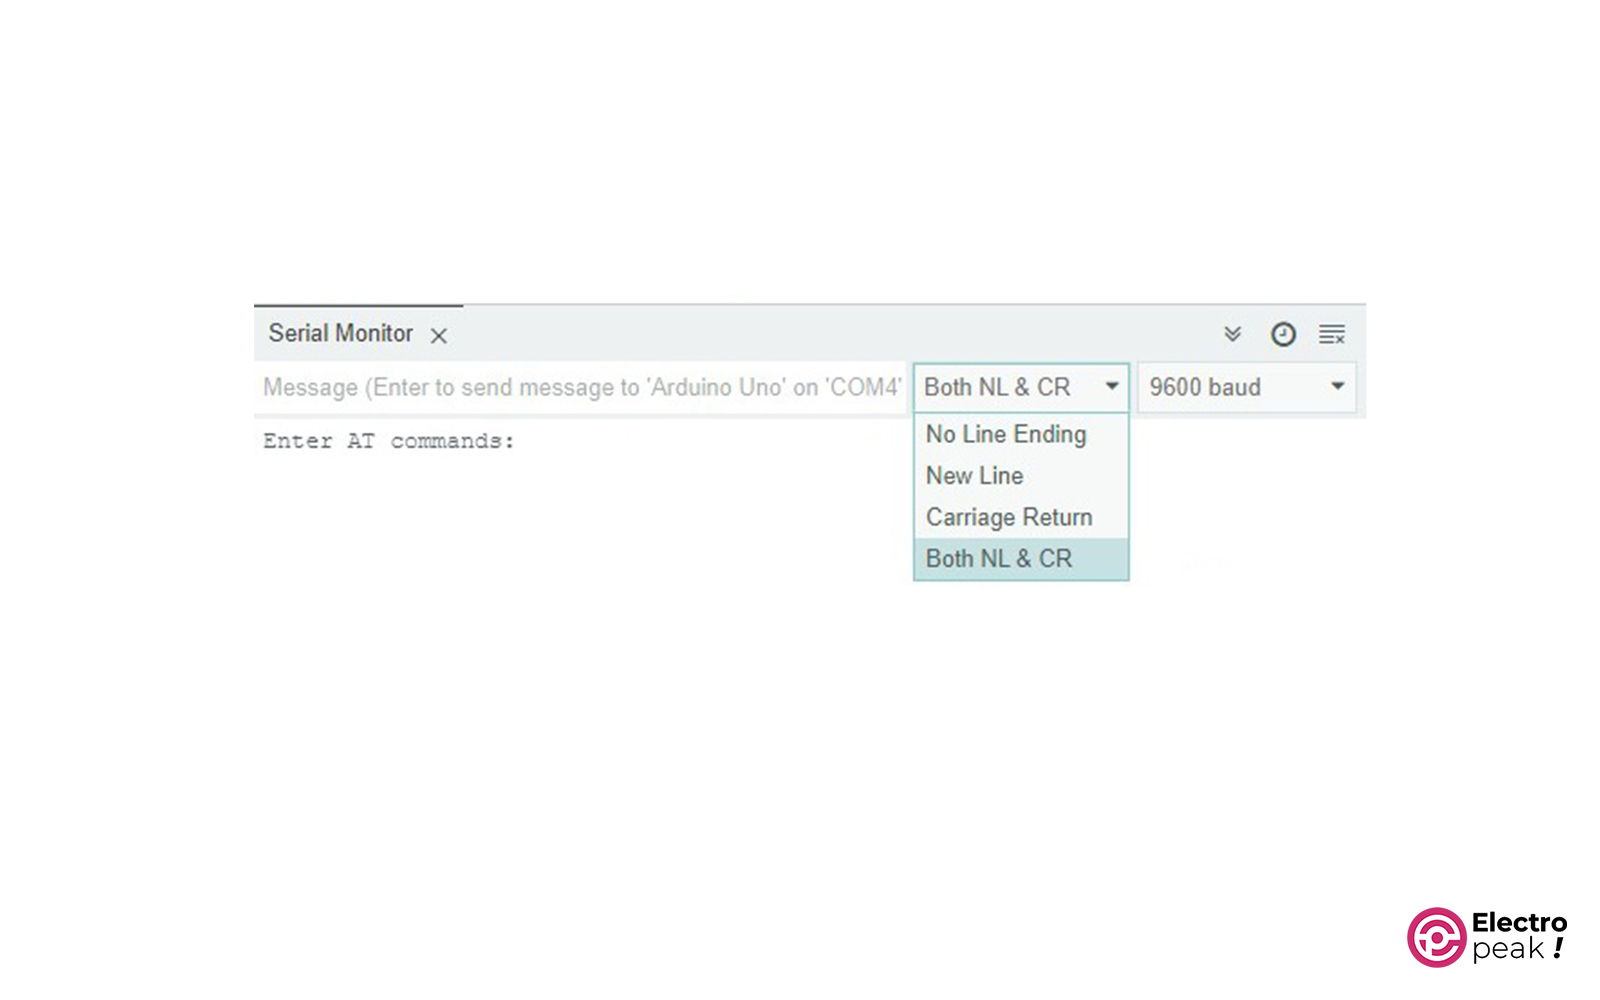
Once you see the “Enter AT commands:” phrase, enter the following AT commands line by line. The Bluetooth module will respond to each line with the word “OK.”. If not, double-check your wiring and code.
AT+ORGL
AT+ROLE=0
AT+POLAR=1,0
AT+UART=<115200, 0, 0> //For Arduino Nano and Pro mini, use <57600,0,0> instead
AT+INIT
All right, your module is now ready for programming Arduino.
Programming Arduino over Bluetooth Using HC-05 Module
To program your Arduino with Bluetooth, follow these steps:
Wiring
Connect your Bluetooth module to Arduino as shown in the image below.
Be sure to connect the Reset pin of the Arduino programmer chip, which is located on the ICSP connector, to GND. Otherwise, the serial signals of the programmer chip will interfere with the signals of your Bluetooth module, and, as a result, the Arduino won’t be programmed.
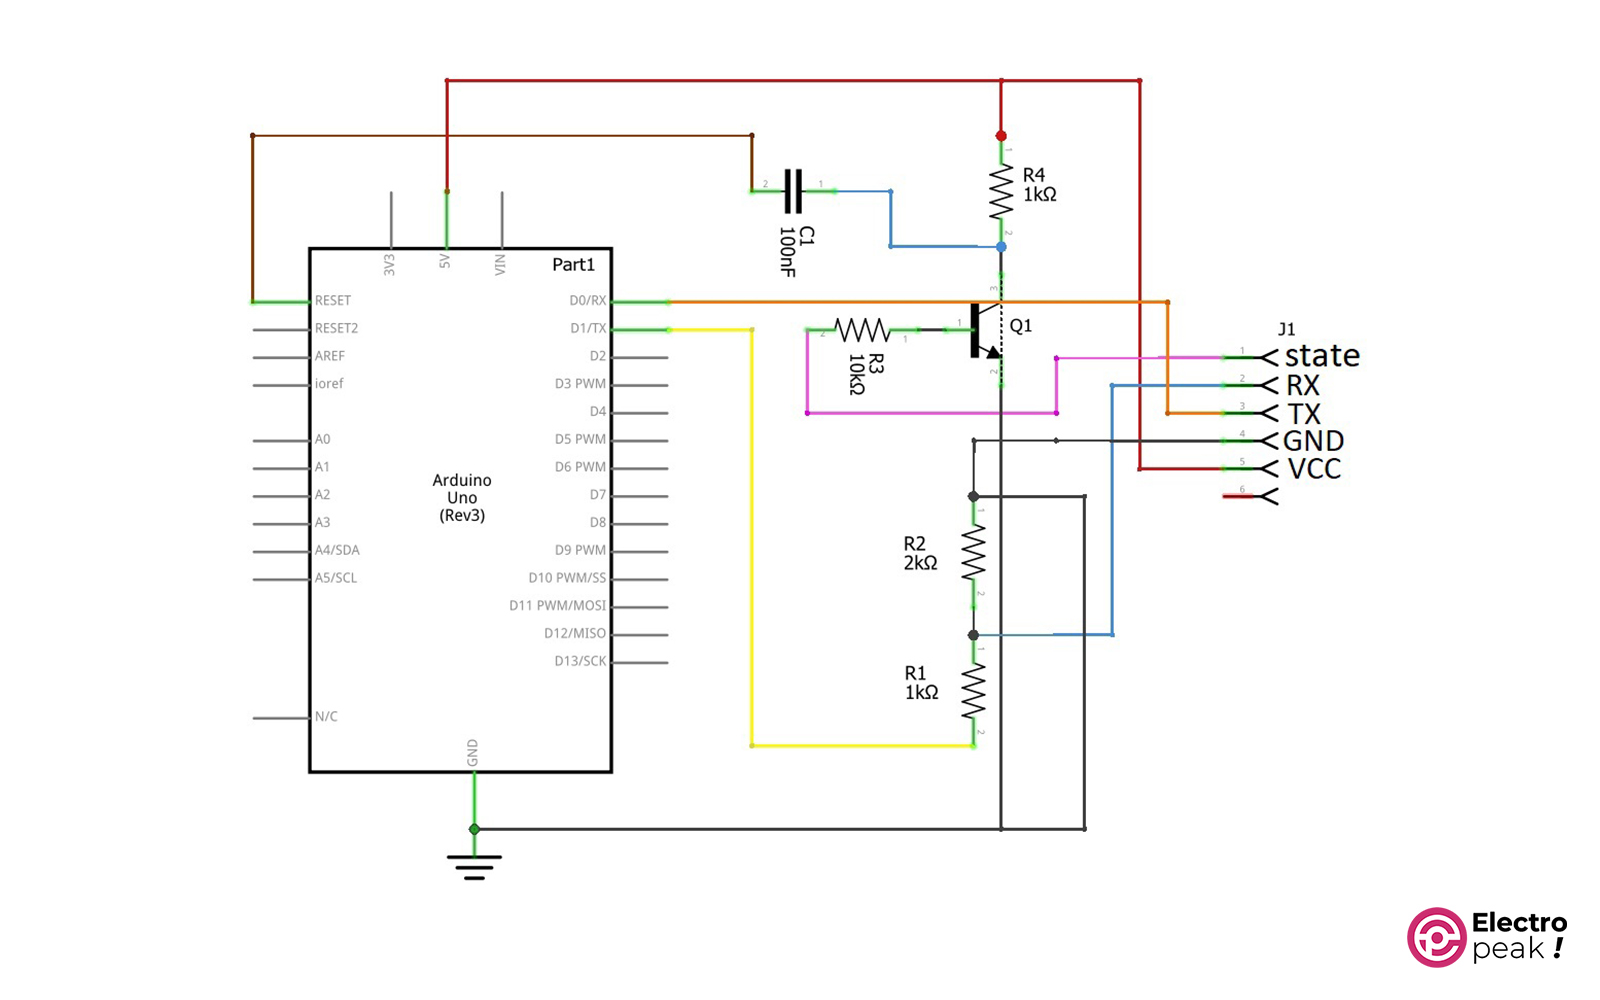
Here’s the circuit schematic:
Connecting to Arduino via Bluetooth and Programming It
First, power up your Arduino board. Next, go into Windows and pair it with the HC-05 Bluetooth module.
Once paired successfully, the module’s LED will blink at a slower rate.
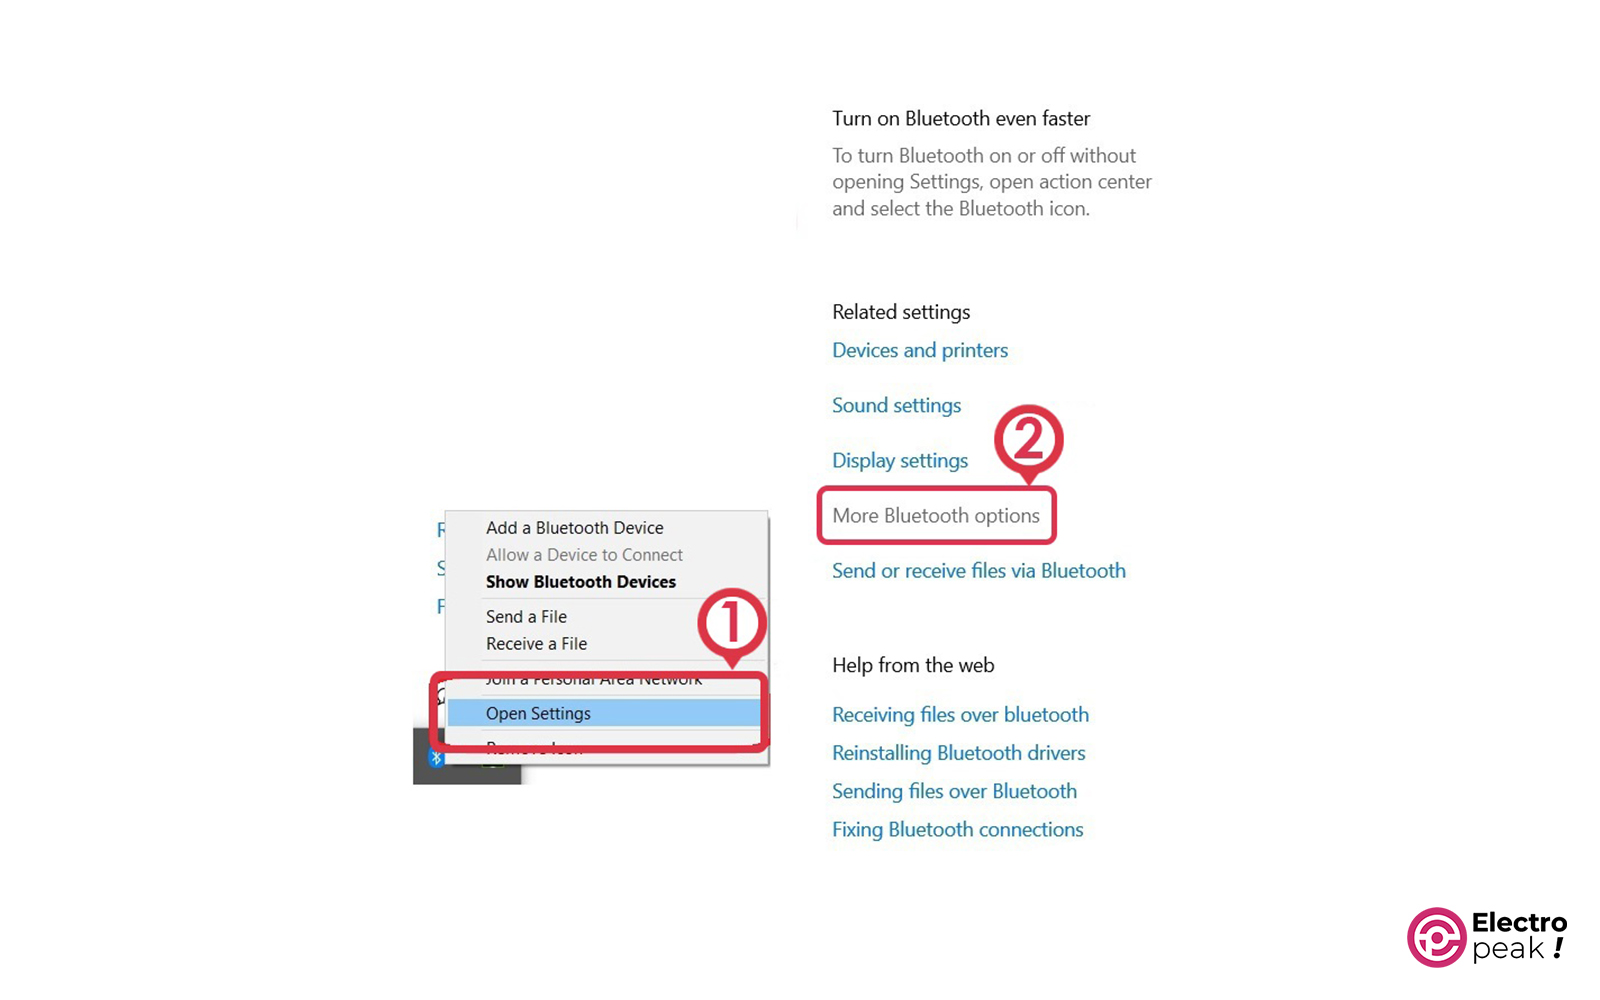
Now, right-click on the Bluetooth icon in the Windows Taskbar and select “Open Settings.” In the opened window, click on “More Bluetooth Options” (as shown in the image below).
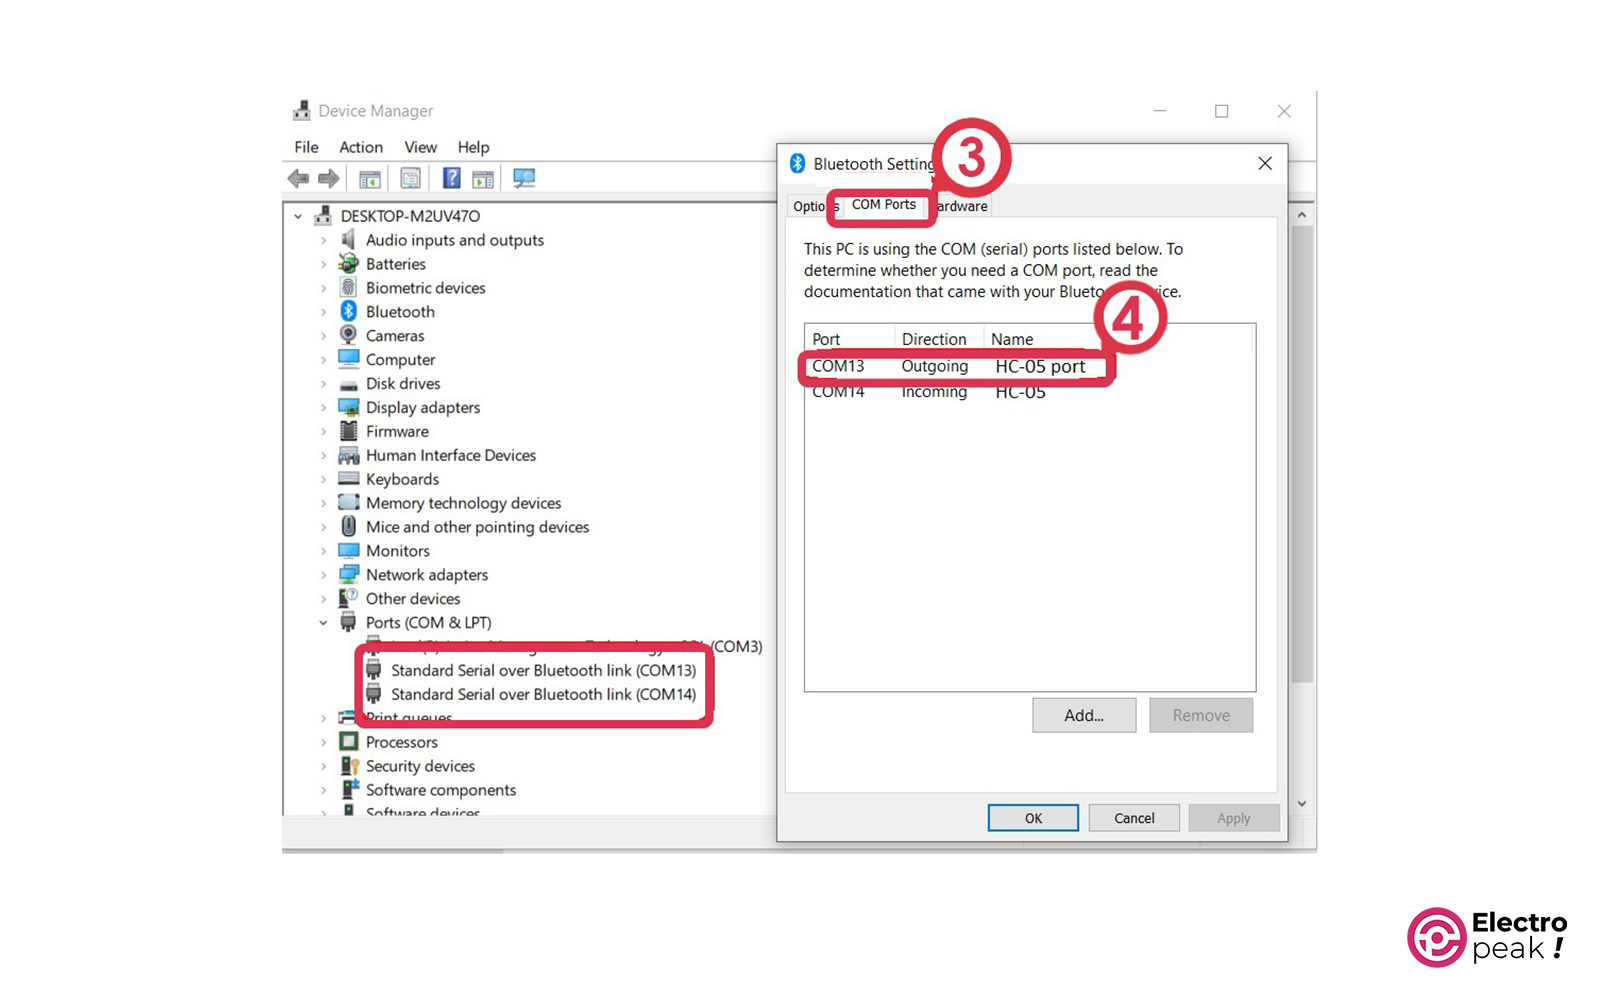
Go to the “COM Ports” section. Note down the COM number of the option whose “Direction” is set to “Outgoing”. Then, open the Arduino software.
To upload your code in the Arduino IDE software, first, go to the Tools menu. Then, set the port number to the one you previously noted down. Finally, select the Arduino board type and upload your code.
What’s Next?
In this tutorial, you have learned about Bluetooth modules and how to use them in serial mode. By configuring them and connecting the serial pins, you could program your Arduino.
Using this programming method is particularly helpful when your board cannot be easily accessed, such as when utilizing an Arduino to control a mobile robot or when it is placed within a sealed enclosure.
With this approach, you’ll also have more freedom to design and customize your hardware projects.
In addition, you have established a wireless serial connection with Arduino. Now you can send your desired data via Bluetooth and view it on a computer or smartphone’s serial monitor.

Comments (2)
Hello! I’ve done everething described in this article. BTW, thank you for information! The only problem is Arduino IDE (2.2.1 on Win10 64x). First I’ve found I need to put a tick in Tools > Programmer menu near “Arduino as ISP”. Other way it is not programming at all. When I select this programmer it allows to program Arduino UNO only 1 time (Arduino IDE run in admin mode). Next time I press Compile&Upload it writes “…can’t access COM port bla bla”. Than you need to rerun Arduino IDE and it allows you programe 1 time again. Weird situation. Maybe some of you have encountered a similar situation and know how to solve it?
Hi,
The Arduino as ISP option is selected only when you have two Arduino boards and you want to program the other using the ICSP port of one of them. Therefore, you should not select this option.
It is possible that the Arduino IDE software has a problem with its update. We tested with version 1.8.13 and 2.1 and it worked without any problems.
Do you connect the reset pin of the arduino programmer chip, which is located on the ICSP connector, to GND? If you have not done this, the serial signals of the programmer chip will interfere with the Bluetooth module signal and the Arduino will not be programmed.
Programmer chip means Atmega16 IC which is located near the USB port.
Look at the wiring diagram carefully.