
Introduction
Are you interested in Ethernet communication? In this comprehensive tutorial, we will explore the world of Ethernet communication with Arduino using the ENC28J60 module. Whether you are a beginner or an experienced Arduino enthusiast, this will be useful for you. In this tutorial, we will learn how to interface the ENC28J60 module providing step-by-step instructions and key points. Through simple explanations and a practical example, we will learn how to establish TCP/IP connections, send and receive data, and create our own web server using the ENC28J60 module.
By the end of this tutorial, you’ll be a pro on Ethernet communication with Arduino and projects that can connect to the Internet.
What You Will Learn
- Getting familiar with Ethernet communication
- How to create a server locally
- Getting familiar with the method of connecting to the server as a client and reading data from the server
Pinout of ENC28J60 Ethernet Module
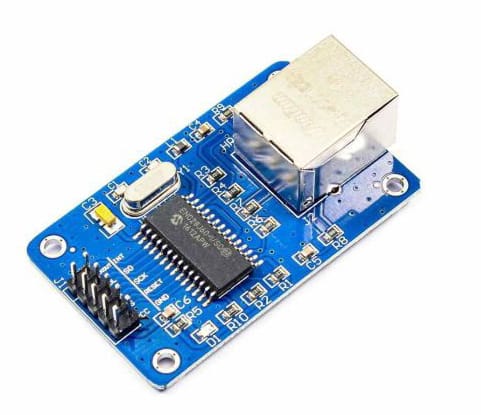
This module equipped with “ENC28J60 Ethernet network” controller, supports various network protocols. It can easily communicate with microcontrollers because of having a SPI interface. The maximum data transfer speed of this IC is 10Mbps, which is enough for many applications. This module has 10 pins as shown in the image below.
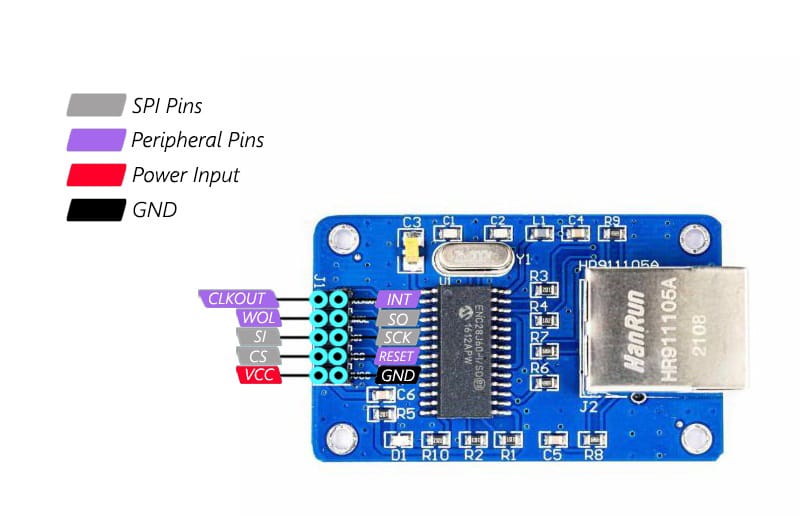
Here is what the pins do:
- CLKOUT: programmable clock output
- INT: Active-low interrupt output
- WOL: Wake on LAN
- SO: MISO, SPI data output
- SI: MOSI, SPI data input
- SCK: SPI clock
- CS: CHIP Select for SPI
- RESET: active-low input Reset
- VCC: module power supply
- GND: module ground
ENC28J60 Ethernet to SPI Module Applications
- Remotely readable Sensors
- Monitoring medical and laboratory equipment
- Control of electrical and electronic systems and equipment via the Internet
- Networking a set of microcontrollers that are far apart
- Internet web servers
Required Materials

The components required to build any server or client are as follows. According to your projects, determine how many of them you need.
*: you can also use any other Arduino board.
Creating a Web Server with Arduino and ENC28J60 Module
First, we create a web server using an Arduino board and an ENC28J60 Ethernet to SPI module. To do this, follow the steps below.
Step 1: Wiring
Wire up the components as shown below (connect the SPI pins of Arduino to the SPI pins of Ethernet module).

Step 2: Web Server Code
Before you start coding, first download the EthernetENC library from this link and install it in the Arduino software.
Now let’s get to the web server code. By this code, Arduino reads 6 analog inputs and displays them in a specific format on the web server page.
In the code below, there are some comments to help you understand the details.
/*
modified on OCT 23, 2023
Modified by MajidMerati from Arduino Examples
<blockquote class="wp-embedded-content" data-secret="nxkO6CapIs"><a href="https://electropeak.com/learn/">Home</a></blockquote><iframe class="wp-embedded-content" sandbox="allow-scripts" security="restricted" style="position: absolute; clip: rect(1px, 1px, 1px, 1px);" title="“Home” — Electropeak" src="https://electropeak.com/learn/embed/#?secret=u9bU0KzGyG#?secret=nxkO6CapIs" data-secret="nxkO6CapIs" width="600" height="338" frameborder="0" marginwidth="0" marginheight="0" scrolling="no"></iframe>
*/
#include <SPI.h>
#include <EthernetENC.h>
// Enter a MAC address and IP address for your controller below.
// The IP address will be dependent on your local network:
byte mac[] = {
0xDE, 0xAD, 0xBE, 0xEF, 0xFE, 0xED
};
IPAddress ip(192, 168, 6, 101);
// Initialize the Ethernet server library
// with the IP address and port you want to use
// (port 80 is default for HTTP):
EthernetServer server(80);
void setup() {
// You can use Ethernet.init(pin) to configure the CS pin
//Ethernet.init(10); // Most Arduino shields
//Ethernet.init(5); // MKR ETH shield
//Ethernet.init(0); // Teensy 2.0
//Ethernet.init(20); // Teensy++ 2.0
//Ethernet.init(15); // ESP8266 with Adafruit Featherwing Ethernet
//Ethernet.init(33); // ESP32 with Adafruit Featherwing Ethernet
// Open serial communications and wait for port to open:
Serial.begin(9600);
while (!Serial) {
; // wait for serial port to connect. Needed for native USB port only
}
Serial.println("Ethernet WebServer Example");
// start the Ethernet connection and the server:
Ethernet.begin(mac, ip);
// Check for Ethernet hardware present
if (Ethernet.hardwareStatus() == EthernetNoHardware) {
Serial.println("Ethernet shield was not found. Sorry, can't run without hardware. :(");
while (true) {
delay(1); // do nothing, no point running without Ethernet hardware
}
}
if (Ethernet.linkStatus() == LinkOFF) {
Serial.println("Ethernet cable is not connected.");
}
// start the server
server.begin();
Serial.print("server is at ");
Serial.println(Ethernet.localIP());
}
void loop() {
// listen for incoming clients
EthernetClient client = server.available();
if (client) {
Serial.println("new client");
// an http request ends with a blank line
boolean currentLineIsBlank = true;
while (client.connected()) {
if (client.available()) {
char c = client.read();
Serial.write(c);
// if you've gotten to the end of the line (received a new line
// character) and the line is blank, the http request has ended,
// so you can send a reply
if (c == '\n' && currentLineIsBlank) {
// send a standard http response header
client.println("HTTP/1.1 200 OK");
client.println("Content-Type: text/html");
client.println("Connection: close"); // the connection will be closed after completion of the response
client.println("Refresh: 5"); // refresh the page automatically every 5 sec
client.println();
client.println("<!DOCTYPE HTML>");
client.println("<html>");
// output the value of each analog input pin
for (int analogChannel = 0; analogChannel < 6; analogChannel++) {
int sensorReading = analogRead(analogChannel);
client.print("analog input ");
client.print(analogChannel);
client.print(" is ");
client.print(sensorReading);
client.println("<br />");
}
client.println("</html>");
break;
}
if (c == '\n') {
// you're starting a new line
currentLineIsBlank = true;
} else if (c != '\r') {
// you've gotten a character on the current line
currentLineIsBlank = false;
}
}
}
// give the web browser time to receive the data
delay(1);
// close the connection:
client.stop();
Serial.println("client disconnected");
}
}
Code Cracking:
Before programming the Arduino board, follow the steps below:
1) Enter a unique MAC address in line 13.
2) Write the IP address of the server in line 15.
3) Enter the desired port number in line 20.
4) If the CS pin of the Ethernet module is connected to a pin other than the Arduino SS pin, change the pin number in line 24. Also, if using boards other than Arduino (such as Teensy, ESP8266 or ESP32), select the appropriate option for the CS pin number from lines 25 to 29.
5) In lines 85 to 89, you can change the text displayed on the web server.
After the above steps, upload the code.
After a few seconds, your web server will be activated. Open the browser software and enter the IP address of your server in the URL field. The default address of this code is 192.168.6.101. By doing so, you will see the following window.
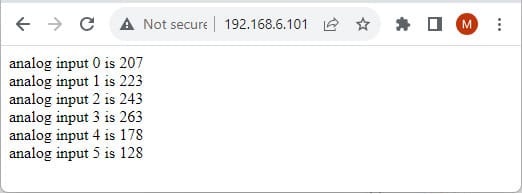
As you can see, the inputs of 6 analog channels are displayed on this window.
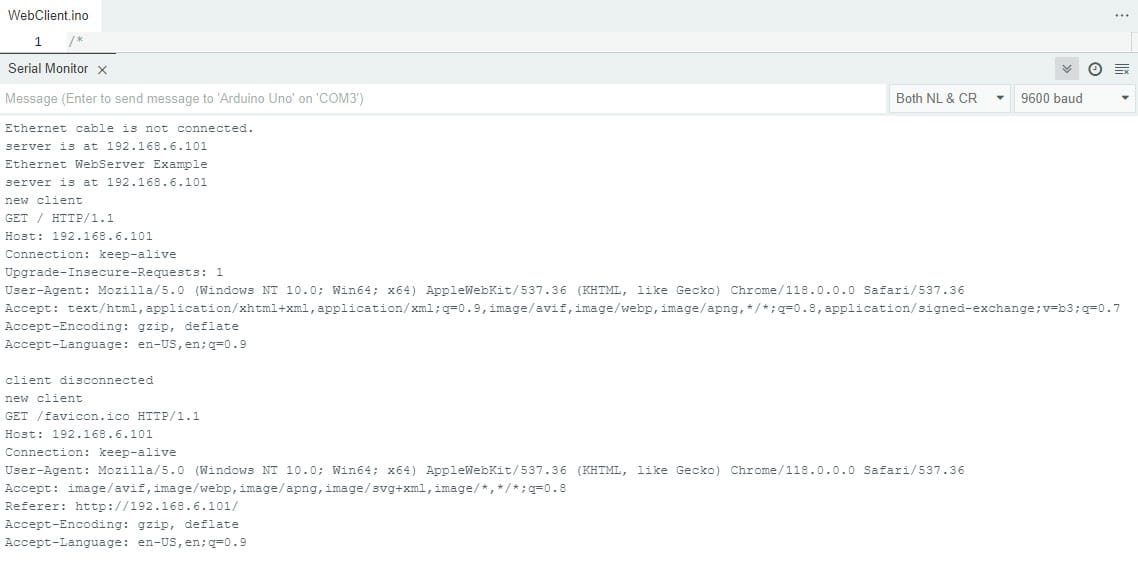
Now open the Serial Monitor window from the Arduino software. If all the wires and LAN cable are connected correctly and you’ve got the right settings, the following output will be displayed.
Creating a Client with Arduino and ENC28J60 Module
Now, let’s see how we can create a client and connect it to the server. Here, the wiring is the same as the previous section.
The code written for the client side tries to connect to the web server created in the previous section and receive its data. Then, it separates the inserted analog values from the received data and displays them on the serial port.
Client Code
In the code below, there are some comments to help you understand the details.
/*
modified on OCT 23, 2023
Modified by MajidMerati from Arduino Examples
<blockquote class="wp-embedded-content" data-secret="nxkO6CapIs"><a href="https://electropeak.com/learn/">Home</a></blockquote><iframe class="wp-embedded-content" sandbox="allow-scripts" security="restricted" style="position: absolute; clip: rect(1px, 1px, 1px, 1px);" title="“Home” — Electropeak" src="https://electropeak.com/learn/embed/#?secret=u9bU0KzGyG#?secret=nxkO6CapIs" data-secret="nxkO6CapIs" width="600" height="338" frameborder="0" marginwidth="0" marginheight="0" scrolling="no"></iframe>
*/
#include <SPI.h>
#include <EthernetENC.h>
// if you don't want to use DNS (and reduce your sketch size)
// use the numeric IP instead of the name for the server:
char server_char[4] = {192, 168, 6, 101};
IPAddress server_num(server_char[0], server_char[1], server_char[2], server_char[3]); // numeric IP for Google (no DNS)
//char server_name[] = "just1look.ir"; // name address for Google (using DNS)
//Define port No.
int HTTP_PORT = 80;
// Enter a MAC address for your controller below.
// Newer Ethernet shields have a MAC address printed on a sticker on the shield
byte mac[6] = {0x54, 0x55, 0x58, 0x10, 0x00, 0x24};
// Set the static IP address to use if the DHCP fails to assign
IPAddress ip(192, 168, 6, 102);
IPAddress myDns(192, 168, 6, 1);
// Initialize the Ethernet client library
// with the IP address and port of the server
// that you want to connect to (port 80 is default for HTTP):
EthernetClient client;
// Variables to measure the speed
unsigned long beginMicros, endMicros;
unsigned long byteCount = 0;
bool printWebData = true; // set to false for better speed measurement
void setup() {
// You can use Ethernet.init(pin) to configure the CS pin
Ethernet.init(10); // Most Arduino shields
//Ethernet.init(5); // MKR ETH shield
//Ethernet.init(0); // Teensy 2.0
//Ethernet.init(20); // Teensy++ 2.0
//Ethernet.init(15); // ESP8266 with Adafruit Featherwing Ethernet
//Ethernet.init(33); // ESP32 with Adafruit Featherwing Ethernet
// Open serial communications and wait for port to open:
Serial.begin(9600);
while (!Serial) {
; // wait for serial port to connect. Needed for native USB port only
}
// start the Ethernet connection:
Serial.println("Initialize Ethernet with DHCP:");
if (Ethernet.begin(mac) == 0) {
Serial.println("Failed to configure Ethernet using DHCP");
// Check for Ethernet hardware present
if (Ethernet.hardwareStatus() == EthernetNoHardware) {
Serial.println("Ethernet shield was not found. Sorry, can't run without hardware. :(");
while (true) {
delay(1); // do nothing, no point running without Ethernet hardware
}
}
if (Ethernet.linkStatus() == LinkOFF) {
Serial.println("Ethernet cable is not connected.");
}
// try to congifure using IP address instead of DHCP:
Ethernet.begin(mac, ip, myDns);
} else {
Serial.print(" DHCP assigned IP ");
Serial.println(Ethernet.localIP());
}
// give the Ethernet shield a second to initialize:
delay(1000);
Serial.print("connecting to ");
#ifdef server_name
Serial.print(server_name);
#else
Serial.print(server_num);
#endif
Serial.println("...");
// if you get a connection, report back via serial:
#ifdef server_name
if (client.connect(server_name, HTTP_PORT)) {
#else
if (client.connect(server_num, HTTP_PORT)) {
#endif
Serial.print("connected to ");
Serial.println(client.remoteIP());
// Make a HTTP request:
client.println("GET / HTTP/1.1");
#ifdef server_num
client.print("Host:"); client.print(server_char[0]); client.print(','); client.print(server_char[1]); client.print(','); client.print(server_char[2]); client.print(','); client.println(server_char[3]);
#endif
#ifdef server_name
client.print("Host:"); client.println(server_name);
#endif
client.println("Connection: close");
client.println();
} else {
// if you didn't get a connection to the server:
Serial.println("connection failed");
}
beginMicros = micros();
}
void loop() {
// if there are incoming bytes available
// from the server, read them and print them:
int len = client.available();
if (len > 0) {
// byte buffer[80];
// if (len > 80) len = 80;
// client.read(buffer, len);
String value;
int Analog[6];
while (true) {
value = client.readStringUntil('\n');
value.trim();
if (value.startsWith("analog input")) {
value.remove(0, 13);
value.trim();
Analog[value.substring(0, 1).toInt()] = value.substring(value.indexOf('s') + 1, value.indexOf('<')).toInt();
}
else if (value.startsWith("</html>")) {
break;
}
Serial.println(value);
}
for(int i=0;i<6;i++){
Serial.println(Analog[i]);
}
// if (printWebData) {
// Serial.write(buffer, len); // show in the serial monitor (slows some boards)
// }
// byteCount = byteCount + len;
}
// if the server's disconnected, stop the client:
if (!client.connected()) {
endMicros = micros();
Serial.println();
Serial.println("disconnecting.");
client.stop();
Serial.print("Received ");
Serial.print(byteCount);
Serial.print(" bytes in ");
float seconds = (float)(endMicros - beginMicros) / 1000000.0;
Serial.print(seconds, 4);
float rate = (float)byteCount / seconds / 1000.0;
Serial.print(", rate = ");
Serial.print(rate);
Serial.print(" kbytes/second");
Serial.println();
// do nothing forevermore:
while (true) {
delay(1);
}
}
}
Code Cracking:
Before programming the Arduino, apply the following settings to the code.
1) Write the IP address of the server in line 12. If you have a non-local server and host, you can enter the URL address of your server in line 14. Remember to comment the lines 12 and 13 and uncomment the line 14.
2) Enter the port number in line 17.
3) Write the unique MAC address in line 21.
4) Enter the IP address you want your client to have in line 24.
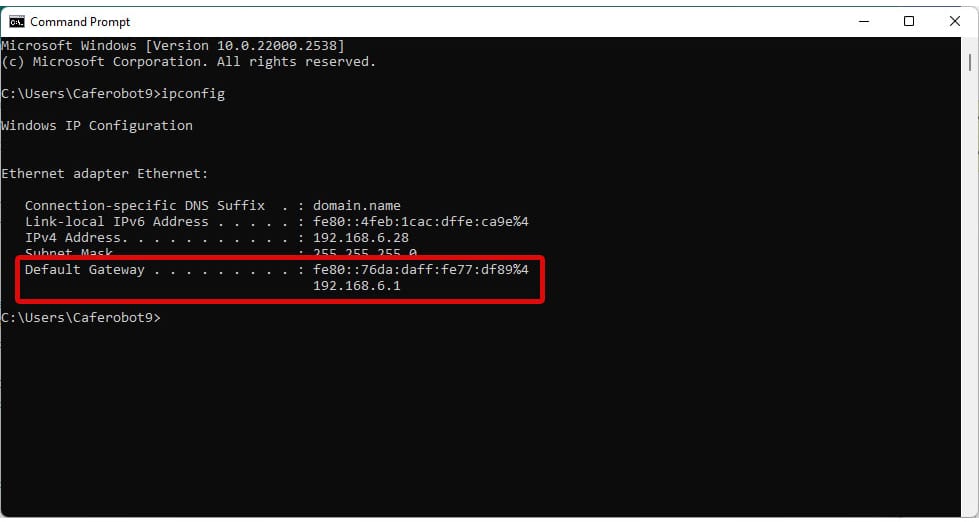
5) Change the DNS settings in line 25. Usually, on home networks, the value 192.168.1.1 will work. To make sure, you can open the CMD software and enter the word “ipconfig.” In the image below, the result of executing this command and DNS or Gateway of the system are displayed.
6)If you used a pin other than the Arduino SS pin to connect the CS pin of the Ethernet module to Arduino, you should write its number in line 39.
7) If using boards other than Arduino, select it from lines 40 to 44.
8) All analog values entered on the web server are available up to line 130.
After the steps above, upload the code on Arduino and open the Serial Monitor window. You will see the following image.
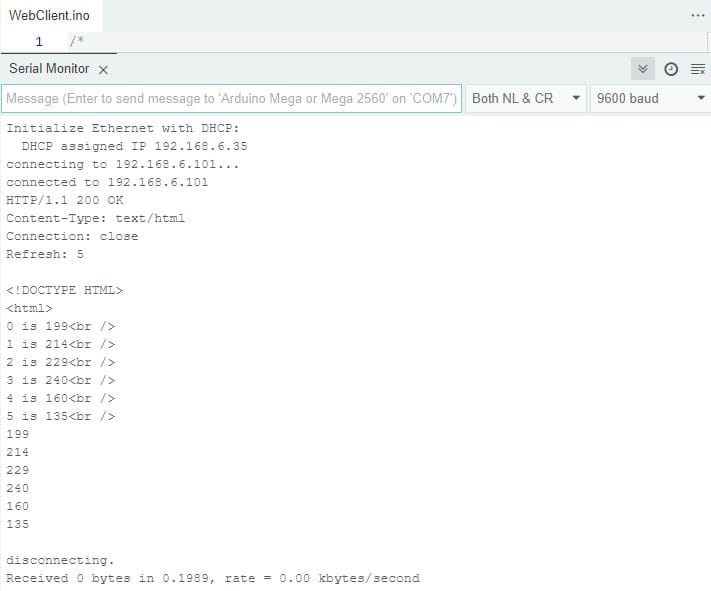
As you can see, the client first reads the entire web server page and then separates the analog values from it and prints it.
What’s Next?
In this project, we first learned about the ENC28J60 Ethernet to SPI module and its various applications. Then we learned how to use it along with Arduino boards to create a web server and client that can exchange data with each other through the local network.
Here are some ideas to develop this project:
- By renting or buying a server and host, bring the network out of the local mode so that the server and the client can communicate from anywhere in the world.
- Create multiple clients and connect them to the server. This way, you can do automation or make that place smart.
- Instead of Arduino, use ESP32 boards that can somehow run php codes. This allows you to post data from the client to the server.
- Add different modules to your project, including relays, thermometers, gas sensors, lighting, etc.
