Product added to cart

The Micro:bit is a small, programmable computer designed for educational purposes, especially for teaching coding and electronics to beginners.
Creating an account has many benefits: check out faster, keep more than one address, track orders and more.

We offer free shipping on all orders over $100and under 2kg.
Please note that free shipping is only available for orders under 2kg.
DHL is a renowned shipping courier known for its global reach and reliable delivery services. With a vast network and advanced logistics capabilities, DHL offers fast and secure shipping solutions for international shipments.
For the majority of countries, DHL provides an estimated delivery time of 5 to 7 days.
In certain instances, DHL may not be available for shipments to EU countries. In such cases, we may opt to ship your order using FedEx instead of DHL. Rest assured, FedEx offers a comparable estimated time of arrival (ETA) and your package should typically arrive within 5-7 days.
The base shipping cost for DHL is $35. You can see the final shipping amount on the checkout page. If your order is over $300and less than 2kg, you will qualify for free shipping through DHL Express.
Economy Shipping is a cost-effective international delivery option using a network of trusted logistics partners. Depending on the destination country, the carrier may vary to ensure the most efficient and reliable delivery.
Estimated delivery time is typically 10–15 business days in most cases; But may take up to 20 days. Orders over $100 and under 2kg qualify for free Economy Shipping.
All shipments include tracking. You will receive a tracking number along with a tracking link after dispatch. Most shipments can be tracked via 17TRACK.
Our shipping term is FOB Shenzhen, which does not cover any customs fees. It is important to note that you may be responsible for paying any charges imposed by your country's government, such as duties, taxes, and additional fees imposed by the courier company.
 BBC Micro:Bit Expansion Breakout Board V2.0 Previous
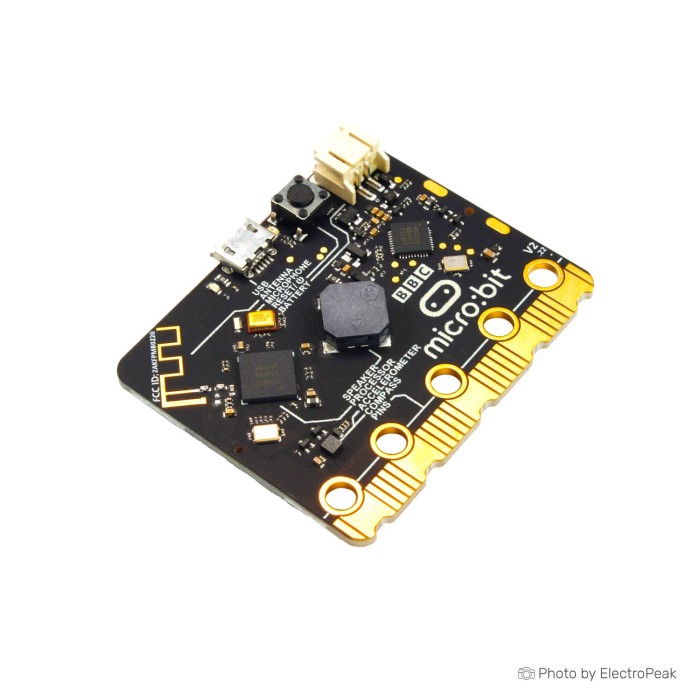
The BBC micro:bit, a small device (4cm x 5cm) ARM development board designed to help kids learn programming, has been updated to a new version called V2. It can be used for fun projects like making digital games, musical instruments, robots, science experiments, wearable devices, etc.
This compact device, described as half the size of a credit card, is equipped with an ARM Cortex-M4 microcontroller, accelerometer and magnetometer sensors, Bluetooth and USB connectivity, a display featuring 25 LEDs, two programmable buttons, and the flexibility to be powered by either USB or an external battery pack.

You can see the pinout of micro:bit V2.2 pinout below.

Here are some key pin categories:
These pins provide a lot of flexibility for connecting various sensors, actuators, and other components to the Micro:bit for interactive projects. For this, you can use Micro:Bit Expansion Breakout Board V2.0. The official Micro:bit documentation and datasheets provide detailed information on each pin, its capabilities, and recommended use.
The Micro:bit is designed to be a versatile educational tool suitable for a wide range of individuals, particularly those interested in learning about programming, electronics, and creative problem-solving. Here are some groups of people who might find the Micro:bit suitable for various purposes:
Ultimately, the Micro:bit is adaptable to various skill levels and interests, making it a versatile tool for a wide audience. Its simplicity and ease of use make it particularly suitable for beginners and those entering the world of coding and electronics.
Programming the Micro:bit can be done using various programming languages, but two of the most common are the block-based language MakeCode and the text-based language MicroPython.
You can learn the basic steps of learning programming for microbit from this tutorial.
Arduino includes a variety of boards in different ranges. If we compare Microbit with its fellow Arduino board, we come to the conclusion that Microbit boards are more suitable for starting work and learning machine language and programming. Because it has a variety of peripheral modules on it and eliminates the need for electronic knowledge to some extent. But if you intend to do special and engineering projects, it is better to use Arduino. Because all its bases are free and you can connect to any type of sensor or operator you need.
The Micro:bit is a small, programmable computer designed for educational purposes, especially for teaching coding and electronics to beginners.
The most popular way to programming Micro:bit is MakeCode (block-based) and MicroPython (text-based). You can also use another tools such as Arduino IDE, PlatformIO, Swift Playgrounds (for Apple iPad or Mac computer), Scratch (for windows or macOS PCs that has Bluetooth) and many other softwares.
For more information, refer to this link.
Yes, the Micro:bit is designed to be beginner-friendly and is widely used in educational settings for teaching coding and electronics to young learners. Because of user-friendly design, block-based programming method, built-In sensors and LED and educational resources parameters, it is suitable for kids.
Programming the Micro:bit can be done using block-based programming languages like MakeCode or text-based languages like MicroPython. Below are steps for both approaches:
Step 1: Access MakeCode:
Go to the MakeCode website.
Step 2: Create a New Project
Click on "New Project" to start a new project.
Step 3: Drag and Drop Blocks
Use the drag-and-drop block interface to create your program. Explore different block categories for input, output, loops, and more.
Step 4: Programming Blocks
Drag blocks to the workspace and connect them to create sequences. Customize parameters of the blocks to control the behavior of your program.
Step 5: Connect the Micro:bit
Connect your Micro:bit to your computer using a USB cable.
Click the "Download" button to transfer your program to the Micro:bit.
Step 6: Run the Program
After downloading, the Micro:bit will restart and run your program.
Step 1: Access MicroPython Editor
Visit the MicroPython editor for the Micro:bit: https://python.microbit.org/.
Step 2: Write MicroPython Code
In the editor, write MicroPython code using a text-based syntax.
Start with simple commands like display.scroll("Hello!") or basic.show_number(42).
Step 3: Connect the Micro:bit
Connect your Micro:bit to your computer using a USB cable.
Step 4: Download MicroPython Code
Click the "Download" button to save the MicroPython code as a .hex file.
Step 5: Paste onto the Micro:bit
Locate the Micro:bit as a USB drive on your computer.
Step 6: Copy and paste the downloaded .hex file onto the Micro:bit.
Step 7: Run the Program
After pasting, the Micro:bit will restart, and your MicroPython program will run..
Whether you choose MakeCode or MicroPython depends on your preference and familiarity with programming languages. Both methods provide an excellent way to learn and experiment with the Micro:bit.
The Micro:bit is a versatile and programmable device that allows you to create a wide range of projects. Here are some ideas for what you can make with the Micro:bit:
These project ideas represent just a fraction of the possibilities with the Micro:bit. Its combination of sensors, LEDs, buttons, and wireless capabilities opens the door to countless creative and educational projects.
Yes, the Micro:bit is highly suitable for classroom use and is widely used in educational settings for teaching coding, electronics, and computational thinking. Here are several reasons why the Micro:bit is well-suited for the classroom environment:
Yes, the Micro:bit has GPIO pins on the edge connector, allowing you to connect external components such as sensors, LEDs, and more. You can use micro:bit expantion breakout board.
Yes, the Micro:bit V2 introduced a built-in speaker, allowing it to play sound. This feature provides an additional dimension to the Micro:bit's capabilities, enabling users to incorporate audio feedback into their projects.
To play sound on the Micro:bit, you can use the music module in MicroPython or the music blocks in the MakeCode editor.
Yes, there is a wealth of tutorials and resources available for learning with the Micro:bit. Whether you are a teacher incorporating Micro:bit into your curriculum or an individual learner exploring the possibilities, these resources can help you get started and advance your skills. Here are some recommended places to find Micro:bit tutorials and resources:
helloxxxx

Please complete your information below to login.
Sign In
Create New Account