
Overview
What You Will Learn
- General information about DC motors
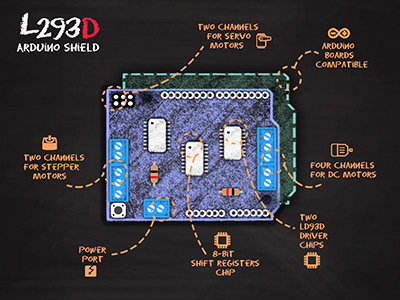
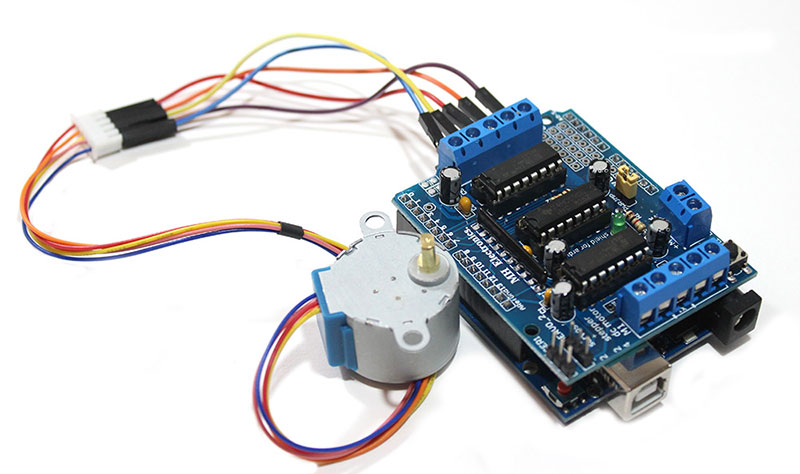
- Introduction to L293D motor shield
- Driving DC, Servo & Stepper motors
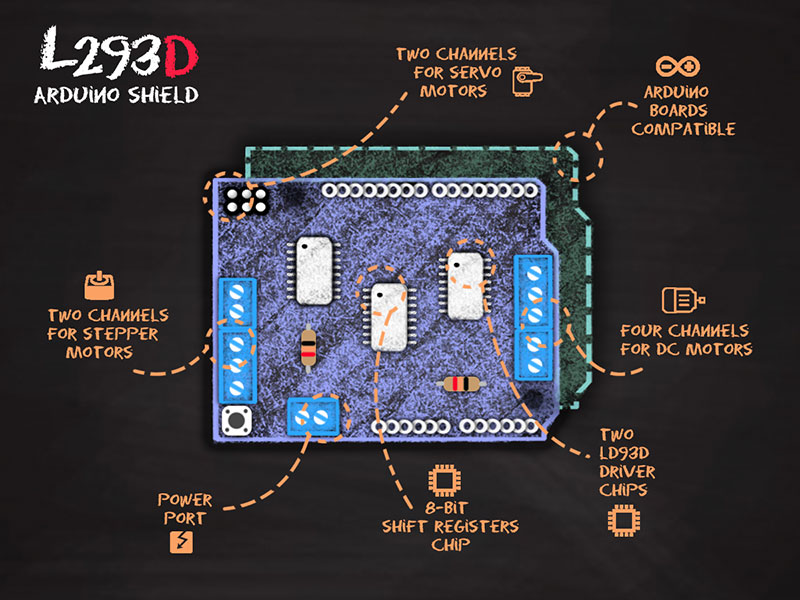
Motors & Drivers
Each channel of this module has the maximum current of 1.2A and doesn’t work if the voltage is more than 25v or less than 4.5v. So be careful with choosing the proper motor according to its nominal voltage and current. For more features of this shield let’s mention compatibility with Arduini UNO and MEGA, electromagnetic and thermal protection of motor and disconnecting circuit in case of unconventional voltage raise.
How to Use Arduino L293D Motor Driver Shield?
While using this shield 6 analog Pins (which can be used as digital pins too), pin 2 and pin 13 of arduino are free.
In the case of using Servo motor, pins 9, 10, 2 are in use.
In the case of using DC motor, pin11 for #1, pin3 for #2, pin5 for #3, pin6 for #4 and pins 4, 7, 8 and 12 for all of them are in use.
In the case of using Stepper motor, pins 11 and 3 for #1, pins 5 and 6 for #2 and pins 4, 7, 8 and 12 for all of them are in use.
You can use free pins by wired connections.
If you are applying separate power supply to Arduino and shield, make sure you have disconnected the jumper on the shield.

Driving DC Motor
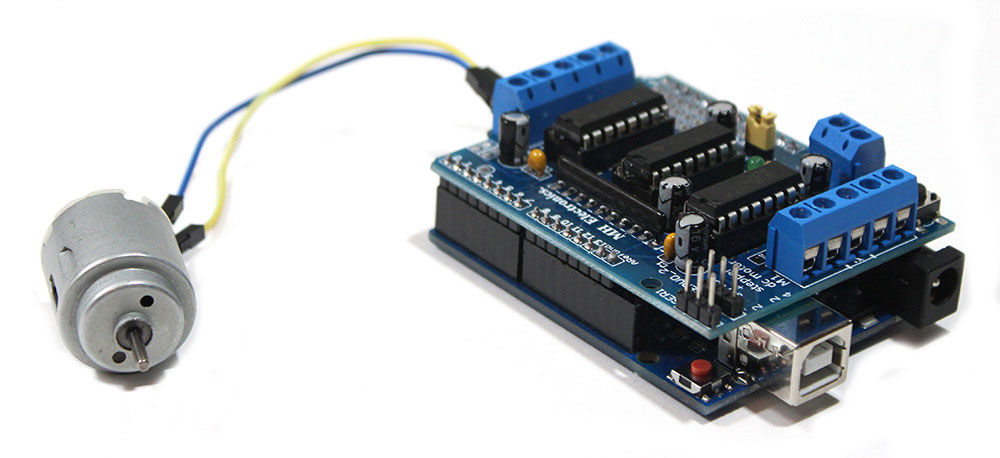
#include <AFMotor.h>The Library you need to control the motor:
AF_DCMotor motor(1, MOTOR12_64KHZ)Defining the DC motor you are using.
The first argument stands for the number of the motors in the shield and the second one stands for the motor speed control frequency. The second argument can be MOTOR12_2KHZ, MOTOR12_8KHZ, MOTOR12_8KHZ, and MOTOR12_8KHZ for motors number 1 and 2, and it can be MOTOR12_8KHZ, MOTOR12_8KHZ, and MOTOR12_8KHZ for motors number 3 and 4. And if it left unchecked, it will be 1KHZ by default.
motor.setSpeed(200);Defining the motor speed. It can be set from 0 to 255.
void loop() {
 motor.run(FORWARD);
 delay(1000);
 motor.run(BACKWARD);
 delay(1000);
 motor.run(RELEASE);
 delay(1000);
}
Function motor.run() specifies the motor’s motion status. The status can be FORWARD, BACKWARD, and RELEASE. RELEASE is the same as the brake but it may take some time until the motor’s full stop.
It is recommended to solder a 100nF capacitor to each motor pins to reduce noise.
Driving Servo Motor

Arduino IDE library and examples are suitable for driving a Servo motor.
#include <servo.h>The library you need for driving the Servo motor.
Servo myservo;Defining a Servo motor object.
void setup()
{
  myservo.attach(9);
}
Determine the pin connecting to Servo.(pin 9 for sevo #1 and pin 10 for servo #2)
void loop()
{
  myservo.write(val);
  delay(15);
}Driving Stepper Motor
#include <AFMotor.h>Determine the library you need.
AF_Stepper motor(48, 2);Defining a Stepper motor object. The first argument is the motor step resolution. (for example, if your motor has the precision of 7.5 deg/step, it means the motor step resolution is . The second argument is the number of the Stepper motor connected to the shield.
void setup() {
  motor.setSpeed(10);
  motor.onestep(FORWARD, SINGLE);
  motor.release();
  delay(1000);
}

void loop() {
  motor.step(100, FORWARD, SINGLE);
  motor.step(100, BACKWARD, SINGLE);

  motor.step(100, FORWARD, DOUBLE);
  motor.step(100, BACKWARD, DOUBLE);

  motor.step(100, FORWARD, INTERLEAVE);
  motor.step(100, BACKWARD, INTERLEAVE);

  motor.step(100, FORWARD, MICROSTEP);
  motor.step(100, BACKWARD, MICROSTEP);
}
Determine motor speed in rpm.
The first argument is the amount of step needed to move, the second one is to determine direction (FORWARD or BACKWARD), and the third argument determines the steps type: SINGLE (Activate a coil), DOUBLE (Activate two coils for more torque), INTERLEAVED (Continuous change in the number of coils from one to two and vice versa to double precision, however, in this case, the speed is halved), and MICROSTEP (Changing the steps is done slowly for more precision. In this case, the torque is lower).
By default, when the motor stops moving, it maintains its status.
You must use the function motor.release() to release the motor.

Comments (7)
hello everyone thanks for approve
You are welcome.
Dear Saeed
Thank you very much for providing information about LM293 Shield
The information is very clear.
I am very grateful
Hi Amir. We are very glad to hear that this article was useful to you.
While using this shield 6 analog Pins (which can be used as digital pins too), pin 2 and pin 13 of arduino are free.
In the case of using Servo motor, pins 9, 10, 2 are in use.
if you are saying in the 1st line that pin 2 is free, then how you can say in the 2nd line that pin 2 will be used for servo?? i think there is mistake.you should see it.
Hi, thanks for your attention but you’re a bit mistaken. In the 1st line, it’s saying that “while using ….. pin 2 and pin 13 of Arduino are free.”. Well, it means that this shield itself won’t occupy these pins. And in the 2nd line it’s saying that “In the case of using Servo motor, pins 9, 10, 2 are in use.” Which means that if you’re willing to use a servo motor, you need to use these extra pins, so, there is apparently no contradictions between these two lines.
Hello, thanks for the tutorial. But I’m wondering about something in the stepper motor code, why do you need motor.onestep in the setup and also motor.step in the loop?