Interfacing Ublox NEO-6M GPS Module with Arduino

NEO-6M GPS Module Features

The GY-NEO-6M module is an advanced GPS module that supports UART communication protocol with active antenna. You can interface this module easily with any microcontroller. This module has a rechargeable battery and can also be connected directly to a computer using a USB to TTL converter.

This module can receive information and then calculate the geographical position with very high accuracy and fast speed. In addition to supporting BeiDou, Galileo, GLONASS, GPS / QZSS, the module has internal memory to save settings. This module is compatible with Arduino and can be used in any project.

Tip
The on-board LED starts blinking when module is connected to GPS satellites.

You can download the datasheet of this module here.

NEO-8M GPS Module Pinout

This sensor has 4 pins:

  • VIN: Module power supply – 5 V
  • GND: Ground
  • RX: Receive data via serial protocol
  • TX: Sending data via serial protocol

You can see pinout of this module in the image below.

Required Materials

Hardware Components

Arduino UNO R3 × 1
NEO-6M GPS Module × 1
Male to Female jumper wire × 1

Software Apps

Arduino IDE

Interfacing NEO-6M GPS Module with Arduino

Step 1: Circuit

The following circuit shows how you should connect Arduino to NEO-6M module. Connect wires accordingly.

Step 2: Code

Install the following library on your Arduino.

https://github.com/mikalhart/TinyGPSPlus

Tip

If you need more help with installing a library on Arduino, read this tutorial: How to Install an Arduino Library

Upload the following code to your Arduino.

   /*   
modified on Sep 27, 2020
Modified by MohammedDamirchi from https://github.com/mikalhart/TinyGPSPlus
Home 
*/ 

#include <TinyGPS++.h>
#include <SoftwareSerial.h>
/*
   This sample sketch demonstrates the normal use of a TinyGPS++ (TinyGPSPlus) object.
   It requires the use of SoftwareSerial, and assumes that you have a
   9600-baud serial GPS device hooked up on pins 4(rx) and 3(tx).
*/
static const int RXPin = 4, TXPin = 3;
static const uint32_t GPSBaud = 9600;

// The TinyGPS++ object
TinyGPSPlus gps;

// The serial connection to the GPS device
SoftwareSerial ss(RXPin, TXPin);

void setup()
{
  Serial.begin(115200);
  ss.begin(GPSBaud);

  Serial.println(F("DeviceExample.ino"));
  Serial.println(F("A simple demonstration of TinyGPS++ with an attached GPS module"));
  Serial.print(F("Testing TinyGPS++ library v. ")); Serial.println(TinyGPSPlus::libraryVersion());
  Serial.println(F("by Mikal Hart"));
  Serial.println();
}

void loop()
{
  // This sketch displays information every time a new sentence is correctly encoded.
  while (ss.available() > 0)
    if (gps.encode(ss.read()))
      displayInfo();

  if (millis() > 5000 && gps.charsProcessed() < 10)
  {
    Serial.println(F("No GPS detected: check wiring."));
    while(true);
  }
}

void displayInfo()
{
  Serial.print(F("Location: ")); 
  if (gps.location.isValid())
  {
    Serial.print(gps.location.lat(), 6);
    Serial.print(F(","));
    Serial.print(gps.location.lng(), 6);
  }
  else
  {
    Serial.print(F("INVALID"));
  }

  Serial.print(F("  Date/Time: "));
  if (gps.date.isValid())
  {
    Serial.print(gps.date.month());
    Serial.print(F("/"));
    Serial.print(gps.date.day());
    Serial.print(F("/"));
    Serial.print(gps.date.year());
  }
  else
  {
    Serial.print(F("INVALID"));
  }

  Serial.print(F(" "));
  if (gps.time.isValid())
  {
    if (gps.time.hour() < 10) Serial.print(F("0"));
    Serial.print(gps.time.hour());
    Serial.print(F(":"));
    if (gps.time.minute() < 10) Serial.print(F("0"));
    Serial.print(gps.time.minute());
    Serial.print(F(":"));
    if (gps.time.second() < 10) Serial.print(F("0"));
    Serial.print(gps.time.second());
    Serial.print(F("."));
    if (gps.time.centisecond() < 10) Serial.print(F("0"));
    Serial.print(gps.time.centisecond());
  }
  else
  {
    Serial.print(F("INVALID"));
  }

  Serial.println();
}

Arduino

After uploading the code, you can see the output in the serial monitor.

Liked What You See?​
Get Updates And Learn From The Best​

Comments (2)

  • Ch Voshal Jaya Surya Reply

    Could you please help me i am getting error like this.
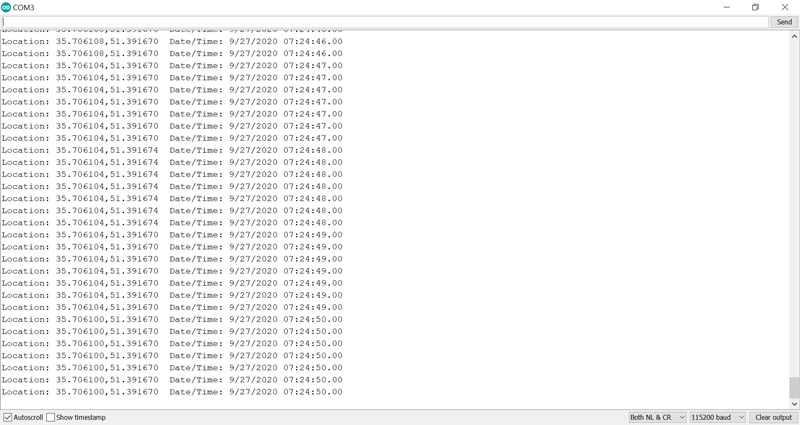
    20:20:42.490 -> Location: INVALID Date/Time: INVALID INVALID
    20:20:42.571 -> Location: INVALID Date/Time: INVALID INVALID
    20:20:42.667 -> Location: INVALID Date/Time: INVALID INVALID
    20:20:42.715 -> Location: INVALID Date/Time: INVALID INVALID
    20:20:42.764 -> Location: INVALID Date/Time: INVALID INVALID
    20:20:42.811 -> Location: INVALID Date/Time: INVALID INVALID
    20:20:42.905 -> Location: INVALID Date/Time: INVALID INVALID
    20:20:42.988 -> Location: INVALID Date/Time: INVALID INVALID
    20:20:43.036 -> Location: INVALID Date/Time: INVALID INVALID

    October 17, 2021 at 2:51 pm
    • Mehran Maleki Reply

      Hi,
      It takes about 5 to 10 minutes for the module to connect to the network. So, after interfacing the module and powering it on, you need to wait a little to get valid data. Also, you can’t use this module indoors. And even if you’re indoors, put the module near a window, so it can connect to the network.

      October 18, 2021 at 6:12 am

Leave a Reply

Your email address will not be published. Required fields are marked *