
Introduction
Welcome to the world of environmental sensing! Nowadays, with all the climate changes and pollution concerns, understanding and monitoring our surroundings have become super important. That’s why we’re going to talk about the BME680 sensor!
The BME680 sensor can measure temperature, humidity, pressure, and even VOCs (volatile organic compounds). It gives us valuable data to improve our quality of life.
But knowing how to use it effectively can be very helpful. In this tutorial, we’ll cover the tips and tricks to make the most out of your BME680 sensor.

What You Will Learn
• Features of the BME680 sensor
• Reading environmental parameters (temperature, humidity, pressure, and gas concentration)
• Improving sensor accuracy by calibration and oversampling
BME680 Pinout
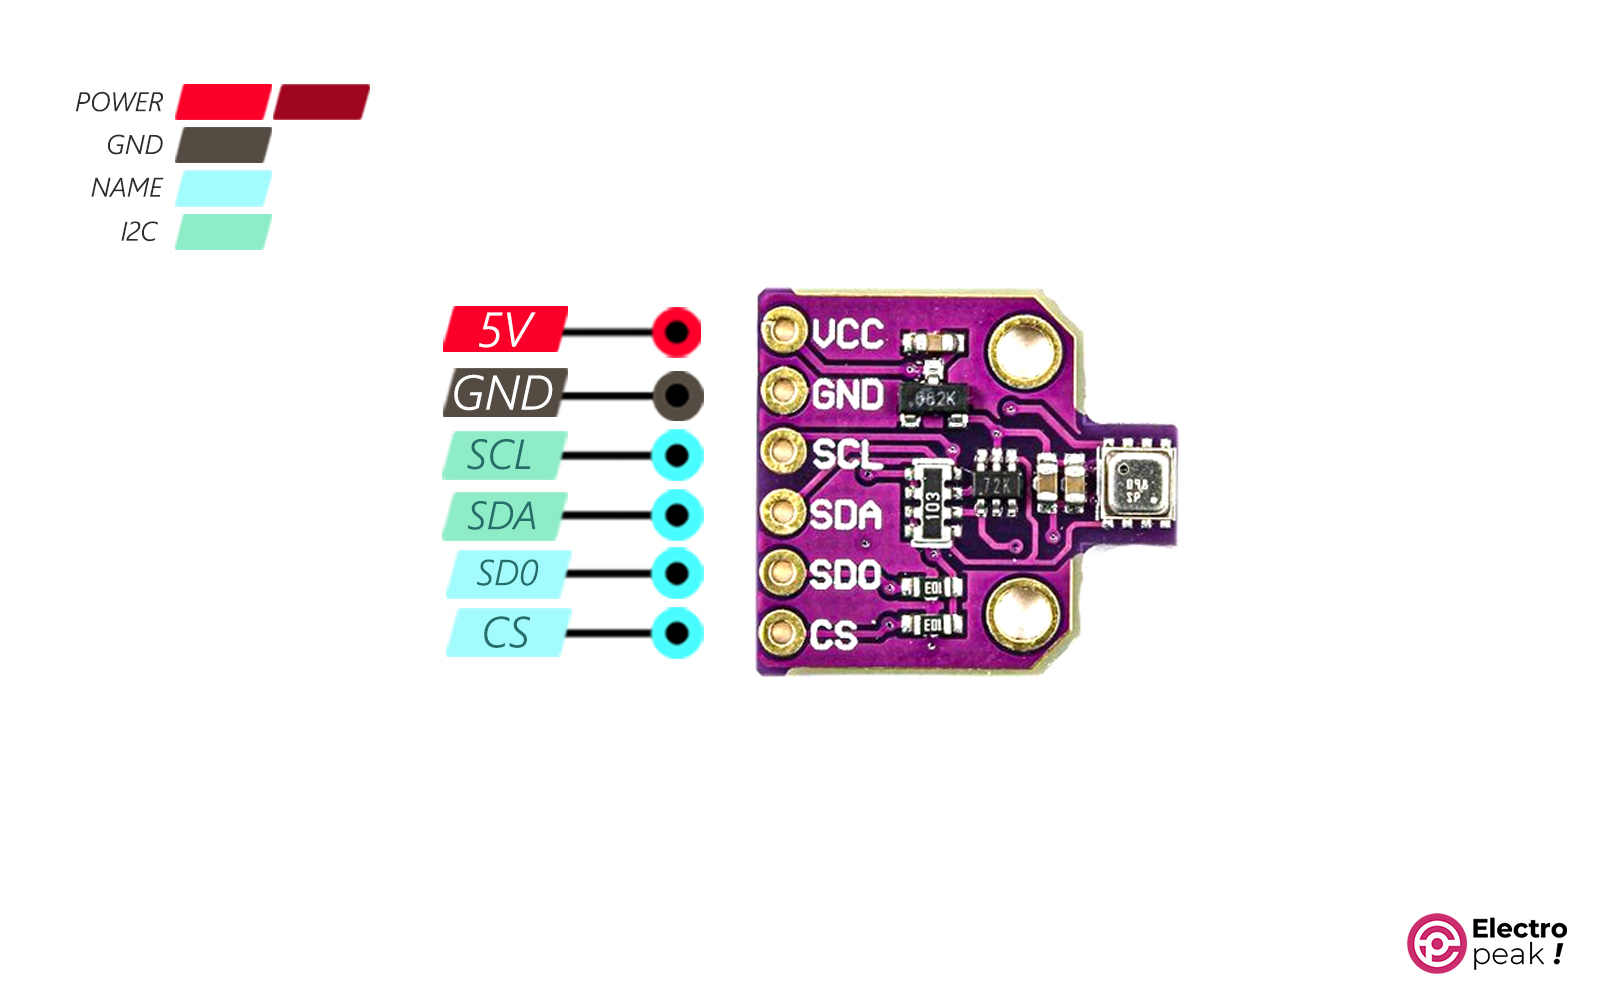
The BME680 sensor module has six pins as follows:
Vcc: Module power supply (5V)
GND: Ground
SCL: Clock pin (I2C protocol)
SDA: Data pin (I2C protocol)
SDO: Selecting the I2C address
CS: Chip Select (but here, it selects the communication protocol)
You can select the I2C address of the BME680 module between 0x76 and 0x77 by connecting the SDO pin to GND or Vcc, respectively.
Here’s the pinout of the BME680 module in the image below:
BME680 — Specifications and Applications
Specifications:
- Temperature range: -40 to +85°C
- Humidity range: 0 to 100% RH
- Pressure range: 300 to 1100 hPa (equivalent to 0.3 to 1.1 bar)
- Temperature resolution: 1°C
- Humidity: Max error: ±3%, Hysteresis error: ±1.5%
- Pressure: RMS noise: 0.12Pa (equivalent to 1.7cm), Temperature coefficient: ±1.3Pa/K (equivalent to ±10.9cm at 1°C change)
Applications:
- Indoor air quality monitoring and regulation
- Smart homes
- IoT
- Weather forecasting
- Improving GPS performance
- Indoor navigation (e.g., detecting floors, elevators)
- Outdoor navigation
- Recreational, and sports activities
- Measuring vertical speed
Required Materials
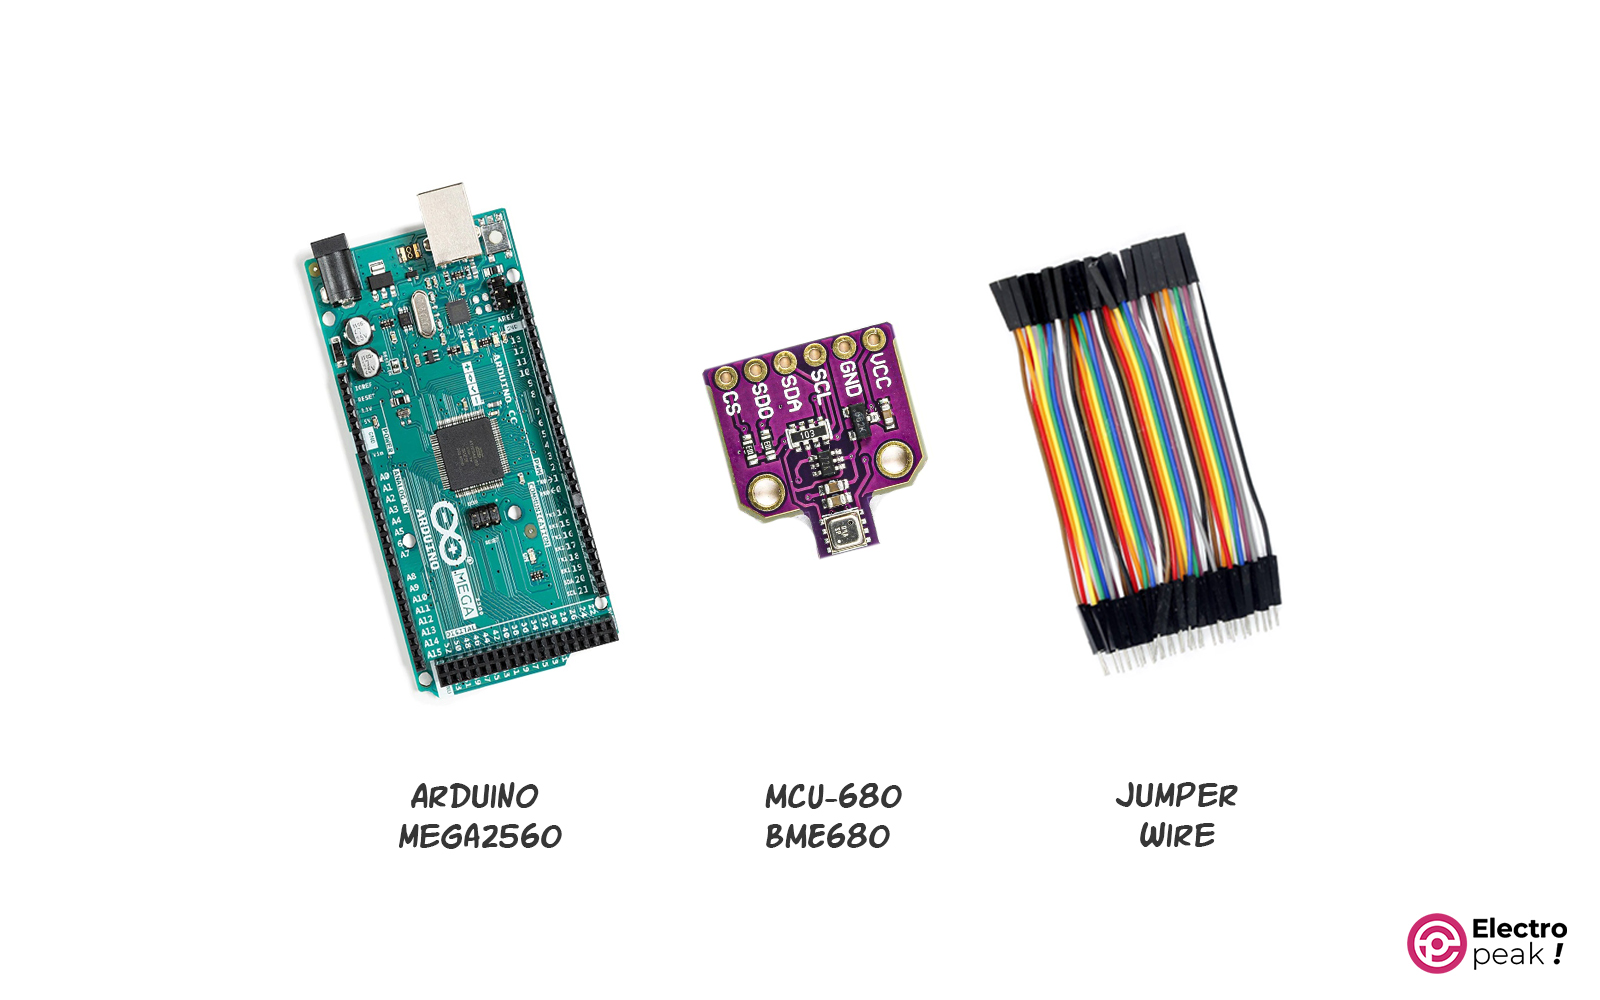
Hardware Components
**: You can use any other Arduino board with an I2C port (if you plan to use the BSEC library, which we’ll mention at the end of this tutorial, you’ll need to use Arduino Mega or ESP boards).
Software
How to Interface the BME680 Sensor Module with Arduino
Before we start working with the sensor, let’s first get to know the module a bit. The image below shows the BME680 module.
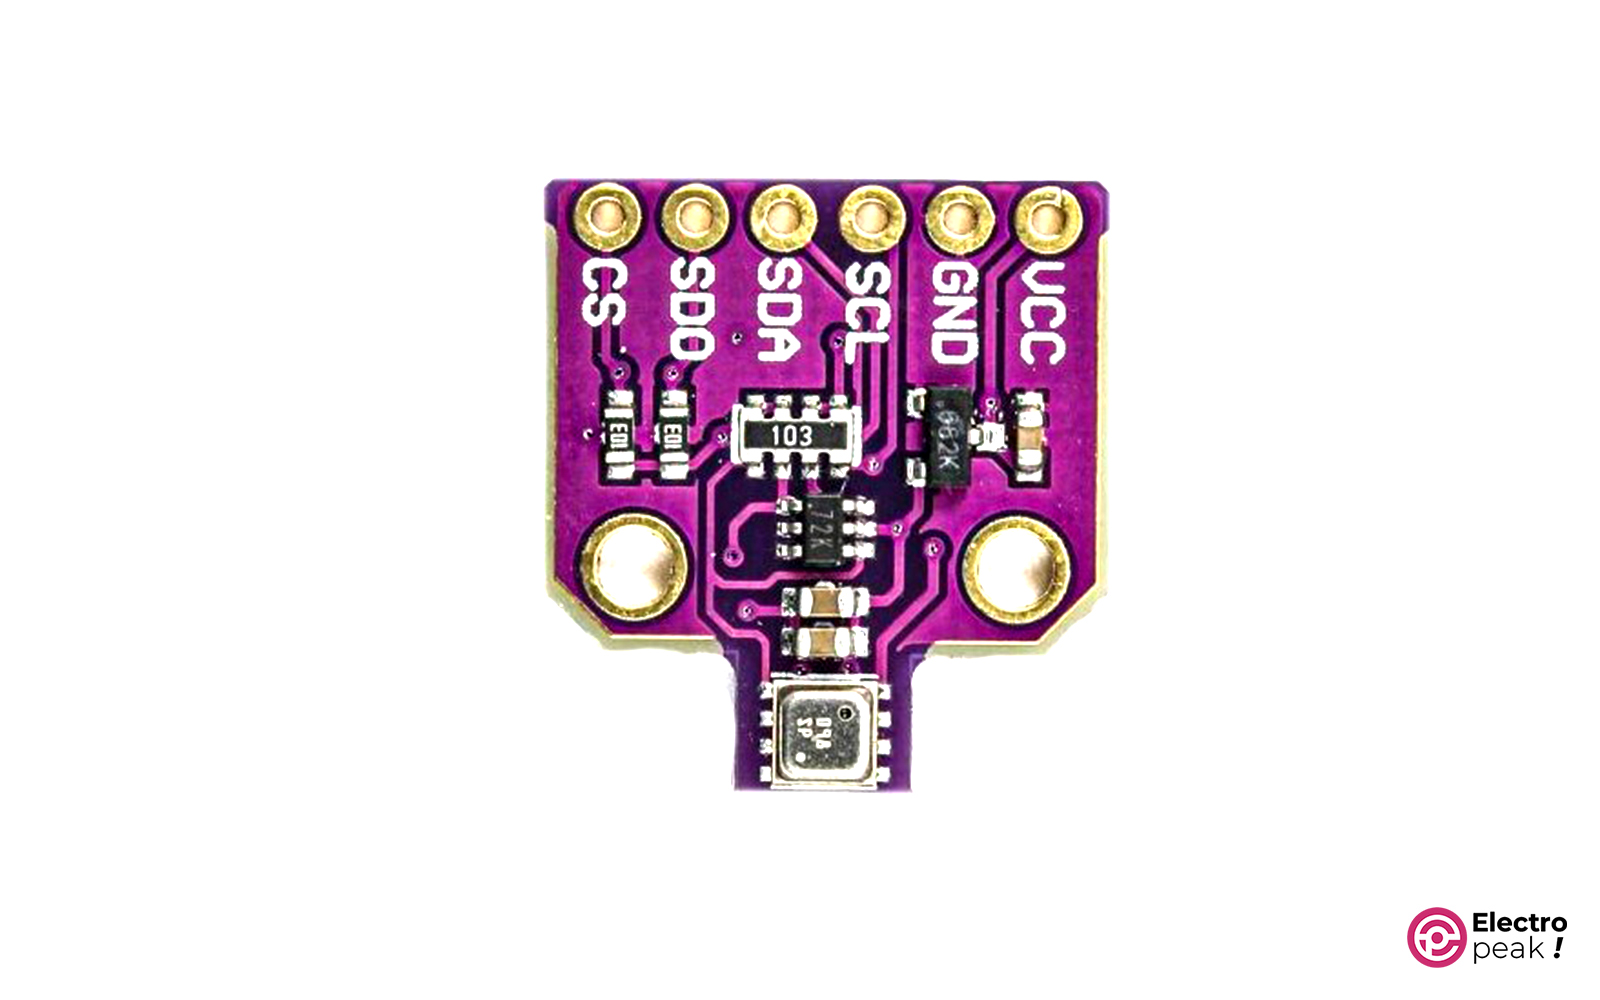
This module can communicate in both I2C and SPI modes. To select the I2C or SPI mode, you need to connect the CS pin to VCC or GND, respectively.
But the default communication protocol is I2C, and that’s what we’ll use in this tutorial.
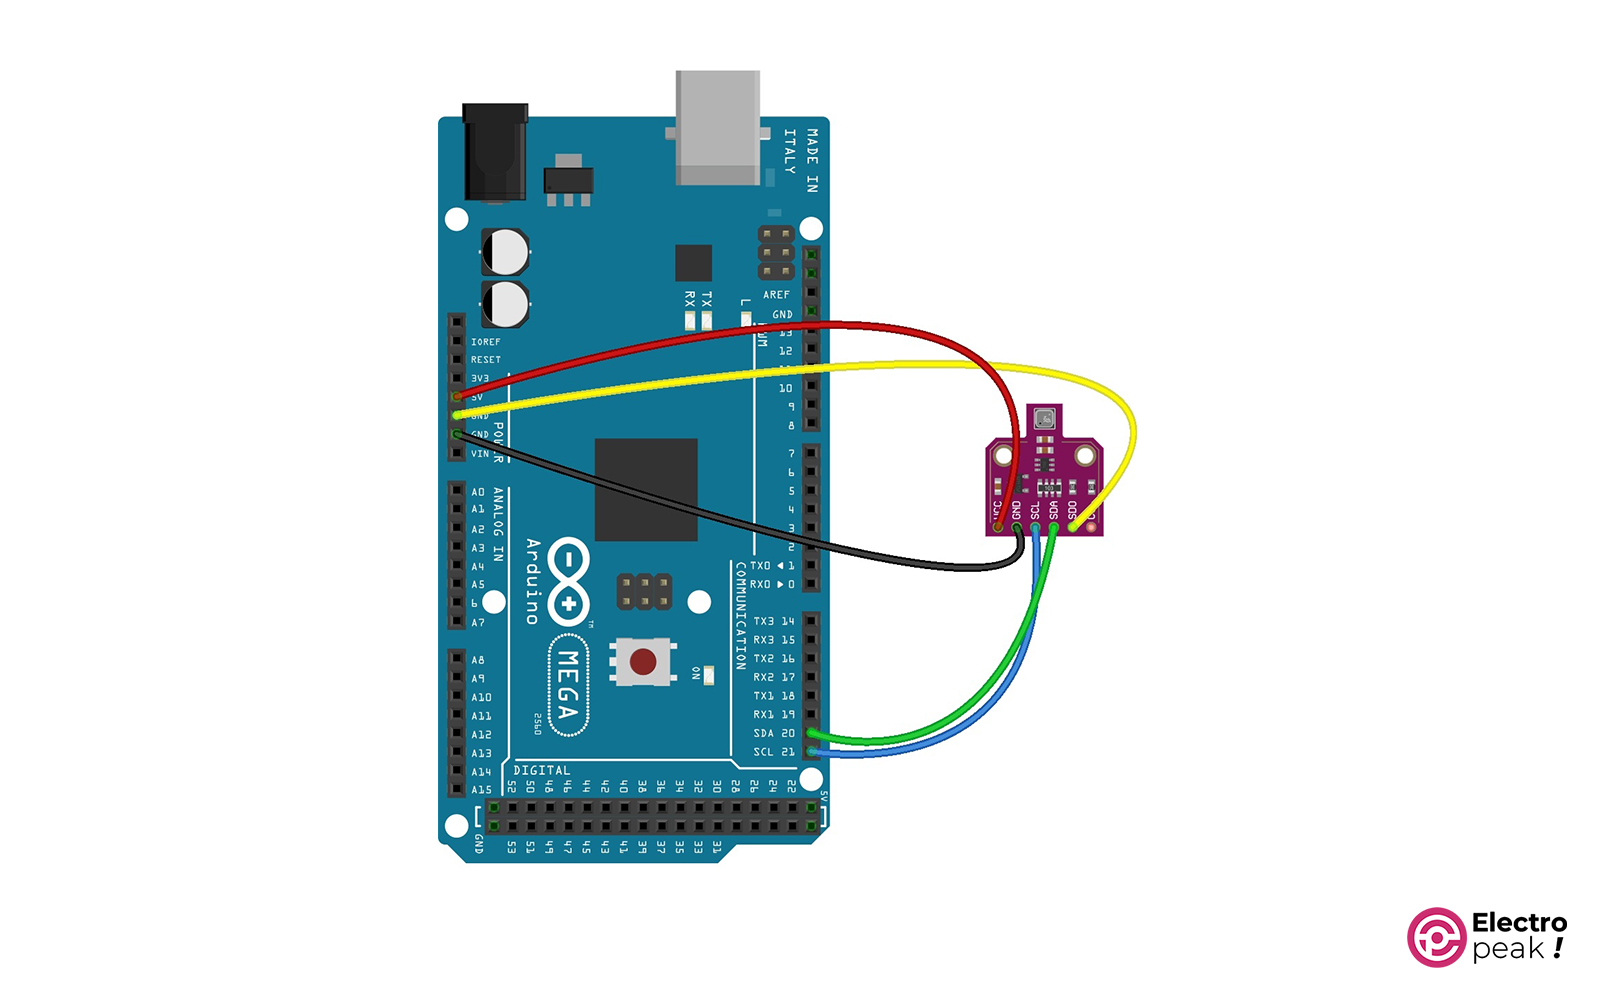
Step 1: Wiring
Wire up the components as shown below:
Step 2: Code
First, install the Adafruit BME680 library in the Arduino software, and then upload the following code to your Arduino board.
#include <Wire.h>
#include <SPI.h>
#include <Adafruit_Sensor.h>
#include "Adafruit_BME680.h"

#define BME_SCK 13
#define BME_MISO 12
#define BME_MOSI 11
#define BME_CS 10

#define SEALEVELPRESSURE_HPA (1013.25)

Adafruit_BME680 bme; // I2C
//Adafruit_BME680 bme(BME_CS); // hardware SPI
//Adafruit_BME680 bme(BME_CS, BME_MOSI, BME_MISO, BME_SCK);

void setup() {
 Serial.begin(9600);
 while (!Serial);
 Serial.println(F("BME680 test"));

 if (!bme.begin()) {
 Serial.println("Could not find a valid BME680 sensor, check wiring!");
 while (1);
 }

 // Set up oversampling and filter initialization
 bme.setTemperatureOversampling(BME680_OS_8X);
 bme.setHumidityOversampling(BME680_OS_2X);
 bme.setPressureOversampling(BME680_OS_4X);
 bme.setIIRFilterSize(BME680_FILTER_SIZE_3);
 bme.setGasHeater(320, 150); // 320*C for 150 ms
}

void loop() {
 if (! bme.performReading()) {
 Serial.println("Failed to perform reading :(");
 return;
 }
 Serial.print("Temperature = ");
 Serial.print(bme.temperature);
 Serial.println(" *C");

 Serial.print("Pressure = ");
 Serial.print(bme.pressure / 100.0);
 Serial.println(" hPa");

 Serial.print("Humidity = ");
 Serial.print(bme.humidity);
 Serial.println(" %");

 Serial.print("Gas = ");
 Serial.print(bme.gas_resistance / 1000.0);
 Serial.println(" KOhms");

 Serial.print("Approx. Altitude = ");
 Serial.print(bme.readAltitude(SEALEVELPRESSURE_HPA));
 Serial.println(" m");

 Serial.println();
 delay(2000);
}
Code Cracking
As usual, the first step is to include the necessary libraries.
#include <Wire.h>
#include <SPI.h>
#include <Adafruit_Sensor.h>
#include "Adafruit_BME680.h"
Next, we define the atmospheric pressure at sea level to use it in altitude calculations.
#define SEALEVELPRESSURE_HPA (1013.25)
Now, we create an instance of the BME680 sensor.
Adafruit_BME680 bme; // I2C
Next in line is the Setup function. Here, we establish a serial connection with the computer and an I2C connection with the BME680 sensor. If the sensor connection fails, we display the following message in the serial monitor: “Could not find a valid BME680 sensor, check wiring!”
The following line is for adjusting the gas sensor heater. You can adjust the heater temperature and how long it should stay on with the first and second parameters, respectively.
bme.setGasHeater(320, 150); // 320*C for 150 ms
Now, we get into the loop() function. At the beginning of this function, we start sampling all the sensor output data.
bme.performReading()
This way, we measure temperature, humidity, pressure, and gas concentration.
You can access each of the measured data as follows:
– Temperature (°C): bme.temperature
– Humidity (%): bme.humidity
– Gas amount (Ω): bme.gas_resistance
– Altitude (Pascal): bme.readAltitude (SEALEVELPRESSURE_HPA)
In the loop() function, we measure the parameters every 2 seconds and display them in the serial monitor.
Results
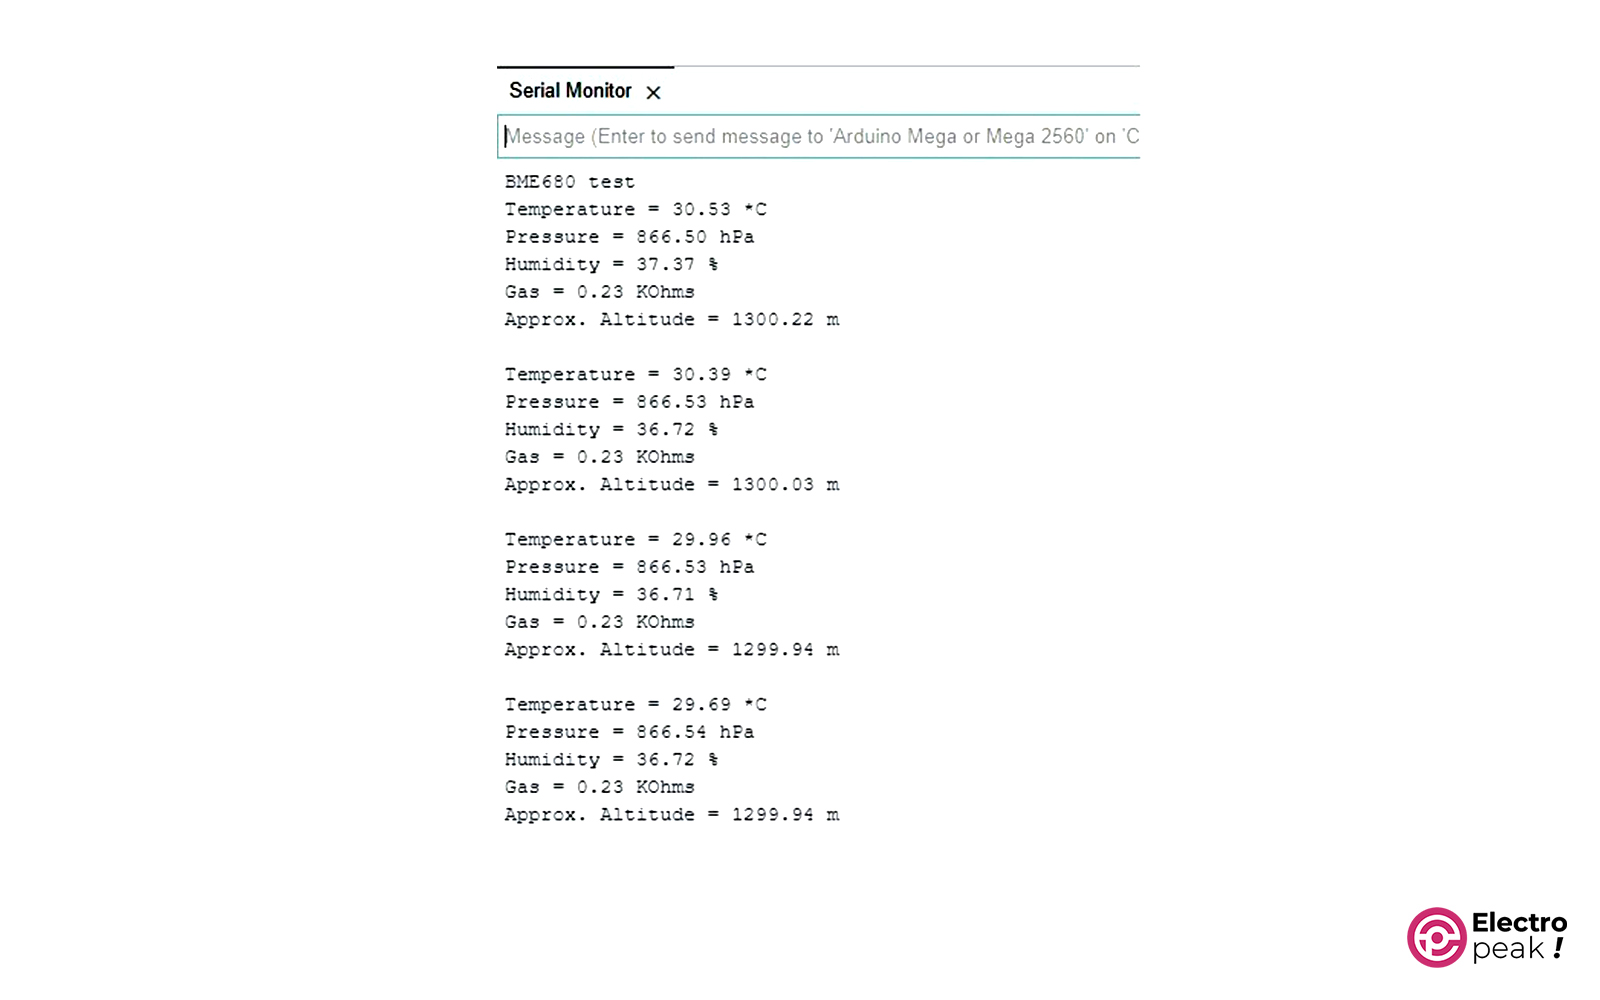
After programming the Arduino board and opening the serial monitor, you’ll see the data displayed as follows:
BME680 test
Temperature = 29.37 *C
Pressure = 866.53 hPa
Humidity = 28.59 %
Gas = 80.58 KOhms
Approx. Altitude = 1300.03 m

Temperature = 29.83 *C
Pressure = 866.55 hPa
Humidity = 27.85 %
Gas = 87.49 KOhms
Approx. Altitude = 1299.65 m
BME680 Sensor – How to Improve the Sampling Accuracy
In the previous section, we measured the parameters. Yet, there are ways to improve measurement accuracy.
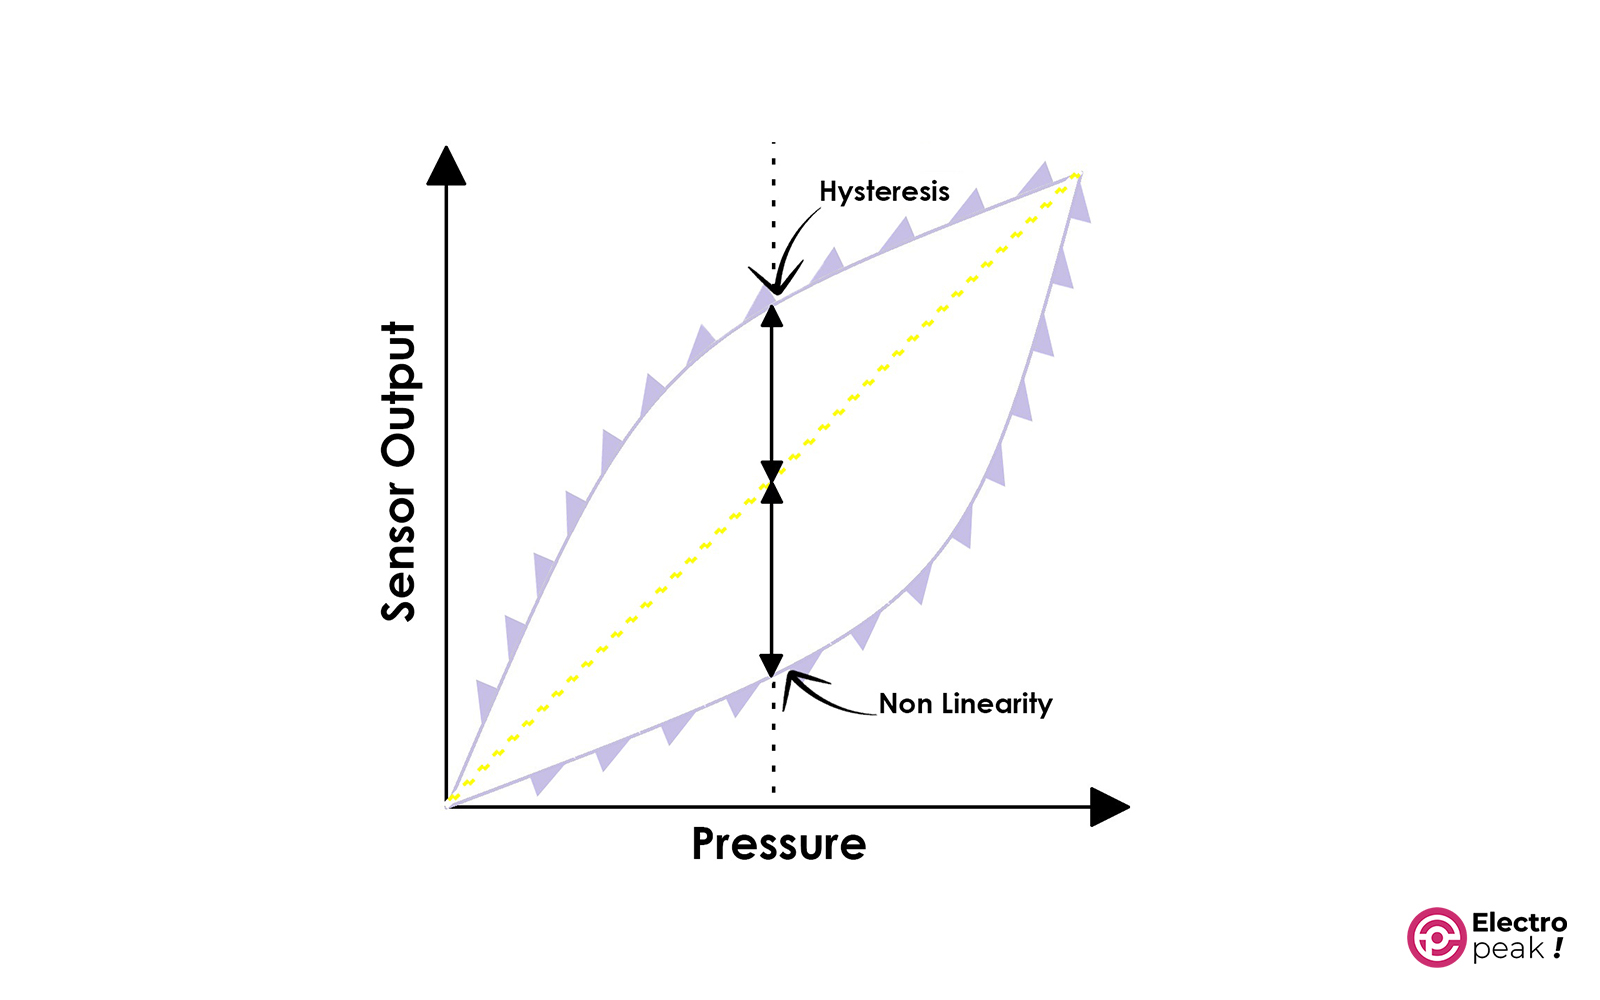
All sensors have different types of errors, like Random Noise, Repeatability, Hysteresis (Offset), Non-linearity, and so on. But, there are solutions for each of them! We’ll mention some of them to improve the measurement accuracy of the BME680 sensor.
Proper Placement of Sensors
In indoor applications, sensor placement is crucial since the air doesn’t circulate properly. Try not to place the sensor near heat sources, and make sure it’s accessible.
Calibration
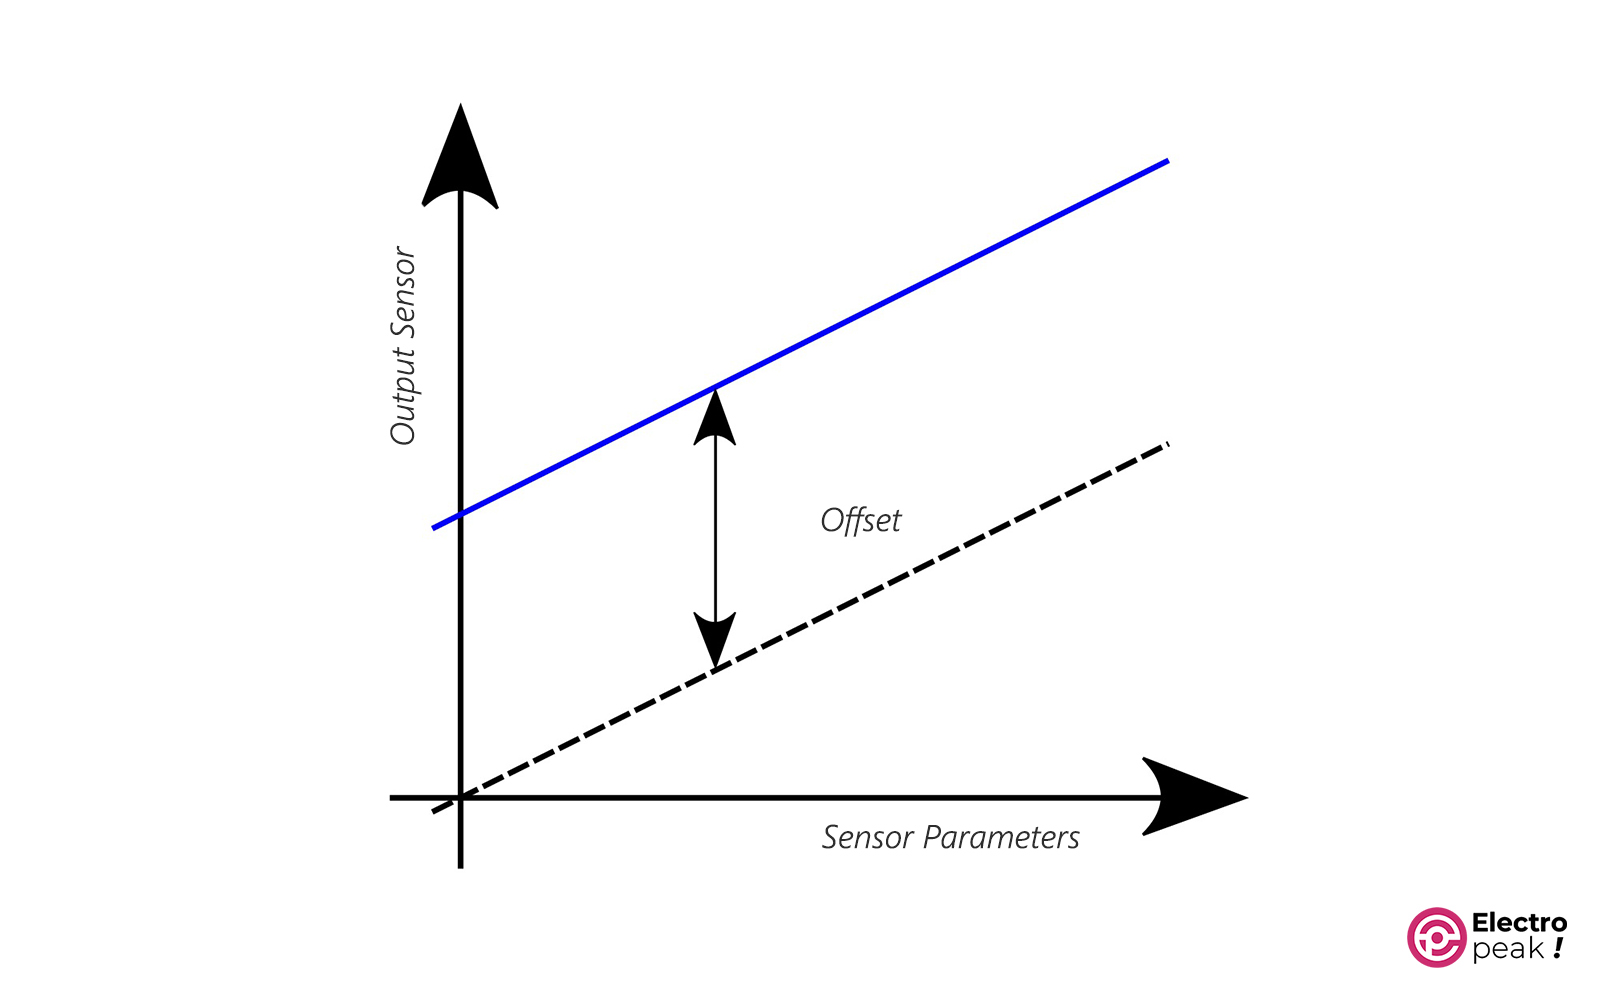
Most sensors have a certain level of Offset and non-linearity error.
For example, to get rid of the Offset error, the most reliable way is to use a reference value. You can indirectly contact the sensor with distilled water ice, which has a freezing temperature without impurities. You can calculate the freezing temperature of distilled water ice based on the sea level altitude or the atmospheric pressure of the environment around the sensor. The difference between the measured values and the calculated values will show the Offset value of your sensor.
You can use a similar method to remove the Offset of other parameters.
For non-linearity, however, you need a precise measuring device. By placing the sensor and the reference device in different environmental conditions, you can compare the measured values of both devices and plot a graph for each. The sensor’s measurement curve should be linear. Otherwise, you can obtain the equation of the curve that represents the relationship between the measured value and the actual value. This equation can then be used to calculate the actual value in subsequent measurements.
Oversampling
Another common error is noise. For this one, you need to use filters. When measuring one parameter, you can use the following filters to remove the noise.
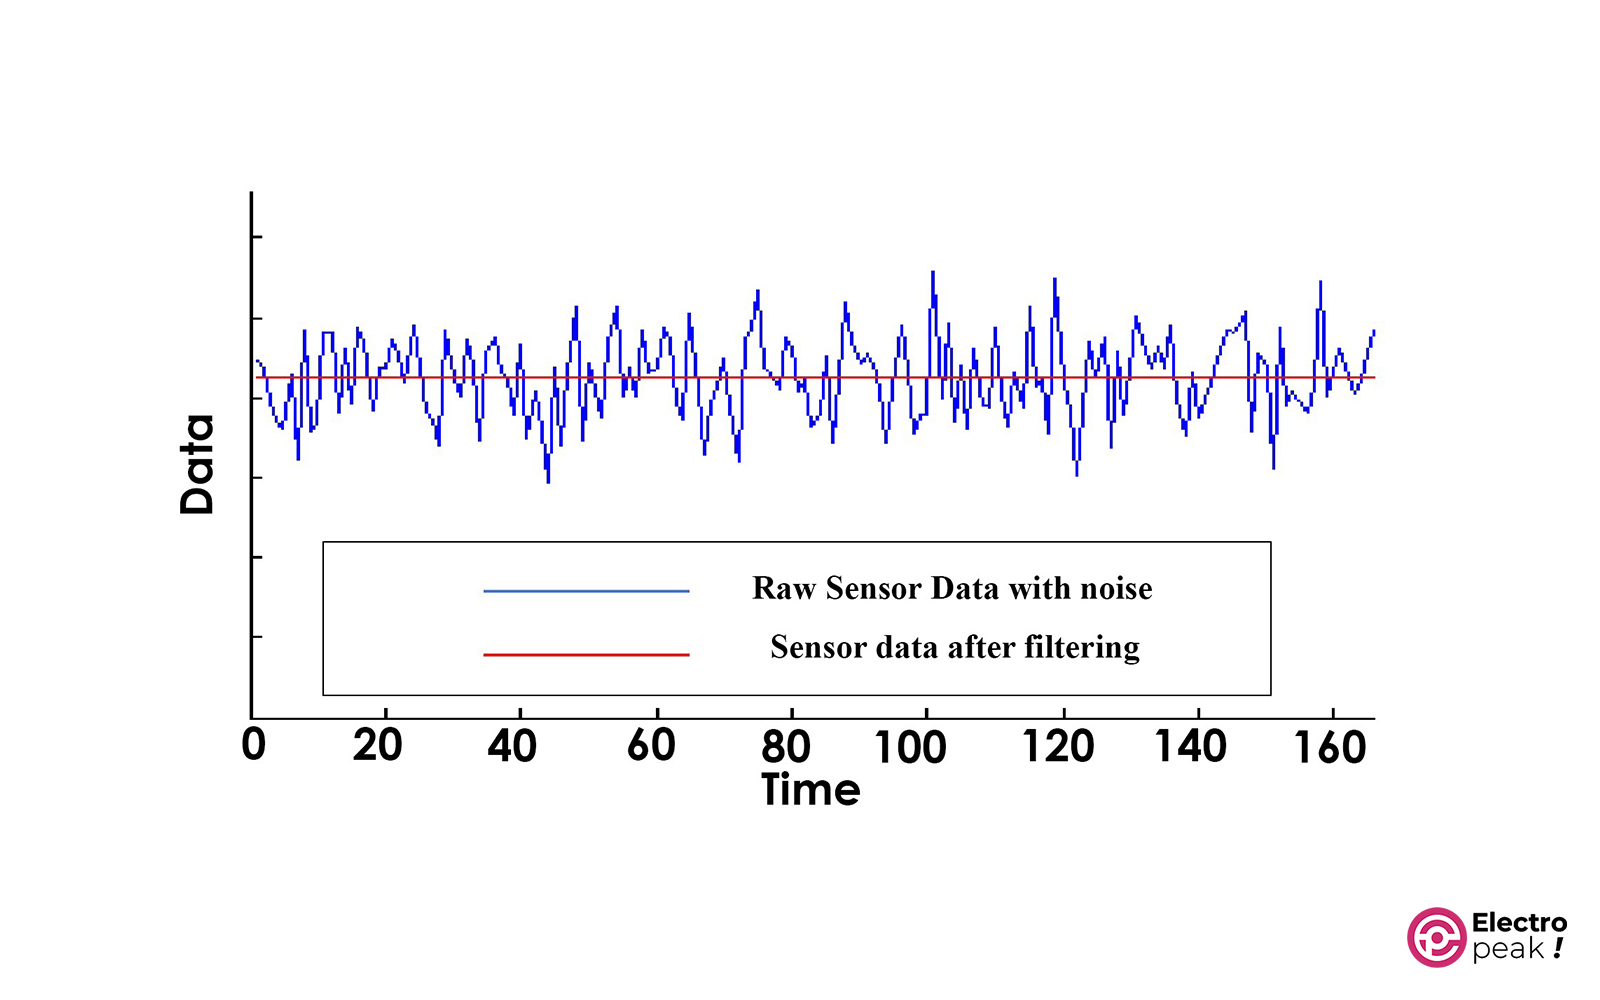
- Weighted filter (Oversampling): First, take multiple samples and calculate their average. This will reduce the effect of random noise. The drawback of this method is a slower response time to sudden changes in the measured parameter.
- Variable-weight filter (IIR): Evaluate the sampled values based on their freshness and take the weighted average of them. This method has a better response time.
The BME sensor has both types of filters internally. If you enable the IIR filter, the resolution of the measured values will be 20 bits. The Oversampling filter increases the resolution depending on the number of samples. Here, we perform 8, 2, and 16 extra samples for temperature, humidity, and pressure, respectively.
To activate both filters mentioned above, add the following lines to the line 17 of the code and upload it to your Arduino.
  bme.setTemperatureOversampling(BME680_OS_8X);
  bme.setHumidityOversampling(BME680_OS_2X);
  bme.setPressureOversampling(BME680_OS_16X);
  bme.setIIRFilterSize(BME680_FILTER_SIZE_127);
When you run the code, you can see the output in the Serial Monitor.
What’s Next?
In this tutorial, we learned how to interface the BME680 sensor with Arduino. As you’ve noticed, it has some great features. With a bit of creativity, you can take care of many tasks using this sensor.
To get a better idea of the air quality, you can use the BSEC software. This software supports various microcontrollers and can measure Indoor Air Quality (IAQ) using advanced algorithms.
For more details, you can check out the datasheet of this component, which explains how to use the BSEC software.
You can download the BSEC2 library from this link. It supports various Arduino boards, including ESP32, ESP8266, 8-bit AVR-based boards, and Cortex ARM (M0, M0+, M3, M4, M4_FPU, and M7).
With this library, you can greatly improve your work performance.
You can also set up a server using ESP32 or ESP8266 and enjoy other applications, such as the Internet of Things (IoT) or smart facility management.
