
XY-TR01 Digital Temperature & Humidity Control Module
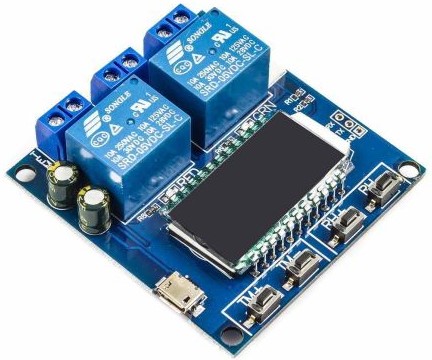
The XY-TR01 Digital Temperature and Humidity Thermostat Module is great for controlling humidity and temperature. It has a digital sensor called SHT20. In addition, its user interface comes with a digital display to show data and four control buttons to adjust humidity and temperature. The module also has two separate relays (maximum current: 10A) to independently control the cooling/heating and humidification/dehumidification modes.
There are two separate ports for power supply: (1) MicroUSB (5V input), and ( 2) a pair of PHONIX Terminals (6-30V DC input). You can choose the one that suits your devices.
The temperature range is from -20 to 60°C, with a resolution of 0.1°C, and the humidity range from 0 to 100 %.
The temperature control part has two modes: cooling and heating. The humidity control part also has two modes: humidification and dehumidification.
Applications of XY-TR01 Module: smart greenhouses, automatic temperature control for homes and workplaces, industrial and laboratory purposes, incubators, etc.
XY-TR01 Specifications
• Power supply: 6-30V DC (from PHONIX terminal), and 5V DC (from MicroUSB port)
• Module maximum current: 65 mA
• Relay maximum current: 10 A
• Temperature sensor: SHT20
• Temperature sensor wire length: 1 m
• Sampling rate: 2Hz (two temperature measurements per second)
• Resolution: 0.1°C
• Temperature range: -20 to 60°C
• Relative humidity range: 0 to 100%
• Dimensions: 61×58×20mm
For more information, you can download the SHT20 Sensor datasheet below:
XY-TR01 Pinout
The XY-TR01 module has three pairs of PHONIX terminals: one 4-pin XH terminal, one MicroUSB port, and two RX and TX pins.
Here’s what these pins/ports do:
PHONIX Terminals:
• VCC(V+): module power supply (6-30V DC)
• GND (V-): ground
• OUT/IN 1: input/output pin of temperature relay
• OUT/IN 3: input/output pin of humidity relay
The 4-pin XH terminal is used to connect the temperature sensor.
The MicroUSB port provides a 5V power supply for the module.
And on the right side of the screen, you’ll find three pins:
• GND: ground
• RX: data receiving pin (Serial Protocol)
• TX: data transmission pin (Serial Protocol)
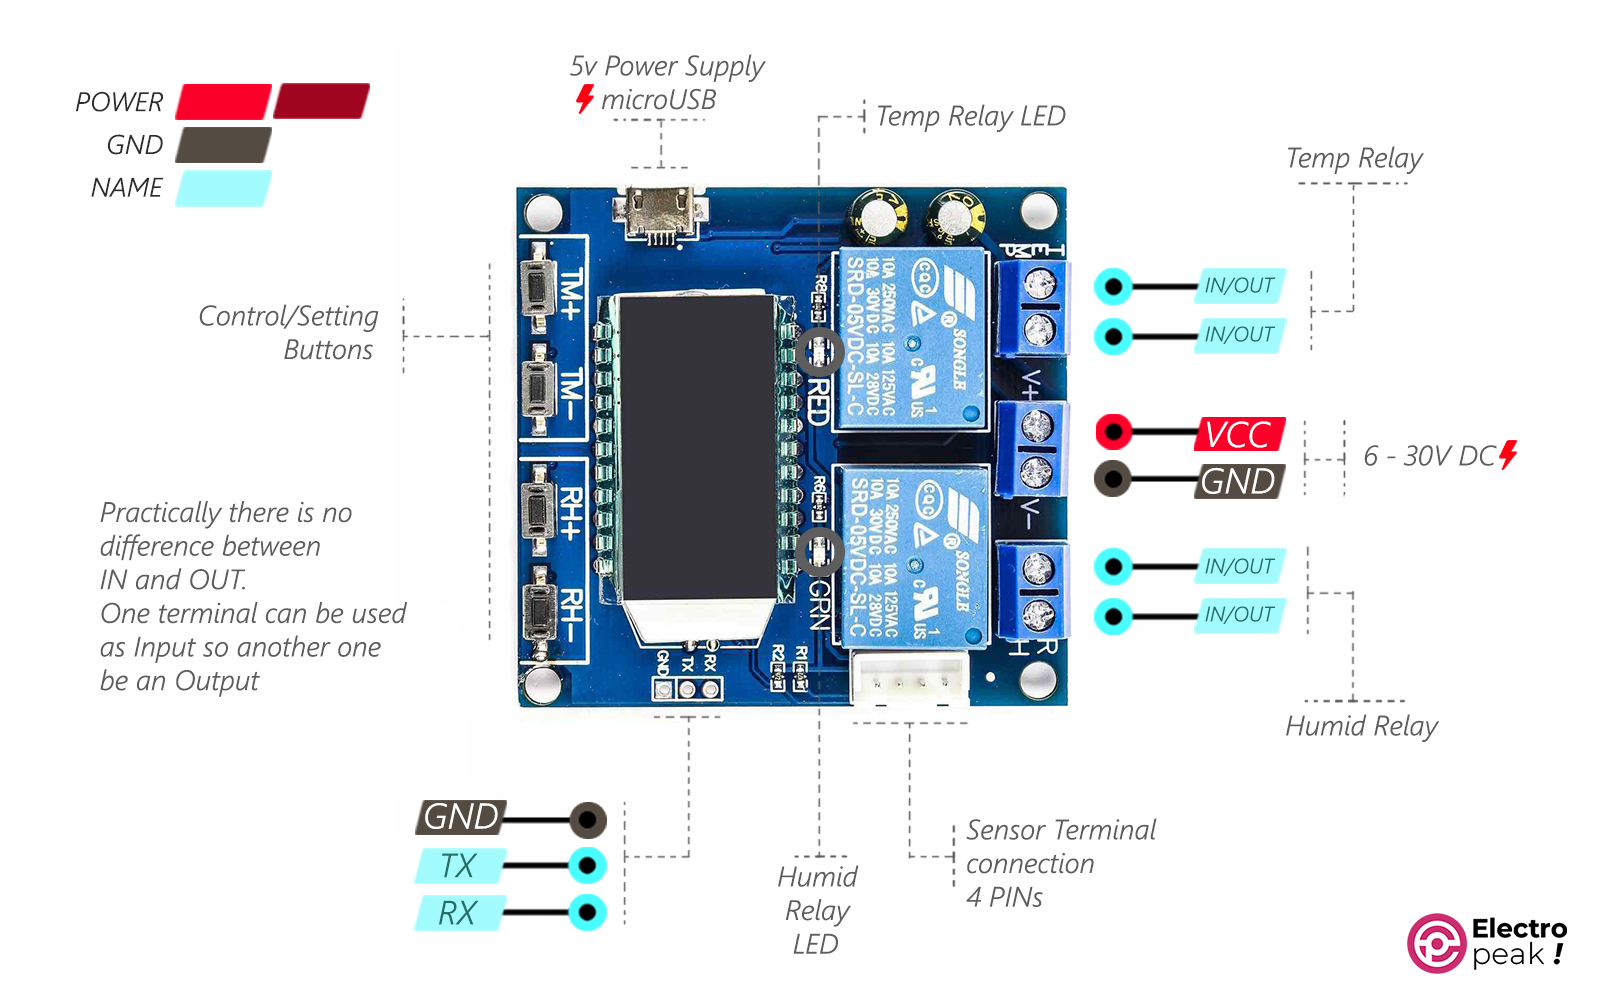
XY-TR01 Adjustment Buttons
• TM+: start point (temperature )
• TM-: stop point (temperature)
• RH+: start point (relative humidity)
• RH-: stop point (relative humidity)
Required Materials
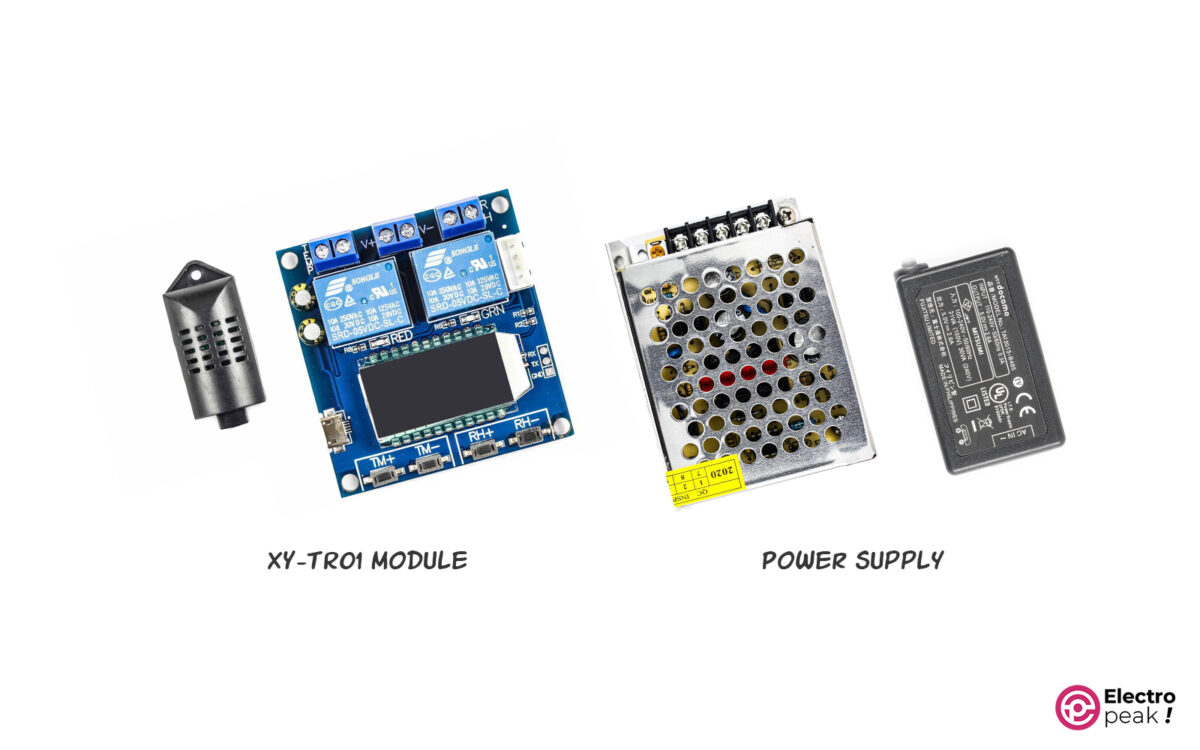
Hardware Components
* only one of these power supplies is needed.
How to Use XY-TR01 Temperature and Humidity Control Module
It’s pretty easy to work with the XY-TR01 module. Just keep the following tips in mind.
The most important part, where people often face difficulties, is the wiring.
The image below shows the general wiring.
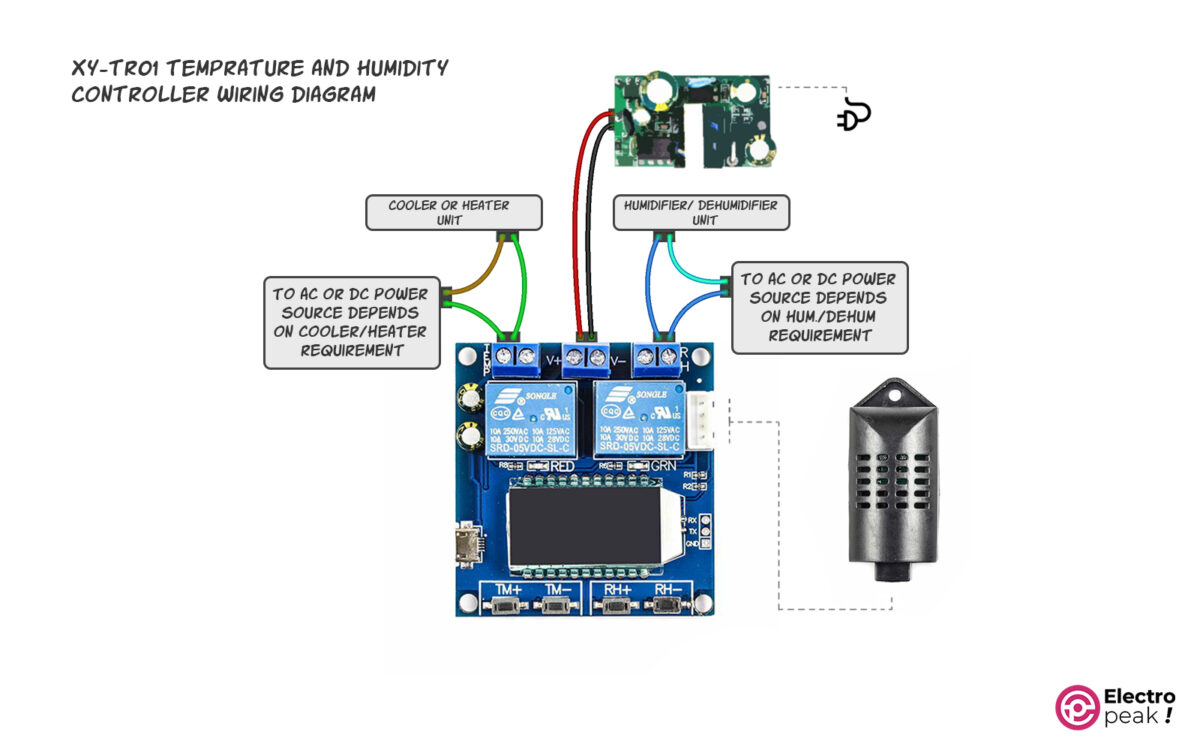
You should connect the GND and V+ terminals to the power supply pins of the module.
The top left terminal in the image—labeled with “TEMP”—is the output of the thermometer’s relay. As mentioned, both pins are interchangeable and can be used as input or output. In addition, In cooling mode, this output controls cooling tools such as fans, while in heating mode, it controls heating tools such as heaters.
The top right terminal in the image above—labeled with “RH”—is the output of the hygrometer’s relay. In humidification mode, this output activates the humidifier when the ambient humidity is lower than the desired level. It’s the opposite, though, in the dehumidification mode; you should connect the output to a dehumidifier to decrease the ambient humidity.
The image below illustrates an example of using the temperature and humidity control module in heating mode. The output of the thermometer’s relay is connected to an AC-powered heater. When the relay is activated, it connects the green and dark purple wires, turning on the heater.
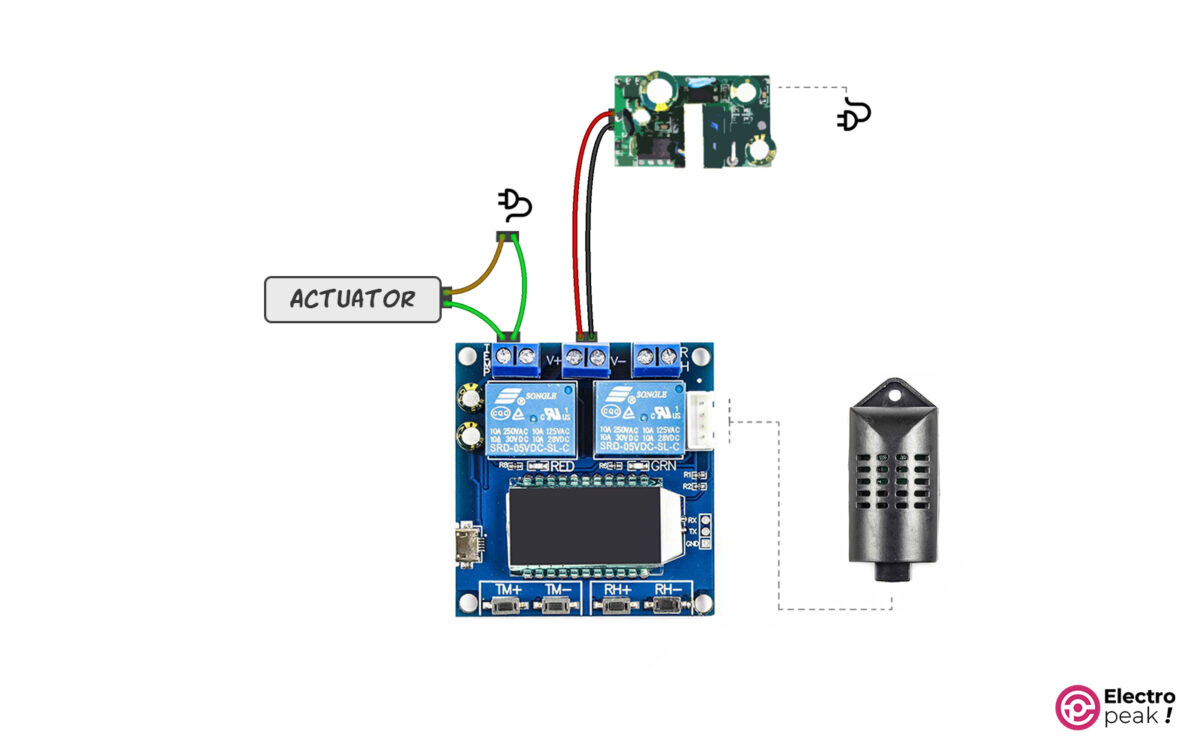
The actuator, which is typically an electric cooling or heating tool, can be powered by DC or AC with different voltage values depending on the specific actuator. For example, you can run a 220V AC heater or a 5V DC fan. Just remember to use the appropriate power supply.
XY-TR01 Temperature Settings
As mentioned, the XY-TR01 module has two temperature modes: heating and cooling. The module can automatically detect the mode based on the following pattern:
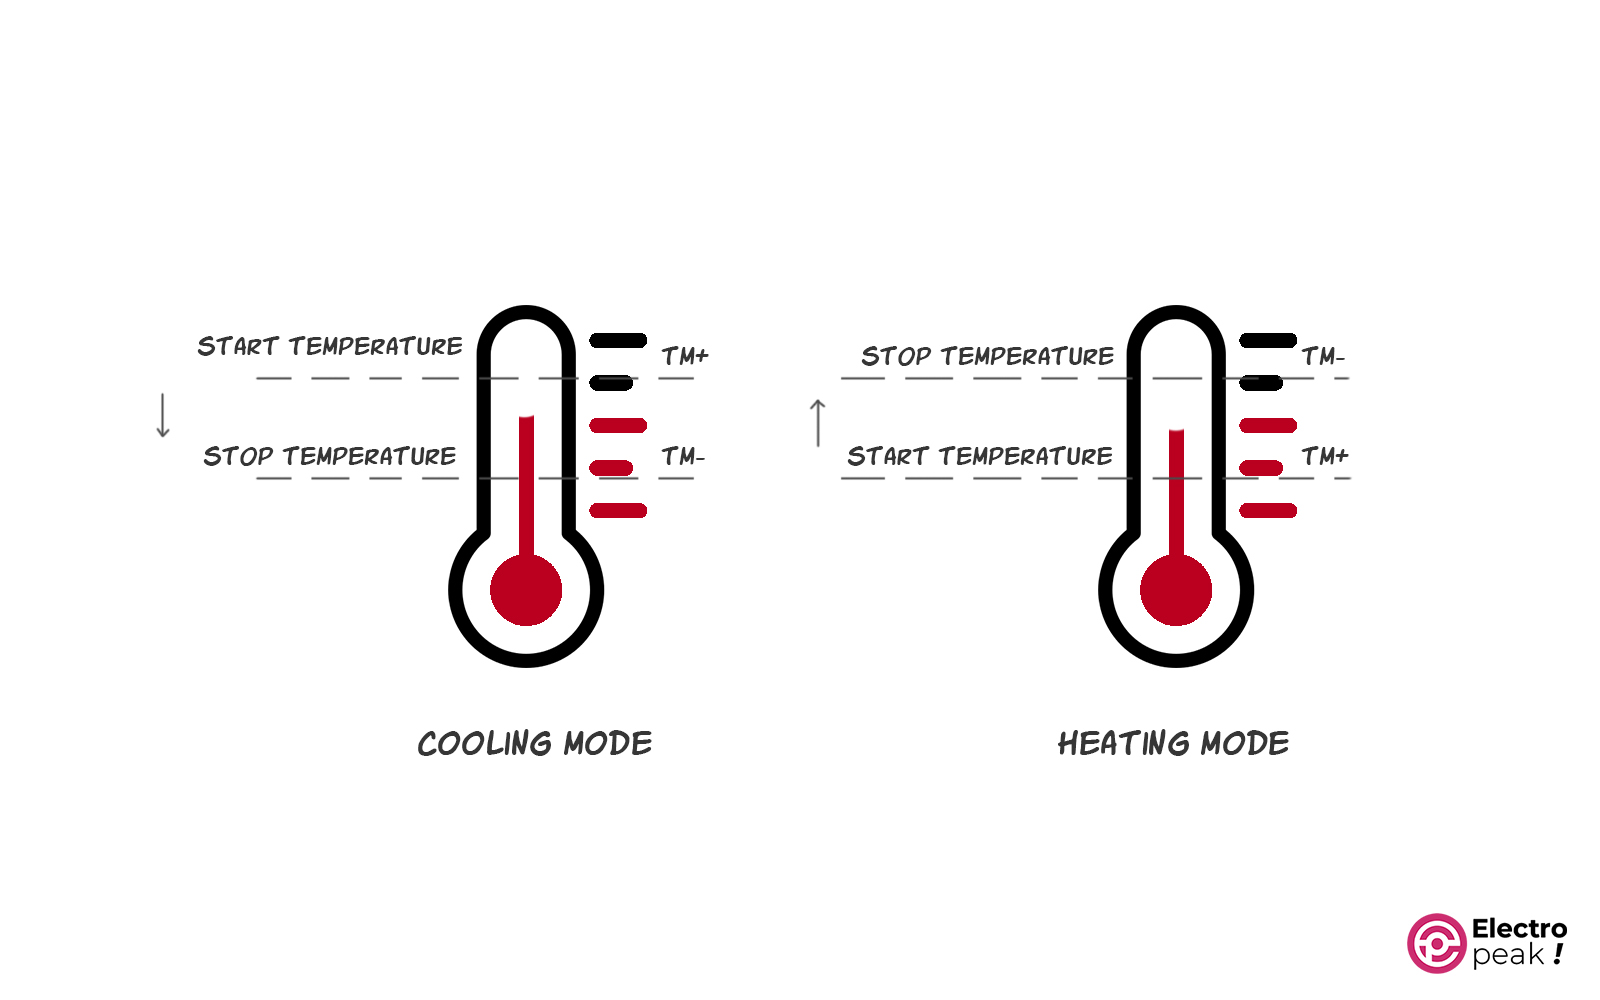
Heating Mode (H)
TM+ < TM-
We switch to this mode when the ambient temperature is lower than the desired temperature and we want to turn on a heating device. In winter, for example, most devices are in such mode.
In this mode, when the “measured temperature” (ambient temperature) is lower than TM+: 1) the red LED, as an indicator, turns on, activating the temperature relay, and 2) the heating devices connected to the relay start operating to increase the temperature.
When the ambient temperature gets higher than TM-: 1) the red LED turns off, deactivating the temperature relay; and 2) the heating devices stop operating.
Cooling Mode (C)
TM+ > TM-
We use this mode when the ambient temperature is higher than the desired temperature and we want to turn on the cooling devices. In summer, for example, most devices are in such mode.
In this mode, when the “measured temperature” (ambient temperature) is higher than TM+: 1) the red LED, as an indicator, turns on, activating the temperature relay, and 2) the cooling devices connected to the relay start operating to decrease the temperature.
When the ambient temperature gets lower than TM-: 1) the red LED turns off, deactivating the temperature relay, and 2) the cooling devices stop operating.
TM+ Settings
• When the module is on, press the TM+ button and hold it down for more than three seconds to enter the settings.
• Here, the temperature value (the number in the first line of the screen) starts blinking.
• You can set the desired temperature by pressing the TM+ and TM- buttons.
• When the value is adjusted, the settings—after 6 seconds—are automatically saved, and the screen gets back to normal.
The image below shows the general process of the settings.

TM- Settings
• When the module is on, press the TM- button and hold it down for more than three seconds to enter the settings.
• Similarly, the temperature value (the number in the first line of the screen) starts blinking.
• You can set the desired temperature by pressing the TM+ and TM- buttons.
• When the value is adjusted, the settings—after 6 seconds—are automatically saved, and the screen gets back to normal.
XY-TR01 Humidity Settings
As mentioned earlier, the humidity control part also has two modes: humidification and dehumidification. Similarly, the module automatically detects the operating mode based on the pattern below.
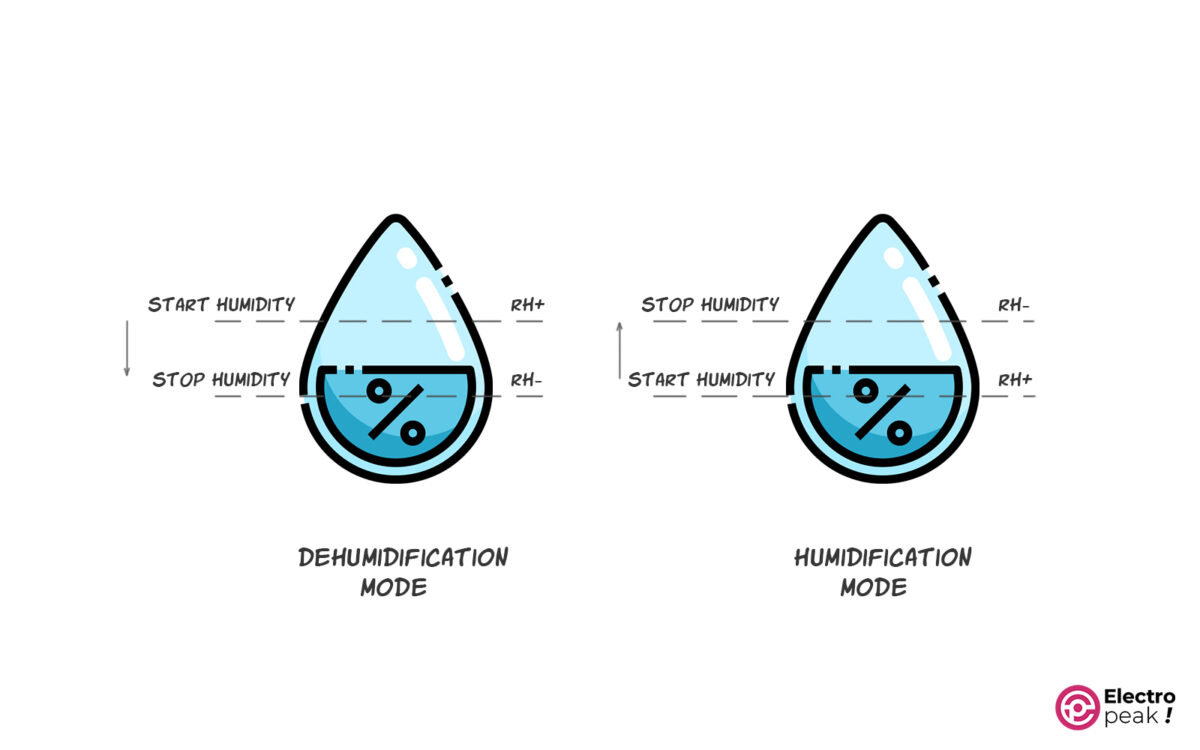
Humidification Mode (E)
RH+ < RH-
We switch to this mode when the ambient humidity is lower than the desired humidity and we want to increase the humidity.
In this mode, when the “measured humidity” (ambient humidity) is lower than RH+: 1) the green LED, as an indicator, turns on, activating the humidity relay, and 2) the humidifiers connected to the relay start operating to increase the relative humidity.
When the ambient humidity gets higher than RH-: 1) the green LED turns off, deactivating the humidity relay, and 2) the humidifiers stop operating.
Dehumidification Mode (D)
RH+ < RH-
We use this mode when the ambient humidity is higher than the desired humidity, and we want to decrease humidity.
In this mode, when the “measured humidity” (ambient humidity) is higher than RH+: 1) the green LED, as an indicator, turns on, activating the humidity relay, and 2) the dehumidifiers connected to the relay start operating to decrease the relative humidity.
When the ambient humidity gets lower than RH-: 1) the green LED turns off, deactivating the humidity relay, and 2) the dehumidifiers stop operating.
RH+ Settings
• When the module is on, press the RH+ button and hold it down for more than three seconds to enter the settings.
• Here, the humidity value (the number in the second line of the screen) starts blinking.
• You can set the desired humidity by pressing the RH+ and RH- buttons.
• When the value is adjusted, the settings—after 6 seconds—are automatically saved, and the screen gets back to normal.
RH- Settings
• When the module is on, press the RH- button and hold it down for more than three seconds to enter the settings.
• Similarly, the humidity value (the number in the second line of the screen) starts blinking.
• You can set the desired humidity by pressing the RH+ and RH- buttons.
• When the value is adjusted, the settings—after 6 seconds—are automatically saved, and the screen gets back to normal.
User Interface on XY-TR01 Module
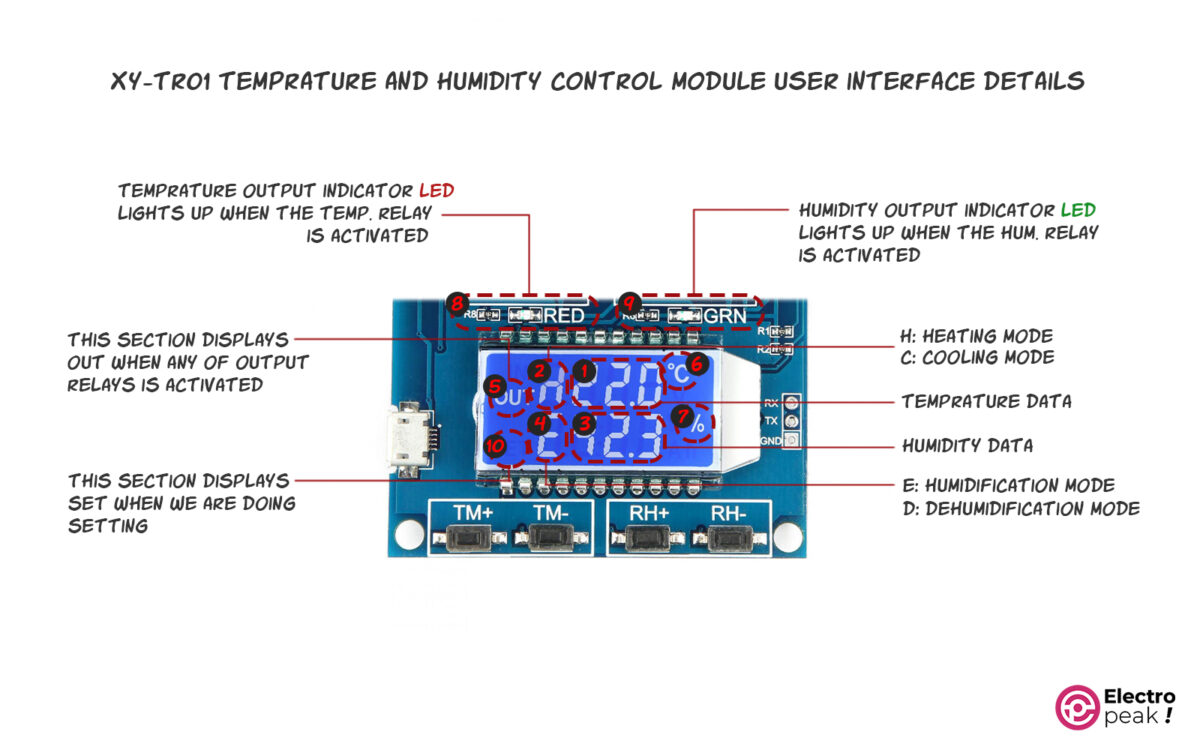
Now, let’s briefly explain the different parts shown in the image above:
1. Temperature value: It normally shows the temperature measured by the sensor.
2. Temperature mode: H: heating mode, and C: cooling mode. It will start blinking when the temperature relay output is active.
3. Relative Humidity Percentage
4. Humidity mode. E: humidification, and D: dehumidification. It will start blinking when the humidity relay output is active.
5. Activated output: It displays “OUT” when any of the output relays are active (connected), and nothing is displayed when none of the outputs are active.
6. Temperature unit: It will start blinking when the module detects that the temperature output should be active but the temperature relay has been manually deactivated.
7. % symbol for relative humidity: It will start blinking when the module detects that the humidity output should be activated but the humidity relay has been deactivated manually.
8. Red LED: It will be on when the temperature relay is active.
9. Green LED: It will be on when the humidity relay is active.
10. This part displays the word “SET” when we are adjusting one of the module’s parameters.
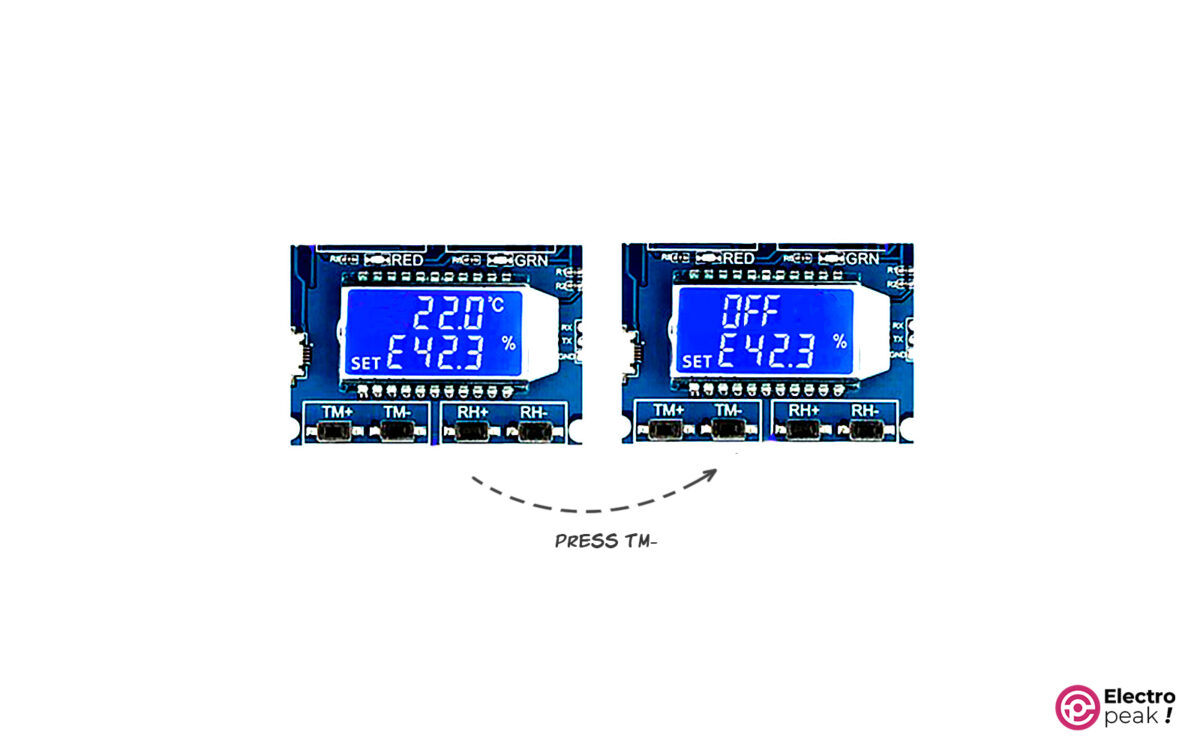
Manually Deactivating XY-TR01 Outputs
In the XY-TR01 module, you can manually deactivate the outputs.
To deactivate the temperature relay, simply press the TM- button once when the module is in its normal state. Then, the word “OFF” starts blinking in the first line of the screen, and after a few seconds, the screen goes back to normal.
In this case, what was mentioned above will no longer happen if the module is within the range where the temperature output should be activated. Instead, the “°C” symbol starts blinking to indicate that the temperature relay output is inactive.
Below, you can see the process of adjusting the output of the XY-TR01 module:
To reactivate the temperature relay, just press the TM- once more. Now, the word “ON” starts blinking in the first line of the screen, and after a few seconds, the screen goes back to normal. Therefore, the relay output is not inactive anymore.
The same process applies to deactivating the output of the humidity relay: in the normal state, press the RH- button once. After that, the screen will display the words “ON” or “OFF” in the second line.
The % symbol starts blinking when the relay output should be active, but we have manually deactivated it.
What’s Next?
Using this module, try to build a cooling system that allows us to adjust the temperature.
Using two of these modules—each one in a different mode—try to design a smart system for controlling the temperature and humidity of a greenhouse that can keep the temperature in a constant range—23 to 26°C, for example.
