
Introduction
If you are familiar with programming for STM, ESP, and RP2040 microcontrollers, you must have heard of MicroPython programming language.
To write code in this language, you need specific software. One of the most common integrated development environments (IDE) designed for programming in Micropython language is Thonny – MicroPython software.
In this tutorial, we will learn how to work with this software. Therefore, at the end of this tutorial, you should be able to write a simple code in MicroPython language for your microcontroller.
What You Will Learn
- Getting familiar with Thonny IDE
- Getting familiar with how to prepare your microcontroller to be programmed in MicroPython language
- Getting familiar with MicroPython language
MicroPython in a Nutshell
Having been optimized for microcontrollers, MicroPython is an interpreter of an open-source programming language called Python that works on microcontroller-based development boards. Instead of dealing with complex low-level languages like C or C++ (what Arduino uses for programming), you can write straightforward and simple code with MicroPython to control hardware using Python.
Here are three main advantages of this programming language compared to the C language:
- Code testing without programming the microcontroller
To run and test the written code, you don’t need to compile or upload the code to your microcontroller. You can type the code and run it by the microcontroller instantly. - Extensive software library
Just like the Python programming language, MicroPython has some libraries to support many tasks. For example, you can simply take care of the following tasks: analyzing JSON data by a web service, text searching with a simple phrase, or even programming network sockets with internal libraries. - Extensibility
Advanced users can extend MicroPython with low-level C/C++ functions. So you can integrate a high-level MicroPython code with a faster low-level code if needed.
As mentioned, ARM-based microcontrollers—such as STM32, ESP32/8266, and RP2040—can work with MicroPython. In this tutorial, we will learn how to program ESP32/8266 with this programming language.
Required Materials

Hardware Components
*: You can also use other ESP32 boards.
Programming with MicroPython in Thonny IDE
Follow the steps below to prepare the Thonny IDE software.
Software Installation
Download the setup file for the Thonny Micropython IDE software from this link and then install it.
Installing Firmware on ESP32
You cannot program microcontrollers in MicroPython by default. To activate this feature, you need to flash/upload/burn its firmware on the microcontroller.
There are different ways to do this. One of the easiest ways is to use the Thonny IDE software environment. Thonny IDE has a tool that allows you to quickly install this firmware on your board.
Another way is to use the “Esptool.py” tool. You can visit this link to learn more about it.
First, click on this link. On the opened page, you can see the firmware link for all types of boards. Here, click on the link of the image below.

Then on the opened page, click on the link shown in the image below.

As shown in the image below, open Thonny IDE software and go to Tools->Options…

Now, first select MicroPython (ESP32) and then set the serial port number.
Finally, click on “Install or update MicroPython (esptool).”

On the new window shown in the image below, first, select “Target port.” Then click on “Select local MicroPython image” and open the downloaded firmware file.
This will automatically select and complete the MicroPython family, variant, and version options.

Finally, click “Install” to upload the firmware to your microcontroller.
Writing Code in Thonny IDE
Now you can write codes in Thonny IDE.
Copy and paste the following code into the specified area shown in the image below. Then click on the symbol marked by the number 2.
					from machine import Pin
from time import sleep
pin38 = Pin(38, Pin.OUT)
while True:
    pin38.value(0)
    sleep(0.5)
    pin38.value(1)
    sleep(0.5)

By doing this, the LED on your ESP32S3 board will start blinking.
Uploading Code to Microcontroller in Thonny IDE
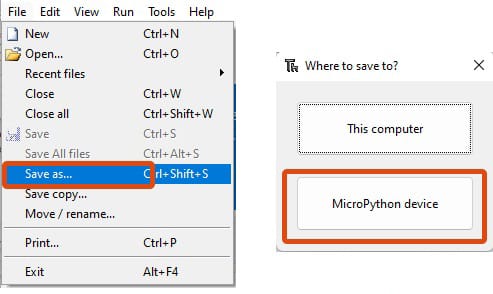
To upload the code to your microcontroller, just open the File menu and click on Save as.
This will open the following window. Here, select the “MicroPython device” option.
Now, your microcontroller will be reset and the uploaded code will be executed.
Running the Code Line by Line in Thonny IDE
You can enter your code in the Shell section of Thonny IDE. The codes entered in this section will be executed instantly by pressing the Enter key.
These features allow you to easily find the problem of your program.
What’s Next?
In this tutorial, you learned about the benefits of using Micropython as well as one of its IDEs— Thonny-Micropython.
You can do your projects by using the many libraries that are provided for you.
Many practical libraries have been written for this programming language. Here are some examples of the most recent ones:

Edge Impulse is the leading development platform for machine learning used by over 40,000 developers on 65,000 projects worldwide. Edge Impulse provides a wonderful ML development experience on embedded devices for a variety of sensors, audio and video. We can enable highly optimized ML deployments on hardware ranging from MCUs to CPUs and AI accelerators.

The OpenMV project is trying to create low-cost, extensible, Python-based machine vision modules, and its goal is “Machine Vision for Arduino!” In other words, the goal is to bring machine vision algorithms closer to developers and enthusiasts.
Home Assistant is a free and open-source software for home automation. It’s designed as a central control system for smart home devices with a focus on local control and privacy. You can access it through a web-based user interface using apps for Android and iOS, or with voice commands via a virtual assistant such as Google Assistant or Amazon Alexa.
