
Overview
In this article, we will dive into the exciting world of ESP32 BLE on the Arduino IDE, exploring how to easily connect your Arduino with other BLE devices. Whether you want to create a wireless sensor network, control your smart home devices, or build a mobile app that interacts with your Arduino, the ESP32 BLE module has got you covered.
The ESP32 BLE module is a versatile and powerful Bluetooth solution that allows for fast and efficient communication between devices. With its low energy consumption, you can create projects that run on battery power for extended periods without worrying about draining your power source.
Armed with the Arduino IDE, you can take advantage of the ESP32’s rich feature set and easily program it to connect, communicate, and exchange data with other BLE devices. This tutorial will guide you through the process of setting up BLE in ESP32 using the Arduino IDE software and demonstrate how to read data on ESP32 via BLE connection and connect two ESP32 devices using BLE. So, join us as we unlock the endless possibilities of ESP32 BLE on the Arduino IDE. Get ready to elevate your Arduino projects to a whole new level of connectivity and functionality!
What You Will Learn
- What BLE is
- BLE structure and functioning modes
- Setting up BLE in ESP32 module using Arduino IDE software
- Reading data on ESP32 using cellphone via BLE connection
- Connecting two ESP32 with BLE
What is BLE and its difference with Classic Bluetooth?
Bluetooth is a standard common wireless technology for transmitting and receiving data in short distances, used for over 20 years. The advantages of Bluetooth include low power consumption and price. Bluetooth connections are either classic (common model) or low energy (BLE).
ESP32 supports both types of Bluetooth connections.
What is BLE?
BLE stands for Bluetooth Low Energy. In 2001, Nokia researchers made adjustments to the common Bluetooth devices to reduce their energy consumption for an upgraded version. The results were published as a theory in 2004.
Afterward, several companies including Logitech (MIMOSA project) made efforts to improve Bluetooth connection. Finally, in 2006, the public version came out under the Wibree brand. Its power consumption was about 10 times lower than the common Bluetooth modules.

After negotiations and agreements with Bluetooth Special Interest Group, The “Bluetooth 4” with low energy technology was released. It is known as Bluetooth Smart.

Most devices with Bluetooth 4.0 or higher support BLE too.
You can see a comparison of classic and low energy Bluetooth in the table below (source: Bluetooth SIG)
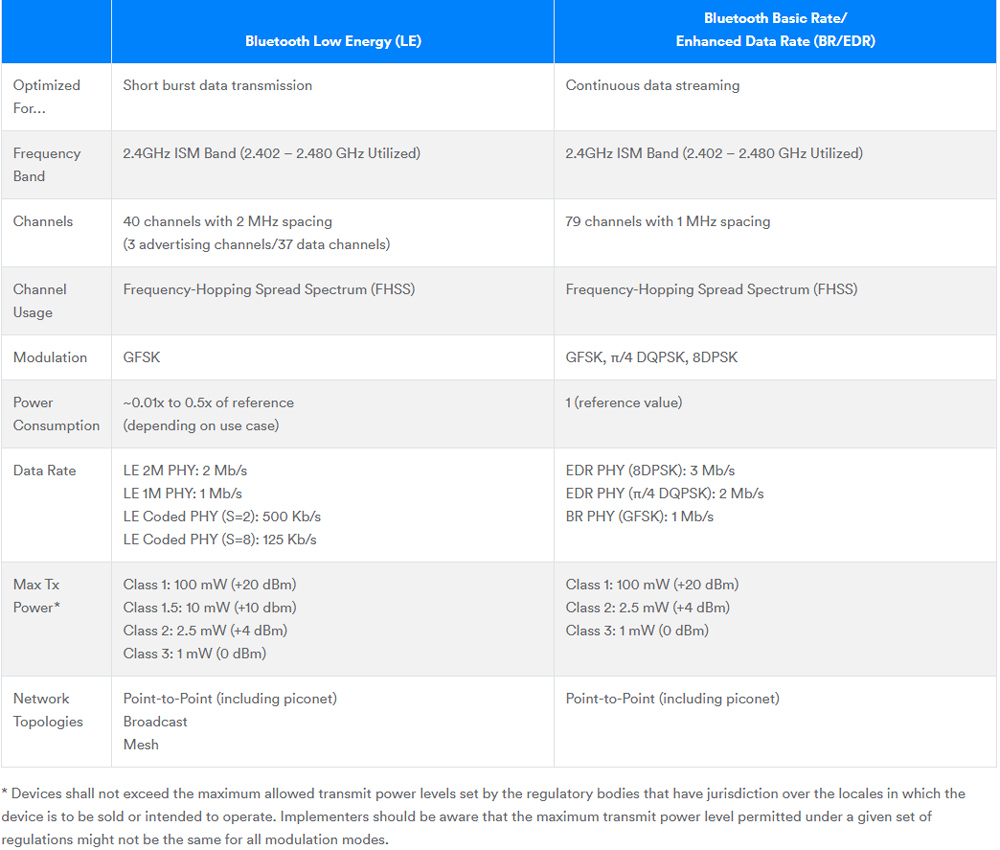
Understanding the basics of Bluetooth Low Energy (BLE)
Low Energy Bluetooth protocol has several layers and structures. We will cover the most important one. In case you need more information, read the ESP32 Bluetooth datasheet or visit the Bluetooth SIG website.
BLE GAP Protocol

Once the connection is made, the peripheral device stops sending packets and other central devices won’t be able to recognize the peripheral device. After making the connection using the GAP protocol, sending and receiving data will be possible through the GATT protocol.
BLE GATT Protocol
Devices recognize each other using GAP and connect. Then they start transmitting and receiving data with GATT.
GATT stands for Generic Attribute Profile, responsible for defining a method to send and receive data between the two connected devices with BLE.
Data transmission in GATT is performed by the two Services and Characteristics concepts.
GATT uses the famous Attribute Protocol or ATT to send and receive data. It stores the Services and Characteristics and the corresponding data in a table (LUT).
How Devices communicate Using GATT
GATT connection mechanism is similar to Server and Client architecture in networks. In this structure, any peripheral device can be a server and central devices can be considered as clients.
Any peripheral device (server) has an ATT table and the Characteristics and Services for that device.
When establishing the connection between peripheral and central devices, a Connection Interval is suggested by the peripheral device. The central device tries to detect whether new information is available or not. The central device might be busy with other operations such as connecting to another device, so it doesn’t always obey the time interval.
The following figure shows a simple schematic of the connection between server and client.
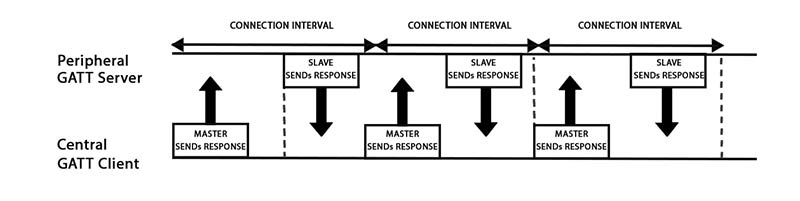
As you can see in the above figure, the request always comes from the central device (server) and peripheral device (client) responds to it.
Profile, Services, and Characteristics
GATT includes a network consisting of different sections called Profiles, Services and Characteristics. These sections are connected hierarchically.
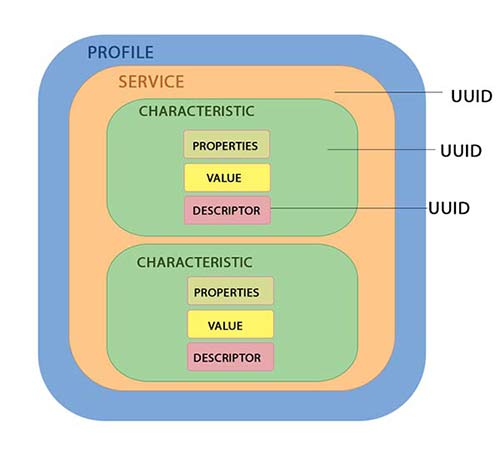
Profiles
Profiles are a set of services defined by Bluetooth SIG (Bluetooth Special Interest Group) or designers of peripheral devices. For example, you can download the blood pressure sensor’s profiles here.
Services
Services are a set of simple information (like sensor’s readings). Services divide into subcategories called Characteristics.
Various services such as reading battery level, blood pressure, heart rate and so on are defined by Bluetooth SIG. Any service has a unique ID code called UUID. This code can be 16 bits (for official services) and 128 bits (for services provided by other designers). For example, the 16-bit UUID for blood pressure is 0X1810.
You can see the full table for official services .
Characteristics
Services can be broken down into one or several Characteristics. For example, linear acceleration readings have 3 axes in x, y and z coordinates.
Similar to services, characteristics have unique 16 or 128 bits UUID. The full table of the official characteristics can be seen here.
UUID
Every service, characteristic, and descriptor is identified by a Universally Unique Identifier (UUID), which is a distinct 128-bit (16-byte) number. For instance,
55072829-bc9e-4c53-938a-74a6d4c78776
is an example of a UUID. Shortened UUIDs for various types, services, and profiles are defined by the Bluetooth Special Interest Group (SIG).
However, if your application requires a custom UUID, you can create one using a UUID generator website. Essentially, UUIDs are utilized to uniquely identify information, such as a specific service provided by a Bluetooth device.
Required Materials
Hardware Components
The second example requires two ESP32 modules. The rest of the examples only require one module. You can use any of the ESP32 Boards you wish.
Software Apps
Setting up the Arduino IDE for ESP32 BLE development
Before you can start developing ESP32 BLE projects on the Arduino IDE, you need to set up the necessary tools and libraries. This involves installing the ESP32 board definitions, configuring the IDE, and installing the BLE library.
For a complete instruction, follow this tutorial: Installing the ESP32 Board in Arduino IDE (Windows, Mac OS X, Linux)
Here is a short instruction:
To install the ESP32 board definitions, you need to open the Arduino IDE and go to “File” > “Preferences”. In the “Additional Boards Manager URLs” field, enter the following URL:
https://dl.espressif.com/dl/package_esp32_index.json
After entering the URL, click on “OK” to save the preferences. Next, go to “Tools” > “Board” > “Boards Manager”. In the search bar, type “esp32” and click on the “esp32” entry that appears. Click on “Install” to install the ESP32 board definitions.
Once the board definitions are installed, you need to select the appropriate board from the “Tools” > “Board” menu. Choose the board that corresponds to your ESP32 development board.
After setting up the board definitions, you need to install the BLE library. To do this, go to “Sketch” > “Include Library” > “Manage Libraries”. In the library manager, search for “BLE” and click on the “BLE” entry that appears. Click on “Install” to install the library.
With the necessary tools and libraries installed, you are now ready to start developing ESP32 BLE projects on the Arduino IDE.
Tip
To view ESP32 library examples, first, you need to select the board type in Tools menu.
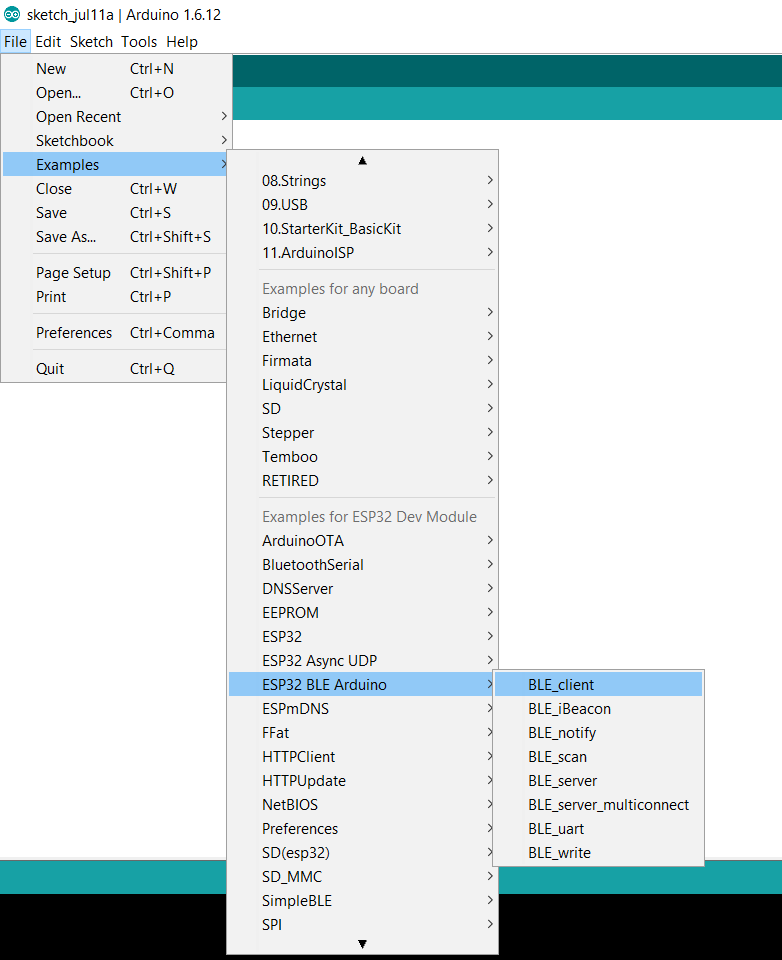
ESP32 BLE Example 1: How to set up BLE in server mode
Open the BLE_server example following the path File>Examples>ESP32 BLE Arduino
Code
/*
    Based on Neil Kolban example for IDF: https://github.com/nkolban/esp32-snippets/blob/master/cpp_utils/tests/BLE%20Tests/SampleServer.cpp
    Ported to Arduino ESP32 by Evandro Copercini
    updates by chegewara
*/

#include <BLEDevice.h>
#include <BLEUtils.h>
#include <BLEServer.h>

// See the following for generating UUIDs:
// https://www.uuidgenerator.net/

#define SERVICE_UUID        "4fafc201-1fb5-459e-8fcc-c5c9c331914b"
#define CHARACTERISTIC_UUID "beb5483e-36e1-4688-b7f5-ea07361b26a8"

void setup() {
  Serial.begin(115200);
  Serial.println("Starting BLE work!");

  BLEDevice::init("Long name works now");
  BLEServer *pServer = BLEDevice::createServer();
  BLEService *pService = pServer->createService(SERVICE_UUID);
  BLECharacteristic *pCharacteristic = pService->createCharacteristic(
                                         CHARACTERISTIC_UUID,
                                         BLECharacteristic::PROPERTY_READ |
                                         BLECharacteristic::PROPERTY_WRITE
                                       );

  pCharacteristic->setValue("Hello World says Neil");
  pService->start();
  // BLEAdvertising *pAdvertising = pServer->getAdvertising();  // this still is working for backward compatibility
  BLEAdvertising *pAdvertising = BLEDevice::getAdvertising();
  pAdvertising->addServiceUUID(SERVICE_UUID);
  pAdvertising->setScanResponse(true);
  pAdvertising->setMinPreferred(0x06);  // functions that help with iPhone connections issue
  pAdvertising->setMinPreferred(0x12);
  BLEDevice::startAdvertising();
  Serial.println("Characteristic defined! Now you can read it in your phone!");
}

void loop() {
  // put your main code here, to run repeatedly:
  delay(2000);
}
How the Code Works
#include <BLEDevice.h>
#include <BLEUtils.h>
#include <BLEServer.h>
Above commands add the libraries required for creating BLE server to the code.
#define SERVICE_UUID        "4fafc201-1fb5-459e-8fcc-c5c9c331914b"
#define CHARACTERISTIC_UUID "beb5483e-36e1-4688-b7f5-ea07361b26a8"
As previously mentioned, a UUID for Service and another UUID for Characteristic have to be defined. These two UUID are created randomly. You can select your favorite UUID using this website.
The necessary configurations for operating the server are made in the setup menu.
Serial.begin(115200);To view the results in the serial window, the serial connection is launched at the baud rate of 115200 bits per second.
BLEDevice::init("Long name works now");You can enter the server name using init command. Replace the phrase “Long name works now” with the name you want.
BLEServer *pServer = BLEDevice::createServer();This command creates a server with the name you entered.
BLEService *pService = pServer->createService(SERVICE_UUID);
BLECharacteristic *pCharacteristic = pService->createCharacteristic(
                                       CHARACTERISTIC_UUID,
                                       BLECharacteristic::PROPERTY_READ |
                                       BLECharacteristic::PROPERTY_WRITE
                                       );
The above two commands create the previously defined Service and Characteristic on the server.
PROPERTY_READ, PROPERTY_WRITE, etc. set the access rights to this Characteristic. For example, regarding this Characteristic, the client connected to the server can either read or write Characteristic values.
After creating the Characteristic, you can give it a value using setValue() method.
pCharacteristic->setValue("Hello World says Neil");In this example, the value of Characteristic is a simple text (Hello World says Neil). Based on your needs, you can change it to a different text or output values for one or more sensors.
pService->start();After configuring the server, you can launch it using start() command
After the server starts working, it needs to constantly send Advertising packets so that other devices can see and recognize it.
BLEAdvertising *pAdvertising = BLEDevice::getAdvertising();The code above is responsible for sending advertising packets.
This is a simple example for creating a BLE server, with no operations in the loop() section. You can add commands based on your requirements (for example go to BLE_notify).
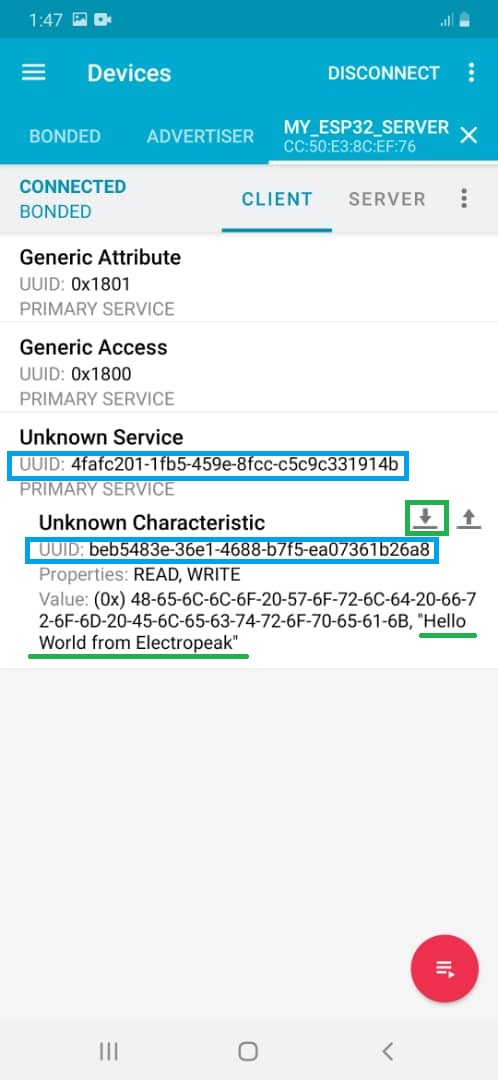
Finding the created server on a cell phone
We changed the server’s name to “My_ESP32_Server” and Characteristic’s name to “Hello World from Electropeak”. You can set any name you like.
Once code uploads onto ESP32, turn the phone’s Bluetooth on and start nRF_Connect app (you can use other similar software). Scan the available BLE codes to find your server.
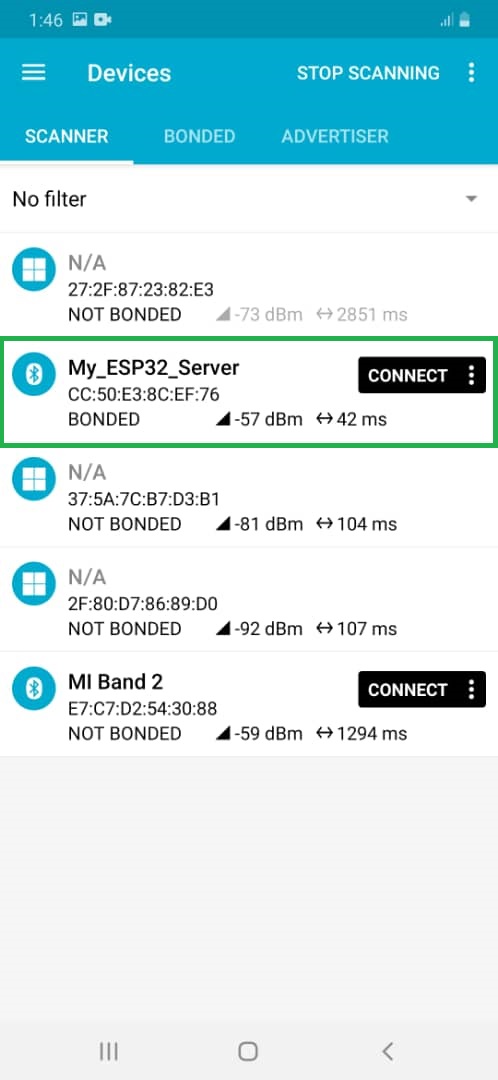
Click the “CONNECT” button to establish a connection to your server. Now you can view the server information. Click the downward arrow (in the green box) to view the Characteristic value.
ESP32 BLE Example 2: How to set up BLE in Client Mode
Open the BLE_client example.
code
/**
 * A BLE client example that is rich in capabilities.
 * There is a lot new capabilities implemented.
 * author unknown
 * updated by chegewara
 */

#include "BLEDevice.h"
//#include "BLEScan.h"

// The remote service we wish to connect to.
static BLEUUID serviceUUID("4fafc201-1fb5-459e-8fcc-c5c9c331914b");
// The characteristic of the remote service we are interested in.
static BLEUUID    charUUID("beb5483e-36e1-4688-b7f5-ea07361b26a8");

static boolean doConnect = false;
static boolean connected = false;
static boolean doScan = false;
static BLERemoteCharacteristic* pRemoteCharacteristic;
static BLEAdvertisedDevice* myDevice;

static void notifyCallback(
  BLERemoteCharacteristic* pBLERemoteCharacteristic,
  uint8_t* pData,
  size_t length,
  bool isNotify) {
    Serial.print("Notify callback for characteristic ");
    Serial.print(pBLERemoteCharacteristic->getUUID().toString().c_str());
    Serial.print(" of data length ");
    Serial.println(length);
    Serial.print("data: ");
    Serial.println((char*)pData);
}

class MyClientCallback : public BLEClientCallbacks {
  void onConnect(BLEClient* pclient) {
  }

  void onDisconnect(BLEClient* pclient) {
    connected = false;
    Serial.println("onDisconnect");
  }
};

bool connectToServer() {
    Serial.print("Forming a connection to ");
    Serial.println(myDevice->getAddress().toString().c_str());

    BLEClient*  pClient  = BLEDevice::createClient();
    Serial.println(" - Created client");

    pClient->setClientCallbacks(new MyClientCallback());

    // Connect to the remove BLE Server.
    pClient->connect(myDevice);  // if you pass BLEAdvertisedDevice instead of address, it will be recognized type of peer device address (public or private)
    Serial.println(" - Connected to server");

    // Obtain a reference to the service we are after in the remote BLE server.
    BLERemoteService* pRemoteService = pClient->getService(serviceUUID);
    if (pRemoteService == nullptr) {
      Serial.print("Failed to find our service UUID: ");
      Serial.println(serviceUUID.toString().c_str());
      pClient->disconnect();
      return false;
    }
    Serial.println(" - Found our service");


    // Obtain a reference to the characteristic in the service of the remote BLE server.
    pRemoteCharacteristic = pRemoteService->getCharacteristic(charUUID);
    if (pRemoteCharacteristic == nullptr) {
      Serial.print("Failed to find our characteristic UUID: ");
      Serial.println(charUUID.toString().c_str());
      pClient->disconnect();
      return false;
    }
    Serial.println(" - Found our characteristic");

    // Read the value of the characteristic.
    if(pRemoteCharacteristic->canRead()) {
      std::string value = pRemoteCharacteristic->readValue();
      Serial.print("The characteristic value was: ");
      Serial.println(value.c_str());
    }

    if(pRemoteCharacteristic->canNotify())
      pRemoteCharacteristic->registerForNotify(notifyCallback);

    connected = true;
}
/**
 * Scan for BLE servers and find the first one that advertises the service we are looking for.
 */
class MyAdvertisedDeviceCallbacks: public BLEAdvertisedDeviceCallbacks {
 /**
   * Called for each advertising BLE server.
   */
  void onResult(BLEAdvertisedDevice advertisedDevice) {
    Serial.print("BLE Advertised Device found: ");
    Serial.println(advertisedDevice.toString().c_str());

    // We have found a device, let us now see if it contains the service we are looking for.
    if (advertisedDevice.haveServiceUUID() && advertisedDevice.isAdvertisingService(serviceUUID)) {

      BLEDevice::getScan()->stop();
      myDevice = new BLEAdvertisedDevice(advertisedDevice);
      doConnect = true;
      doScan = true;

    } // Found our server
  } // onResult
}; // MyAdvertisedDeviceCallbacks


void setup() {
  Serial.begin(115200);
  Serial.println("Starting Arduino BLE Client application...");
  BLEDevice::init("");

  // Retrieve a Scanner and set the callback we want to use to be informed when we
  // have detected a new device.  Specify that we want active scanning and start the
  // scan to run for 5 seconds.
  BLEScan* pBLEScan = BLEDevice::getScan();
  pBLEScan->setAdvertisedDeviceCallbacks(new MyAdvertisedDeviceCallbacks());
  pBLEScan->setInterval(1349);
  pBLEScan->setWindow(449);
  pBLEScan->setActiveScan(true);
  pBLEScan->start(5, false);
} // End of setup.


// This is the Arduino main loop function.
void loop() {

  // If the flag "doConnect" is true then we have scanned for and found the desired
  // BLE Server with which we wish to connect.  Now we connect to it.  Once we are
  // connected we set the connected flag to be true.
  if (doConnect == true) {
    if (connectToServer()) {
      Serial.println("We are now connected to the BLE Server.");
    } else {
      Serial.println("We have failed to connect to the server; there is nothin more we will do.");
    }
    doConnect = false;
  }

  // If we are connected to a peer BLE Server, update the characteristic each time we are reached
  // with the current time since boot.
  if (connected) {
    String newValue = "Time since boot: " + String(millis()/1000);
    Serial.println("Setting new characteristic value to \"" + newValue + "\"");

    // Set the characteristic's value to be the array of bytes that is actually a string.
    pRemoteCharacteristic->writeValue(newValue.c_str(), newValue.length());
  }else if(doScan){
    BLEDevice::getScan()->start(0);  // this is just eample to start scan after disconnect, most likely there is better way to do it in arduino
  }

  delay(1000); // Delay a second between loops.
} // End of loop
How the Code Works
#include "BLEDevice.h"BLEDevice library is used to create the client.
static BLEUUID serviceUUID("4fafc201-1fb5-459e-8fcc-c5c9c331914b");
static BLEUUID    charUUID("beb5483e-36e1-4688-b7f5-ea07361b26a8");
Same as for the server, the two above commands set UUID for Service and Characteristic. Please note these UUID should be the same as the ones for server.
static void notifyCallback(
  BLERemoteCharacteristic* pBLERemoteCharacteristic,
  uint8_t* pData,
  size_t length,
  bool isNotify) {
    Serial.print("Notify callback for characteristic ");
    Serial.print(pBLERemoteCharacteristic->getUUID().toString().c_str());
    Serial.print(" of data length ");
    Serial.println(length);
    Serial.print("data: ");
    Serial.println((char*)pData);
notifyCallback. function notifies the reading value of Characteristic.
class MyAdvertisedDeviceCallbacks: public BLEAdvertisedDeviceCallbacks {
 /**
   * Called for each advertising BLE server.
   */
  void onResult(BLEAdvertisedDevice advertisedDevice) {
    Serial.print("BLE Advertised Device found: ");
    Serial.println(advertisedDevice.toString().c_str());

    // We have found a device, let us now see if it contains the service we are looking for.
    if (advertisedDevice.haveServiceUUID() && advertisedDevice.isAdvertisingService(serviceUUID)) {

      BLEDevice::getScan()->stop();
      myDevice = new BLEAdvertisedDevice(advertisedDevice);
      doConnect = true;
      doScan = true;

    } // Found our server
  } // onResult
}; // MyAdvertisedDeviceCallbacks
Above class searches the environment to find a server with the required Services. This class is applied and checked on all surrounding servers to find the server with the intended Service. Once found, it will stop scanning.
In the setup section, basic settings to set up the client are made.
void loop() {
  if (doConnect == true) {
    if (connectToServer()) {
      Serial.println("We are now connected to the BLE Server.");
    } else {
      Serial.println("We have failed to connect to the server; there is nothin more we will do.");
    }
    doConnect = false;
  }
  if (connected) {
    String newValue = "Time since boot: " + String(millis()/1000);
    Serial.println("Setting new characteristic value to \"" + newValue + "\"");

    // Set the characteristic's value to be the array of bytes that is actually a string.
    pRemoteCharacteristic->writeValue(newValue.c_str(), newValue.length());
  }else if(doScan){
    BLEDevice::getScan()->start(0);  // this is just eample to start scan after disconnect, most likely there is better way to do it in arduino
  }

  delay(1000); // Delay a second between loops.
}
In the loop section, if the doConnect flag has the value true, the client searches for the intended server to make a connection.
After connection to the server, the value of the Characteristic is changed once every second. In this example, the new value for Characteristic equals the elapsed time since ESP32 started to work. You have the option to change this value.
Connecting a server and client to each other
Upload server code to an ESP32 module and client code to another ESP32 module. Open the serial window for the ESP32 module which has the client code.
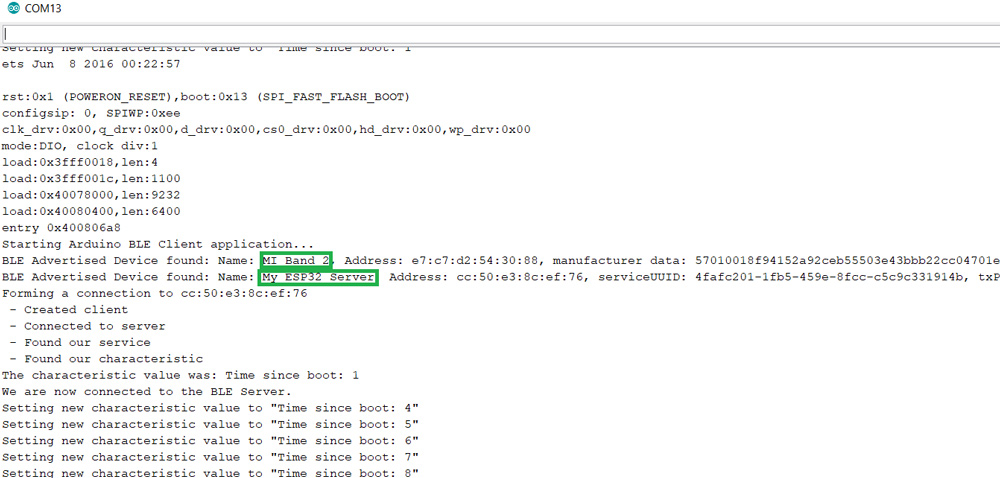
The client has found two BLE server devices. Since the defined UUID in My_ESP32_Server is the same as those set in the client, then the client will connect to this server.
ESP32 BLE Example 3: How to Set up BLE in Notify Mode
In this case, ESP32 acts as a server. The only difference is that the client normally requests information from the server; however, in the notify mode, this happens in reverse. This mode is used when the server wants to inform the client of the change in a variable (such as temperature).
Code
/*
    Video: https://www.youtube.com/watch?v=oCMOYS71NIU
    Based on Neil Kolban example for IDF: https://github.com/nkolban/esp32-snippets/blob/master/cpp_utils/tests/BLE%20Tests/SampleNotify.cpp
    Ported to Arduino ESP32 by Evandro Copercini
    updated by chegewara

   Create a BLE server that, once we receive a connection, will send periodic notifications.
   The service advertises itself as: 4fafc201-1fb5-459e-8fcc-c5c9c331914b
   And has a characteristic of: beb5483e-36e1-4688-b7f5-ea07361b26a8

   The design of creating the BLE server is:
   1. Create a BLE Server
   2. Create a BLE Service
   3. Create a BLE Characteristic on the Service
   4. Create a BLE Descriptor on the characteristic
   5. Start the service.
   6. Start advertising.

   A connect hander associated with the server starts a background task that performs notification
   every couple of seconds.
*/
#include <BLEDevice.h>
#include <BLEServer.h>
#include <BLEUtils.h>
#include <BLE2902.h>

BLEServer* pServer = NULL;
BLECharacteristic* pCharacteristic = NULL;
bool deviceConnected = false;
bool oldDeviceConnected = false;
uint32_t value = 0;

// See the following for generating UUIDs:
// https://www.uuidgenerator.net/

#define SERVICE_UUID        "4fafc201-1fb5-459e-8fcc-c5c9c331914b"
#define CHARACTERISTIC_UUID "beb5483e-36e1-4688-b7f5-ea07361b26a8"


class MyServerCallbacks: public BLEServerCallbacks {
    void onConnect(BLEServer* pServer) {
      deviceConnected = true;
    };

    void onDisconnect(BLEServer* pServer) {
      deviceConnected = false;
    }
};


void setup() {
  Serial.begin(115200);

  // Create the BLE Device
  BLEDevice::init("ESP32");

  // Create the BLE Server
  pServer = BLEDevice::createServer();
  pServer->setCallbacks(new MyServerCallbacks());

  // Create the BLE Service
  BLEService *pService = pServer->createService(SERVICE_UUID);

  // Create a BLE Characteristic
  pCharacteristic = pService->createCharacteristic(
                      CHARACTERISTIC_UUID,
                      BLECharacteristic::PROPERTY_READ   |
                      BLECharacteristic::PROPERTY_WRITE  |
                      BLECharacteristic::PROPERTY_NOTIFY |
                      BLECharacteristic::PROPERTY_INDICATE
                    );

  // https://www.bluetooth.com/specifications/gatt/viewer?attributeXmlFile=org.bluetooth.descriptor.gatt.client_characteristic_configuration.xml
  // Create a BLE Descriptor
  pCharacteristic->addDescriptor(new BLE2902());

  // Start the service
  pService->start();

  // Start advertising
  BLEAdvertising *pAdvertising = BLEDevice::getAdvertising();
  pAdvertising->addServiceUUID(SERVICE_UUID);
  pAdvertising->setScanResponse(false);
  pAdvertising->setMinPreferred(0x0);  // set value to 0x00 to not advertise this parameter
  BLEDevice::startAdvertising();
  Serial.println("Waiting a client connection to notify...");
}

void loop() {
    // notify changed value
    if (deviceConnected) {
        pCharacteristic->setValue((uint8_t*)&value, 4);
        pCharacteristic->notify();
        value++;
        delay(1000); // bluetooth stack will go into congestion, if too many packets are sent, in 6 hours test i was able to go as low as 3ms
    }
    // disconnecting
    if (!deviceConnected && oldDeviceConnected) {
        delay(500); // give the bluetooth stack the chance to get things ready
        pServer->startAdvertising(); // restart advertising
        Serial.println("start advertising");
        oldDeviceConnected = deviceConnected;
    }
    // connecting
    if (deviceConnected && !oldDeviceConnected) {
        // do stuff here on connecting
        oldDeviceConnected = deviceConnected;
    }
}
How the Code Works
After adding required libraries, you need to set UUID for Service and Characteristic.
class MyServerCallbacks: public BLEServerCallbacks {
    void onConnect(BLEServer* pServer) {
      deviceConnected = true;
    };

    void onDisconnect(BLEServer* pServer) {
      deviceConnected = false;
    }
};
The MyServerCallbacks sets the variable deviceConnected as true in case client is connected to server, and false if not connected.
Basic settings are made in the setup section. As previously mentioned, ESP32 starts working in server mode.
BLEDevice::init("ESP32");You can change the server name in the above code.
pServer = BLEDevice::createServer();
 pServer->setCallbacks(new MyServerCallbacks());
Above two lines create a server with the name you have set.
BLEService *pService = pServer->createService(SERVICE_UUID);Then a service with defined UUID is created on the server.
pCharacteristic = pService->createCharacteristic(
                      CHARACTERISTIC_UUID,
                      BLECharacteristic::PROPERTY_READ   |
                      BLECharacteristic::PROPERTY_WRITE  |
                      BLECharacteristic::PROPERTY_NOTIFY |
                      BLECharacteristic::PROPERTY_INDICATE
                    );
Afterwards, a Characteristic with defined UUID is created on the server. PROPERTY_READ, PROPERTY_WRITE, etc. set access to this Characteristic.
pService->start();With Sstart() command, server starts to work.
BLEAdvertising *pAdvertising = BLEDevice::getAdvertising();
pAdvertising->addServiceUUID(SERVICE_UUID);
pAdvertising->setScanResponse(false);
pAdvertising->setMinPreferred(0x0);  // set value to 0x00 to not advertise this parameter
BLEDevice::startAdvertising();
Above commands start sending Advertising packets.
You can write your main code in the loop section.
For example, in this code:
if (deviceConnected) {
        pCharacteristic->setValue((uint8_t*)&value, 4);
        pCharacteristic->notify();
        value++;
        delay(3); // bluetooth stack will go into congestion, if too many packets are sent, in 6 hours test i was able to go as low as 3ms
}Warning
if (!deviceConnected && oldDeviceConnected) {
    delay(500); // give the bluetooth stack the chance to get things ready
     pServer->startAdvertising(); // restart advertising
     Serial.println("start advertising");
     oldDeviceConnected = deviceConnected;
}
If the client and server get disconnected, server starts to send advertising packets again so it can be seen by the clients.
Testing Code with Cellphone
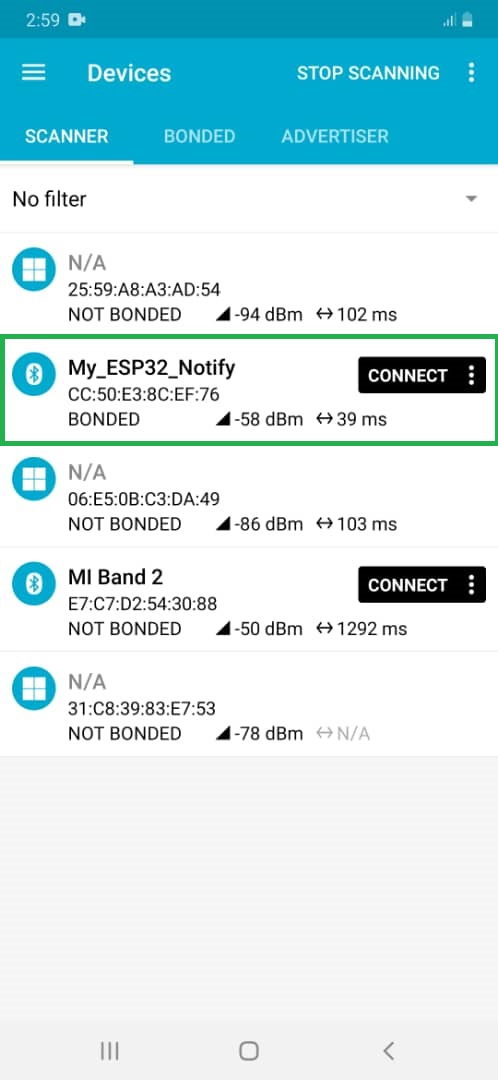
First, change the server name to “My_ESP2_Notify” and increase the interval for change in value from 3 milliseconds to 1 second
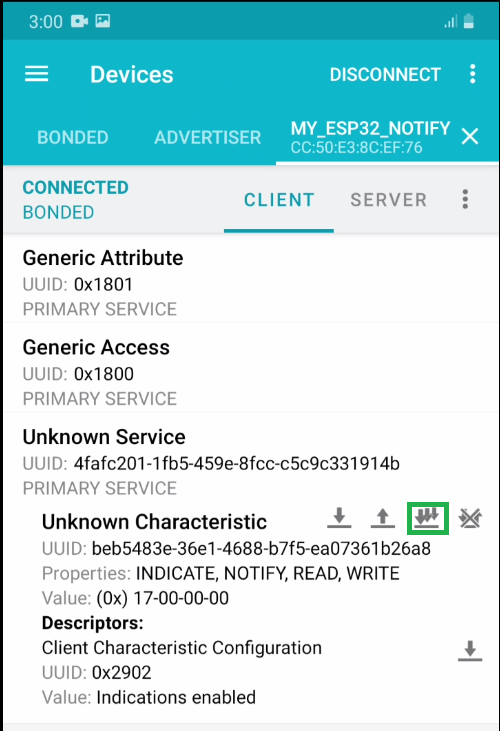
Click the button framed in the following figure to view the changes in the variable “value”.
By following this tutorial, you’ll gain practical knowledge of implementing BLE in ESP32 and expand your capabilities in wireless communication for your projects. Start exploring the possibilities of ESP32 Bluetooth Low Energy and unlock the potential of seamless data transfer.
Conclusion and next steps in ESP32 BLE development
In conclusion, the ESP32 BLE module offers a powerful and versatile solution for incorporating Bluetooth Low Energy into your Arduino projects. With its low energy consumption and rich feature set, the ESP32 BLE module enables you to create projects that are both energy-efficient and highly functional.
In this article, we explored the basics of Bluetooth Low Energy and the features of the ESP32 development board. We learned how to set up the Arduino IDE for ESP32 BLE development and configure the ESP32 for Bluetooth Low Energy. We also discussed how to set up BLE in server, client and notify modes using the ESP32, and how to implement BLE communication between two ESP32 devices.
As you continue your journey in ESP32 BLE development, there are many exciting possibilities to explore. You can experiment with different services and characteristics, integrate additional sensors and actuators, or build mobile apps that interact with your ESP32 devices. The ESP32 BLE module provides a solid foundation for creating innovative and connected Arduino projects.
So, whether you are a beginner or an experienced Arduino enthusiast, the world of ESP32 BLE on the Arduino IDE is waiting for you. Get ready to elevate your Arduino projects to a whole new level of connectivity and functionality!

Comments (8)
great tutorial, thank you! I was looking for ages solving my issue of how to start advertising again after disconnect
You’re quite welcome. Glad we could help.
Thank you for useful information. There is a small mistake: UUIDs are not 16-bytes and 128-bytes, but only 16-bits and 128-bits (2 bytes and 16 bytes).
Glad you enjoyed it! And yes, you’re correct. There has been some kind of misspelling in the article, and it’s now updated.
Hi,
Thanks for this detailed information. Great tutorial.
But, how do you create multiple Characteristics, for example temperature, humidity and battery voltage level ?
Should different pointers such as pCharacteristic be created ? And how ?
Thanks
Hi.
thank you for your attention dear Guy
as you know every parameter that you pionted has different UUID that should be set for each one
Still one copy of the same code, which appears in tens of web pages and which is missing the most important part:
How do you read and write to the BT connection in the loop() ?
How to receive characters and how to send something back
Hello Risto,
This issue is common across all BLE systems. You need to configure the services correctly for this system. I’ve uploaded a code that works exclusively for the UART Service over BLE. You can download it from this link.
If you encounter any more issues, feel free to share them.