
Overview
What You Will Learn
- What ultrasonic module is and how it works
- How to use ultrasonic module with Arduino
- Controlling a monitor using the ultrasonic module
General Information About Ultrasonic Module
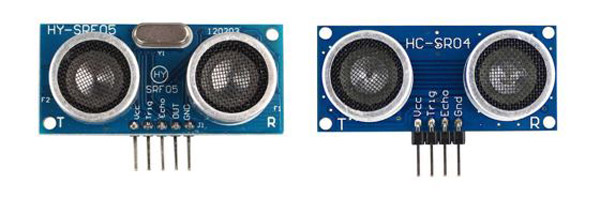
The ultrasonic sensor is a proximity sensor. This sensor calculates the time and direction of ultrasound in the air by sending a short audio pulse at a frequency higher than the human hearing range and receiving it after reflection of the surface of the object. Using this time, the distance is measured at high resolution. The ultrasonic method is one of the best methods for measuring distance and detecting objects due to the high accuracy and speed, the lack of contact with the object, no corrosion and proper price. Most of the ultrasonic modules include a Transmitter and a receiver. The receiver and transmitter of the SRF04 and SRF05 modules are adjacent to each other and can detect objects in the range of 2 to 300 cm accurately. The SRF05 module is an improved version of SRF04. This version supports dual-mode and includes 5 pins to work with. But the SRF04 module has 4 pins and supports only one mode. Both of these modules have a common mode that is known as mode1.
In mode 1 first, you should apply a pulse for at least 10 microseconds to the trig pin. The module will automatically send 8 pulses at the frequency 40 kHz and set the Echo pin to 1. The Echo pin remains high until the module receives the reflected pulses from an object. Then we can calculate the time between sending and receiving the signal by measuring the time that the Echo pin is at a high logic level. In this mode leave the SRF05 OUT pin without connection.
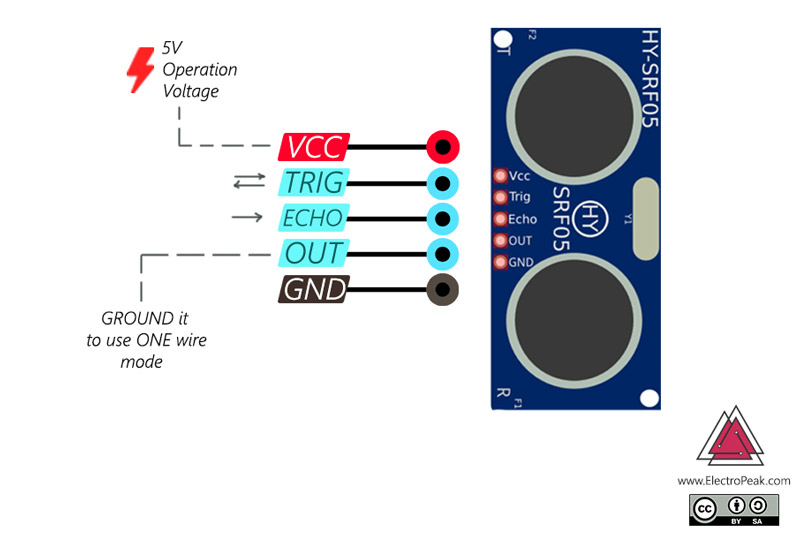

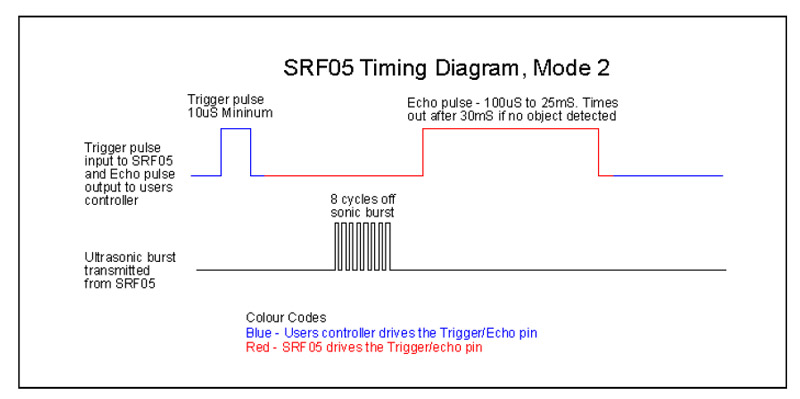
Mode 2, which is only available in the SRF05 module, uses a single pin for both Trigger and Echo signals. To use this mode, connect the OUT pin to the ground and use the Trigger pin to send and receive the pulse. We can calculate the distance from the first object by measuring the signal duration, as mentioned before.
Required Materials
Hardware Components
Software Apps
Ultrasonic Module and Arduino Interfacing
The connection between the ultrasonic module and Arduino is very simple. Just connect the Trig and Echo pins to two pins of Arduino and introduce these two pins to Arduino. Using these pins, Arduino calculates the distance from the first object in front of the module, as explained before.
Tip
Circuit

Code
/*
   * Ultrasonic Sensor HC-SR05/4 and Arduino
    * by Hanie Kiani
*  https://electropeak.com/learn
    */
long duration;
    int distance;

    const int trig = 9;
    const int echo = 10;


    void setup() {
    pinMode(trig, OUTPUT); // Sets the trigPin as an Output
    pinMode(echo, INPUT); // Sets the echoPin as an Input
    Serial.begin(9600); // Starts the serial communication
    }
    void loop() {
       distance = calculateDistance();
Serial.println(distance);

    }
    int calculateDistance(){

  digitalWrite(trig, LOW);
  delayMicroseconds(2);
  // Sets the trigPin on HIGH state for 10 micro seconds
  digitalWrite(trig, HIGH);
  delayMicroseconds(10);
  digitalWrite(trig, LOW);
  duration = pulseIn(echo, HIGH); // Reads the echoPin, returns the sound wave travel time in microseconds
  distance= duration*0.034/2;
  return distance;
}
Let’s take a closer look to the code:
digitalWrite(trigPin, HIGH);
  delayMicroseconds(10);
  digitalWrite(trigPin, LOW);
sending a 10 microsecond pulse on the trig pin.
duration = pulseIn(echoPin, HIGH);the pulseIn() function calculates the time that the Echo pin is high, which is actually equal to the time between the signal being transmitted and received.
distance= duration*0.034/2;By multiplying the time duration and the speed of sound, you can calculate the distance traveled by the sound.
Controlling Your Monitor with Arduino and Ultrasonic Module
Suppose a video is playing on your screen. We want to control the video to play or stop, its volume and moving it forward and backward just by using hand gestures.
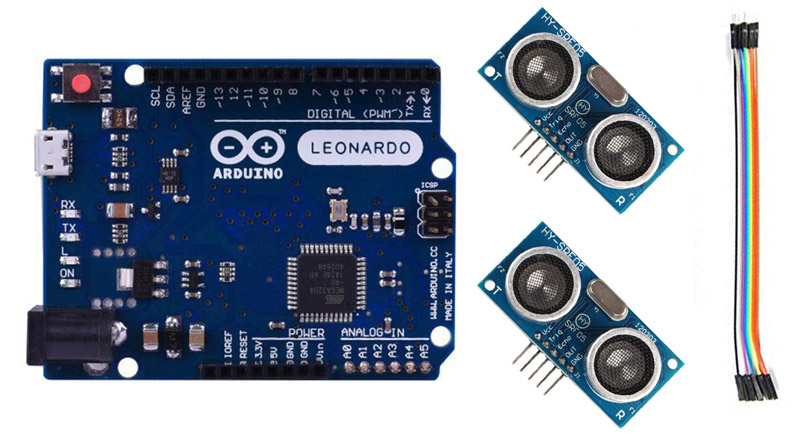
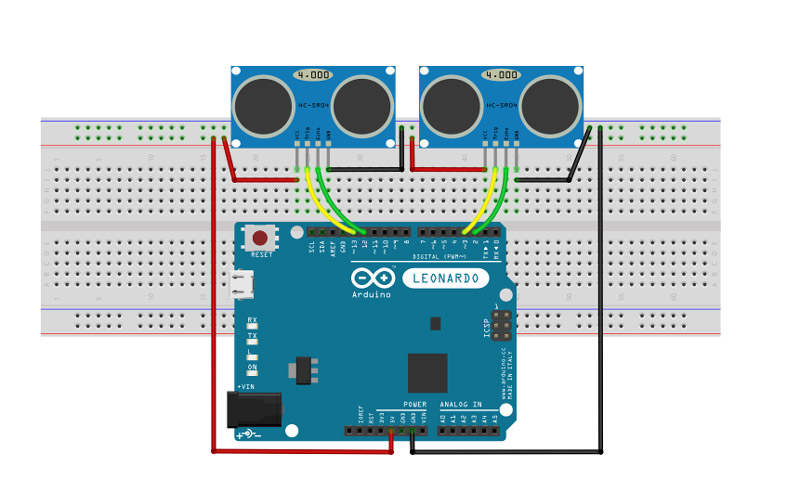
To do this connect two ultrasonic modules to an Arduino Leonardo board, and place the modules in the right and the left above your monitor.
Upload the following code on your board. Now you can stop or play the video by placing your both hands in 20 to 30 centimeters distance from the modules!
If you place your right hand at the distance of 9 to 15cm in front of the right module and move it away slightly from it, the video goes back 5 seconds. And if you close your hand slightly to the module, the video goes 5 seconds forward.
Don’t worry about the volume! By placing your left hand at a distance of 9 to 15cm from the module and closing it to the module, the volume of the video will be increased and by moving your hand away it will be decreased.
Circuit
Code
You need the Keyboard.h library for this part. You can download it from here.
/*
    * Control Your PC with Ultrasonic Sensor HC-SR04 and Arduino
    * by Hanie Kiani
    *  https://electropeak.com/learn
 */
#include <Keyboard.h>
long duration;
int distance,distLeft,distRight;

const int trigger1 = 2; //Trigger pin of 1st Sesnor
const int echo1 = 3; //Echo pin of 1st Sesnor
const int trigger2 = 4; //Trigger pin of 2nd Sesnor
const int echo2 = 5;//Echo pin of 2nd Sesnor


void setup() {
Serial.begin(9600);

pinMode(trigger1, OUTPUT);
pinMode(echo1, INPUT);
pinMode(trigger2, OUTPUT);
pinMode(echo2, INPUT);
}


void loop() {
distance=calculateDistance(trigger1,echo1);
distLeft =distance;

distance=calculateDistance(trigger2,echo2);
distRight =distance;

//Pause Modes -Hold
if ((distLeft >20 && distRight>20) && (distLeft <30 && distRight<30)) //Detect both hands
{Serial.println("Play/Pause");
                        Keyboard.press(KEY_TAB);
                        delay(100);
                        Keyboard.releaseAll();
  delay (500);}

distance=calculateDistance(trigger1,echo1);
distLeft =distance;

distance=calculateDistance(trigger2,echo2);
distRight =distance;


//Control Modes
//Lock Left - Control Mode
if (distLeft>=9 && distLeft<=14)
{
  delay(100); //Hand Hold Time
 distance=calculateDistance(trigger1,echo1);
  distLeft =distance;
  if (distLeft>=0 && distLeft<=15)
  {
    Serial.println("Left Hand detected");
    while(distLeft<=20)
    {
     distance=calculateDistance(trigger1,echo1);
      distLeft =distance;
      if (distLeft<5) //Hand pushed in
      {Serial.println ("Volume Up");
                         Keyboard.press(KEY_UP_ARROW); //up  key
                         delay(100);
                         Keyboard.releaseAll();
        delay (300);}
      if (distLeft>17) //Hand pulled out
      {Serial.println ("Volume Down");
       Keyboard.press(KEY_DOWN_ARROW); //down  key
                         delay(100);
                         Keyboard.releaseAll();
       delay (300);}
    }
  }
}

//Lock Right - Control Mode
if (distRight>=9 && distRight<=14)
{
  delay(100); //Hand Hold Time
 distance=calculateDistance(trigger2,echo2);
  distRight =distance;
  if (distRight>=0 && distRight<=20)
  {
    Serial.println("Right Hnaad Detected");
    while(distRight<=20)
    {
      distance=calculateDistance(trigger2,echo2);
      distRight =distance;
      if (distRight<5) //Right hand pushed in
      {Serial.println ("Rewind");
       Keyboard.press(KEY_LEFT_ARROW); //left key
                         delay(100);
                         Keyboard.releaseAll();
       delay (300);
      }
      if (distRight>17) //Right hand pulled out
      {Serial.println ("Forward");
       Keyboard.press(KEY_RIGHT_ARROW); //right  key
                         delay(100);
                         Keyboard.releaseAll();
       delay (300);}
  }
}
}

delay(200);
}
 int calculateDistance(int trig, int echo){

  digitalWrite(trig, LOW);
  delayMicroseconds(2);
  // Sets the trigPin on HIGH state for 10 micro seconds
  digitalWrite(trig, HIGH);
  delayMicroseconds(10);
  digitalWrite(trig, LOW);
  duration = pulseIn(echo, HIGH); // Reads the echoPin, returns the sound wave travel time in microseconds
  distance= duration*0.034/2;
distance = 50;
 return distance;
}
What’s Next?
- Try to calculate the distance from every object around the ultrasonic module by adding a servo motor to the module.
- Try to define other gestures for new options like changing the speed of playing the video.

Comments (4)
Awesome tutorial! Just one question though. You write for the HY-SRF05: “Mode 2, which is only available in the SRF05 module, uses a single pin for both Trigger and Echo signals. To use this mode, connect the OUT pin to the ground and use the Echo pin to send and receive the Echo pulse. ” Did you mean “use the Trig pin to send and receive the Echo pulse.” This would be more consistent with your diagram.
Hello John.
Thanks for mention that. I will modify the description.
Hello,
I don’t understand the difference between mode 1 and 2..
I have a SRF05. How is it wired in mode 2?
Is there only drawing for mode 1 here?
Hi Eric,
In mode one, the Trig pin is used to enable the module to send the ultrasonic pulses, and then the Echo pin stays HIGH until the reflected pulsed are received. Similarly, in mode two, the Trig pin is used to enable the module to send the ultrasonic pulses, and then the “Trig pin” itself stays HIGH until the reflected pulses are received. That is the only difference.
As mentioned in the article, In order to use your module in mode two, you should connect the OUT pin to the ground. Also, you can leave the Echo pin not connected, since the Trig pin will do all the work. And for the code, you need to replace “echo” with “trig” in the “calculateDistance()” function and the rest of the code stays the same. And that’s all!