
Overview
In this tutorial, you will learn how to calibrate and use MQ9 gas sensor with an Arduino board.
What You Will Learn
- What the gas sensor is and how it works.
- Comparison of different gas sensor models
- How MQ9 gas sensor works
- Using MQ9 gas sensor with Arduino
What Is A Gas Sensor And How Does It Work?
A gas sensor is a device that detects the presence of one or more types of gas in the environment. These sensors have wide applications such as security systems of refineries, industrial centers, and even homes. These sensors can detect combustible gas, toxic gas, pollutant gas, and so on. There are several methods for gas detection, the most commonly used is electrochemical sensors. These sensors measure the concentration of a specific gas by performing a chemical reaction on their heated electrodes and measuring the resulting electric current.
MQ Gas Sensor Series
MQ gas sensor series are the most common gas sensors available. These sensors have various models for detecting various gases, some of which are listed in the following table:
| Sensor Name | Detectable gas |
|---|---|
| MQ2 | Methane , Butane , LPG , Smoke |
| MQ3 | Alcohol , Methanol , Smoke |
| MQ8 | Hydrogen |
| MQ9 | Carbon monoxide , Flammable gases |
| MQ131 | Ozone |
| MQ135 | Air quality |
| MQ216 | Natural gas , Coal gas |
| MQ137 | Ammonia |
| MQ4 | Methane , CNG gas |
Here we will get to know how to hookup MQ9, but they all work almost in the same way.

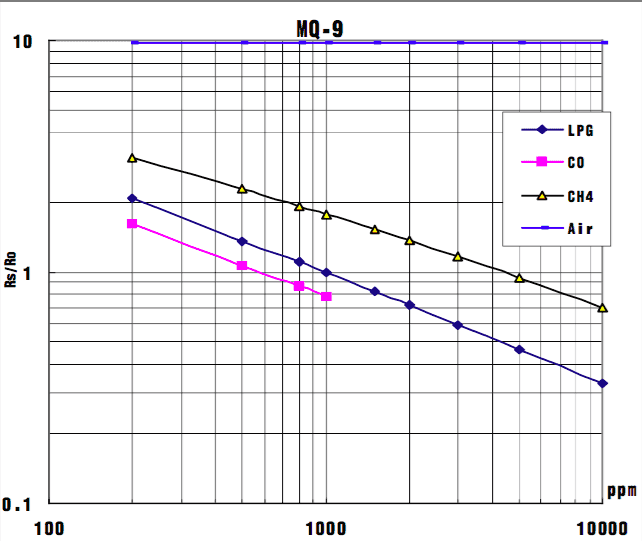
The MQ9 sensor is sensitive to carbon monoxide and flammable gases. It can detect the detect carbon monoxide density from 10ppm to 1000ppm and flammable gases density from 100ppm to 10000ppm. MQ9 has an internal heater which starts warming up if a 5V voltage is applied.
The internal resistance of this sensor changes as the density of the detectable gases changes. This value can be read by a simple circuit. MQ9 sensor modules in the market have already implemented the necessary circuit and you do not need any extra item.
Interfacing MQ9 Gas Sensor and Arduino
In order to get correct and accurate data, you need to take the following actions first:
- MQ9 sensor needs 24-48 hours of preheating time. Connect the power supply and leave for the required time until it gets ready.
- You need to calibrate the sensor (We have explained this in the following section)
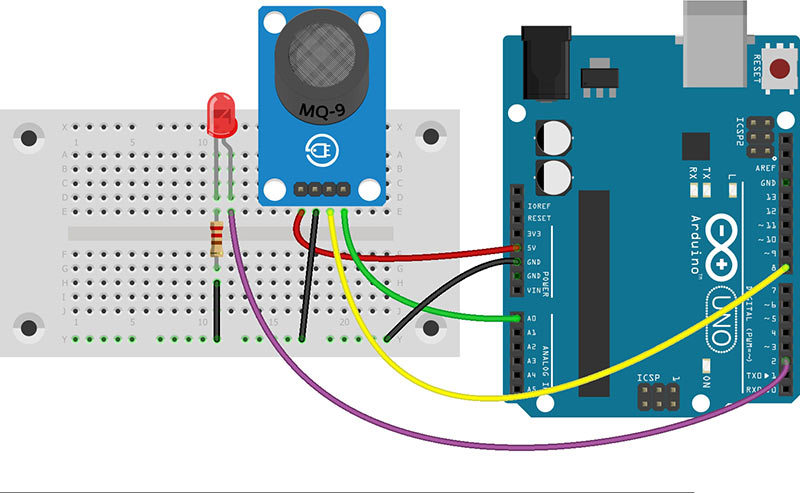
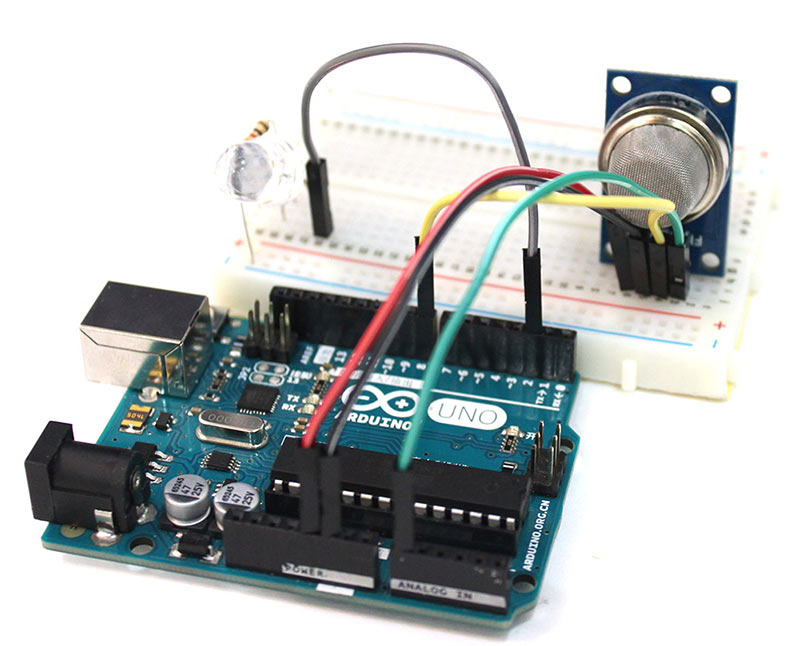
Circuit
This module has 4 pins. Connect Vcc to 5V and GND to GND. The AO pin returns an analog value based on the concentration of the gas. The DO pin returns HIGH if the concentration of gas is higher than a certain value. This value can be set by the potentiometer on the board.
Note
1. Do not expose this sensor to water and frost.
2. Applying a voltage higher than 5V or applying the voltage to the wrong pins may damage the sensor.
3. Exposing the sensor to a high concentration of gases for a long time may have a negative effect on its performance.
4. Shaking or vibrating the sensor may decrease its accuracy.
How to Calibrate MQ9 Gas Sensor?
Before using the module you have to calibrate it. This sensor measures the gas concentration based on resistance ratio. This ratio includes R0 (sensor resistance in 1000ppm concentration of LPG) and Rs (Internal resistance of the sensor which changes by gas concentration). In clean air, after preheating, upload the following code and wait for about 15 minutes until R0 reaches a fixed value.
/*

MQ9 Calibration

modified on 19 Feb 2019
by Saeed Hosseini
Home
this code is based on https://www.elecrow.com/wiki/index.php?title=Analog_CO/Combustible_Gas_Sensor(MQ9)
*/

void setup() {
  Serial.begin(9600);
}

void loop() {
  float sensor_volt;
  float RS_air; //  Rs in clean air
  float R0;  // R0 in 1000 ppm LPG
  float sensorValue;

//Average
    for(int x = 0 ; x < 100 ; x++)
  {
    sensorValue = sensorValue + analogRead(A0);
  }
  sensorValue = sensorValue/100.0;
//-----------------------------------------------/

  sensor_volt = (sensorValue/1024)*5.0;
  RS_air = (5.0-sensor_volt)/sensor_volt; // Depend on RL on yor module
  R0 = RS_air/9.9; // According to MQ9 datasheet table

  Serial.print("sensor_volt = ");
  Serial.print(sensor_volt);
  Serial.println("V");

  Serial.print("R0 = ");
  Serial.println(R0);
  delay(1000);

}
As you see in the code, we have averaged from 100 data to achieve a stable value. Then we measure the sensor voltage and according to RL restance (in our case, 5K), we calculate Rs. Then according to the table available in the datasheet, R0 can be found.
Code
Note
In the following code, replace R0 with the value you achieved in the previous step.
/*

  MQ9

  modified on 19 Feb 2019
  by Saeed Hosseini
  Home

*/

const int LED = 2;
const int DO = 8;

void setup() {
  Serial.begin(9600);
  pinMode(LED, OUTPUT);
  pinMode(DO, INPUT);
}

void loop() {

  int alarm = 0;
  float sensor_volt;
  float RS_gas;
  float ratio;
 //-Replace the name "R0" with the value of R0 in the demo of First Test -/
  float R0 = 0.91;

  int sensorValue = analogRead(A0);
  sensor_volt = ((float)sensorValue / 1024) * 5.0;
 RS_gas = (5.0 - sensor_volt) / sensor_volt; // Depend on RL on yor module


  ratio = RS_gas / R0; // ratio = RS/R0
 //------------------------------------------------------------/

  Serial.print("sensor_volt = ");
  Serial.println(sensor_volt);
  Serial.print("RS_ratio = ");
  Serial.println(RS_gas);
  Serial.print("Rs/R0 = ");
  Serial.println(ratio);

  Serial.print("\n\n");

  alarm = digitalRead(DO);
  if (alarm == 1) digitalWrite(LED, HIGH);
  else if (alarm == 0) digitalWrite(LED, LOW);

  delay(1000);

}
What’s Next?
- Find the gas concentration in PPM with the help of the above table.
- Create an intelligent CO leakage notifier.

Comments (32)
Best tutorial about using the gas sensor in the whole internet.
Keep up the good work!
Thank you for your kind comment. We always try to do our best.
Hello,
Thanks for the tutorial!
I have a strange thing (I guess…)
I See R0 = -0.10 and sensor_volt (after 30 minutes) of 2303.64 volt…
Any idea what is wrong?
Hi Johan.
Maybe your sensor is corrupted. can you check it with another sensor?
Hi, Thanks for the reply.
I have 5 sensors, they do all the same….
This happens in the serial monitor:
sensor_volt = 0.65V
R0 = 0.68
sensor_volt = 1.29V
R0 = 0.29
sensor_volt = 1.94V
R0 = 0.16
sensor_volt = 2.58V
R0 = 0.09
sensor_volt = 3.22V
R0 = 0.06
sensor_volt = 3.87V
R0 = 0.03
sensor_volt = 4.51V
R0 = 0.01
sensor_volt = 5.15V
R0 = -0.00
sensor_volt = 5.80V
R0 = -0.01
sensor_volt = 6.44V
R0 = -0.02
sensor_volt = 7.08V
R0 = -0.03
sensor_volt = 7.73V
R0 = -0.04
sensor_volt = 8.37V
R0 = -0.04
sensor_volt = 9.02V
R0 = -0.04
sensor_volt = 9.66V
R0 = -0.05
sensor_volt = 10.30V
R0 = -0.05
sensor_volt = 10.94V
R0 = -0.05
sensor_volt = 11.58V
R0 = -0.06
sensor_volt = 12.22V
R0 = -0.06
sensor_volt = 12.86V
R0 = -0.06
sensor_volt = 13.50V
R0 = -0.06
sensor_volt = 14.14V
R0 = -0.07
sensor_volt = 14.78V
R0 = -0.07
sensor_volt = 15.42V
R0 = -0.07
sensor_volt = 16.06V
R0 = -0.07
sensor_volt = 16.69V
R0 = -0.07
sensor_volt = 17.33V
R0 = -0.07
Well, I think I figured out.. I put the float :
float sensor_volt;
float RS_air; // Rs in clean air
float R0; // R0 in 1000 ppm LPG
float sensorValue;
Before Setup, and now I get normal data.
R0=0.78 (stable)
Sensor_volt = 0.57V
Very good
Hola, hay algo que no entiendo, el valor de r0/es que significa? Qué valor me está dando? Y porque dice que el mq9 utiliza un voltaje variable de 1.5 a 5 v? Cómo podría hacer ese regulamiento?
Hola my friend! Please ask your question in English.
Hello,
thank you, but what about other gases in the diagram, rather than “LPG”?
what would you do for R0/Rs ratio as they are not constant?
Hello.
We are glad you are interested in this project.
you should use linearization method.
I See R0 = -0.10 and sensor_volt 0vfV
whats wrong i follow the code.
Can you change your sensor and try again?
There is an error in the code!
Change this:
float sensorValue;
with:
float sensorValue = 0;
And everything will be fine!
hello
thanks Saeed Hosseini
anybody can read value convert to ppm?
co to ppm formula…
Hello.
You can use the table given in this tutorial right after the code and before the “What’s Next?” section for that.
Exposure to CO does not light the LED.
Ambient Air
sensor_volt = 0.21
RS_ratio = 22.27
Rs/R0 = 10.51
Carbon Monoxide
sensor_volt = 0.29
RS_ratio = 16.36
Rs/R0 = 7.72
I am looking to create an alarm, any help is appreciated
Rotate the potentiometer on the sensor and see if this makes any difference.
Hi I am having a similar problem with mine in the first code where I’m getting 0V sensor voltage. Could this be to do with the potentiometer as well?
Many thanks
Hi.
MQ9 sensor has two outputs, an analog output and a digital one. Which output of the sensor are you getting 0V from?
If you’re getting 0V from the digital output, then yes. Rotating the potentiometer on the sensor can be helpful. But if you’re getting 0V from the analog output, there might be something wrong with the sensor itself. It might have been damaged.
On section R0 = Rs_air/9.9; which table can I see to get 9.9 on the datasheet. help please
I’ve seen this referenced in a few guides now, where is this magic number on the datasheet? Are they just eyeballing it off the graph?
Hi Saeed,
Thanks for posting this tutorial. I just have a query in relation to it’s operation.
In quite a few places I’ve read that, to reliably sense CO, the sensor needs to have 1.5v applied to it rather than 5v. It has been suggested that it only reliably senses every 2.5 mins, i.e after a continuous pulse of 5v for 60s followed by 1.5v for 60s and a reading taken immediately before the next pulse cycle.
Your tutorial seems to suggest that it will read a good number at 5v full time.
The data sheet also suggests the 5v is to be used for CH4 and 1.5v for CO.
I’m just wondering if there’s something I’m missing in your tutorial?
Thanks again…
Hi,
You’re right. According to the datasheet, the sensor needs around 2.5 minutes to give a reliable output. And as you can see, it’s mentioned right before the calibration code that we also have waited about 15 minutes for the sensor to reach a stable value.
how to calibrate MQ7 carbone monoxyde sensor? is it the same method as MQ9?
Hi dear
you can use the same method as MQ-9
please help
I write the first code ,l do it with MQ7 sensor l get
Sensor_volt = 0.00 V
R0 = 598.01
Hi, l change the pin D0 with A0 of arduino and pin A0 with pin 8 of arduino l get
sensor_volt =0.05V
R0=66.25
It’s okay ??
Please l need help
Hi Dinna,
before everything else, u can test your sensor using this article Interfacing MQ-8 Hydrogen Gas Sensor Module with Arduino
I know it’s for another sensor, but all sensors in this category work the same.
Thank you
hello i want to know which RO is good to use while trying to convert to ppm beacause i am just getting some crazy numbers